background image

このたびは、ヤマハ管楽器をお買い上げいただき、まことにありがとうございます。
楽器を正しく組み立て性能をフルに発揮させるため、また永く良い状態で楽器を
お使いいただくために、この取扱説明書をよくお読みください。

P.19

You are now the owner of a high quality musical instrument. Thank you for choosing Yamaha. 

For instructions on the proper assembly of the instrument, and how to keep the instrument in opti-

mum condition for as long as possible, we urge you to read this Owner’s Manual thoroughly.

P.33

Sie sind nun der stolze Besitzer eines hochwertigen Musikinstruments. Vielen Dank, dass Sie sich für 

ein Instrument der Marke Yamaha entschiedenen haben. Um mit den Handgriffen zum Zusammen-

setzen und Zerlegen des Instruments vertraut zu werden und dieses über Jahre hinweg in optimalem 

Zustand halten zu können, raten wir Ihnen, diese Anleitung aufmerksam durchzulesen.

P.47

Vous êtes dès à présent le propriétaire d’un instrument de musique de haute qualité. 

Nous vous remercions d’avoir choisi Yamaha. En ce qui concerne les instructions relatives à un assem-

blage adéquat de l’instrument et sur la façon de garder l’instrument dans des conditions optimales aussi 

longtemps que possible, nous vous conseillons vivement de lire entièrement le présent Mode d’emploi.

P.61

P.75

Usted es ahora propietario de un instrumento musical de alta calidad. Le agradecemos su elección 

de un instrumento Yamaha. Le aconsejamos que lea todo este manual de instrucciones para ver las 

instrucciones para el montaje correcto del instrumento y para aprender a conservar el instrumento en 

óptimas condiciones durante tanto tiempo como sea posible.

Agora você é o proprietário de um instrumento musical de alta qualidade. Obrigado pela sua

escolha de um instrumento Yamaha. Para instruções da montagem correta do instrumento, e

de como conservar o instrumento em condições ideais pelo maior tempo possível, pedimos

que você leia este Manual do Proprietário por completo.

P.89

现在您已经是高品质乐器的主人了 ! 在此 , 我们衷心感谢您选择雅马哈乐器 ,
同时也恳请您完整阅读该使用手册 , 从而可以充分了解有关乐器正确组装及
如何使您的乐器尽可能长久地处于最佳状况的使用说明。

P.103

P.117

야마하 악기를 구입해 주셔서 감사합니다 . 악기의 알맞은 조립 방법 및 보관을 위

해 본 사용설명서를 반드시 읽어주시기 바랍니다 . 

P.3

Вы стали обладателем высококачественного музыкального инструмента. Благодарим Вас 

за выбор продукции Yamaha. Для получения инструкций по правильной сборке данного 

инструмента и его длительном хранении в оптимальных условиях мы настоятельно реко-

мендуем Вам внимательно прочитать настоящее руководство.

Summary of Contents for YHR-891 G

Page 1: ...Manual Waldhorn Bedienungsanleitung Cor Mode d emploi Trompa Manual de instrucciones Trompa Manual de instruções 圆号 使用手册 Валторна Руководство пользователя 호른 사용설명서 日本語 English Deutsch Français Español 中文 Русский 한국어 Português ...

Page 2: ...temps que possible nous vous conseillons vivement de lire entièrement le présent Mode d emploi P 61 P 75 Usted es ahora propietario de un instrumento musical de alta calidad Le agradecemos su elección de un instrumento Yamaha Le aconsejamos que lea todo este manual de instrucciones para ver las instrucciones para el montaje correcto del instrumento y para aprender a conservar el instrumento en ópt...

Page 3: ...t Do not modify the instrument Besides voiding the warranty modification of the instrument may make repairs impossible The precautions given below concern the proper and safe use of the instrument and are to pro tect you and others from any damage or injuries Please follow and obey these precautions If children are using the instrument a guardian should clearly explain these precautions to the chi...

Page 4: ...alve 2nd Valve 1st Valve 3rd Valve Slide Bell 2nd Valve Slide 1st Valve Slide Main Tuning Slide Mouthpiece Mouthpipe 4th Lever 1st Lever 2nd Lever 3rd Lever Finger Hook 4th Valve 3rd Valve 2nd Valve 1st Valve 3rd Valve Slide Bell 2nd Valve Slide 1st Valve Slide 4th Valve Slide Main Tuning Slide Back side ...

Page 5: ...st Valve Slide F Tuning Slide Bb 1st Valve Slide Main Tuning Slide Mouthpiece Mouthpipe 4th Lever 1st Lever 2nd Lever 3rd Lever Finger Hook 4th Valve 3rd Valve 2nd Valve 1st Valve Bb 3rd Valve Slide Bell F 3rd Valve Slide F Tuning Slide 1 Bb 2nd Valve Slide F 2nd Valve Slide F 1st Valve Slide Bb 1st Valve Slide Main Tuning Slide F Tuning Slide 2 Specifications and or design may change without noti...

Page 6: ...n Lubrication Oiling the Rotors 1 While holding the levers down remove the valve slides then apply rotor oil to the rotors as shown in the illustration below a few drops per rotor 2 Move the levers so that the oil is spread evenly Attaching the Mouthpiece Gently insert the mouthpiece into the mouthpipe Never force the mouthpiece into the mouthpipe The mouthpiece may become stuck in the mouth pipe ...

Page 7: ...ut 0 6 should more or less tune the instrument to A 442Hz Take notice that when temperatures are warmer the main tuning slide should be pulled out a little more while cooler temperatures will require that you push the slide in Also the position and angle of your right hand in the bell will have an influence on pitch as well Single Horns Slide the main tuning slide in or out to tune the instrument ...

Page 8: ...ed in the same way as the 2nd valve lowering the pitch a half step What is Gestopft or hand stopping This is a technique used on F Single or Double Horns using F side where the hand is placed fur ther into the bell to raise the horn s pitch by a half step and change the tone of the instrument But doing so requires the player to transpose the score down a half step to produce the correct pitch The ...

Page 9: ...ure from the water key too The valve slides are made of brass or nickel silver which are both excellent at resisting corrosion However corrosion may appear if moisture is left in the instrument for an extended period of time Please use caution Body Maintenance Use a polishing cloth to gently wipe the instru ment s surface If dirt or tarnish is obvious the following products can be used For lacquer...

Page 10: ...lve Slide Maintenance 1 Depress the valve levers and remove the valve slides 2 Wrap a cleaning rod with a gauze cloth leaving no bare metal exposed and remove dirt from the valve slides and the insides of the outer pipes 3 Use the gauze to remove dirt from the surface of the valve slide then apply a little slide grease 4 Slide the valve slide in and out a few times to distribute the grease evenly ...

Page 11: ...t use clean water to thoroughly rinse out the dirt and soap 4 After completely removing all moisture with a gauze apply oil and grease Take Care When Cleaning Inside of the Instru ment Never dismantle the rotors Also when rinsing the tubing with water run water through the main tun ing slides in the opposite direction of the airflow If water is run through the instrument from the mouthpiece dirt c...

Page 12: ...the illustration below You can change the stroke from long to short by changing the position of the bearing stopper screw on the YHR 567GDB Open F is shown in the illustration When the bearing stopper screw is installed near the rotating center the stroke will become short When the screw is installed far from the rotating center the stroke will become long Bearing stopper screw Install here for Op...

Page 13: ...elow this function can be reversed so that the horn plays in Bb open Bb when the lever is not depressed and in the key of F when the lever is depressed To use this setup move the string and the string seat then place the string over the string seat String Stopper Screw B Rotor Stem Screw Lever Linkage String Stopper Screw A Open F Open F Open Bb Open Bb The YHR 567 567D is used in the illustration...

Page 14: ...nd transforms the single F horn into an Eb horn so that you can play Eb parts without transposing The crook is designed so that the horn fits in the case when it is attached When using the Eb crook the 1st through 3rd valve tuning slides should be pulled out a little Main Tuning Slide Eb Crook ...

Page 15: ... 4th valve slide the F natural slide offers the sound of an open F horn It en hances clarity in the mid low range such as C actual F or G actual C and stable intonation The F Natural Slide is designed so that the horn fits in the case when attached F Natural Slide ...

Page 16: ...rom whom you pur chased the instrument The valve slide is stuck and can not be removed The slide is sluggish Dirt or dust has accumulated between the outer and inner slides and the valve slide is damaged Remove dirt from the slides then apply some slide grease Dropping or hitting the slide has created a dent or the slide was bent while cleaning Contact the dealer from whom you pur chased the instr...

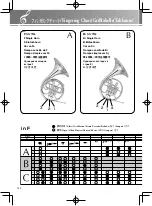
Page 17: ...Fingering Chart Grifftabelle Tablature 3 in F 1 2 3 4 F シングル F Single Horn F Einfachhorn Cor en Fa Trompa sencilla de F Trompa simples em Fá F 调单一调性法国圆号 Одинарная валторна в строе F F 싱글 호른 Bb シングル Bb Single Horn B Einfachhorn Cor en Si b Trompa sencilla de Bb Trompa simples em Síb 降 B 调单一调性法国圆号 Одинарная валторна в строе Bb Bb 싱글 호른 A B ...

Page 18: ...b lorsqu elle est enfoncée La cuarta espátula de las trompas dobles completas se emplea para cambiar entre los lados de F y Bb de la trompa Cuando la trompa sale de fábrica este cilindro está ajustado para que la trompa cambie del lado de F al de Bb cuando se presiona la cuarta espátula A quarta chave da trompa dupla é usada para alternar entre os lados Fá e Si da trompa Quando sai da fábrica está...

Page 19: ...134 押さえる Close Geschlossen Fermé Cerrado Fechado 按下 Закрыт 닫기 放す Open Offen Ouvert Abierto Aberto 放开 Открыт 열기 フ ィ ンガリ ングチャー ト Fingering Chart Grifftabelle Tablature Tabla ...

Page 20: ...o de la derecha es un digitado alternativo Algumas partes em clave de Fá dos períodos Clássico e Romântico costumam estar uma oitava abaixo O dedilhado da esquerda deve ser usado para notas que tem dedilhado duplo O dedilhado da direita é um dedilhado alternativo 古典和浪漫主义音乐的一些低音谱号在习惯上会降低一个八度 应当注意左手指法是双指法 而右手指法为交替指法 Некоторыепартиивбасовомключевжанрахклассицизмаиромантизмаит д традиционнопишутсянаок...

Page 21: ...Manual Development Group 2013 Yamaha Corporation Published 06 2019 发行 POCP A0 VDE1680 430 8650 静岡県浜松市中区中沢町 10 1 ...

Reviews:

Related manuals for YHR-891 G