


6-2
CHAPTER 6 Increasing the robot operating speed
e
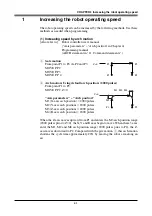
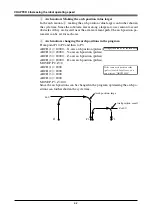
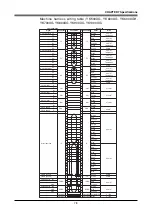
Arch motion: Making the arch position value larger
In the arch motion
w
, making the arch position value larger can further shorten
the cycle time. Since the robot arm moves along a larger arc, use caution to avoid
obstacles if they are located near the arm movement path. The arch position pa-
rameter can be set for each axis.
r
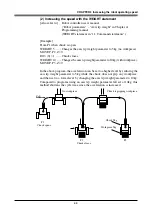
Arch motion: changing the arch positions in the program
From point P1 to P2 and then to P3:
ARCH (1) = 10000 ... X-axis arch position (pulses)
ARCH (2) = 20000 ... Y-axis arch position (pulses)
ARCH (3) = 20000 ... Z-axis arch position (pulses)
ARCH (4) = 20000 ... R-axis arch position (pulses)
MOVE P, P2, Z=0
ARCH (1) = 2000
ARCH (2) = 2000
ARCH (3) = 2000
ARCH (4) = 2000
MOVE P, P3, Z=100
Since the arch positions can be changed in the program, optimizing the arch po-
sitions can further shorten the cycle time.
Z=0
P1
P2
P3
Z=100
Arch position: large
Arch position: small
Arch position can be set for each axis.
If the same arch position value
(pulses) is used for all axes, you
can write as "ARCH 2000".
Summary of Contents for YK-X Series
Page 1: ...User s Manual ENGLISH E YAMAHA SCARA ROBOT E35 Ver 1 08 YK XG YK X series ...
Page 2: ......
Page 6: ...MEMO ...
Page 10: ...MEMO ...
Page 12: ...MEMO ...
Page 30: ...MEMO ...
Page 36: ...MEMO ...
Page 46: ...3 10 CHAPTER 3 Installation Ground symbol M4 Ground terminal Fig 3 6 Ground terminal ...
Page 78: ...3 42 MEMO ...
Page 80: ...MEMO ...
Page 101: ...4 21 CHAPTER 4 Adjustment Cover Elongated hole Y axis origin sensor stay Bolt Fig 4 8 a ...
Page 102: ...4 22 CHAPTER 4 Adjustment Dog Hex nut Fig 4 8 b Bolt Y axis arm X axis arm Fig 4 8 c ...
Page 119: ...4 39 CHAPTER 4 Adjustment R End effector End effector Z Y X Fig 4 18 ...
Page 120: ...4 40 MEMO ...
Page 122: ...MEMO ...
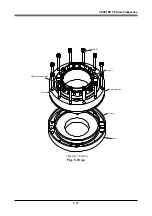
Page 138: ...5 16 CHAPTER 5 Periodic Inspection M6 16 M5 16 X axis motor Base Fig 5 3 ...
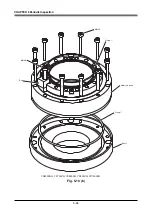
Page 146: ...5 24 CHAPTER 5 Periodic Inspection M3 16 M4 18 X axis arm Fig 5 10 ...
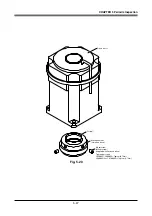
Page 155: ...5 33 CHAPTER 5 Periodic Inspection O ring r M5 14 M6 16 R axis motor Fig 5 17 ...
Page 156: ...5 34 CHAPTER 5 Periodic Inspection M3 14 M3 16 O ring w Fig 5 18 ...
Page 161: ...CHAPTER 6 Increasing the robot operating speed 1 Increasing the robot operating speed 6 1 ...
Page 162: ...MEMO ...
Page 168: ...6 6 MEMO ...
Page 170: ...MEMO ...
Page 177: ...MEMO ...


