2
1) Press HDMI1-4 or AUX1/2 to
select the Blu-ray disc player
as the input source.
For example, if the Blu-ray disc player is connected to the
HDMI IN 1 jack of this unit (as shown in “Example - A”),
press HDMI1.
HDMI 4
iPod
RADIO
ENTER
HDMI 1
HDMI 2
HDMI 3
TV
AUX 1
AUX 2
TV
AV
2) Start playback of a Blu-ray
disc.
1
Select the Blu-ray disc player
as the video input on your TV.
1
Select the desired TV channel.
2
Press TV to select the TV as the
input source.
HDMI 4
iPod
RADIO
ENTER
HDMI 1
HDMI 2
HDMI 3
TV
AUX 1
AUX 2
TV
AV
5
Press and hold INTELLIBEAM
for more than 2 seconds.
The INTELLIBEAM key is located inside of the slide cover.
7
8
9
4
5
6
1
2
3
UNIVOLUME
SUR. DECODE INTELLIBEAM
PREPARATION & CHECK
Please connect the MIC.
Please place the MIC at least
1.8m/6ft away from the unit.
The MIC should be set
at ear level when seated.
Measurement takes about 3min.
After [ENTER] is pressed,
please leave the room.
[ENTER]:Start [RETURN]:Cancel
AUTO SETUP
6
Make sure that your listening
room is as quiet as possible.
For accurate measurement, turn off air conditioner or other
devices that make noises.
7
Prepare to leave the room.
The best setting may not be done if you are in the room.
Prepare to leave the room in 10 seconds after pressing ENTER
in step 8.
When leaving the room, bring this Quick Reference Guide with you.
Wait outside the room during the AUTO SETUP procedure.
The AUTO SETUP procedure takes about 3 minutes.
To cancel the AUTO SETUP procedure after it is started, press
RETURN.
y
•
•
•
•
9
Press ENTER.
The following screen appears on the TV for 2 seconds and
then the menu screen disappears from the TV.
ENTER
SURROUND
CINEMA DSP
MENU
TOP MENU
STEREO
AUTO SETUP COMPLETE
Please remove the MIC from
the unit and the listening
position.
10
Disconnect the IntelliBeam
microphone.
Now the AUTO SETUP is complete. Keep the IntelliBeam
microphone in a safe place.
The settings are automatically saved in the system memory.
INPUT
VOLUME
INTELLIBEAM MIC
INTELLIBEAM MIC
Enjoying TV in surround sound
3
Press /- to adjust the volume.
If the TV speakers output sounds, mute it.
TV
MUTE
TV
INPUT
MUTE
TV VOL
CH
VOLUME
Enjoying Blu-ray discs in surround sound
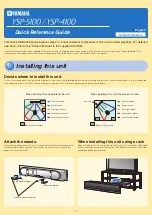
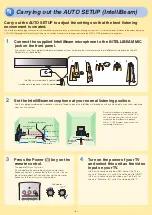
Carry out the AUTO SETUP to adjust the settings so that the best listening
environment is created.
The IntelliBeam technology allows you to achieve sound adjustments that best match your listening environment. It is normal for loud test tones to be output during the
AUTO SETUP procedure. Make sure that there are no children around in the listening room while the AUTO SETUP procedure is in progress.
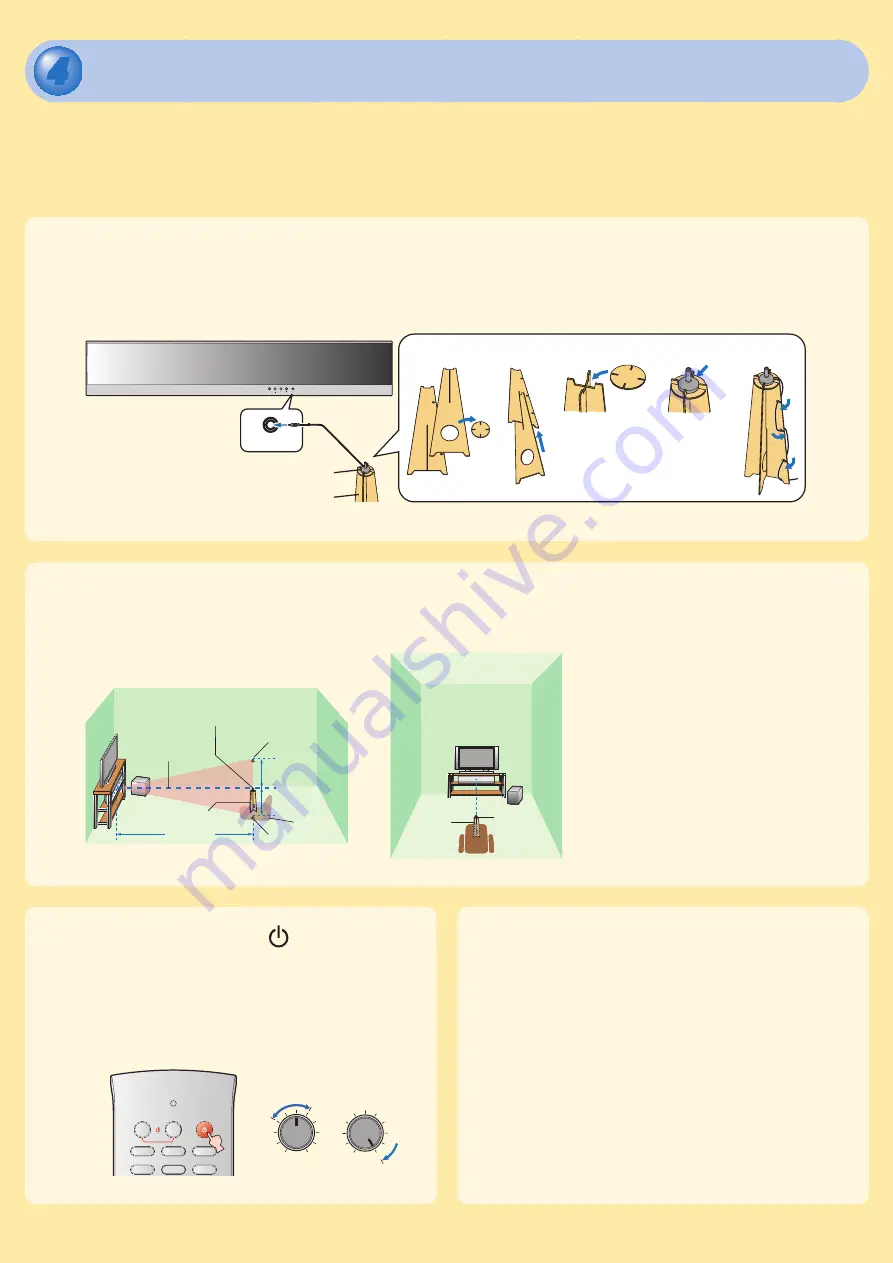
1
Connect the supplied IntelliBeam microphone to the INTELLIBEAM MIC
jack on the front panel.
If necessary, use the supplied cardboard microphone stand. Assemble the stand and place the IntelliBeam microphone on top of it
horizontally as shown below.
INPUT
VOLUME
INTELLIBEAM MIC
INTELLIBEAM MIC
1
2
3
4
5
IntelliBeam microphone (supplied)
Cardboard microphone stand (supplied)
2
Set the IntelliBeam microphone at your normal listening position.
Use the supplied cardboard microphone stand or a tripod to place the IntelliBeam microphone at the same height as your ears would be
when you are seated.
1.8 m (6.0 ft)
or more
Within 1 m (3.3 ft)
IntelliBeam microphone
Cardboard
microphone
stand
Listening
position
Place the IntelliBeam microphone on the
extended center line of this unit and 1.8 m
(6.0 ft) or more away from it. Also, make
sure place the IntelliBeam microphone
within 1 m (3.3 ft) upper or lower from the
center height of this unit.
IntelliBeam
microphone
Center line
Within 1 m (3.3 ft)
Cardboard microphone stand
Upper limit
Lower limit
Center height of
this unit
4
Turn on the power of your TV
and select this unit as the video
input on your TV.
If this unit is connected to the HDMI input on the TV (as
shown in “Example - A”), switch the video input to “HDMI”.
If this unit is connected to the video input 1 on the TV (as
shown in “Example - B”), switch the video input to “1”.
3
Press the Power ( ) key on the
remote control.
The power of this unit turns on.
If a subwoofer with adjustable volume and crossover
frequency controls is connected to this unit, turn it on, set
the volume to about half way and then set the crossover
frequency to the maximum as shown below.
HDMI 1
HDMI 2
HDMI 3
TV
AUX 1
AUX 2
TV
AV
VOLUME
MIN
MAX
CROSSOVER/
HIGH CUT
MIN
MAX
Subwoofer
4
Press SURROUND and then the CINEMA DSP keys to
select the desired CINEMA DSP program.
Each time you press the CINEMA DSP key, program switches. For details on each program, see
“Enjoying CINEMA DSP programs” of “Owner’s Manual” (on the supplied CD-ROM). To turn off the
CINEMA DSP program, press OFF.
HDMI 4
iPod
RADIO
SURROUND
OFF
ENTER
TAINMENT
MUSIC
CINEMA DSP
MOVIE
HDMI 1
HDMI 2
HDMI 3
TV
AUX 1
AUX 2
STEREO
TV
AV
2
Start play back of your iPod/
iPhone.
INPUT
VOLUME
INTELLIBEAM MIC
MENU
For proper transmission, you need to set the group IDs of this unit
and PDX-50TX to the same value. For the Group ID setting of this
unit, refer to “WIRELESS SETUP” of “Owner’s Manual” (supplied
CD-ROM).
y
•
1
Prepare your iPod/iPhone
and the Yamaha wireless
transmitter for iPod (PDX-50TX/
PDX-50BC).
For instructions on PDX-50TX/PDX-50BC, refer to “Safety
and Accessory Information” (separate booklet).
1
Press RADIO repeatedly to
select “FM”.
HDMI 4
iPod
RADIO
OFF
ENTER
TAINMENT
MUSIC
CINEMA DSP
MOVIE
HDMI 1
HDMI 2
HDMI 3
TV
AUX 1
AUX 2
TV
AV
X X X X
F M
X
8 8 . 9
X
M H z
2
Press TUNING
/
.
Frequency is changed.
4
5
6
1
2
3
UNIVOLUME
SUR. DECODE INTELLIBEAM
MEMORY
SLEEP
INFO
TUNING
PRESET
CATEGORY
X X X X
F M
X
9 2 . 5
X
M H z
FM tuning
Playing back iPod/iPhone
Using the audio functions of this unit
Adjusting volume level automatically (UNIVOLUME)
Selecting surround or stereo playback
Press SURROUND or STEREO.
You can enjoy stereoscopic sound field with surround playback and hi-fi
sound with stereo playback.
ENTER
SURROUND
CINEMA DSP
MENU
TOP MENU
STEREO
Press UNIVOLUME.
You can limit the volume level of the TV so that it will not increase suddenly
when whenever the contents being broadcast change (due to commercials,
etc.). The UNIVOLUME key is located inside of the slide cover.
7
8
9
4
5
6
1
2
3
UNIVOLUME
SUR. DECODE INTELLIBEAM
Basic playback operations
8
Press ENTER to start the AUTO
SETUP procedure and then leave
the room within 10 seconds.
ENTER
SURROUND
CINEMA DSP
MENU
TOP MENU
STEREO
Will begin in 10sec
Please leave the room
*--------
[RETURN]:Cancel
AUTO SETUP START
The setup screen automatically changes during the AUTO
SETUP procedure.
When the AUTO SETUP procedure is complete, the “SHOW
RESULT” screen appears on the TV.
MEASUREMENT COMPLETE
BEAM MODE :5Beam/Plus2
SUBWOOFER :YES
[ENTER]:Save set-up.
[RETURN]:Do not save set-up.
SHOW RESULT
If “ENVIRONMENT CHECK (FAILED)” is displayed, see “Error
massages for AUTO SETUP” of “Owner’s Manual” (on the
supplied CD-ROM) and then run the procedure again.
The result may differ depending on the environment.
If any error occurs, the corresponding error message appears on the
screen. In this case, see “Error massages for AUTO SETUP” of “Owner’
s Manual” (on the supplied CD-ROM).
y
•
•
5
Checking digital
audio input
You can check the digital signals being input from the Blu-ray disc player through
the digital connection (HDMI, optical, coaxial) by using the supplied demonstration
DVD.
1
Press HDMI1-4 or AUX1/2 to
select the Blu-ray disc player
as the input source and start
playback of the demonstration
DVD.
HDMI 4
iPod
RADIO
ENTER
HDMI 1
HDMI 2
HDMI 3
TV
AUX 1
AUX 2
2
Check whether the
q
DIGITAL
indicator lights up.
q
DIGITAL
If the indicator does not light up, check the setting for digital audio output
on the player. For details, see “Using the supplied demonstration DVD”
(page 7 of “Safety and Accessory Information” (separate booklet)).
y
•
Playing back audio signals
4
Carrying out the AUTO SETUP (IntelliBeam)
4
Carrying out the AUTO SETUP (IntelliBeam)
Playing back audio signals
– –


