ELECTRICAL COMPONENTS
8-66
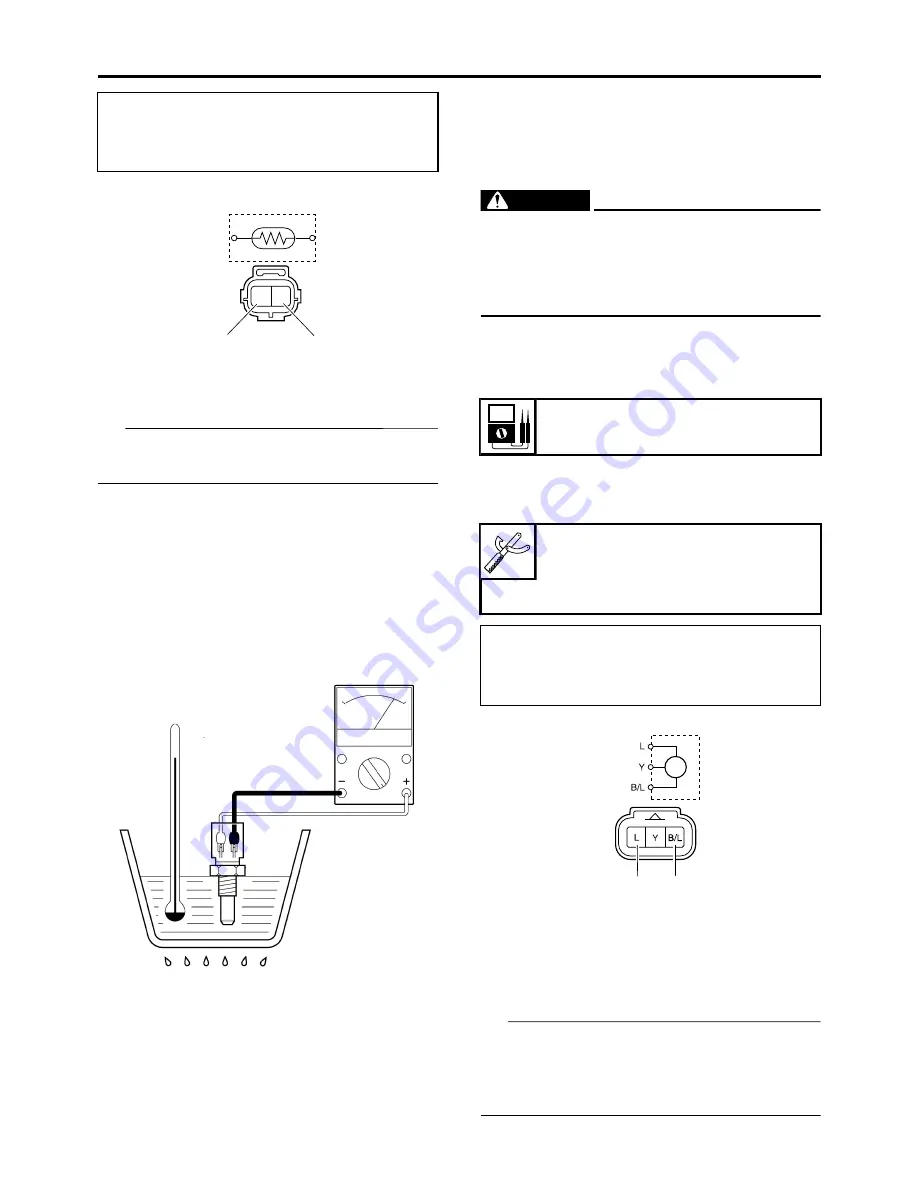
b. Immerse the coolant temperature sensor in
a container filled with coolant.
TIP
Make sure the coolant temperature sensor ter-
minals do not get wet.
c. Place a thermometer in the coolant.
d. Slowly heat the coolant, and then let it cool
to the specified temperature indicated in the
table.
e. Check the coolant temperature sensor for
continuity at the temperatures indicated in
the table.
▲▲▲▲▲▲▲▲▲▲▲▲▲▲▲▲▲▲▲▲▲▲▲▲▲▲▲▲▲▲▲▲
EASB291364
CHECKING THE THROTTLE POSITION
SENSOR
1. Remove:
• Throttle position sensor
(from the throttle body)
EWA
WARNING
• Handle the throttle position sensor with
special care.
• Never subject the throttle position sensor
to strong shocks. If the throttle position
sensor is dropped, replace it.
2. Check:
• Throttle position sensor maximum resis-
tance
Out of specification
Replace.
▼▼▼▼▼▼▼▼▼▼▼▼▼▼▼▼▼▼▼▼▼▼▼▼▼▼▼▼▼▼▼▼
a. Connect the pocket tester (
1k) to the
throttle position sensor.
b. Check the throttle position sensor maximum
resistance.
▲▲▲▲▲▲▲▲▲▲▲▲▲▲▲▲▲▲▲▲▲▲▲▲▲▲▲▲▲▲▲▲
3. Install:
• Throttle position sensor
TIP
When mounting the throttle position sensor, ad-
just its angle properly. Refer to “ADJUSTING
THE THROTTLE POSITION SENSOR” on
page 7-9.
• Positive tester probe
Green/White “1”
• Negative tester probe
Black/Blue “2”
1
2
G/W
B/L
B/L
G/W
Resistance
6.30 k
Pocket tester
90890-03112
Analog pocket tester
YU-03112-C
• Positive tester probe
Blue “1”
• Negative tester probe
Black/Blue “2”
2
1
Summary of Contents for YZ 2015 Series
Page 6: ...EASB291006 YAMAHA MOTOR CORPORATION U S A YZ MOTORCYCLE LIMITED WARRANTY...
Page 10: ......
Page 33: ...CONTROL FUNCTIONS 1 21 a 2...
Page 65: ...LUBRICATION POINTS AND LUBRICANT TYPES 2 22 EASB291066...
Page 68: ...LUBRICATION SYSTEM CHART AND DIAGRAMS 2 25...
Page 70: ...LUBRICATION SYSTEM CHART AND DIAGRAMS 2 27...
Page 72: ...LUBRICATION SYSTEM CHART AND DIAGRAMS 2 29...
Page 74: ...CABLE ROUTING DIAGRAM 2 31 EASB291068 CABLE ROUTING DIAGRAM...
Page 76: ...CABLE ROUTING DIAGRAM 2 33...
Page 78: ...CABLE ROUTING DIAGRAM 2 35...
Page 80: ...CABLE ROUTING DIAGRAM 2 37...
Page 82: ...CABLE ROUTING DIAGRAM 2 39...
Page 84: ...CABLE ROUTING DIAGRAM 2 41...
Page 86: ...CABLE ROUTING DIAGRAM 2 43...
Page 88: ...CABLE ROUTING DIAGRAM 2 45...
Page 128: ...ELECTRICAL SYSTEM 3 38...
Page 200: ...CHAIN DRIVE 4 70...
Page 244: ...ELECTRIC STARTER 5 41...
Page 266: ...OIL PUMP AND BALANCER GEAR 5 63 c d 6 6 7 8 8 b...
Page 286: ...TRANSMISSION 5 83...
Page 306: ...CHECKING THE INTAKE AIR TEMPERATURE SENSOR 8 67 CHECKING THE FUEL INJECTOR 8 68...
Page 321: ...CHARGING SYSTEM 8 15 EASB291338...
Page 325: ...COOLING SYSTEM For JPN 8 19 EASB291341...
Page 355: ...FUEL PUMP SYSTEM 8 49 EASB291348...
Page 356: ...ELECTRICAL COMPONENTS 8 50 ELECTRICAL COMPONENTS EASB291349 8 9 10 1 3 2 4 5 6 7...
Page 358: ...ELECTRICAL COMPONENTS 8 52 11 10 9 2 3 1 6 7 8 4 5...
Page 360: ...ELECTRICAL COMPONENTS 8 54 EASB291350 CHECKING THE SWITCHES 4 1 3 2 E B S E B E B E E B B...
Page 382: ...LIST OF SELF DIAGNOSTIC AND FAIL SAFE ACTIONS 9 7...


