ELECTRICAL COMPONENTS
8-67
EASB291365
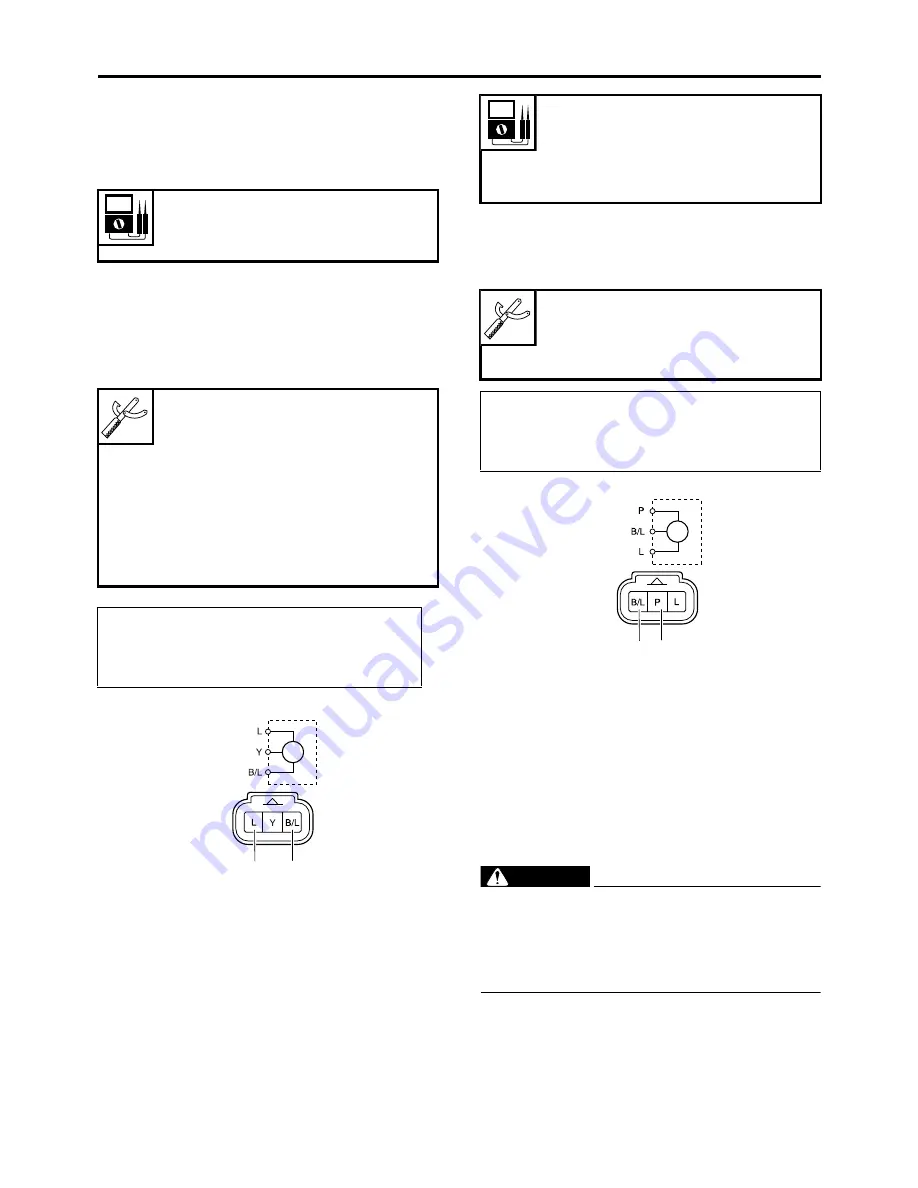
CHECKING THE THROTTLE POSITION
SENSOR INPUT VOLTAGE
1. Check:
• Throttle position sensor input voltage
Out of specification
Replace the ECU.
▼▼▼▼▼▼▼▼▼▼▼▼▼▼▼▼▼▼▼▼▼▼▼▼▼▼▼▼▼▼▼▼
a. Connect the test harness S-pressure sensor
(3P) to the throttle position sensor coupler
and the wire harness.
b. Connect the pocket tester (20 VDC) to the
test harness S-pressure sensor (3P).
c. Start the engine.
d. Measure the throttle position sensor input
voltage.
▲▲▲▲▲▲▲▲▲▲▲▲▲▲▲▲▲▲▲▲▲▲▲▲▲▲▲▲▲▲▲▲
EASB291366
CHECKING THE INTAKE AIR PRESSURE
SENSOR
1. Check:
• Intake air pressure sensor output voltage
Out of specification
Replace.
▼▼▼▼▼▼▼▼▼▼▼▼▼▼▼▼▼▼▼▼▼▼▼▼▼▼▼▼▼▼▼▼
a. Connect the pocket tester (20 VDC) to the
intake air pressure sensor coupler (wire har-
ness side).
b. Start the engine.
c. Measure the intake air pressure sensor out-
put voltage.
▲▲▲▲▲▲▲▲▲▲▲▲▲▲▲▲▲▲▲▲▲▲▲▲▲▲▲▲▲▲▲▲
EASB291367
CHECKING THE INTAKE AIR TEMPERA-
TURE SENSOR
1. Remove:
• Intake air temperature sensor
(from the air filter case)
EWA
WARNING
• Handle the intake air temperature sensor
with special care.
• Never subject the intake air temperature
sensor to strong shocks. If the intake air
temperature sensor is dropped, replace it.
2. Check:
• Intake air temperature sensor resistance
Out of specification
Replace.
Throttle position sensor input
voltage
4–6 V
Pocket tester
90890-03112
Analog pocket tester
YU-03112-C
Test harness S– pressure sensor
(3P)
90890-03207
Test harness S– pressure sensor
(3P)
YU-03207
• Positive tester probe
Blue “1”
• Negative tester probe
Black/Blue “2”
2
1
Intake air pressure sensor output
voltage
3.61–3.67 V at 101.3 kPa (3.61–
3.67 V at 1.01kgf/cm
2
, 3.61–3.67
V at 14.7 psi)
Pocket tester
90890-03112
Analog pocket tester
YU-03112-C
• Positive tester probe
Pink “1”
• Negative tester probe
Black/Blue “2”
1
2
Summary of Contents for YZ 2015 Series
Page 6: ...EASB291006 YAMAHA MOTOR CORPORATION U S A YZ MOTORCYCLE LIMITED WARRANTY...
Page 10: ......
Page 33: ...CONTROL FUNCTIONS 1 21 a 2...
Page 65: ...LUBRICATION POINTS AND LUBRICANT TYPES 2 22 EASB291066...
Page 68: ...LUBRICATION SYSTEM CHART AND DIAGRAMS 2 25...
Page 70: ...LUBRICATION SYSTEM CHART AND DIAGRAMS 2 27...
Page 72: ...LUBRICATION SYSTEM CHART AND DIAGRAMS 2 29...
Page 74: ...CABLE ROUTING DIAGRAM 2 31 EASB291068 CABLE ROUTING DIAGRAM...
Page 76: ...CABLE ROUTING DIAGRAM 2 33...
Page 78: ...CABLE ROUTING DIAGRAM 2 35...
Page 80: ...CABLE ROUTING DIAGRAM 2 37...
Page 82: ...CABLE ROUTING DIAGRAM 2 39...
Page 84: ...CABLE ROUTING DIAGRAM 2 41...
Page 86: ...CABLE ROUTING DIAGRAM 2 43...
Page 88: ...CABLE ROUTING DIAGRAM 2 45...
Page 128: ...ELECTRICAL SYSTEM 3 38...
Page 200: ...CHAIN DRIVE 4 70...
Page 244: ...ELECTRIC STARTER 5 41...
Page 266: ...OIL PUMP AND BALANCER GEAR 5 63 c d 6 6 7 8 8 b...
Page 286: ...TRANSMISSION 5 83...
Page 306: ...CHECKING THE INTAKE AIR TEMPERATURE SENSOR 8 67 CHECKING THE FUEL INJECTOR 8 68...
Page 321: ...CHARGING SYSTEM 8 15 EASB291338...
Page 325: ...COOLING SYSTEM For JPN 8 19 EASB291341...
Page 355: ...FUEL PUMP SYSTEM 8 49 EASB291348...
Page 356: ...ELECTRICAL COMPONENTS 8 50 ELECTRICAL COMPONENTS EASB291349 8 9 10 1 3 2 4 5 6 7...
Page 358: ...ELECTRICAL COMPONENTS 8 52 11 10 9 2 3 1 6 7 8 4 5...
Page 360: ...ELECTRICAL COMPONENTS 8 54 EASB291350 CHECKING THE SWITCHES 4 1 3 2 E B S E B E B E E B B...
Page 382: ...LIST OF SELF DIAGNOSTIC AND FAIL SAFE ACTIONS 9 7...


