CHASSIS
3-26
EASB296096
CHECKING THE REAR BRAKE PADS
1. Measure:
• Brake pad thickness “a”
Out of specification
Replace as a set.
TIP
The pads worn up to the indicator “b” grooves
mean that the brake pad thickness limit is
reached.
2. Replace:
• Brake pads
▼▼▼▼▼▼▼▼▼▼▼▼▼▼▼▼▼▼▼▼▼▼▼▼▼▼▼▼▼▼▼▼
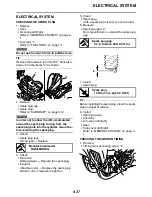
a. Remove the protector “1” and the pad pin
plug “2”.
b. Loosen the pad pin “3”.
c. Remove the rear wheel “4” and the brake
caliper “5”.
Refer to “REAR WHEEL” on page 4-7.
d. Remove the pad pin “6” and the brake pads
“7”.
e. Connect the plastic hose “8” to the bleed
screw “9” and place a container under the
end of the plastic hose.
f. Loosen the bleed screw and push the brake
caliper piston in.
EWA
WARNING
Do not reuse the drained brake fluid.
g. Tighten the bleed screw.
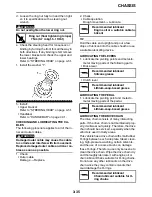
h. Install the brake pad “10” and the pad pin
“11”.
TIP
• Install the brake pads with their projections “a”
into the brake caliper recesses “b”.
• Temporarily tighten the pad pin at this point.
Brake pad lining thickness
6.4 mm (0.25 in)
Limit
1.0 mm (0.04 in)
b
a
a
1
2
3
4
5
Bleed screw
6 Nm (0.6 m·kgf, 4.3 ft·lbf)
7
6
9
8
T
R
.
.
10
11
a
b
Summary of Contents for YZ 2016 Series
Page 6: ...EASB296006 YAMAHA MOTOR CORPORATION U S A YZ MOTORCYCLE LIMITED WARRANTY...
Page 10: ......
Page 31: ...CONTROL FUNCTIONS 1 19 a 2...
Page 63: ...LUBRICATION POINTS AND LUBRICANT TYPES 2 22...
Page 66: ...LUBRICATION SYSTEM CHART AND DIAGRAMS 2 25...
Page 68: ...LUBRICATION SYSTEM CHART AND DIAGRAMS 2 27...
Page 70: ...LUBRICATION SYSTEM CHART AND DIAGRAMS 2 29...
Page 72: ...CABLE ROUTING DIAGRAM 2 31 EASB296066 CABLE ROUTING DIAGRAM...
Page 74: ...CABLE ROUTING DIAGRAM 2 33...
Page 76: ...CABLE ROUTING DIAGRAM 2 35...
Page 78: ...CABLE ROUTING DIAGRAM 2 37...
Page 80: ...CABLE ROUTING DIAGRAM 2 39...
Page 82: ...CABLE ROUTING DIAGRAM 2 41...
Page 84: ...CABLE ROUTING DIAGRAM 2 43...
Page 86: ...CABLE ROUTING DIAGRAM 2 45...
Page 262: ...OIL PUMP AND BALANCER GEAR 5 63 a 2 10 b 2 9 1 b 5 3 a 4 10 5 9 3 E c d 6 7 8 8 b 6...
Page 282: ...TRANSMISSION 5 83...
Page 302: ...8 CHECKING THE INTAKE AIR TEMPERATURE SENSOR 8 68 CHECKING THE FUEL INJECTOR 8 68...
Page 317: ...CHARGING SYSTEM 8 15...
Page 321: ...COOLING SYSTEM For JPN 8 19...
Page 351: ...FUEL PUMP SYSTEM 8 49...
Page 352: ...ELECTRICAL COMPONENTS 8 50 EASB296346 ELECTRICAL COMPONENTS EASB296347 7 8 9 1 3 2 4 5 6...
Page 354: ...ELECTRICAL COMPONENTS 8 52 11 10 9 2 3 1 6 7 8 4 5...
Page 356: ...ELECTRICAL COMPONENTS 8 54 EASB296348 CHECKING THE SWITCHES 4 1 3 2 B B Sb B B B B B B B B...
Page 378: ...LIST OF SELF DIAGNOSTIC AND FAIL SAFE ACTIONS 9 7...


