VALVES AND VALVE SPRINGS
5-28
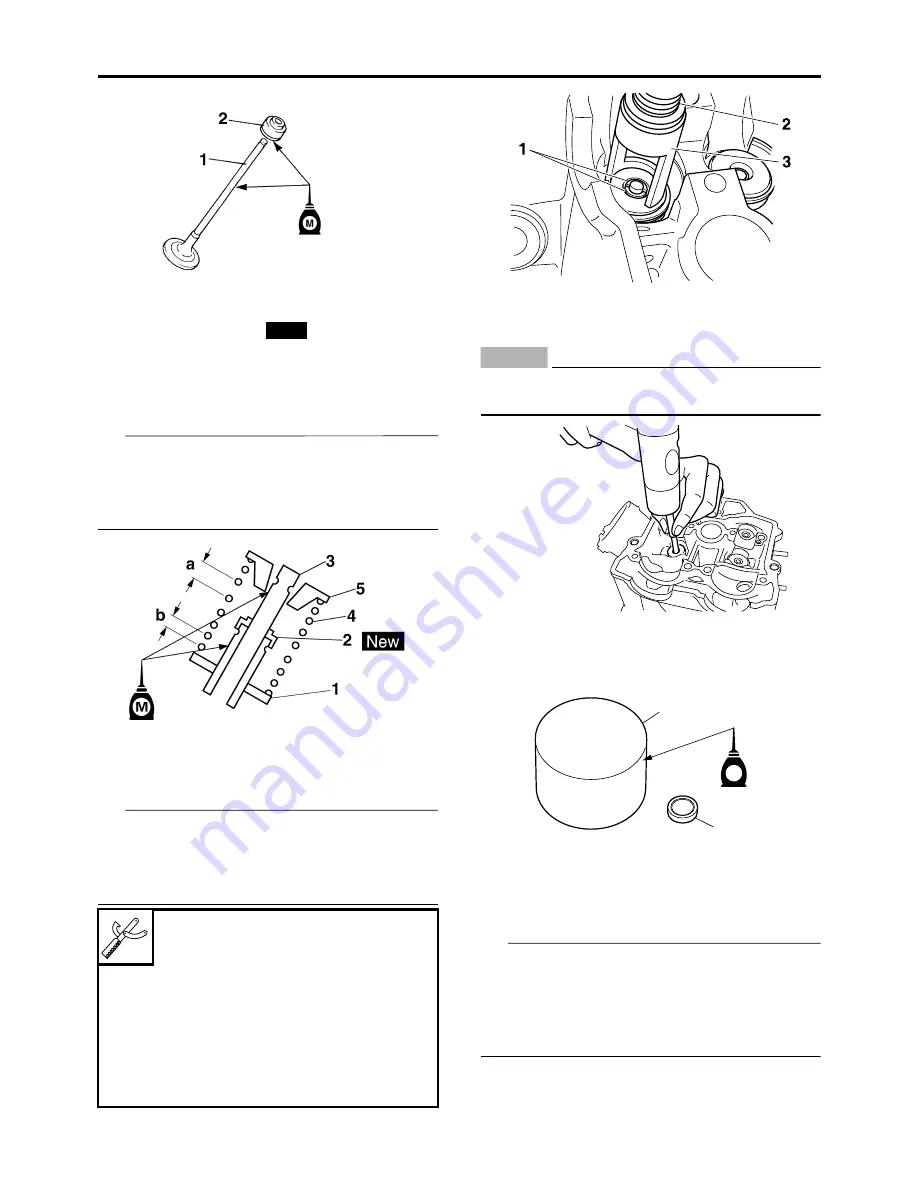
3. Install:
• Spring seat “1”
• Valve stem seal “2”
• Valve “3”
• Valve spring “4”
• Valve spring retainer “5”
(to the cylinder head)
TIP
• Make sure each valve is installed in its original
place.
• Install the valve springs with the larger pitch
“a” facing up.
4. Install:
• Valve cotter “1”
TIP
Install the valve cotters by compressing the
valve spring with the valve spring compressor
“2” and the valve spring compressor adapter
“3”.
5. To fasten the valve cotters onto the valve
stem, lightly tap the valve tip with a soft-face
hammer.
ECA
NOTICE
Hitting the valve tip with excessive force
could damage the valve.
6. Lubricate:
• Adjusting pad “1”
• Valve lifter “2”
7. Install:
• Adjusting pad
• Valve lifter
TIP
• Check that the valve lifter turns smoothly
when rotated with your finger.
• Make sure that the valve lifter and the adjust-
ing pad are reinstalled in their original posi-
tions.
b. Smaller pitch
Valve spring compressor
90890-04019
Valve spring compressor
YM-04019
Valve spring compressor attach-
ment
90890-04108
Valve spring compressor adapter
22 mm
YM-04108
New
E
1
2
Summary of Contents for YZ 2018 Series
Page 6: ...EASB916006 YAMAHA MOTOR CORPORATION U S A YZ MOTORCYCLE LIMITED WARRANTY...
Page 10: ......
Page 40: ...MOTORCYCLE CARE AND STORAGE 1 28...
Page 64: ...LUBRICATION SYSTEM CHART AND DIAGRAMS 2 23...
Page 66: ...LUBRICATION SYSTEM CHART AND DIAGRAMS 2 25...
Page 68: ...LUBRICATION SYSTEM CHART AND DIAGRAMS 2 27...
Page 70: ...CABLE ROUTING DIAGRAM 2 29 EASB29B065 CABLE ROUTING DIAGRAM...
Page 72: ...CABLE ROUTING DIAGRAM 2 31...
Page 74: ...CABLE ROUTING DIAGRAM 2 33...
Page 76: ...CABLE ROUTING DIAGRAM 2 35...
Page 78: ...CABLE ROUTING DIAGRAM 2 37...
Page 80: ...CABLE ROUTING DIAGRAM 2 39...
Page 82: ...CABLE ROUTING DIAGRAM 2 41...
Page 84: ...CABLE ROUTING DIAGRAM 2 43...
Page 255: ...OIL PUMP AND BALANCER GEAR 5 58 a 2 10 b 2 9 1 b 5 3 a 4 10 5 9 3 E c d 6 7 8 8 b 6...
Page 276: ...TRANSMISSION 5 79...
Page 290: ...FUEL TANK 7 5 A Left B Right 1 1 A 0 mm 0 in B 1 1 15 mm 0 59 in...
Page 296: ...THROTTLE BODY 7 11...
Page 299: ......
Page 313: ...CHARGING SYSTEM 8 14...
Page 321: ...COOLING SYSTEM For JPN 8 22...
Page 351: ...FUEL PUMP SYSTEM 8 52 EASB29B345...
Page 352: ...ELECTRICAL COMPONENTS 8 53 ELECTRICAL COMPONENTS EASB29B346 9 10 11 1 3 2 4 5 6 7 8...
Page 354: ...ELECTRICAL COMPONENTS 8 55 11 10 9 2 3 1 6 7 8 4 5...
Page 356: ...ELECTRICAL COMPONENTS 8 57 EASB29B347 CHECKING THE SWITCHES 4 1 3 2 B B Sb B B B B B B B B...
Page 372: ...ELECTRICAL COMPONENTS 8 73 c Measure the fuel injector resistance...


