CRANKSHAFT ASSEMBLY AND BALANCER SHAFT
5-73
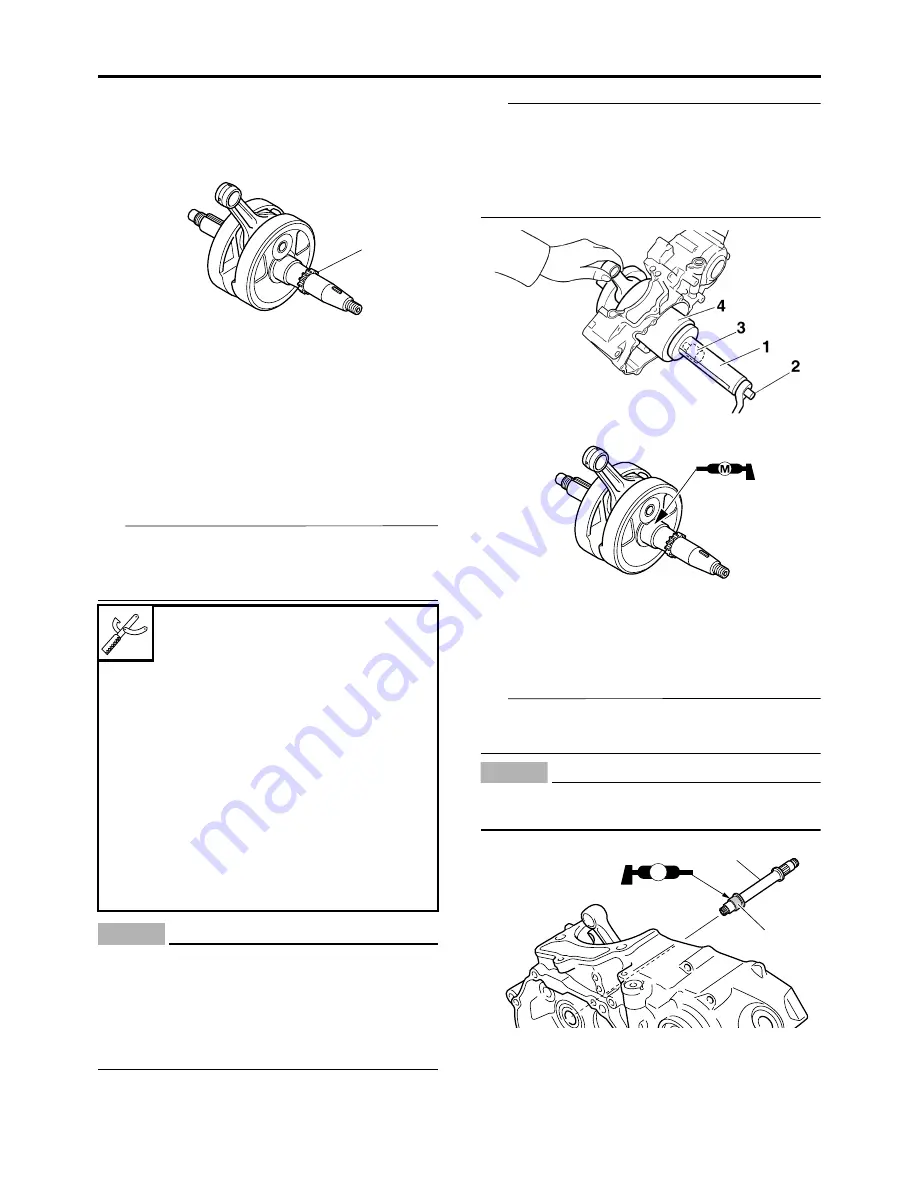
4. Check:
• Crankshaft sprocket “1”
Damage
Replace the crankshaft.
5. Check:
• Crankshaft journal oil passage
Obstruction
Blow out with compressed
air.
EASB29B286
INSTALLING THE CRANKSHAFT ASSEM-
BLY
1. Install:
• Crankshaft assembly
TIP
Install the crankshaft assembly with the crank-
shaft installer pot “1”, crankshaft installer bolt
“2”, adapter (M12) “3” and spacer “4”.
ECA
NOTICE
• To avoid scratching the crankshaft and to
ease the installation procedure, lubricate
the oil seal lips with lithium-soap-based
grease.
• In order to prevent the crankshaft seizure,
apply molybdenum disulfide grease.
TIP
Hold the connecting rod at top dead center
(TDC) with one hand while turning the nut of the
crankshaft installer bolt with the other. Turn the
crankshaft installer bolt until the crankshaft as-
sembly bottoms against the bearing.
EASB29B287
INSTALLING THE BALANCER SHAFT
1. Install:
• Balancer shaft “1”
TIP
Apply the molybdenum grease to the part “a”
where the balancer shaft fit into the bearing.
ECA
NOTICE
Do not apply the molybdenum grease to the
balancer shaft thread.
Crankshaft installer pot
90890-01274
Installing pot
YU-90058
Crankshaft installer bolt
90890-01275
Bolt
YU-90060
Adapter (M12)
90890-01278
Adapter #3
YU-90063
Spacer (crankshaft installer)
90890-04081
Pot spacer
YM-91044
1
M
1
a
Summary of Contents for YZ 2018 Series
Page 6: ...EASB916006 YAMAHA MOTOR CORPORATION U S A YZ MOTORCYCLE LIMITED WARRANTY...
Page 10: ......
Page 40: ...MOTORCYCLE CARE AND STORAGE 1 28...
Page 64: ...LUBRICATION SYSTEM CHART AND DIAGRAMS 2 23...
Page 66: ...LUBRICATION SYSTEM CHART AND DIAGRAMS 2 25...
Page 68: ...LUBRICATION SYSTEM CHART AND DIAGRAMS 2 27...
Page 70: ...CABLE ROUTING DIAGRAM 2 29 EASB29B065 CABLE ROUTING DIAGRAM...
Page 72: ...CABLE ROUTING DIAGRAM 2 31...
Page 74: ...CABLE ROUTING DIAGRAM 2 33...
Page 76: ...CABLE ROUTING DIAGRAM 2 35...
Page 78: ...CABLE ROUTING DIAGRAM 2 37...
Page 80: ...CABLE ROUTING DIAGRAM 2 39...
Page 82: ...CABLE ROUTING DIAGRAM 2 41...
Page 84: ...CABLE ROUTING DIAGRAM 2 43...
Page 255: ...OIL PUMP AND BALANCER GEAR 5 58 a 2 10 b 2 9 1 b 5 3 a 4 10 5 9 3 E c d 6 7 8 8 b 6...
Page 276: ...TRANSMISSION 5 79...
Page 290: ...FUEL TANK 7 5 A Left B Right 1 1 A 0 mm 0 in B 1 1 15 mm 0 59 in...
Page 296: ...THROTTLE BODY 7 11...
Page 299: ......
Page 313: ...CHARGING SYSTEM 8 14...
Page 321: ...COOLING SYSTEM For JPN 8 22...
Page 351: ...FUEL PUMP SYSTEM 8 52 EASB29B345...
Page 352: ...ELECTRICAL COMPONENTS 8 53 ELECTRICAL COMPONENTS EASB29B346 9 10 11 1 3 2 4 5 6 7 8...
Page 354: ...ELECTRICAL COMPONENTS 8 55 11 10 9 2 3 1 6 7 8 4 5...
Page 356: ...ELECTRICAL COMPONENTS 8 57 EASB29B347 CHECKING THE SWITCHES 4 1 3 2 B B Sb B B B B B B B B...
Page 372: ...ELECTRICAL COMPONENTS 8 73 c Measure the fuel injector resistance...


