ELECTRIC STARTER
5-45
EAM30106
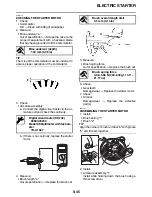
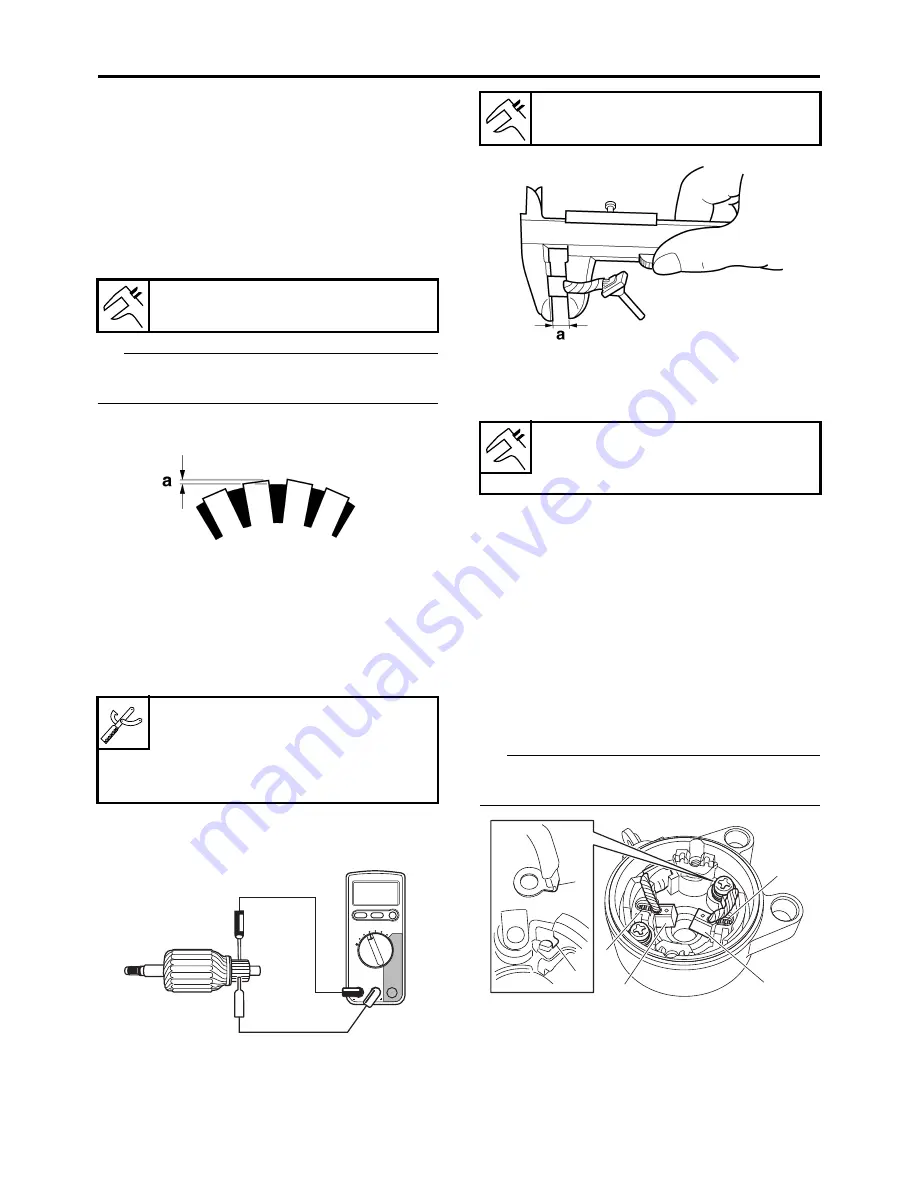
CHECKING THE STARTER MOTOR
1. Check:
•
Commutator
Dirt
Clean with 600 grit sandpaper.
2. Measure:
•
Mica undercut “a”
Out of specification
Scrape the mica to the
proper measurement with a hacksaw blade
that has been grounded to fit the commutator.
TIP
The mica of the commutator must be undercut to
ensure proper operation of the commutator.
3. Check:
•
Armature assembly
a. Connect the digital circuit tester to the ar-
mature coil and check the continuity.
b. If there is no continuity, replace the starter
motor.
4. Measure:
•
Brush length “a”
Out of specification
Replace the brush set.
5. Measure:
•
Brush spring force
Out of specification
Replace the brush set.
6. Check:
•
Gear teeth
Damage/wear
Replace the starter motor.
7. Check:
•
Oil seal
Damage/wear
Replace the defective
part(s).
EAM30107
ASSEMBLING THE STARTER MOTOR
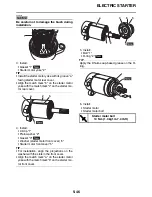
1. Install:
•
Brush spring “1”
•
Brush “2”
TIP
Align the corner of brush terminal “a” with groove
“b” and fit them together.
2. Install:
•
Armature assembly “1”
Install while holding down the brush using a
thin screw driver.
Mica undercut (depth)
1.50 mm (0.06 in)
Digital circuit tester (CD732)
90890-03243
Model 88 Multimeter with tachom-
eter
YU-A1927
Brush overall length limit
3.5 mm (0.14 in)
Brush spring force
3.92–5.88 N (400–600 gf, 14.11–
21.17 oz)
a
b
1
1
2
2
Summary of Contents for YZ 2023 Series
Page 6: ...EAM20162 YAMAHA MOTOR CORPORATION U S A YZ MOTORCYCLE LIMITED WARRANTY...
Page 10: ......
Page 44: ...MOTORCYCLE CARE AND STORAGE 1 32...
Page 61: ...TIGHTENING TORQUES 2 16...
Page 62: ...CABLE ROUTING DIAGRAM 2 17 EAM20152 CABLE ROUTING DIAGRAM Frame and engine left side view...
Page 64: ...CABLE ROUTING DIAGRAM 2 19 Frame and engine right side view...
Page 66: ...CABLE ROUTING DIAGRAM 2 21 Handlebar front view...
Page 68: ...CABLE ROUTING DIAGRAM 2 23 Frame and engine top view...
Page 70: ...CABLE ROUTING DIAGRAM 2 25 Frame and battery top view...
Page 72: ...CABLE ROUTING DIAGRAM 2 27 Rear brake right side view...
Page 74: ...CABLE ROUTING DIAGRAM 2 29...
Page 112: ...ELECTRICAL SYSTEM 3 36...
Page 148: ...REAR BRAKE 4 34 system Refer to BLEEDING THE HYDRAULIC BRAKE SYSTEM on page 3 25...
Page 154: ...HANDLEBAR 4 40 Throttle grip free play 3 0 6 0 mm 0 12 0 24 in...
Page 187: ...INSTALLING THE TRANSMISSION 5 74...
Page 190: ...LUBRICATION SYSTEM CHART AND DIAGRAMS 5 3 1 Oil filter element 2 Oil pump...
Page 191: ...LUBRICATION SYSTEM CHART AND DIAGRAMS 5 4 1 Intake camshaft 2 Exhaust camshaft...
Page 264: ...TRANSMISSION 5 77...
Page 274: ...WATER PUMP 6 9...
Page 284: ...THROTTLE BODY 7 9...
Page 287: ......
Page 288: ...IGNITION SYSTEM 8 1 EAM20142 IGNITION SYSTEM EAM30277 CIRCUIT DIAGRAM...
Page 292: ...ELECTRIC STARTING SYSTEM 8 5 EAM20143 ELECTRIC STARTING SYSTEM EAM30279 CIRCUIT DIAGRAM...
Page 296: ...CHARGING SYSTEM 8 9 EAM20144 CHARGING SYSTEM EAM30282 CIRCUIT DIAGRAM...
Page 299: ...CHARGING SYSTEM 8 12...
Page 300: ...SIGNALING SYSTEM 8 13 EAM20154 SIGNALING SYSTEM EAM30348 CIRCUIT DIAGRAM...
Page 304: ...FUEL INJECTION SYSTEM 8 17 EAM20145 FUEL INJECTION SYSTEM EAM30284 CIRCUIT DIAGRAM...
Page 329: ...FUEL INJECTION SYSTEM 8 42...
Page 330: ...FUEL PUMP SYSTEM 8 43 EAM20146 FUEL PUMP SYSTEM EAM30287 CIRCUIT DIAGRAM...
Page 362: ...SELF DIAGNOSTIC FUNCTION AND DIAGNOSTIC CODE TABLE 9 15...
Page 372: ...CHASSIS 10 9...
Page 374: ......
Page 376: ......
Page 377: ...YZ250FXP 2023 WIRING DIAGRAM BAJ 2819U 13_WD indd 1 2022 04 01 9 58 37...
Page 378: ...YZ250FXP 2023 WIRING DIAGRAM BAJ 2819U 13_WD indd 2 2022 04 01 9 58 37...

