background image

7-11

CHASSIS

SUSPENSION SETTING (REAR SHOCK ABSORBER)

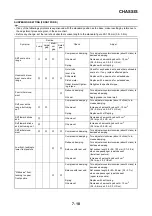
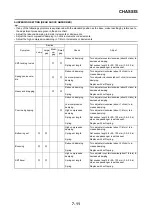
• If any of the following symptoms is experienced with the standard position as the base, make resetting by reference to 

the adjustment procedure given in the same chart.

• Adjust the rebound damping in 2-click increments or decrements.
• Adjust the low compression damping in 1-click increments or decrements.
• Adjust the high compression damping in 1/6 turn increments or decrements.

Symptom

Section

Check

Adjust

Jump

Large 

gap

Medi-

um 

gap

Small 

gap

Stiff, tending to sink

Rebound damping

Turn adjuster counterclockwise (about 2 clicks) to 
decrease damping.

Spring set length

Set sunken length for 90–100 mm (3.5–3.9 in) 
when one passenger is astride seat.

Spongy and unsta-
ble

Rebound damping

Turn adjuster clockwise (about 2 clicks) to in-
crease damping.

Low compression 
damping

Turn adjuster clockwise (about 1 click) to increase 
damping.

Spring

Replace with stiff spring.

Heavy and dragging

Rebound damping

Turn adjuster counterclockwise (about 2 clicks) to 
decrease damping.

Spring

Replace with soft spring.

Poor road gripping

Rebound damping

Turn adjuster counterclockwise (about 2 clicks) to 
decrease damping.

Low compression 
damping

Turn adjuster clockwise (about 1 clicks) to in-
crease damping.

High compression 
damping

Turn adjuster clockwise (about 1/6 turn) to in-
crease damping.

Spring set length

Set sunken length for 90–100 mm (3.5–3.9 in) 
when one passenger is astride seat.

Spring

Replace with soft spring.

Bottoming out

High compression 
damping

Turn adjuster clockwise (about 1/6 turn) to in-
crease damping.

Spring set length

Set sunken length for 90–100 mm (3.5–3.9 in) 
when one passenger is astride seat.

Spring

Replace with stiff spring.

Bouncing

Rebound damping

Turn adjuster clockwise (about 2 clicks) to in-
crease damping.

Spring

Replace with soft spring.

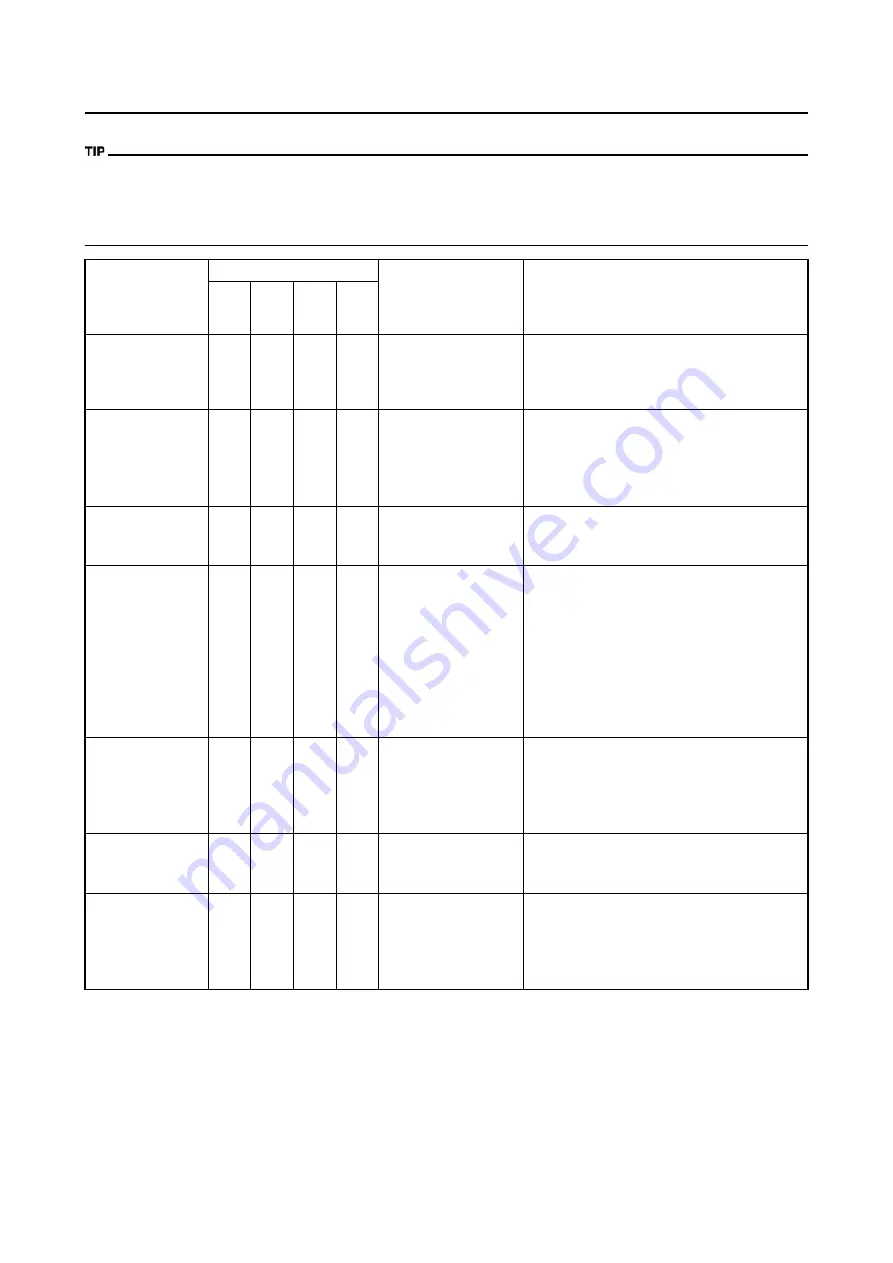
Stiff travel

High compression 
damping

Turn adjuster counterclockwise (about 1/6 turn) to 
decrease damping.

Spring set length

Set sunken length for 90–100 mm (3.5–3.9 in) 
when one passenger is astride seat.

Spring

Replace with soft spring.

Summary of Contents for YZ125 2015

Page 1: ...CLED PAPER 2015 YZ125 YZ125F2 2015 q Read this manual carefully before operating this vehicle q Il convient de lire attentivement ce manuel avant la premi re utilisation du v hicule q Bitte lesen Sie...

Page 2: ...remis avec le v hicule en cas de vente de ce dernier Q Leggere attentamente questo manuale prima di utilizzare il veicolo Questo manuale dovrebbe accompagnare il veicolo se viene venduto Q Bitte lesen...

Page 3: ...2015 2015 YZ125 YZ125 1SR 28199 33 E0 1SR 28199 33 E0 OWNER S SERVICE MANUAL OWNER S SERVICE MANUAL Read this manual carefully before operating this vehicle Read this manual carefully before operatin...

Page 4: ......

Page 5: ...R S SERVICE MANUAL 2014 by Yamaha Motor Co Ltd 1st Edition June 2014 All rights reserved Any reprinting or unauthorized use without the written permission of Yamaha Motor Co Ltd is expressly prohibite...

Page 6: ...S MACHINE IS TO BE OPER ATED BY AN EXPERIENCED RID ER ONLY Do not attempt to operate this ma chine at maximum power until you are totally familiar with its character istics THIS MACHINE IS DESIGNED TO...

Page 7: ...n to find the required fore edge symbol mark and go to a page for required item and de scription MANUAL FORMAT All of the procedures in this manual are organized in a sequential step by step format Th...

Page 8: ...step by step format sup plements 5 are given in addition to the exploded diagram and job instruction chart ILLUSTRATED SYMBOLS Refer to the illustration Illustrated symbols 1 to 7 are used to identify...

Page 9: ...TABLE OF CONTENTS GENERAL INFORMATION 1 SPECIFICATIONS 2 REGULAR INSPECTION AND ADJUSTMENTS 3 ENGINE 4 CHASSIS 5 ELECTRICAL 6 TUNING 7...

Page 10: ...S 3 1 PRE OPERATION INSPECTION AND MAINTENANCE 3 5 ENGINE 3 6 CHASSIS 3 10 ELECTRICAL 3 20 CHAPTER 4 ENGINE SEAT FUEL TANK AND SIDE COVERS 4 1 EXHAUST PIPE AND SILENCER 4 3 RADIATOR 4 5 CARBURETOR AND...

Page 11: ...1 1 LOCATION OF IMPORTANT LABELS GENERAL INFORMATION LOCATION OF IMPORTANT LABELS Please read the following important labels carefully before operating this vehicle CANADA 1...

Page 12: ...1 2 LOCATION OF IMPORTANT LABELS EUROPE...

Page 13: ...1 3 LOCATION OF IMPORTANT LABELS AUS NZ ZA...

Page 14: ...ins high pressure nitrogen gas Mishandling can cause explosion Do not incinerate puncture or open Turn off the main switch after riding to avoid draining the battery Use unleaded gasoline only Measure...

Page 15: ...to change without notice 1 Clutch lever 2 Engine stop switch 3 Front brake lever 4 Throttle grip 5 Radiator cap 6 Fuel tank cap 7 Kickstarter lever 8 Fuel tank 9 Radiator 10 Coolant drain bolt 11 Chec...

Page 16: ...fuel from flowing out and is installed to the fuel tank breather hose In this installation make sure the arrow faces the fuel tank and also downward COLLAR tool for YPVS This collar 1 is used to remov...

Page 17: ...weight lithium base grease to the seal lip s Oil the bearings liberally when installing Do not use compressed air to spin the bearings dry This causes dam age to the bearing surfaces CIRCLIPS 1 All ci...

Page 18: ...Crankcase separating tool YU 01135 B 90890 01135 These tool is used to remove the crankshaft from either case Flywheel puller YM 01189 90890 01189 This tool is used to remove the fly wheel magneto Ro...

Page 19: ...ls are used for checking the cooling system Flywheel puller YU 33270 B 90890 01362 These tool is used to split the crank case Steering nut wrench YU A9472 90890 01403 This tool is used when tighten th...

Page 20: ...s tance output voltage and amper age Clutch holding tool YM 91042 90890 04086 This tool is used to hold the clutch when removing or installing the clutch boss securing nut Dynamic spark tester YM 3448...

Page 21: ...to activate the front brake REAR BRAKE PEDAL The rear brake pedal 1 is located on the right side of the machine Press down on the brake pedal to activate the rear brake FUEL COCK The fuel cock suppli...

Page 22: ...te the machine in the lower gears at moderate throttle open ings for five to eight minutes Stop and check the spark plug condi tion it will show a rich condition during break in 5 Allow the engine to...

Page 23: ...ower bracket Rear For link type Assembly of links Link to frame Link to rear shock absorber Link to swingarm Installation of rear shock absorber Rear shock absorber to frame Installation of swingarm T...

Page 24: ...NING AND STORAGE CLEANING Frequent cleaning of your machine will enhance its appearance maintain good overall performance and ex tend the life of many components 1 Before washing the machine block off...

Page 25: ...troke 54 0 54 5 mm 2 1 2 1 in Compression ratio 8 6 10 7 1 Starting system Kick starter Lubrication system Premix 30 1 YAMALUBE 2 R Oil type or grade 2 stroke Transmission oil Recommended brand YAMALU...

Page 26: ...109 mm 4 3 in Tire Type With tube Size front 80 100 21 51M Size rear 100 90 19 57M Tire pressure front and rear 100 kPa 1 00 kgf cm2 15 psi Brake Front brake type Single disc brake Operation Right han...

Page 27: ...mm 0 0004 in Piston Piston size 53 957 53 972 mm 2 1243 2 1249 in Measuring point H 17 5 mm 0 69 in Piston clearance 0 040 0 045 mm 0 0016 0 0018 in 0 100 mm 0 0039 in Piston offset 0 50 mm 0 0197 in...

Page 28: ...20 mm 0 008 in Clutch spring free length 40 10 mm 1 58 in 38 10 mm 1 50 in Quantity 5 Clutch housing thrust clearance 0 15 0 26 mm 0 006 0 010 in Clutch housing radial clearance 0 01 0 04 mm 0 0006 0...

Page 29: ...S 80 Fuel level F L 9 5 10 5 mm 0 37 0 41 in Reed valve Thickness 0 470 mm 0 0185 in Valve stopper height 8 2 8 6 mm 0 32 0 34 in Valve bending limit 0 2 mm 0 01 in Cooling Radiator core size Width 10...

Page 30: ...n Spring free length 260 0 mm 10 24 in Fitting length 252 0 mm 9 92 in Preload length Min Max 1 5 18 mm 0 06 0 71 in Spring rate STD K 46 00 N mm 4 69 kg mm 262 66 lb in Optional spring Yes Enclosed g...

Page 31: ...height above footrest top 0 0 mm 0 00 in Clutch lever free play lever end 7 0 12 0 mm 0 28 0 47 in Throttle grip free play 3 0 5 0 mm 0 12 0 20 in Item Standard Limit Item Standard Limit Ignition syst...

Page 32: ...adiator M6 6 10 Nm 1 0 m kg 7 2 ft lb Radiator guard M6 2 10 Nm 1 0 m kg 7 2 ft lb Radiator hose clamp M6 8 2 Nm 0 2 m kg 1 4 ft lb Air filter element M6 1 2 Nm 0 2 m kg 1 4 ft lb Carburetor joint M6...

Page 33: ...M6 1 12 Nm 1 2 m kg 8 7 ft lb Bearing plate cover shift cam M6 2 10 Nm 1 0 m kg 7 2 ft lb Shift guide M6 2 10 Nm 1 0 m kg 7 2 ft lb Stopper lever M6 1 10 Nm 1 0 m kg 7 2 ft lb Segment M8 1 30 Nm 3 0 m...

Page 34: ...ft lb Front brake master cylinder and bracket M6 2 9 Nm 0 9 m kg 6 5 ft lb Brake lever mounting bolt M6 1 6 Nm 0 6 m kg 4 3 ft lb Brake lever mounting nut M6 1 6 Nm 0 6 m kg 4 3 ft lb Brake lever posi...

Page 35: ...and connecting rod M14 1 80 Nm 8 0 m kg 58 ft lb Connecting rod and frame M14 1 80 Nm 8 0 m kg 58 ft lb Rear shock absorber and frame M10 1 56 Nm 5 6 m kg 40 ft lb Rear shock absorber and relay arm M1...

Page 36: ...ft lb ELECTRICAL Rear fender rear M6 2 12 Nm 1 2 m kg 8 7 ft lb Mud flap 2 1 Nm 0 1 m kg 0 7 ft lb Side cover M6 2 7 Nm 0 7 m kg 5 1 ft lb Seat M8 2 19 Nm 1 9 m kg 13 ft lb Number plate M6 1 7 Nm 0 7...

Page 37: ...ts should be at room temperature A Distance between flats B Outside thread diameter DEFINITION OF UNITS A Nut B Bolt TORQUE SPECIFI CATION Nm m kg ft lb 10 mm 6 mm 6 0 6 4 3 12 mm 8 mm 15 1 5 11 14 mm...

Page 38: ...CDI magneto lead 10 YPVS breather hose 11 Engine bracket right 12 Engine bracket left 13 Crankcase breather hose 14 Overflow hose 15 Connector cover A Pass the clutch cable on the out side of the thro...

Page 39: ...ther hose out side the engine bracket and in side the down tube Then pass the radiator breather hose inside the YPVS breather hose J Clamp the CDI magneto lead radiator breather hose and YPVS breather...

Page 40: ...tor hose B Using a plastic locking tie clamp the engine stop switch lead igni tion coil lead and CDI magneto lead together with the clamp ends backward and then cut off the tie end C Clamp to the fram...

Page 41: ...connector cover into contact with the coupler G Locate the clamp ends in the ar rowed range H Insert the CDI unit band until it stops at the CDI unit stay I Pass the CDI magneto lead and radiator bre...

Page 42: ...on directs as shown and lightly touches the projec tion on the caliper B Pass the brake hose into the brake hose holders C If the brake hose contacts the spring rear shock absorber correct its twist D...

Page 43: ...that its pipe portion directs as shown and lightly touches the projec tion on the master cylinder B Pass the engine stop switch lead in the middle of the clutch holder C Clamp the engine stop switch l...

Page 44: ...nspection is required by reference to the list below Item After break in Every race about 2 5 hours Every third about 7 5 hours Every fifth about 12 5 hours As re quired Remarks PISTON Inspect and cle...

Page 45: ...in slack 48 0 58 0 mm 1 89 2 28 in Replace COOLING SYSTEM Check coolant level and leakage Check radiator cap opera tion Replace coolant Every two years Inspect hoses OUTSIDE NUTS AND BOLTS Retighten R...

Page 46: ...AND DUST SEAL Clean and lube Lithium base grease PROTECTOR GUIDE Replace REAR SHOCK ABSORBER Inspect and adjust Lube After rain ride Molybdenum disulfide grease Retighten DRIVE CHAIN GUIDE AND ROLLERS...

Page 47: ...n sprocket bolt Inspect bearings Replace bearings Lubricate Lithium base grease THROTTLE CONTROL CA BLE Check routing and connec tion Lubricate Yamaha cable lube or SAE 10W 40 motor oil Item After bre...

Page 48: ...rive chain slack and alignment Check that the drive chain is lubricated properly P 3 13 14 Wheels Check for excessive wear and tire pressure Check for loose spokes and have no excessive play P 3 16 17...

Page 49: ...ap water 5 Install Copper washer Coolant drain bolt 6 Fill Radiator Engine To specified level Do not mix more than one type of ethylene glycol antifreeze con taining corrosion inhibitors for aluminum...

Page 50: ...t Clutch lever free play Handlebar side a Turn the adjuster 1 until the specified clutch lever free play is obtained If the clutch lever free play cannot be obtained on the handlebar side use the adju...

Page 51: ...t by squeezing the element Do not twist the element when squeezing the element Leaving too much of solvent in the element may result in poor starting 3 Inspect Air filter element Damage Replace 4 Appl...

Page 52: ...st Pilot air screw 1 Adjustment steps a Screw in the pilot air screw until it is lightly seated b Back out by the specified number of turns ADJUSTING THE ENGINE IDLING SPEED 1 Start the engine and tho...

Page 53: ...leeding procedure when the tiny bubbles in the system have disap peared j Add brake fluid to the level line on the reservoir Check the operation of the brake after bleeding the brake system 3 Install...

Page 54: ...he brake caliper re cesses b Temporarily tighten the pad pin at this point i Install the brake caliper 8 and tighten the pad pin 9 j Install the pad pin plug 10 3 Inspect Brake fluid level Refer to CH...

Page 55: ...brake system Refer to BLEEDING THE HY DRAULIC BRAKE SYSTEM sec tion CHECKING THE REAR BRAKE PAD INSULATOR 1 Remove Brake pad Refer to CHECKING AND RE PLACING THE REAR BRAKE PADS section 2 Inspect Rea...

Page 56: ...specification Adjust Before checking and or adjusting ro tate the rear wheel through several revolutions and check the slack sev eral times to find the tightest point Check and or adjust the drive cha...

Page 57: ...FRONT FORK REBOUND DAMPING FORCE 1 Adjust Rebound damping force By turning the adjuster 1 STANDARD POSITION This is the position which is back by the specific number of clicks from the fully turned i...

Page 58: ...ever attempt to turn the adjuster beyond the maximum or minimum setting e Tighten the locknut 5 Install Rear frame upper Rear frame lower ADJUSTING THE REAR SHOCK ABSORBER REBOUND DAMPING FORCE 1 Adju...

Page 59: ...ire while it is cold Loose bead stoppers allow the tire to slip off its position on the rim when the tire pressure is low A tilted tire valve stem indicates that the tire slips off its position on the...

Page 60: ...ring nut us ing the steering nut wrench Avoid over tightening g Check the steering stem by turn ing it lock to lock If there is any binding remove the steering stem assembly and inspect the steer ing...

Page 61: ...3 18 CHASSIS...

Page 62: ...lebar contact 6 Drive chain 7 Throttle roller cable guide 8 Throttle roller sliding surface 9 Tube guide cable winding por tion 10 Throttle cable end 11 Clutch cable end A Use Yamaha cable lube or equ...

Page 63: ...g Crankcase cover left 2 Attach Dial gauge 1 Spark plug hole dial stand 2 3 Rotate the magneto rotor 1 until the piston reaches top dead cen ter TDC When this happens the needle on the dial gauge will...

Page 64: ...HE SEAT FUEL TANK AND SIDE COVERS Order Part name Q ty Remarks Turn the fuel cock to OFF Disconnect the fuel hose 1 Seat 1 2 Air scoop left and right 2 3 Fitting band 1 Remove on fuel tank side 4 Bolt...

Page 65: ...air filter case REMOVING THE NUMBER PLATE 1 Remove Bolt number plate Number plate 1 The projection a is inserted into the band of the number plate Pull the band off the projection before removal Remo...

Page 66: ...COVERS section 1 Bolt silencer 2 2 Washer 26 mm 1 02 in 1 3 Washer 22 mm 0 87 in 1 4 Silencer 1 5 Collar L 15 5 mm 0 61 in 1 6 Collar L 13 5 mm 0 53 in 1 7 Grommet front 1 8 Grommet rear 1 9 Tension s...

Page 67: ...pe Fully apply Quick gasket Yamaha bond No 1215 or equivalent as shown 5 Install Bolt fiber 1 Silencer 2 Bolt silencer front 3 Bolt silencer rear 4 Side cover right Yamaha bond No 1215 90890 85505 Thr...

Page 68: ...T FUEL TANK AND SIDE COVERS section 1 Radiator guard 2 2 Radiator hose clamp radiator hose 1 3 2 Only loosening 3 Radiator hose 2 1 4 Left radiator 1 5 Radiator hose 4 1 6 Right radiator 1 7 Radiator...

Page 69: ...TOR 1 Install Radiator breather hose 1 Radiator hose 3 2 Radiator hose 1 3 To right radiator 4 Clamp the radiator hose in the direc tion as shown 2 Install Right radiator 1 Washer 2 Bolt right radiato...

Page 70: ...arks Fuel tank Refer to SEAT FUEL TANK AND SIDE COVERS section 1 Clamp carburetor joint 2 Loosen the screw carburetor joint 2 Carburetor 1 3 Carburetor joint 1 4 Reed valve assembly 1 5 Stopper reed v...

Page 71: ...r top 1 Refer to removal section 2 Throttle valve 1 3 Needle holder 1 4 Jet needle 1 5 Float chamber 1 6 Needle jet cover 1 7 Float pin 1 8 Float 1 9 Valve seat 1 10 Main jet 1 11 Main jet holder 1 12...

Page 72: ...r use a wire CHECKING THE NEEDLE VALVE 1 Inspect Needle valve 1 Valve seat 2 Grooved wear a Replace Dust b Clean Always replace the needle valve and valve seat as a set CHECKING THE THROTTLE VALVE 1 C...

Page 73: ...e 1 Stopper reed valve 2 Screw reed valve 3 Install the reed valve with the reed valve bending as shown Note the cut a in the lower corner of the reed and stopper plate Tighten each screw gradually to...

Page 74: ...he needle holder 7 8 Install Mixing chamber top 1 Screw mixing chamber top 2 To carburetor 3 After installing check the throttle grip for smooth movement 9 Install Air vent hose 1 Overflow hose 2 Clam...

Page 75: ...ND SILENCER section Radiator Refer to RADIATOR section 1 Spark plug 1 2 Engine bracket 2 3 Nut cylinder head 5 Loosen each nut 1 4 turn and remove them after all nuts are loosened 4 Cylinder head 1 5...

Page 76: ...Piston 1 Refer to removal section 4 Small end bearing 1 Refer to removal section 5 Piston ring 1 Refer to removal section 6 Power valve cover 1 7 Thrust plate 1 8 Bolt link lever 1 9 Valve holder 1 1...

Page 77: ...sharp instrument Avoid scratching the aluminum 2 Inspect Cylinder head water jacket Crust of minerals Rust Re place 3 Measure Cylinder head warpage Out of specification Resurface Warpage measurement a...

Page 78: ...ck Free play There should be no noticeable free play Free play exists Inspect the connecting rod for wear Replace the pin and or connecting rod as required CHECKING THE PISTON RING 1 Install Piston ri...

Page 79: ...Do not use a sharp instrument Avoid scratching the aluminum INSTALLING THE POWER VALVE 1 Install Power valve 1 1 Power valve 2 2 Bolt power valve 3 Install the power valve at cut away faced a for dow...

Page 80: ...mall end bearing 2 Dowel pin 3 Apply the engine oil onto the bear ing crankshaft and connecting rod and connecting rod big end wash ers Install the gasket with the seal print side toward the crankcase...

Page 81: ...Apply the lithium soap base grease on the O rings 7 Install Cylinder head 1 Copper washer 2 Nut cylinder head 3 Tighten the nuts cylinder head in stage using a crisscross pattern 8 Install Engine brac...

Page 82: ...ON OIL section in the CHAPTER 3 Bolt brake pedal Shift the brake pedal downward Rotor and stator Refer to CDI MAGNETO section Clutch cable Disconnect at engine side 1 Clutch cover 1 2 Bolt clutch spri...

Page 83: ...ing 1 5 Ball 1 6 Push rod 2 1 7 Nut clutch boss 1 Refer to removal section 8 Lock washer 1 Refer to removal section 9 Clutch boss 1 Refer to removal section 10 Thrust washer D 34 mm 1 34 in 1 11 Prima...

Page 84: ...all four points CHECKING THE CLUTCH PLATES 1 Measure Clutch plate warpage Out of specification Replace clutch plate as a set Use a surface plate 1 and thick ness gauge 2 CHECKING THE PUSH LEVER SHAFT...

Page 85: ...sher 2 Circlip 3 To push rod 1 4 Apply the transmission oil on the bearing and washer 7 Install Push rod 2 1 Ball 2 Push rod 1 3 Apply the transmission oil on the push rod 1 2 and ball 8 Install Press...

Page 86: ...he CHAPTER 3 Clutch cable Disconnect at engine side Bolt brake pedal Shift the brake pedal downward Radiator hose 4 Disconnect at water pump side Bolt push rod Refer to CYLINDER HEAD CYLINDER AND PIST...

Page 87: ...SHIFT SHAFT Order Part name Q ty Remarks 1 Kick idle gear 1 2 Kick shaft assembly 1 Refer to removal section 3 Shift pedal 1 4 Shift shaft 1 5 Roller 1 6 Shift guide 1 Refer to removal section 7 Shift...

Page 88: ...KICK SHAFT AND KICK GEAR 1 Check Kick gear smooth movement Unsmooth movement Replace 2 Inspect Kick shaft 1 Wear damage Replace CHECKING THE KICK GEAR AND KICK IDLE GEAR 1 Inspect Kick gear 1 Kick idl...

Page 89: ...Install Shift lever assembly 1 To shift guide 2 3 Install Shift lever assembly 1 Shift guide 2 The shift lever assembly is installed at the same time as the shift guide Apply the transmission oil on...

Page 90: ...mary drive gear 1 Place an aluminum plate a between the teeth of the primary drive gear and driven gear 4 Install Dowel pin 1 Gasket crankcase cover right 2 5 Install Crankcase cover right 1 Mesh the...

Page 91: ...Right crankcase cover Refer to KICK SHAFT AND SHIFT SHAFT section 1 Governor assembly 1 2 Dowel pin 1 Refer to removal section 3 Retainer 1 4 Ball 4 5 Retainer weight 1 6 Plain washer 3 7 Thrust beari...

Page 92: ...mpression spring 2 Plate 3 Washer 4 Thrust bearing 5 Collar 6 Retainer weight 7 To governor shaft 8 Apply the lithium soap base grease on the thrust bearing 2 Install Ball 1 Retainer 2 To governor sha...

Page 93: ...me Q ty Remarks Crankcase cover right Refer to KICK SHAFT AND SHIFT SHAFT section 1 Water pump housing cover 1 2 Impeller shaft gear 1 3 Dowel pin 1 4 Plain washer 1 5 Impeller shaft assembly 1 6 Bear...

Page 94: ...OIL SEAL 1 Install Oil seal inside 1 Oil seal outside 2 Apply the lithium soap base grease on the oil seal lip Install the oil seal with its manufac ture s marks or numbers facing the right crankcase...

Page 95: ...stall Water pump housing cover 1 Bolt water pump housing cover 2 Copper washer coolant drain bolt 3 Coolant drain bolt 4 Bolt water pump hous ing cover 10 Nm 1 0 m kg 7 2 ft lb Coolant drain bolt 10 N...

Page 96: ...Remarks Seat and fuel tank Refer to SEAT FUEL TANK AND SIDE COVERS section Bolt Radiator Refer to RADIATOR section Disconnect the CDI magneto lead 1 Left crankcase cover 1 2 Nut rotor 1 Refer to remo...

Page 97: ...sure that its flat surface a is in parallel with the crankshaft center line b When installing the rotor align the keyway c of the rotor with the woodruff key 3 Install Washer 1 Nut rotor 2 Use the rot...

Page 98: ...to EXHAUST PIPE AND SILENCER section Clutch cable Disconnect at the engine side Radiator Refer to RADIATOR section Spark plug cap Disconnect the CDI magneto lead 1 Drive chain sprocket cover 1 2 Nut d...

Page 99: ...3 10 Pivot shaft 1 Refer to removal section 11 Engine 1 Refer to removal section Order Part name Q ty Remarks 26 Nm 2 6 m kg 19 ft lb 64 Nm 6 4 m kg 46 ft lb 64 Nm 6 4 m kg 46 ft lb 85 Nm 8 5 m kg 61...

Page 100: ...de Pivot shaft 2 Nut pivot shaft 3 Engine mounting bolt lower 4 Nut engine mounting bolt lower 5 Engine mounting bolt front 6 Nut engine mounting bolt front 7 Engine bracket 8 Bolt engine bracket 9 Nu...

Page 101: ...t while applying the rear brake 3 Bend the lock washer tab to lock the nut 4 Install Drive chain sprocket guide 1 Drive chain sprocket cover 2 Screw drive chain sprocket cov er 3 Nut drive sprocket 75...

Page 102: ...Refer to KICK SHAFT AND SHIFT SHAFT section Stopper lever Refer to KICK SHAFT AND SHIFT SHAFT section Rotor and stator Refer to CDI MAGNETO section 1 Segment 1 Refer to removal section 2 Bolt L 45 mm...

Page 103: ...SHAFT 9 Crankshaft 1 Refer to removal section 10 Oil seal 2 11 Bearing 2 Refer to removal section Order Part name Q ty Remarks 30 Nm 3 0 m kg 22 ft lb 10 Nm 1 0 m kg 7 2 ft lb 20 Nm 2 0 m kg 14 ft lb...

Page 104: ...If the cases do not separate check for a remaining case bolt or fitting Do not force REMOVING THE CRANKSHAFT 1 Remove Crankshaft 1 Use the crankcase separating tool 2 Make appropriate bolts 3 as shown...

Page 105: ...e the crank shaft and bearing come in contact Apply the lithium soap base grease on the oil seal lip Do not use a hammer to drive in the crankshaft A For USA and CDN B Except for USA and CDN 2 Check S...

Page 106: ...g a crisscross pat tern 7 Install Holder 1 Bolt holder 2 8 Install Segment 1 Bolt segment 2 When installing the segment onto the shift cam 3 align the punch mark a with the dowel pin b Turn the segmen...

Page 107: ...marks Engine Refer to ENGINE REMOVAL section Separate the crankcase Refer to CRANKCASE AND CRANK SHAFT section 1 Guide bar long 1 2 Guide bar short 1 3 Shift cam 1 4 Shift fork 3 1 5 Shift fork 1 1 6...

Page 108: ...k and or guide bar For a malfunctioning shift fork re place not only the shift fork itself but the two gears each adjacent to the shift fork INSTALLING THE TRANSMISSION 1 Install 6th pinion gear 21T 1...

Page 109: ...shift fork 1 L with the 5th wheel gear 4 and 3 R with the 6th wheel gear 6 on the drive axle Mesh the shift fork 2 C with the 3rd 4th pinion gear 5 on the main axle 2 Install Shift cam 1 Apply the tr...

Page 110: ...ertake inspection adjustment disassembly or reassembly only by reference to this manual It may lead to servicing trouble and mechanical damage FRONT WHEEL AND REAR WHEEL REMOVING THE FRONT WHEEL Order...

Page 111: ...hine by placing the suitable stand under the engine Refer to HANDLING NOTE 1 Nut rear wheel axle 1 2 Rear wheel axle 1 3 Drive chain puller 2 4 Rear wheel 1 Refer to removal section 5 Collar 2 6 Rear...

Page 112: ...ke disc deflection only rear brake disc Use the dial gauge 1 Out of specification Inspect wheel runout If wheel runout is in good condi tion replace the brake disc 2 Measure Brake disc thickness a Out...

Page 113: ...al 5 Apply the lithium soap base grease on the bearing and oil seal lip when installing Install the bearing with seal facing outward Use a socket that matches the out side diameter of the race of the...

Page 114: ...le 2 Install the left drive chain puller and insert the wheel axle from left side Apply the lithium soap base grease on the wheel axle 8 Install Right drive chain puller 1 Washer 2 Nut wheel axle 3 Te...

Page 115: ...and under the engine Refer to HANDLING NOTE Drain the brake fluid Refer to removal section 1 Brake hose holder protector 2 2 Union bolt 2 3 Brake hose 1 4 Pad pin plug 1 Remove when loosening the pad...

Page 116: ...e Refer to HANDLING NOTE Rear wheel Refer to FRONT WHEEL AND REAR WHEEL section Drain the brake fluid Refer to removal section 1 Brake pedal 1 2 Brake master cylinder 1 3 Brake hose holder 2 4 Union b...

Page 117: ...der Part name Q ty Remarks A Front B Rear A B 1 Pad pin 1 1 2 Brake pad 2 2 3 Pad support 1 1 4 Brake caliper piston 2 1 Refer to removal section 5 Brake caliper piston dust seal 2 1 Refer to removal...

Page 118: ...INDER Order Part name Q ty Remarks A Front B Rear 1 Brake master cylinder cap 1 2 Diaphragm 1 3 Reservoir float 1 4 Push rod Front 1 5 Brake master cylinder boot 1 6 Circlip 1 Use a long nose circlip...

Page 119: ...ion when expelling piston from cylinder Never attempt to pry out piston Caliper piston removal steps a Insert a piece of rag into the brake caliper to lock one brake caliper b Carefully force the pist...

Page 120: ...caliper piston dust seals whenever a caliper is disassembled INSTALLING THE BRAKE CALIPER PISTON 1 Clean Brake caliper Brake caliper piston seal Brake caliper piston dust seal Brake caliper piston Cle...

Page 121: ...cup sec ondary 2 To brake master cylinder piston 3 Apply the brake fluid on the brake master cylinder cup After installing cylinder cup should be installed as shown di rection Wrong installation caus...

Page 122: ...tion b on the brake master cylinder 2 Install Brake master cylinder 1 Bolt brake master cylinder 2 3 Install Spring 1 Brake pedal 2 O ring 3 Bolt brake pedal 4 Clip 5 Apply the lithium soap base greas...

Page 123: ...rake hose holders make sure the brake hose does not contact the spring rear shock absorber If it does correct its twist FILLING THE BRAKE FLUID 1 Fill Brake fluid Until the fluid level reaches LOWER l...

Page 124: ...t brake Diaphragm Brake master cylinder cap 1 Screw brake master cylinder cap 2 After installation while pulling the brake lever in or pushing down on the brake pedal check whether there is any brake...

Page 125: ...to FRONT WHEEL AND REAR WHEEL section Front brake caliper Refer to FRONT BRAKE AND REAR BRAKE section Number plate Refer to SEAT FUEL TANK AND SIDE COVERS section in the CHAPTER 4 1 Protector 1 2 Pin...

Page 126: ...to removal section 5 Inner tube 1 Refer to removal section 6 Outer tube 1 7 Piston metal 1 8 Protector guide 1 9 Slide metal 1 10 Oil seal washer 1 11 Oil seal 1 12 Base valve 1 Drain the fork oil Re...

Page 127: ...the inner tube and locknut 3 Hold the locknut and remove the adjuster Do not remove the locknut as the damper rod may go into the damp er assembly and not be taken out REMOVING THE INNER TUBE 1 Remov...

Page 128: ...amage Re place CHECKING THE ADJUSTER 1 Inspect Adjuster 1 O ring 2 Wear damage Replace ASSEMBLING THE FRONT FORK 1 Wash the all parts in a clean sol vent 2 Stretch the damper assembly ful ly 3 Fill Fr...

Page 129: ...le protecting the damper as sembly 1 with a rag and com pressing fully allow excessive oil to overflow on the base valve side Take care not to damage the damp er assembly 13 Allow the overflowing oil...

Page 130: ...me ter end a facing the fork spring 25 Install Damper assembly 1 To inner tube 2 To install the damper assembly into the inner tube hold the inner tube aslant If the inner tube is held vertically the...

Page 131: ...on the front fork per formance Never allow foreign materials to enter the front fork 32 Install Damper assembly 1 To outer tube Temporarily tighten the damper as sembly 33 Install Protector guide 1 IN...

Page 132: ...Bolt protector 2 6 Adjust Rebound damping force Turn in the damping adjuster 1 fin ger tight and then turn out to the orig inally set position 7 Adjust Compression damping force Turn in the damping a...

Page 133: ...rottle cable cap 1 Turn over the cap cover 6 Throttle cable 1 Disconnect at the throttle side 7 Throttle 1 Loosen the bolts 8 Cap cover 1 9 Collar 1 10 Left grip 1 Refer to removal section 11 Handleba...

Page 134: ...5 25 HANDLEBAR DISASSEMBLING THE THROTTLE Order Part name Q ty Remarks 1 Grip cap lower 1 2 Grip cap upper 1 3 Grip assembly 1 4 Grip right 1 Refer to removal section 5 Tube guide 1...

Page 135: ...lower 2 Bolt grip cap 3 Temporarily tighten the bolts grip cap INSTALLING THE HANDLEBAR 1 Install Handlebar lower holder 1 Washer 2 Nut handlebar lower holder 3 Install the handlebar lower holder wit...

Page 136: ...ng surface and ca ble guide Install the roller so that the UP PER mark a faces upward Pass the throttle cable in the groove b in the roller 8 Install Throttle cable cap 1 Screw throttle cable cap 2 9...

Page 137: ...imensions shown Pass the engine stop switch lead in the middle of the clutch lever hold er 14 Install Clutch cable 1 Apply the lithium soap base grease on the clutch cable end 15 Adjust Clutch lever f...

Page 138: ...the engine Refer to HANDLING NOTE Number plate Refer to SEAT FUEL TANK AND SIDE COVERS section in the CHAPTER 4 Handlebar Refer to HANDLEBAR section 1 Front fender 1 2 Steering stem nut 1 3 Front fork...

Page 139: ...ing races Spin the bearings by hand If the bearings hang up or are not smooth in their operation in the bearing races replace bearings and bearing races as a set INSTALLING THE LOWER BRACKET 1 Install...

Page 140: ...If not adjust the steering by loosen ing the steering ring nut little by lit tle 10 Adjust Front fork top end a 11 Tighten Pinch bolt upper bracket 1 Pinch bolt lower bracket 2 Tighten the lower brac...

Page 141: ...NG NOTE Brake hose holder Refer to FRONT BRAKE AND REAR BRAKE section Rear brake caliper Refer to FRONT BRAKE AND REAR BRAKE section Bolt brake pedal Shift the brake pedal backward Drive chain 1 Drive...

Page 142: ...1 Cap 2 Refer to removal section 2 Relay arm 1 3 Connecting rod 1 4 Collar 2 5 Oil seal 2 6 Thrust bearing 2 7 Bushing 2 8 Oil seal 8 9 Bearing 10 Refer to removal section 70 Nm 7 0 m kg 50 ft lb 80...

Page 143: ...spect Oil seal 3 Damage Replace INSTALLING THE BEARING AND OIL SEAL 1 Install Bearing 1 Oil seal 2 To swingarm Apply the molybdenum disulfide grease on the bearing when install ing Install the bearing...

Page 144: ...relay arm 4 To swingarm Apply the molybdenum disulfide grease on the bolt circumference and threaded portion Do not tighten the nut yet 6 Install Swingarm 1 Pivot shaft 2 Apply the molybdenum disulfi...

Page 145: ...chain tensioner 5 14 Install Drive chain support 1 Drive chain support cover 2 Bolt drive chain support L 50 mm 1 97 in 3 Nut drive chain support 4 Bolt drive chain support cover L 10 mm 0 39 in 5 Nu...

Page 146: ...SILENCER section in the CHAPTER 4 1 Clamp air filter joint 1 Only loosening 2 Rear frame 1 3 Bolt rear shock absorber relay arm 1 Hold the swingarm 4 Bolt rear shock absorber frame 1 5 Rear shock abs...

Page 147: ...disposal NOTES ON DISPOSAL YAMAHA DEALERS ONLY Before disposing the rear shock ab sorber be sure to extract the nitrogen gas from valve 1 Wear eye protec tion to prevent eye damage from es caping gas...

Page 148: ...al lips and col lars Apply the lithium soap base grease on the O rings 2 Install Bushing 1 Collar 2 Dust seal 3 Apply the molybdenum disulfide grease on the bearing and dust seal lips Install the dust...

Page 149: ...5 40 REAR SHOCK ABSORBER 7 Tighten Bolt air filter joint 1 Bolt air filter joint 2 Nm 0 2 m kg 1 4 ft lb...

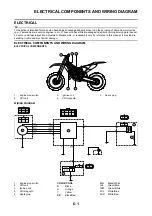
Page 150: ...ndertake inspection adjustment disassembly or reassembly only by reference to this manual It may lead to servicing trouble and mechanical damage ELECTRICAL COMPONENTS AND WIRING DIAGRAM ELECTRICAL COM...

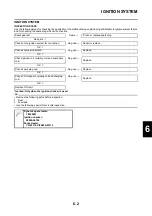
Page 151: ...2 Fuel tank Use the following special tools in this inspection Spark gap test Spark Clean or replace spark plug No spark Check entire ignition system for connection No good Repair or replace OK Check...

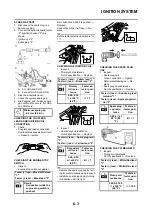
Page 152: ...ug cap by turn ing it counterclockwise and inspect Install the spark plug cap by turning it clockwise until it is tight CHECKING THE SPARK PLUG CAP 1 Inspect Spark plug cap Loose connection Tighten De...

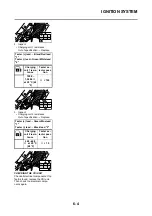
Page 153: ...ctrical components If no fault is found replace the CDI unit Then check the electrical compo nents again Tester lead Black Red lead 1 Tester lead Green White lead 2 Charging coil 1 resis tance Tester...

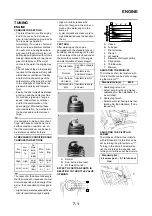
Page 154: ...ant reduced density Higher humidity reduces the amount of oxygen in the air by so much of the water vapor in the same air Lower atmospheric pressure at a high altitude reduces the density of the air T...

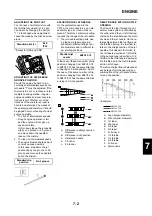
Page 155: ...are available in different straight por tion diameters and in different ta per starting positions In the case of the same number of clip position changing from 6BFY43 74 to 6BFY42 74 has the same effe...

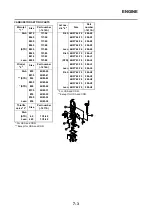
Page 156: ...KM 32 Lean 30 4KM 30 Throttle valve 3 Size Part number 14112 Rich STD 4 0 1C3 40 Lean 4 25 1C3 42 For USA and CDN Except for USA and CDN Jet nee dle 4 Size Part number 14116 Rich 6BFY44 72 284 K2 6BFY...

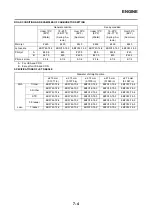
Page 157: ...47 5 45 42 5 47 5 45 42 5 Pilot air screw 2 1 4 2 1 4 2 1 4 2 1 4 2 1 4 2 1 4 Diameter of straight portion 2 72 mm 0 1071 in 2 73 mm 0 1075 in 2 74 mm 0 1079 in 2 75 mm 0 1083 in 2 76 mm 0 1087 in Ri...

Page 158: ...h the clip is fitted The position is numbered from the top If a change in the clip position 1 groove is effective try another jet needle that pro vides a difference of 0 5 in the clip position Rich mi...

Page 159: ...en tire course and some settings may be sacrificed Thus the settings should be matched to the portion of the course that has the greatest ef fect on the race result In such a case run through the ent...

Page 160: ...ar suspension take care so that the machine front and rear are balanced in position etc when setting the front fork 1 Use of soft spring Change the rebound damping Turn out one or two clicks Change th...

Page 161: ...the soft spring for more re bound damping to compensate for its greater spring load Run with the rebound damping adjust er one or two clicks on the stiffer side and readjust it to suit your preference...

Page 162: ...ING PRE LOAD in the CHAPTER 3 SPRING PART NUMBER 22212 Maximum Minimum 5UN 00 5UN 10 5UN 20 5UN 30 5UN 40 5UN 50 5UN 60 5UN 70 5UN A0 5UN B0 5UN C0 5UN D0 5UN E0 5UN F0 5UN G0 Position in which the sp...

Page 163: ...tire range bottoming out Compression damping Turn adjuster clockwise about 2 clicks to in crease damping Oil amount Increase oil amount by about 5 10 cm3 0 2 0 4 Imp oz 0 2 0 3 US oz Spring Replace wi...

Page 164: ...avy and dragging Rebound damping Turn adjuster counterclockwise about 2 clicks to decrease damping Spring Replace with soft spring Poor road gripping Rebound damping Turn adjuster counterclockwise abo...

Page 165: ......

Page 166: ...PRINTED IN JAPAN E PRINTED ON RECYCLED PAPER...

Reviews: