background image

Description

3-1

3

EAU63371

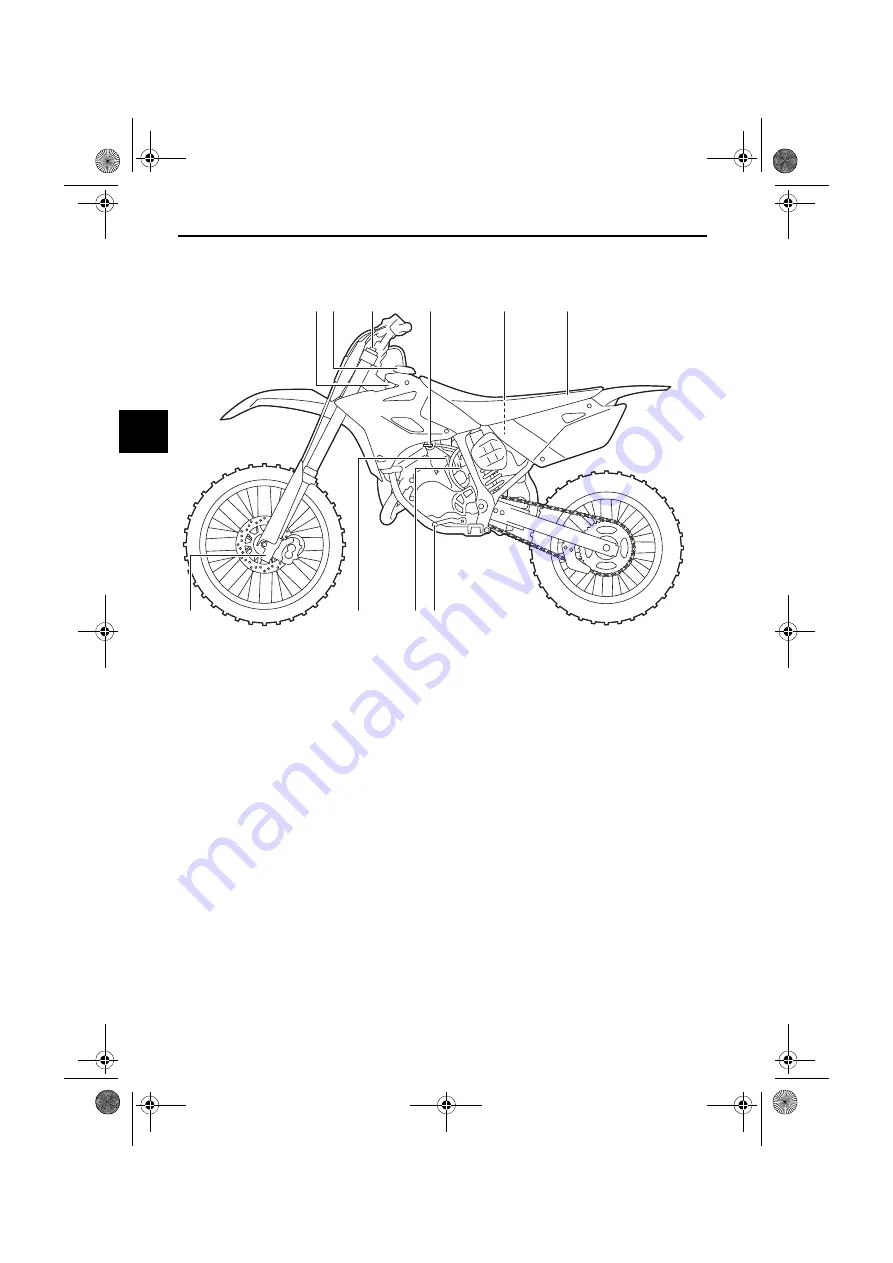
Left view

1 2

7

8

9

10

4

3

5

6

1. Radiator cap (page 7-8)
2. Fuel tank cap (page 4-3)
3. Rebound damping force adjuster (page 4-8)
4. Fuel cock (page 4-6)
5. Air filter element (page 7-10)
6. Seat (page 4-8)
7. Shift pedal (page 4-2)
8. Throttle stop screw (page 7-13)
9. Starter (choke) knob (page 4-7)
10.Compression damping force adjuster (page 4-8)

U1SN16E0.book  Page 1  Thursday, June 1, 2017  3:13 PM

Summary of Contents for YZ85 2017

Page 1: ...DIC183 OWNER S MANUAL YZ85J 1SN 28199 16 LIT 11626 31 30 YZ85 MOTORCYCLE Read this manual carefully before oper ating this vehicle...

Page 2: ...EAU10043 Read this manual carefully before operating this vehicle This manual should stay with this vehicle if it is sold U1SN16E0 book Page 1 Thursday June 1 2017 3 13 PM...

Page 3: ...per ating or allowing your child to operate this motorcycle Do not attempt to op erate this motorcycle until you have attained adequate knowledge of its controls and operating features and until you h...

Page 4: ...of the motorcycle at all times Parents should permit continued use only if they de termine that the child has the ability to operate the motorcycle safely Motorcycles are single track vehicles Their s...

Page 5: ...cates a hazardous situation which if not avoided could result in death or serious injury A NOTICE indicates special precautions that must be taken to avoid damage to the vehi cle or other property A T...

Page 6: ...he air filter element 7 10 Adjusting the carburetor 7 12 Adjusting the engine idling speed 7 13 Adjusting the throttle grip free play 7 13 Tires 7 14 Spoke wheels 7 16 Adjusting the clutch lever free...

Page 7: ...ntents Specifications 9 1 Consumer information 10 1 Identification numbers 10 1 YAMAHA MOTOR CORPORATION U S A YZ WR MOTORCYCLE LIMITED WARRANTY 10 2 Index 11 1 U1SN16E0 book Page 2 Thursday June 1 20...

Page 8: ...cle They contain important in formation for safe and proper operation of your vehicle Never remove any labels from your vehicle If a label becomes difficult to read or comes off a replacement label is...

Page 9: ...you operate this vehicle on a public road ALWAYS WEAR AN APPROVED MOTORCYCLE HELMET eye protection and protective clothing EXPERIENCED RIDER ONLY 5PA 2118K 00 Cold tire normal pressure should be set a...

Page 10: ...to make sure it is in safe operating condition Failure to inspect or maintain the vehi cle properly increases the possibility of an accident or equipment damage See page 5 1 for a list of pre operati...

Page 11: ...he engine Protective Apparel The majority of fatalities from motorcy cle accidents are the result of head in juries The use of a safety helmet is the single most critical factor in the pre vention or...

Page 12: ...nstalled by a Yamaha dealer Aftermarket Parts Accessories and Modifications While you may find aftermarket prod ucts similar in design and quality to genuine Yamaha accessories recog nize that some af...

Page 13: ...fications and more in formation on replacing your tires Transporting the Motorcycle Be sure to observe following instruc tions before transporting the motorcy cle in another vehicle Remove all loose i...

Page 14: ...age 4 3 3 Rebound damping force adjuster page 4 8 4 Fuel cock page 4 6 5 Air filter element page 7 10 6 Seat page 4 8 7 Shift pedal page 4 2 8 Throttle stop screw page 7 13 9 Starter choke knob page 4...

Page 15: ...page 4 7 3 Bleed screw page 4 10 4 Spark plug cap page 7 6 5 Transmission oil filler cap page 7 7 6 Coolant drain bolt page 7 9 7 Brake pedal page 4 3 8 Transmission oil drain bolt page 7 7 9 Rebound...

Page 16: ...ption 3 3 3 EAU63401 Controls and instruments 4 1 3 2 1 Clutch lever page 4 1 2 Engine stop switch page 4 1 3 Brake lever page 4 2 4 Throttle grip page 7 13 U1SN16E0 book Page 3 Thursday June 1 2017 3...

Page 17: ...th clutch operation The clutch lever is equipped with a clutch lever position adjusting bolt Ad just the distance between the clutch le ver and the handlebar grip as follows 1 Loosen the locknut 2 Whi...

Page 18: ...d with a brake lever position adjusting bolt Ad just the distance between the brake le ver and the throttle grip as follows 1 Slide the rubber cover toward the end of the brake lever 2 Loosen the lock...

Page 19: ...13183 Fuel tank cap To remove the fuel tank cap turn it counterclockwise and then pull it off To install the fuel tank cap insert it into the tank opening and then turn it clockwise WARNING EWA11092 M...

Page 20: ...If knocking or pinging occurs use a gasoline of a different brand If the recommended 2 stroke engine oil is not available use an equivalent oil Gasohol There are two types of gasohol gaso hol containi...

Page 21: ...uel expands when it heats up heat from the engine or the sun can cause fuel to spill out of the fuel tank 3 Wipe up any spilled fuel immedi ately NOTICE Immediately wipe off spilled fuel with a clean...

Page 22: ...with the arrow mark on the one way valve pointed downward as shown EAU41281 Fuel cock The fuel cock supplies fuel from the tank to the carburetor while filtering it also The fuel cock has two positio...

Page 23: ...U13651 Kickstarter To start the engine fold out the kick starter lever move it down lightly with your foot until the gears engage and then push it down smoothly but force fully This model is equipped...

Page 24: ...erwise poor handling and loss of stability may result This front fork is equipped with re bound damping force adjusting screws and compression damping force ad justing screws NOTICE ECA10102 To avoid...

Page 25: ...e to small differences in production the actual number of clicks always represents the entire ad justing range To obtain a precise ad justment it would be advisable to check the number of clicks of ea...

Page 26: ...he remov able sidestand and then rest the motorcycle on it EAU41336 Adjusting the shock absorber assembly This shock absorber assembly is equipped with a spring preload adjust ing nut a rebound dampin...

Page 27: ...the adjusting screw in direction b Compression damping force To increase the compression damping force and thereby harden the com pression damping turn the adjusting screw in direction a To decrease...

Page 28: ...excessive gas pressure Do not deform or damage the cylinder in any way Cylinder damage will result in poor damping performance Do not dispose of a damaged or worn out shock absorber as sembly yoursel...

Page 29: ...ck hose connection 4 4 4 6 Transmission oil Check for leakage 7 7 Coolant Check coolant level If necessary add recommended coolant to specified level Check cooling system for leakage 7 8 Front brake C...

Page 30: ...dlebar can be turned smoothly and has no excessive play 7 27 Front fork and rear shock absorber as sembly Check that they operate smoothly and there is no oil leakage 4 8 4 10 4 10 7 26 Chassis fasten...

Page 31: ...08 Starting and warming up a cold engine 1 Turn the fuel cock lever to ON 2 Shift the transmission into the neutral position 3 Turn the starter choke on and completely close the throttle See page 4 7...

Page 32: ...bing hills etc The gear positions are shown in the il lustration TIP To shift the transmission into the neu tral position press the shift pedal down repeatedly until it reaches the end of its travel a...

Page 33: ...RNING EWA10322 Failure to properly maintain the vehi cle or performing maintenance ac tivities incorrectly may increase your risk of injury or death during service or while using the vehicle If you ar...

Page 34: ...0 to 15 more minutes The motorcy cle will now be ready to ride nor mally After the engine break in period thor oughly check the motorcycle for loose parts oil leakage and any other prob lems Be sure t...

Page 35: ...exhaust system can become very hot park in a place where pedestri ans or children are not likely to touch them and be burned Do not park on a slope or on soft ground otherwise the vehicle may overturn...

Page 36: ...operly maintain the vehi cle or performing maintenance ac tivities incorrectly may increase your risk of injury or death during service or while using the vehicle If you are not familiar with vehicle...

Page 37: ...be performed by a Yamaha dealer as they require special tools data and technical skills NO ITEM ROUTINE After break in Every race Every third race Every fifth race As required 1 Piston Check piston fo...

Page 38: ...an and regap Replace Check chain slack alignment and condition 15 Drive chain Adjust and thoroughly lubricate chain with Yamaha chain and cable lube or equivalent Replace NO ITEM ROUTINE After break i...

Page 39: ...e Check radiator cap spring operation Change coolant Every 2 years Every year Check all chassis fitting and fasteners 17 Chassis fasteners Correct or tighten if necessary 18 Air filter element Clean R...

Page 40: ...r wear or damage Replace if necessary 25 Rear suspension Check operation and tighten if necessary Lubricate with lithium soap based grease Check operation free play and tighten if necessary 26 Steerin...

Page 41: ...rk plug 1 Check that the porcelain insulator around the center electrode of the spark plug is a medium to light tan the ideal color when the vehi cle is ridden normally TIP If the spark plug shows a d...

Page 42: ...is found have a Yamaha deal er check and repair the motorcycle In addition the transmission oil must be changed at the intervals specified in the periodic maintenance and lubrica tion chart 1 Start th...

Page 43: ...check for the cause EAU20071 Coolant The coolant level should be checked before each ride In addition the cool ant must be changed at the intervals specified in the periodic maintenance and lubricati...

Page 44: ...ze con tent of the coolant as soon as possible otherwise the effec tiveness of the coolant will be reduced ECA10473 EAUM1318 To change the coolant 1 Place the vehicle on a level surfa ce and let the e...

Page 45: ...8392 Cleaning the air filter element The air filter element should be cleaned or replaced at the intervals specified in the periodic maintenance and lubrica tion chart Clean or if necessary re place t...

Page 46: ...ter element into the air filter case with the projection facing upward and then install the wing bolt and its washer NOTICE Make sure that the air filter element is properly seated in the air filter c...

Page 47: ...ft to a Yamaha dealer who has the nec essary professional knowledge and ex perience The adjustment described in the following section however may be serviced by the owner as part of rou tine maintenan...

Page 48: ...Adjusting the throttle grip free play Measure the throttle grip free play as shown Periodically check the throttle grip free play and if necessary adjust it as fol lows TIP The engine idling speed mu...

Page 49: ...re should be checked and if necessary adjusted before each ride WARNING EWA14382 Operation of this vehicle with im proper tire pressure may cause se vere injury or death from loss of control The tire...

Page 50: ...s deformation is an evidence of ageing Old and aged tires shall be checked by tire specialists to ascertain their suitability for further use WARNING EWA10462 The front and rear tires should be of the...

Page 51: ...n of your motor cycle note the following points regarding the specified wheels The wheel rims should be checked for cracks bends warp age or other damage and the spokes for looseness or damage before...

Page 52: ...lever free play adjuster back fur ther down the clutch cable and then loosen the locknut 3 To increase the clutch lever free play turn the clutch lever free play adjusting bolt in direction a To decr...

Page 53: ...in the hydraulic system If there is air in the hydraulic system have a Yamaha dealer bleed the system be fore operating the vehicle Air in the hydraulic system will diminish the braking performance w...

Page 54: ...icator while applying the brake If a brake pad has worn to the point that the wear indicator almost touches the brake disc have a Yamaha dealer replace the brake pads as a set EAU46292 Rear brake pads...

Page 55: ...goes down suddenly have a Yamaha dealer check the cause before further rid ing WARNING EWA15991 Improper maintenance can result in loss of braking ability Observe these precautions Insufficient brake...

Page 56: ...h ride and adjusted if necessary EAU41415 To check the drive chain slack 1 Place the motorcycle on a suitable stand See page 7 28 2 Confirm the rear wheel is off the ground and the rear shock ab sorbe...

Page 57: ...nd then push the rear wheel forward TIP Using the alignment marks on each drive chain puller make sure that both drive chain pullers are in the same po sition for proper wheel alignment 3 Tighten both...

Page 58: ...in solvent 2 Spray Yamaha chain lubricant or other suitable chain lubricant on the entire chain making sure that all side plates and rollers have been sufficiently oiled EAU23098 Checking and lubricat...

Page 59: ...cover is installed correctly it does not completely protect the cable from wa ter entry Therefore use care not to pour water directly onto the cover or cable when washing the vehicle If the cable or c...

Page 60: ...hould be lubricat ed if necessary EAU23252 Lubricating the rear suspen sion The pivoting points of the rear suspen sion must be lubricated by a Yamaha dealer at the intervals specified in the periodic...

Page 61: ...k the inner tubes for scratches damage and excessive oil leakage To check the operation 1 Place the vehicle on a level surfa ce and hold it in an upright posi tion WARNING To avoid injury securely sup...

Page 62: ...he vehicle so there is no danger of it falling over EWA10752 2 Hold the lower ends of the front fork legs and try to move them for ward and backward If any free play can be felt have a Yamaha dealer c...

Page 63: ...24361 Front wheel EAU56371 To remove the front wheel WARNING EWA10822 To avoid injury securely support the vehicle so there is no danger of it falling over 1 Loosen the axle nut 2 Lift the front wheel...

Page 64: ...cified torque EAU25081 Rear wheel EAU56743 To remove the rear wheel WARNING EWA10822 To avoid injury securely support the vehicle so there is no danger of it falling over 1 Loosen the axle nut 2 Lift...

Page 65: ...install the rear wheel 1 Insert the rear wheel between the swingarm and then install the drive chain onto the rear sprocket 2 Install the brake caliper and drive chain pullers and then install the whe...

Page 66: ...uire any repair take it to a Yamaha dealer whose skilled technicians have the necessary tools experience and know how to service the motorcycle properly Use only genuine Yamaha replace ment parts Imit...

Page 67: ...with a dry cloth and correct the spark plug gap or replace the spark plug 2 Ignition Wet Dry There is compression There is no compression The engine does not start Have a Yamaha dealer check the vehi...

Page 68: ...as stopped press down on the cap while turning it counterclockwise and then remove the cap TIP If coolant is not available tap water can be temporarily used instead provided that it is changed to the...

Page 69: ...ll appearance of a mo torcycle Frequent and proper care does not only comply with the terms of the warranty but it will also keep your motorcycle looking good extend its life and optimize its performa...

Page 70: ...oft clean sponge and then rinse thoroughly with clean water Use a toothbrush or bottlebrush for hard to reach areas Stubborn dirt and insects will come off more easily if the area is covered with a we...

Page 71: ...ol dry place and if necessary protect it against dust with a porous cover Be sure the engine and the exhaust sys tem are cool before covering the mo torcycle NOTICE ECA10811 Storing the motorcycle in...

Page 72: ...ug cap WARNING To prevent damage or injury from sparking make sure to ground the spark plug elec trodes while turning the en gine over EWA10952 5 Lubricate all control cables and the pivoting points o...

Page 73: ...Quantity 0 50 L 0 53 US qt 0 44 Imp qt Coolant quantity Radiator including all routes 0 54 L 0 57 US qt 0 48 Imp qt Air filter Air filter element Wet element Fuel Recommended fuel Premium unleaded ga...

Page 74: ...e wheel Rim size 14 x 1 60 Front brake Type Hydraulic single disc brake Specified brake fluid DOT 4 Rear brake Type Hydraulic single disc brake Specified brake fluid DOT 4 Front suspension Type Telesc...

Page 75: ...NUMBER EAU26401 Vehicle identification number The vehicle identification number is stamped into the steering head pipe Record this number in the space pro vided TIP The vehicle identification number i...

Page 76: ...shall include any failures caused by SPECIFIC EXCLUSIONS from this warranty shall include parts replaced due to normal wear or routine maintenance THE CUSTOMER S RESPONSIBILITY under this warranty sha...

Page 77: ...ntenance services non warranty repairs accident and collision damage and oil oil filters air filters spark plugs and brake shoes or pads Q Does the warranty on the engine include the carburetor air fi...

Page 78: ...4 6 Fuel tank cap 4 3 H Handlebar switch 4 1 I Identification numbers 10 1 K Kickstarter 4 7 L Labels location 1 1 M Matte color caution 8 1 P Parking 6 5 Part locations 3 1 Periodic maintenance and...

Page 79: ...right right out of the box Yamalube Take care of your Yamaha with legendary Yamalube oils lubricants and care products They re formulated and approved by the toughest judges we know the Yamaha engine...

Page 80: ...DIC183 PRINTED ON RECYCLED PAPER PRINTED IN JAPAN 2017 06 0 4 1 CR E...

Reviews: