background image

6D03F1X

58

NOTE:

“P” is the deviation of the lower case dimen-
sion from standard. The “P” mark 

a

 is

stamped on the trim tab mounting surface of
the lower case in 0.01 mm units. If the “P”
mark is unreadable, assume that “P” is zero
and check the backlash when the unit is
assembled.

Example:
If  “M3” is 50.75 mm and “M4” is 30.52 mm
and “P” is (–5), then 
T3 = 82.00 + (–5)/100 – 50.75 – 30.52 mm 

= 82.00 – 0.05 – 50.75 – 30.52 mm 
= 0.68 mm

6.

Select the pinion shim(s) (T3) as follows.

Example:
If  “T3” is 0.68 mm, then the pinion shim is
0.65 mm.
If  “T3” is 0.70 mm, then the pinion shim is
0.68 mm.

Backlash 
(counter rotation model)

6

Measuring the forward and reverse 
gear backlash

1.

Remove the water pump assembly.

2.

Set the gear shift to the neutral position
at the lower unit.

3.

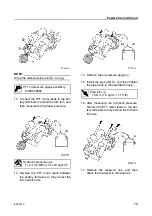
Install the special service tools so that it
pushes against the propeller shaft.

NOTE:

Tighten the center bolt while turning the drive
shaft until the drive shaft can no longer be
turned.

4.

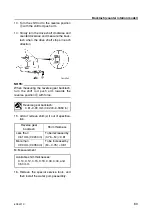
Install the backlash indicator onto the
drive shaft (22.4 mm [0.88 in] in diame-
ter), then the dial gauge onto the lower
unit.

Calculation formula:

Pinion shim thickness (T3) = 
82.00 + P/100 – M3 – M4

Calculated numeral 

at 1/100 place

Rounded numeral

1, 2

0

3, 4, 5

2

6, 7, 8

5

9, 10

8

Available shim thicknesses:

0.10, 0.12, 0.15, 0.18, 0.30, 0.40, and 
0.50 mm

Shift rod push arm: 90890-06052

Bearing housing puller claw L 

1

:

90890-06502

Stopper guide plate 

2

: 90890-06501

Center bolt 

3

: 90890-06504

Shimming (counter rotation model) / Backlash (counter rotation model)

Summary of Contents for Z300A

Page 1: ...Z300A LZ300A SUPPLEMENTARY SERVICE MANUAL 292211 6D0 28197 3F 1X...

Page 2: ...hine operator a bystander or a person inspecting or repairing the outboard motor CAUTION A CAUTION indicates special precautions that must be taken to avoid damage to the out board motor NOTE A NOTE p...

Page 3: ...formation 1 GEN INFO Specifications 2 SPEC Periodic checks and adjustments 3 CHK ADJ Fuel system 4 FUEL Power unit 5 POWR Lower unit 6 LOWR Bracket unit 7 BRKT Electrical systems 8 ELEC Troubleshootin...

Page 4: ...er size 11 Selection 11 Predelivery checks 12 Checking the fuel system 12 Checking the gear oil level 12 Checking the engine oil level 12 Checking the battery 12 Checking the outboard motor mounting h...

Page 5: ...ightening torques 25 Specified torques 25 General torques 27 Periodic checks and adjustments Special service tools 28 Maintenance interval chart 31 Oil injection system 32 Adjusting the oil pump link...

Page 6: ...47 Measuring the forward and reverse gear backlash 47 Propeller shaft housing counter rotation model 50 Drive shaft and lower case counter rotation model 52 Disassembling the reverse gear 54 Assembli...

Page 7: ...6D03F1X Electrical systems Electrical components 72 Port view 72 Top view 73 Troubleshooting Self diagnosis 74 Diagnosing the electronic control system 74 Wiring diagram...

Page 8: ...ic tie 1 Not reusable 3 Hose 1 4 Check screw 1 5 Gasket 2 Not reusable 6 Dowel pin 2 7 Bolt 4 M10 40 mm 8 Drain screw 1 9 Grommet 1 10 Bolt 1 M10 45 mm 11 Bolt 1 M8 60 mm 12 Thrust washer 1 13 Propell...

Page 9: ...o C in an exploded diagram indicate the grade of lubricant and the lubrication point 7 Apply 2 stroke outboard motor oil 8 Apply gear oil 9 Apply water resistant grease Yamaha grease A 0 Apply molybde...

Page 10: ...erial number The outboard motor serial number is stamped on a label attached to the port clamp bracket 1 Model name 2 Approved model code 3 Transom height 4 Serial number Applicable models Z300AETO LZ...

Page 11: ...st stress Wider exhaust ports with planed off edges have been adopted and the exhaust timing has been changed to reduce the exchange loss of the exhaust gas Cooling water jackets have been incorporate...

Page 12: ...of the pistons The top piston rings are made of steel and are ion plated to increase durability The heat treatments for the piston pins and connecting rods have been changed so that there is multipha...

Page 13: ...cooling water passages of the cylinder block are larger to increase reliability and performance 1 Anodes Intake system The openings in the throttle bodies were enlarged to a 46 mm 1 81 in diameter to...

Page 14: ...in the groove helps to reduce impact when the reed valve contacts the reed valve seat The dimensions of the reed valve assembly are the same as those for the Z250 1 Oil groove 2 Identification mark 6...

Page 15: ...connected to the exhaust guide flows down into the water jacket and then drains to the lower case Water jackets have been incorporated to the exhaust manifold to protect it from the high tempera ture...

Page 16: ...exhaust passage in the lower case and also prevents the cooling water from obstructing the exhaust gas Therefore the exhaust back pressure can be reduced A low gear ratio has been adopted to match the...

Page 17: ...lder A wiring harness connector holder has been added to the side of bottom cowling to secure the 10 pin main harness remote oil tank harness warning indicator harness and trim meter harness The wirin...

Page 18: ...peller boss end and on the side of the pro peller boss a Propeller diameter in inches b Propeller pitch in inches c Propeller type propeller mark Selection When the engine speed is at the full throttl...

Page 19: ...king the gear oil level 1 Check the gear oil level Checking the engine oil level 1 Check that the engine oil level is between the maximum and minimum level marks Checking the battery 1 Check the capac...

Page 20: ...ination of the boat and the outboard motor To determine the optimum mounting height test run the outboard motor at differ ent heights 2 Check that the clamp brackets are secured with the clamp bolts C...

Page 21: ...m 1 Check that the outboard motor tilts up and down smoothly when operating the power trim and tilt unit 2 Check that there is no abnormal noise produced when the outboard motor is tilted up or down 3...

Page 22: ...not tilt up when shifting into reverse and that water does not flow in over the transom NOTE The test run is part of the break in operation Break in During the test run perform the break in operation...

Page 23: ...ange r min 4 500 5 500 Maximum fuel consumption L US gal lmp gal hr 105 0 27 7 23 1 at 5 500 r min Engine idle speed r min 700 760 Power unit Type 2 stroke 76 V6 HPDI Total displacement cm3 cu in 3 34...

Page 24: ...ngine oil tank capacity Oil tank L US gal lmp gal 1 2 0 32 0 26 Remote oil tank L US gal lmp gal 10 5 2 77 2 31 Gear oil type Hypoid gear oil Gear oil grade SAE 90 Gear oil quantity cm3 US oz lmp oz 1...

Page 25: ...meter D mm in 92 830 92 850 3 6547 3 6555 Measuring point H mm in 10 0 39 Piston to cylinder clearance mm in 0 165 0 171 0 0065 0 0067 Piston pin boss bore mm in 26 004 26 015 1 0238 1 0242 Oversize p...

Page 26: ...inside diameter mm in 31 000 31 012 1 2205 1 2209 Big end side clearance mm in 0 12 0 26 0 0047 0 0102 Small end axial play limit mm in 2 0 0 08 Crankshaft Crankshaft journal diameter mm in 58 975 58...

Page 27: ...in 0 25 0 35 0 0098 0 0138 Item Unit Model Z300AETO LZ300AETO Ignition and ignition control system Ignition timing cylinder 1 Degree ATDC 7 at engine idle speed Degree BTDC 14 at 5 500 r min Spark pl...

Page 28: ...W 178 5 241 5 Crank position sensor air gap mm in 0 5 1 5 0 02 0 06 Intake air temperature sensor resistance at 0 C 32 F k 5 4 6 6 at 80 C 176 F k 0 3 0 4 Engine temperature sensor resistance B Y B Y...

Page 29: ...m Fuse A 20 30 100 Stator coil output peak voltage G G at cranking unloaded V 5 5 at 1 500 r min unloaded V 40 at 3 500 r min unloaded V 90 Stator coil resistance 1 at 20 C 68 F G G 0 11 0 17 Rectifie...

Page 30: ...284 11 2 660 26 0 X 1 074 42 3 U 1 201 47 3 X 640 25 2 U 766 30 2 907 35 7 757 29 8 404 15 9 32 1 3 45 1 8 216 8 5 245 9 6 12 3 6 7 X 848 33 4 U 925 36 4 677 26 7 mm in 25 1 0 628 24 7 211 8 3 75 3 0...

Page 31: ...6D03F1X 24 Clamp bracket S60V2020 mm in 79 3 1 13 0 5 180 7 1 163 5 6 4 254 10 0 55 5 2 2 411 16 2 163 5 6 4 125 4 4 9 125 4 4 9 180 7 1 13 0 5 50 8 2 0 18 5 0 7 Maintenance specifications...

Page 32: ...d cap 1st M9 28 2 8 20 7 2nd 45 4 5 33 2 3rd Loosen completely 4th 28 2 8 20 7 5th 45 4 5 33 2 Crankshaft balancer nut M32 100 10 0 73 8 Crankcase bolt 1st M10 17 1 7 12 5 2nd 34 3 4 25 1 1st M6 4 0 4...

Page 33: ...ion model Exhaust guide bolt M8 32 3 2 23 6 Gear oil check screw M8 9 0 9 6 6 Lower case mounting bolt M10 47 4 7 34 7 Pinion nut M16 142 14 2 104 7 Propeller nut M18 54 5 4 39 8 Ring nut 108 10 8 79...

Page 34: ...ug 7 0 7 5 2 Gear pump housing mounting screw M4 2 0 2 1 5 Gear pump housing bolt M5 4 0 4 3 0 Trim down spring screw M5 4 0 4 3 0 Main valve 11 1 1 8 1 Manual valve 2 0 2 1 5 PTT motor unit mounting...

Page 35: ...height gauge 90890 06710 Fixing plate 90890 06711 Digital caliper 90890 06704 Shift rod push arm 90890 06052 Bearing housing puller claw L 90890 06502 Stopper guide plate 90890 06501 Center bolt 90890...

Page 36: ...et 90890 01252 Magnet base B 90890 06844 Needle bearing attachment 90890 06653 90890 06654 Driver rod L3 90890 06652 Ball bearing attachment 90890 06657 Driver rod LL 90890 06605 Bearing outer race at...

Page 37: ...6D03F1X 30 PTT oil pressure gauge assembly 90890 06580 PTT oil pressure gauge adapter 90890 06581 Diagnostic flash indicator B 90890 06865 Special service tools...

Page 38: ...Check replace Anodes internal Check replace Battery Check charge Cooling water passages Clean Top cowling Check Fuel filter can be disassembled Check replace Fuel system Check Gear oil Change Lubricat...

Page 39: ...3 Checking the lower unit for air leakage 1 Remove the check screw 1 and then install the special service tool 2 Apply the specified pressure to check that the pressure is maintained in the lower unit...

Page 40: ...CHK ADJ Periodic checks and adjustments 33 6D03F1X General 3 Lubricating the outboard motor 1 Apply water resistant grease to the areas shown S60V3430 A A...

Page 41: ...ease nipple until it flows from the bushings a 2 Apply low temperature resistant grease to the areas shown 3 Apply corrosion resistant grease to the areas shown 4 Apply injector grease to the areas sh...

Page 42: ...1 3 Holder 1 4 Bolt 1 M6 14 mm 5 Collar 2 6 Grommet 2 7 Bracket 1 8 Bolt 2 M6 25 mm 9 Cap 1 10 Fuel hose 1 11 Fuel hose 1 12 O ring 1 Not reusable 13 O ring 1 Not reusable 14 Fuel filter element 1 15...

Page 43: ...ose 2 7 Plastic tie 6 Not reusable 8 Joint 2 9 Joint 1 10 Bolt 3 M8 55 mm 11 Bracket 1 12 Bolt 4 M6 20 mm 13 Plate 1 14 Bolt 2 M8 30 mm 15 Bolt 8 M8 135 mm 16 Bolt 4 M8 45 mm S6D05010 LT 572 LT 1 2 3...

Page 44: ...hift cable 2 and the throttle cable 3 3 Disconnect the fuel hose 4 and the oil hose 5 4 Remove the flywheel magnet cover 5 Remove the junction box cover and then disconnect the cooling water hose 6 an...

Page 45: ...6D03F1X 38 9 Remove the apron B and the hose joint assembly C 10 Remove the bolts D then the power unit 11 Remove the shift rod assembly E and gasket F S6D05070 F E Power unit...

Page 46: ...5 Crankcase cover 1 6 Gasket 1 Not reusable 7 Gasket 1 Not reusable 8 Crankcase cover 1 9 Hose 2 10 Joint 1 11 Hose 1 12 Joint 1 13 Clip 7 14 Plastic tie 4 Not reusable S6D05080 1 2 3 5 6 1 7 8 1 9 1...

Page 47: ...w gasket 2 and the shift rod assembly 3 CAUTION Do not reuse the dowels always replace them with new ones 2 Install the power unit 4 and then tighten the power unit mounting bolts 5 to the specified t...

Page 48: ...ct the cooling water hose 0 to the Rectifier Regulator 7 Connect the PTT motor leads A and then tighten the PTT motor lead bolts to the specified torque 8 Install the bracket B and connect the trim se...

Page 49: ...AUTION Apply force in the direction of the arrows shown to prevent the flywheel holder from slipping off easily NOTE Apply engine oil to the flywheel magnet nut before installation 14 Install the poin...

Page 50: ...1 Water pipe 1 2 Rubber seal 1 3 Rubber seal 1 4 Shift rod joint 1 5 Ball 2 6 Slider 1 7 Shift plunger 1 8 Dog clutch 1 9 Cross pin 1 10 Spring 1 11 Propeller shaft 1 12 Washer 1 13 Reverse gear 1 14...

Page 51: ...ipple 1 20 Rubber seal 1 21 O ring 1 Not reusable 22 Needle bearing 1 23 Oil seal 2 Not reusable 24 Ring 1 25 Bolt 2 M8 20 mm 26 Bolt 2 M8 33 mm 27 Cooling water inlet cover 2 28 Nut 1 29 Screw 1 Prop...

Page 52: ...LOWR Lower unit 45 6D03F1X Shimming regular rotation model 6 A B F R P S6D06020 B4 T3 B3 65 0 T1 B1 39 4 41 0 T2 B2 B5 A1 A2 A3...

Page 53: ...r they contact the fixing plate 2 2 Install the pinion and pinion nut and then tighten the nut to the specified torque 3 Measure the distance M4 between the special service tool and the pinion as show...

Page 54: ...llows Example If T3 is 0 68 mm then the pinion shim is 0 65 mm If T3 is 0 70 mm then the pinion shim is 0 68 mm Backlash regular rotation model 6 Measuring the forward and reverse gear backlash 1 Remo...

Page 55: ...talling the propeller 8 the spacer 9 without the washer 0 then the washer A as shown NOTE Tighten the propeller nut B while turning the drive shaft until the drive shaft can no longer be turned Bearin...

Page 56: ...ut of specifica tion M Measurement 12 Remove the special service tools and then install the water pump assembly Reverse gear backlash 0 61 0 90 mm 0 0240 0 0354 in Reverse gear backlash Shim thickness...

Page 57: ...Shift rod joint 1 5 Ball 2 6 Slider 1 7 Shift plunger 1 8 Dog clutch 1 9 Cross pin 1 10 Spring 1 11 Forward gear 1 12 Forward gear shim 13 Ring nut 1 14 Claw washer 1 15 Taper roller bearing assembly...

Page 58: ...him 19 O ring 1 Not reusable 20 Propeller shaft housing 1 21 Dowel 1 22 Grease nipple 1 23 Rubber seal 1 24 O ring 1 Not reusable 25 Needle bearing 1 26 Oil seal 2 Not reusable 27 Ring 1 28 Bolt 2 M8...

Page 59: ...4 Bolt 4 M8 25 mm 5 Drive shaft housing 1 6 Needle bearing 1 7 O ring 1 Not reusable 8 Pinion shim 9 Thrust bearing 1 10 Lower case 1 11 Needle bearing 1 12 Pinion 1 13 Washer 1 14 Nut 1 15 Reverse g...

Page 60: ...LOWR Lower unit 53 6D03F1X 6 No Part name Q ty Remarks 18 Thrust bearing 1 19 Needle bearing 1 Not reusable 20 Reverse gear 1...

Page 61: ...eedle bearing outer case into the lower case NOTE Apply gear oil to the needle bearing outer case before installation 4 Install the needle bearing into the needle bearing outer case NOTE Apply gear oi...

Page 62: ...the new needle bearing into the reverse gear to the specified depth 6 Install the thrust bearing and reverse gear into the lower case Needle bearing attachment 7 90890 06653 Driver rod SS 8 90890 0660...

Page 63: ...1X 56 Shimming counter rotation model 6 A B F R P S6D06150 B4 T3 B3 65 0 A3 T1 B1 38 4 A1 T2 B8 B5 A5 A4 A2 T 4 B7 B6 47 5 Drive shaft and lower case counter rotation model Shimming counter rotation m...

Page 64: ...ct the fixing plate 2 2 Install the pinion and pinion nut and then tighten the nut to the specified torque 3 Measure the distance M4 between the special service tool and the pinion as shown 4 Turn the...

Page 65: ...ash 1 Remove the water pump assembly 2 Set the gear shift to the neutral position at the lower unit 3 Install the special service tools so that it pushes against the propeller shaft NOTE Tighten the c...

Page 66: ...position c with the shift rod push arm 10 Turn the drive shaft clockwise until the dog clutch 8 is fully engaged 11 Turn the shift rod to the neutral position d with the shift rod push arm 12 Turn th...

Page 67: ...m towards the reverse position c with force 15 Add or remove shim s if out of specifica tion M Measurement 16 Remove the special service tools and then install the water pump assembly Reverse gear bac...

Page 68: ...6 Cowling lock lever 3 7 Bushing 6 8 Plate 3 9 Bolt 6 M6 30 mm 10 Wave washer 3 11 Lever 3 12 Washer 3 13 Bolt 3 M6 16 mm 14 Spring 3 15 Hook 3 16 Bolt 3 M6 16 mm 17 Plastic tie 1 S6D07010 29 28 30 2...

Page 69: ...ble holder 1 26 Grommet 2 27 Power trim and tilt switch 1 28 Bolt 4 M6 20 mm 29 Bracket 1 30 Bracket 1 31 Bracket 1 32 Plate 2 33 Bolt 2 M6 20 mm 34 Grommet 1 S6D07010 29 28 30 26 27 24 25 23 22 21 20...

Page 70: ...ket 1 Not reusable 36 Cover 1 37 Bolt 13 M6 20 mm 38 Cover 1 39 Ground lead 1 40 Rubber trim 1 S6D07010 29 28 30 26 27 24 25 23 22 21 20 13 12 1110 7 8 19 18 17 5 4 9 7 6 4 5 4 5 3 1 2 26 38 31 28 32...

Page 71: ...mbly 1 2 Cover 2 3 Ground lead 1 4 Bolt 1 M6 10 mm 5 Bolt 1 M6 25 mm 6 Adapter 1 7 Dowel 1 8 Plastic tie 1 Not reusable 9 Hose 1 10 Circlip 1 11 Nut 2 12 Washer 4 13 Nut 2 14 Steering yoke 1 15 Washer...

Page 72: ...BRKT Bracket unit 65 6D03F1X 7 No Part name Q ty Remarks 18 Bushing 2 19 Steering arm 1 20 Washer 2 21 Washer 2 22 Grommet 4...

Page 73: ...Washer 2 5 Washer 2 6 Washer 2 7 Bolt 2 M14 190 mm 8 Bracket 1 9 Muffler assembly 1 10 Gasket 1 Not reusable 11 Mount housing 2 12 Ground lead 1 13 Washer 2 14 Washer 2 15 Lower mount 2 16 Bolt 3 M10...

Page 74: ...3F1X 7 No Part name Q ty Remarks 18 Bolt 2 M8 30 mm 19 Gasket 1 U transom model Not reusable 20 Muffler 1 U transom model 21 Bolt 2 M6 35 mm U transom model 22 Bolt 4 M10 45 mm 23 Bolt 2 M14 205 mm 24...

Page 75: ...r exhaust guide 1 5 Gasket 1 Not reusable 6 Upper exhaust guide 1 7 Flushing hose 1 8 Plastic tie 1 Not reusable 9 Joint 1 10 Hose 2 11 Rubber seal 1 12 Pipe 1 13 Rubber seal 1 14 Bolt 6 M8 50 mm 15 B...

Page 76: ...rse the PTT motor leads between the battery terminals to fully extend the trim and tilt rams 7 Remove the oil pressure gauge 2 8 Install the pipe joint a and then tighten the pipe joints to the specif...

Page 77: ...the oil pressure gauge 2 15 Install the pipe joint b and then tighten the pipe joints to the specified torque 16 After measuring the hydraulic pressure connect the PTT motor leads to the bat tery term...

Page 78: ...nded type to the correct level NOTE If the fluid is at the correct level the fluid should overflow out of the filler hole when the cap is removed 19 Install the reservoir cap Recommended power trim an...

Page 79: ...n sensor 2 Emergency switch 3 Pulser coil 4 Oil level sensor 5 Stator coil 6 Water detection switch 7 Atmospheric pressure sensor 8 Electric oil pump 9 Electric fuel pump S6D08010 1 2 4 5 3 9 8 7 6 Po...

Page 80: ...oil 2 Fuel injector 3 Spark plug 4 Oil level sensor 5 Emergency switch 6 Throttle position sensor 7 Power trim and tilt switch 8 Shift position switch 9 Shift cut switch 0 Crank position sensor A Engi...

Page 81: ...iagnostic flash indicator to determine if there are any malfunctions Normal condition no defective part or irregular process ing is found Single flash is given every 4 95 sec onds a Light on 0 33 seco...

Page 82: ...problem This continues until all of the problems are detected and corrected Code Symptom 1 Normal 13 Incorrect pulser coil signal 14 Incorrect crank position sensor signal 15 Incorrect engine temperat...

Page 83: ...4 D Diagnosing the electronic control system 74 Dimensions 23 Disassembling the reverse gear 54 Drive shaft and lower case counter rotation model 52 E ECM Electronic Control Module 10 Electrical 20 El...

Page 84: ...ber 3 Shimming counter rotation model 56 Shimming regular rotation model 45 Special service tools 28 Specified torques 25 Symbols 2 T Test run 15 Tightening torques 25 Top view 73 U Upper case 8 Upper...

Page 85: ...6D03F1X 78 Index MEMO...

Page 86: ...river relay Fuse 100 A Fuse 30 A _ Rectifier Regulator To personal computer for diagnosis To remote control box switch panel To warning indicator To trim meter To diagnostic flash indicator special se...

Page 87: ......

Page 88: ...YAMAHA MOTOR CO LTD Printed in the Netherlands Jul 2003 0 5 1 CR E...

Page 89: ...R W Y B W L W B W Br W L W B W Y B R R R R R R R B B B B B B B Br Br Br Sb Lg Lg Sb Sb Sb Lg B B L G L G B B L Y Pu Y Pu G L W Br W L G B L Y Gy Lg Sb B R B W R Y R B W B G R B W B Br R Y R Y B W R B...

Page 90: ...18 19 20 21 22 23 24 X 1 2 3 4 5 6 7 8 9 10 B R W O B Pu B Pu L Pu W O W B R W Pu B Pu W Pu L G B R W O R Pu R Pu G 11 12 13 14 15 16 17 18 19 20 Pu Y O Y B R W Pu R Pu Y Pu G G 21 22 23 24 25 26 27...

Reviews: