background image


10 

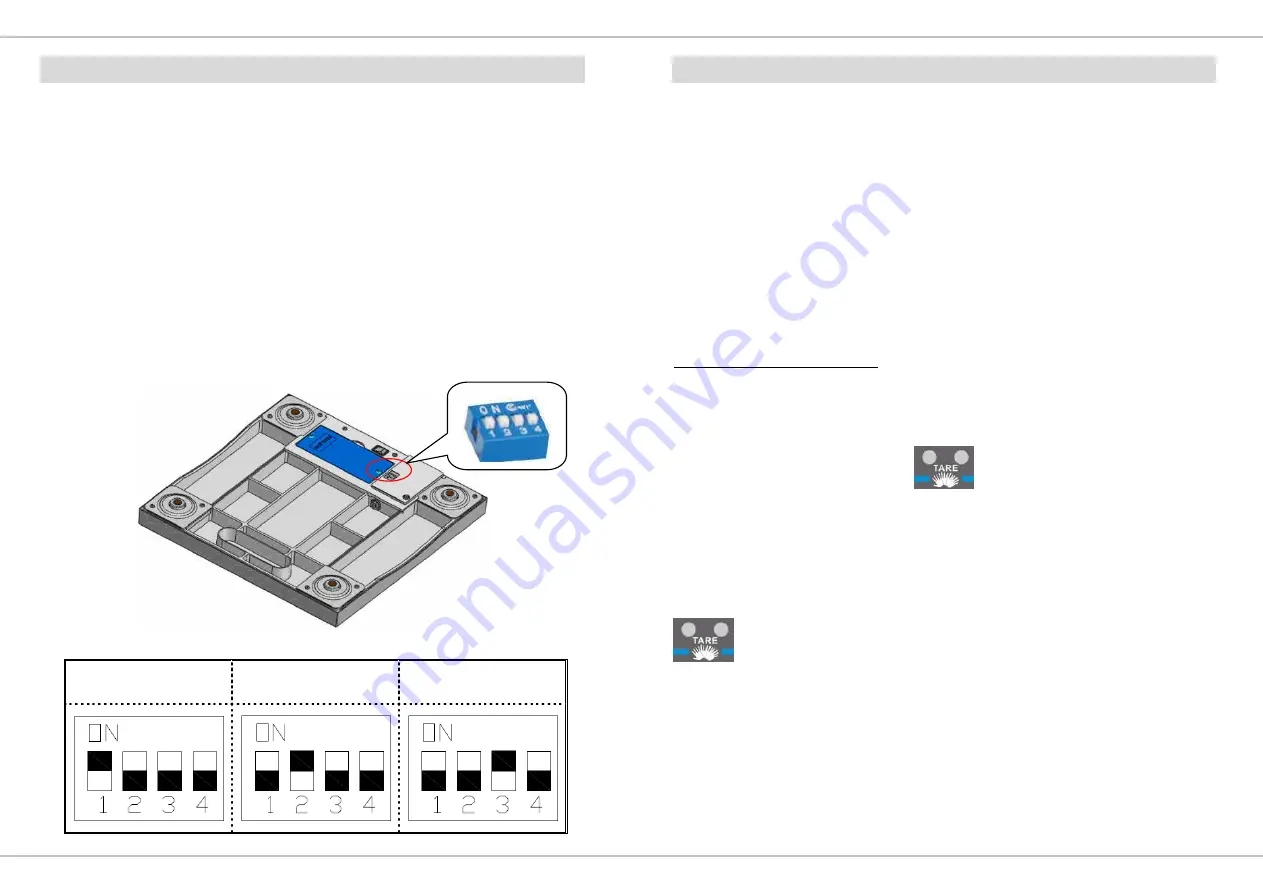
SELECTING THE SCALE PLATFORM’S CHANNEL 

To select the scale platform’s channel, first turn off the scale base 

and wireless display units. Then use the dip switch, which is located 

on the bottom of the scale under the rubber stopper. The dip switch 

has four pins marked ‘1, 2, 3, 4’ (Pin-4 is not active; only 3 channels 

are available for use.) To select a channel, move the pin toward the 

‘ON’ mark (pictured below).    For example- To select Channel-1 for 

the scale, move Pin-1 towards the ‘ON’ mark. Turn on the scale 

base first, then the wireless display for use.   


The dip switch is on the bottom of the scale platform under the 

rubber stopper. 


Channel 1 

Channel 2 

Channel 3 


11 

USING THE TARE FUNCTION 

The Tare Function allows the user to zero the scale to cancel out the 

weight of a container, thus giving the weight of the item being 

weighed.   


Press the ON/OFF button to turn on the scale. 


Place the containter on the scale platform. 


Press  the  ‘TARE’  button  after  the  weight  stabilizes  and  stable 
sign displays.   


The display will reset to ‘0’. 


Place the item to be weighed on the platform(without removing 
the ‘tared’ container).   

OR 

Touch Free Tare Function: This scale is equipped with ‘Photo eye 

mechanism’ for a touch free ‘TARE’ function. Simply pass your hand 

over the ‘Photo eye’ sensor and the scale will tare the weight. 


Place the container to be tared on the scale platform. 


Pass your hand over the 

  sign on the indicator. 


The display will reset to ‘0’. 


Place the next item to be weighed on the scale platform.     


To reset the ‘TARE’ to zero, remove the tared container from the 

platform and press the ‘TARE’ button, or pass your hand over the 

  sign. 


Summary of Contents for AW-WPS

Page 1: ...NG OF THE SCALE 3 Explanation of the graphic symbols 4 TO Ready Scale for Use 5 POWER SUPPLY LOW BATTERY 5 SPECIFICATIONS 6 DISPLAY 6 BUTTON DESCRIPTION 7 PREPARING SCALE FOR WEIGHING 8 CHANGING THE W...

Page 2: ...licable standards These batteries should be kept away from small children If swallowed promptly seek medical assistance Expected Service Life 5 years If you have any problem contact your local service...

Page 3: ...n manual before setup and commissioning even if you are already familiar with Yamato scales 5 TO Ready Scale for Use 1 Remove the scale from its box along with any protective film from the platform co...

Page 4: ...7 BUTTON DESCRIPTION Press to turn the scale ON or OFF Press to Tare zero the weight of any item while weighing Press to Hold the weight on the screen Press to switch between lb oz and kg units of mea...

Page 5: ...isplay 88888 will appear on the display Set the scale and wireless display to the same channel Weighing 1 Press the ON OFF button to turn on the scale 2 88888 appears on the screen then 0 and will fla...

Page 6: ...lows the user to zero the scale to cancel out the weight of a container thus giving the weight of the item being weighed Press the ON OFF button to turn on the scale Place the containter on the scale...

Page 7: ...onds Press to move right or down as shown in setup flowchart The star icon is the default value 13 FUNCTION SETTINGS Function Description Default Units lb kg Auto off Time 120 sec 180 sec 240 sec 300...

Page 8: ...dislay require separate electric power Before using the scale please make sure that both the scale base and wireless display have batteries correctly installed or both adapters correctly plugged in Th...

Page 9: ...as doorbells home security systems and entry controls may interfere This is normal and does not affect the general performance of this product The transmission will resume once the interference recede...

Page 10: ...er temperatures required by lead free soldering The restricted substances and maximum allowed concentrations in the homogenous material are by weight Substance Concentration Lead 0 1 Mercury 0 1 PBB P...

Page 11: ...20...

Reviews: