background image


11 


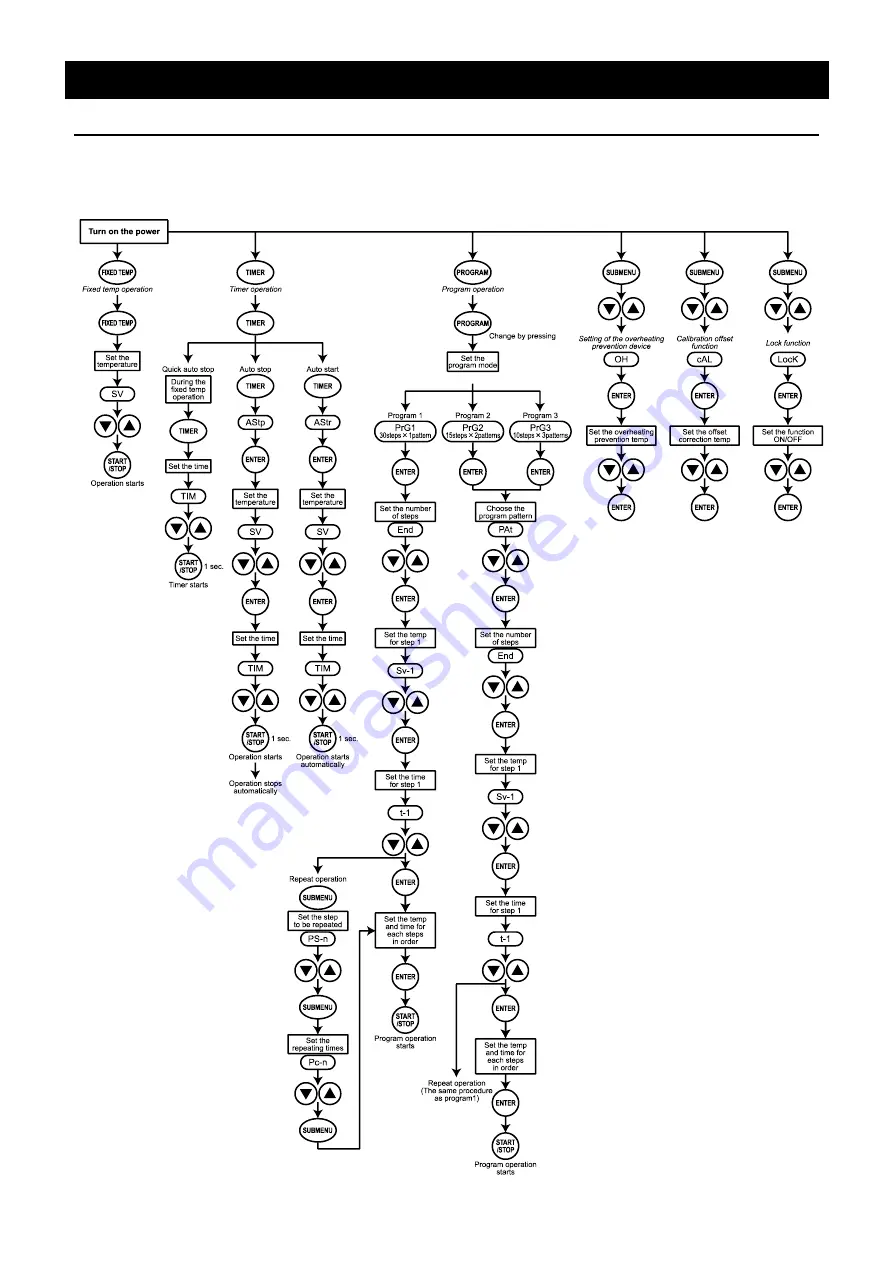
Operation Method 

Operation Mode, Function Setting Key, and Characters 


The operation mode setting and function setting use the key operation and characters show in 
the following figure. 


Summary of Contents for FO610CR

Page 1: ...FO Series of Yamato Scientific Co Ltd To use this unit properly read this Instruction Manual thoroughly before using this unit Keep this instruction manual around this unit for referring at anytime W...

Page 2: ...e Operation 12 Quick Auto Stop Operation 13 Auto Stop Operation 14 Auto Start Operation 16 Program Operation 18 Temperature Rise Fall Curve Reference 23 Program Operation 24 Other Functions 26 Handlin...

Page 3: ...ger of a problem that may cause a serious accident or even fatality CAUTION If the caution is ignored there is the danger of a problem that may cause injury damage to property or the unit itself Meani...

Page 4: ...ution electrical shock Caution scald Caution no water heating Caution don t get wet Caution water only Caution deadly poison Prohibit Prohibit generally Prohibit inflammable Prohibit to disassemble Pr...

Page 5: ...ction If this procedure is not followed fire or electrical shock may result Never perform repair work yourself since it is dangerous and not recommended Do not use the power cord if it is bundled or t...

Page 6: ...electrical shock will occur FO610CR 710CR 810CR model is the 220V single phase mode Be sure to connect this model to the specific power switchboard or receptacle for 220V 2 Choose a proper place for...

Page 7: ...ower switch is turned ON or OFF and fire explosion may result Refer to page 39 List of Dangerous Substances 4 Do not modify Modification of this unit is strictly prohibited This could cause a failure...

Page 8: ...n and don t install in a busy place Touching the unit may cause a burn during and after the operation To prevent take measures that putting up a notice of operating etc 8 Handling of power code Do not...

Page 9: ...7 Description and Function of Each Part Main Unit Rear View Control panel Power cord Production plate Power switch ELB Specification plate Front View Fan Mounting hole for Exhaust opening...

Page 10: ...taneously AUTO STOP Lamp Blinks while setting quick auto stop timer or auto stop timer Lights while quick auto stop timer or auto stop timer is running AUTO START Lamp Blinks while setting auto start...

Page 11: ...emperature Setting Used for setting the temperature for each step in the program Sv 1 to Sv 30 is shown t 1 Program Time Setting Used for setting the time for each step in the program t 1 to t 30 is s...

Page 12: ...temperature operation Pressing the TIMER key displays AS p The setting temperature SV can be set by pressing the ENTER key The operation time tim can be set by pressing it again Pressing the START STO...

Page 13: ...11 Operation Method Operation Mode Function Setting Key and Characters The operation mode setting and function setting use the key operation and characters show in the following figure...

Page 14: ...e setting Also it displays the current setting temperature with blinking The FIXED TEMP lamp blinks too Set the temperature by pressing the 4 Start operation Press the orange START STOP key for about...

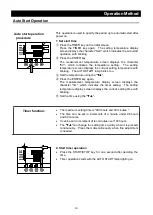
Page 15: ...stment is needed 2 Start timer operation Press the START STOP key for one second after deciding the time Timer operation starts with the FIXED TEMP and AUTO STOP lamps lighting on The timer is activat...

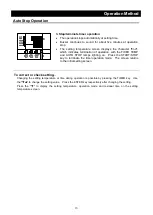
Page 16: ...s the ENTER key again The measurement temperature display screen displays the character tim which indicates the timer setting The setting temperature display screen displays the current setting time w...

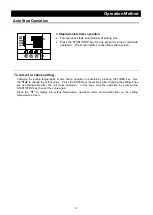
Page 17: ...h the FIXED TEMP and AUTO STOP lamps lighting on Press the START STOP key to terminate the timer operation mode The screen returns to the initial setting screen To correct or check setting Changing th...

Page 18: ...TO START lamp blinks too Set the temperature using the Press the ENTER key again The measurement temperature display screen displays the character tim which indicates the timer setting The setting tem...

Page 19: ...heck setting Changing the setting temperature or time during operation is possible by pressing the TIMER key Use the to change the setting value Press the ENTER key respectively after changing the set...

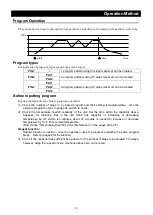
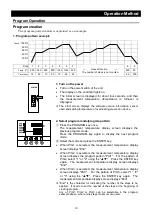
Page 20: ...rogram preparation form in pages 24 and 25 to check Check the temperature rise fall capability of the unit Set the time within the capability above Suppose for instance that in the unit which has capa...

Page 21: ...surement temperature display screen displays the previous program mode Press the PROGRAM key again to display the next program mode Select the mode and press the ENTER key When PrG1 is selected the me...

Page 22: ...the time check the temperature rise fall capability of unit For example about 10 minutes is needed to increase the temperature from room temperature to 600 for FO410C type 15 minutes for FO810CR type...

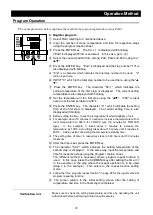
Page 23: ...e set in increments of a minute under 99 hours and 59 minutes It can be set in increment of ten minutes over 100 hours The can change the setting time quickly when it is pressed continuously Press the...

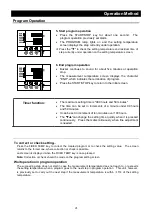
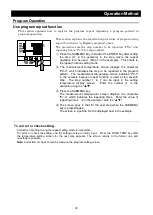
Page 24: ...mperature screen indicates PS 7 in the example because repeat function is used at the seventh step The step number 1 to 7 can be input in the setting temperature display screen Enter the number 1 in t...

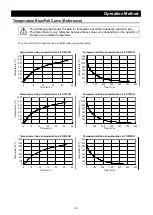
Page 25: ...falling characteristics in FO610CR 0 200 400 600 800 1000 1200 1400 0 100 200 300 400 500 600 Temperature rising characteristics in FO710CR 0 200 400 600 800 1000 1200 1400 0 10 20 30 40 50 60 Temper...

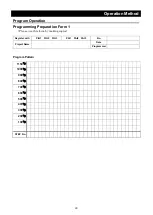
Page 26: ...m Operation Programming Preparation Form 1 Please use this form by making copies Register with PrG1 PrG2 PrG3 PAt1 PAt2 PAt3 No Project Name Date Programmer Program Pattern 1150 1000 900 800 700 600 5...

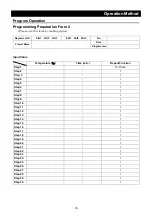
Page 27: ...PAt1 PAt2 PAt3 No Project Name Date Programmer Input Value Temperature Time min Repeat Function Step 1 To Times Step 2 Step 3 Step 4 Step 5 Step 6 Step 7 Step 8 Step 9 Step 10 Step 11 Step 12 Step 13...

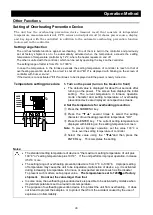
Page 28: ...The current temperature in furnace operation mode character and setting temperature of overheating prevention device are displayed on respective screens 2 Set the temperature for overheating preventi...

Page 29: ...ature display screen falls by the setting temperature while the temperature on furnace rises When it is set to the minus side the temperature on the measurement temperature display screen rises by the...

Page 30: ...a thunderstorm turn off the power key immediately then turn off the circuit breaker and the main power If this procedure is not followed fire or electrical shock may be caused About the amount of sam...

Page 31: ...oration The sensor on this unit R thermocouple is very sensitive Do not contact it to samples when loading or unloading them Do not touch the sensor with bare hands which may cause degradation Sensor...

Page 32: ...it breaker function 1 Connect the power cord 2 Turn the breaker on 3 Push the red test switch with a ballpoint pen etc 4 If there is no problem the master circuit breaker will be turned off Check the...

Page 33: ...rts considering environmental protection The feature components of this unit and materials used are listed below Component Name Material Main body Body Steel Melamine Epoxy composite resin coating Sta...

Page 34: ...ort circuit detection ALARM lamp lights on Er 02 appears Triac is in short circuit Make a call for service Heater disconnecting detection ALARM lamp lights on Er 03 appears Heater is disconnected Make...

Page 35: ...ropriate power supply Heater is not turned off after reaching to preset value Bad condition of SSR Replace the part Bad condition of thermo regulator Thermal fuse blows out Bad condition of fan Replac...

Page 36: ...les office Check following items before contact Model Name of Product Production Number Purchase Date About Trouble in detail as possible Minimum Retention Period of Performance Parts for Repair The m...

Page 37: ...r failure Calibration offset RS485 communication function Safety device Earth leakage circuit breaker Overheating prevention device Self diagnostic functions Sensor error Memory error Heater Iron chro...

Page 38: ...0CR 710CR 810CR Time up Alarm output terminal 281301 All models Output terminal for measured temperature transmission 4 20mA 281302 All models N2 gas leading device 281303 All models Sample tray 28131...

Page 39: ...4 1 2 3 2 1 CN1 CN2 1 2 3 3 2 1 4 3 SSR 2 X 4 3 2 1 TM1 1 CN5 A A 4 3 RS485 T2 2 1 H2 H1 FM AC220V ELB Symbol Part name Symbol Part name ELB Earth leakage breaker X Main relay T1 T2 Terminal block FM...

Page 40: ...A2BAT YSJ FO610C Symbol Part Name Code No Specification Manufacturer ELB Earth leakage breaker A010410001 BV DN 1P N 20A 30mA YSJ SSR SSR A011006011 G3NB 225B 1 DC5 24V YSJ Heater block H080101015 Can...

Page 41: ...te Ammonium perchlorate and other perchlorate Potassium peroxide Sodium peroxide Barium peroxide and other inorganic peroxide Potassium nitrate Sodium nitrate Ammonium nitrate and other nitrate Sodium...

Page 42: ...Unexpected accidents or breakdown may result in Note The contents of this document may be changed in future without notice Any books with missing pages or disorderly binding may be replaced Instructio...

Reviews: