background image

3

5. When assembling the Wind turbine, all the parts should be fastened with fasteners

6. Before hoisting the wind turbines, the end (which should be connected with controller) of the

tower lead should be cut away the insulating layer for 20mm or so. Then screw the three exposed

leads (shot circuit) together.

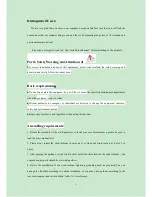
7. Before the connection between the wind turbine flange and the tower flange, please connect the

three leads of the wind turbine to the three leads of the tower accordingly. When using the hinge

method, every pair of wires should be no less than 40mm in length and be wrapped with Acetate

cloth tape for three layers, then sheathed with spun glass paint tube. With this method, connect the

three pairs of wires (attention: the joint of the wires can’t bear the weight of the tower leads

directly, so wires 100mm downward from the joint should be wrapped with adhesive tape and then

stuffed into the steel pipe. After that, wind turbine flange and tower flange can be connected.

8. During the installation, it is prohibited to revolve the rotor blades roughly (the ends of wind

turbine leads or the tower leads are short-circuited at this moment). Only after all the installation

and the examination is finished and the security of the erection crew is guaranteed, it is allowed to

dismantle short circuited leads and then connect with controller and battery before running.

Attention:

Battery should be connected with controller before wind turbine connected with controller

If above stated instruction are not followed when assembling and installing the wind

turbines, we are sorry that any problem or failure resulted are not to be covered by

warranty.

Summary of Contents for 2205

Page 1: ...1 600W USER S MANUAL ...

Page 2: ...s out of order Without authority no company or individual are allowed to change the equipment structure safety and performance design please obey local laws and regulations when using this product Assembling requirements 1 Before the assembly of the wind generator or in the process of maintenance please be sure to read the users manual first 2 Please don t install the wind turbines in rainy days o...

Page 3: ...the joint of the wires can t bear the weight of the tower leads directly so wires 100mm downward from the joint should be wrapped with adhesive tape and then stuffed into the steel pipe After that wind turbine flange and tower flange can be connected 8 During the installation it is prohibited to revolve the rotor blades roughly the ends of wind turbine leads or the tower leads are short circuited ...

Page 4: ...nent magnet rotor alternator with a special kind of stator design efficiently decrease resistance torque Meanwhile it makes the wind turbines match the generators quite well and increase its reliability 600W Rated power W 600W Rated voltage V 24V 48V Wheel diameter m 1 5 Start up wind speed m s 3 Rated wind speed m s 10 Survival wind speed m s 45 TOP NG kg 27 2KG Body material Casting aluminum Bla...

Page 5: ... enhances toughness reduce weight of the generator set and thus make it rotate more easily and safely Tail die casting spine with generator tail furls to protect wind turbine in strong wind Controller converts ac current produced by wind turbine to be dc current to charge battery Battery to store the power from wind turbine inverter to covert dc power from battery to power for family load 4 1 Wind...

Page 6: ...socket screws M10x50mm and tighten with nuts Flange set is closely marched with tower which requires punching after installation by customers so the tower we provide has no punching 2 Connection between flange and tower Connect cable respectively with three lines at the bottom of the head then pierce cable from the center of tower and short circuit three cables of wind generator ...

Page 7: ...7 Fasten flange and tower with 4 pieces of inner hex bolts 3 Installation of tail Firstly insert 2 3 4 5 6 into1 tail rudder according to the following pictures ...

Page 8: ...8 Fix moveable joint and rotary set then tighten Install the back nose cone and tighten with fixing screw 4 Install blade flange onto generator axes ...

Page 9: ...o generator axes with Fix each blade with 3 pieces of bolts nuts M12mm and fix the nuts M12x25mm with wrench then clockwise rotating Blades till blades flange and Generator axes are screw down 7 Fix nose cone at the front of wind generator with screw M6x60mm ...

Page 10: ... solve it immediately 2 Please check wind turbine right before or after storm if anything amiss it is advised to lay down slowly wind turbine to do inspection or repair If inspection needs to be done on the tower make sure wind turbine have been short circuited and protection measures taken before and election climb up 3 The free maintenance batteries should be kept externally clear 4 Do not disas...

Page 11: ...11 Part6 Packing list Serial item qty packing 1 600w generator 1 Carton Box 2 hub 1 3 Blades 3 4 dome 1 5 Tail board 1 6 Tail rod 1 7 Bolt and Nuts Several ...

Reviews:

Related manuals for 2205