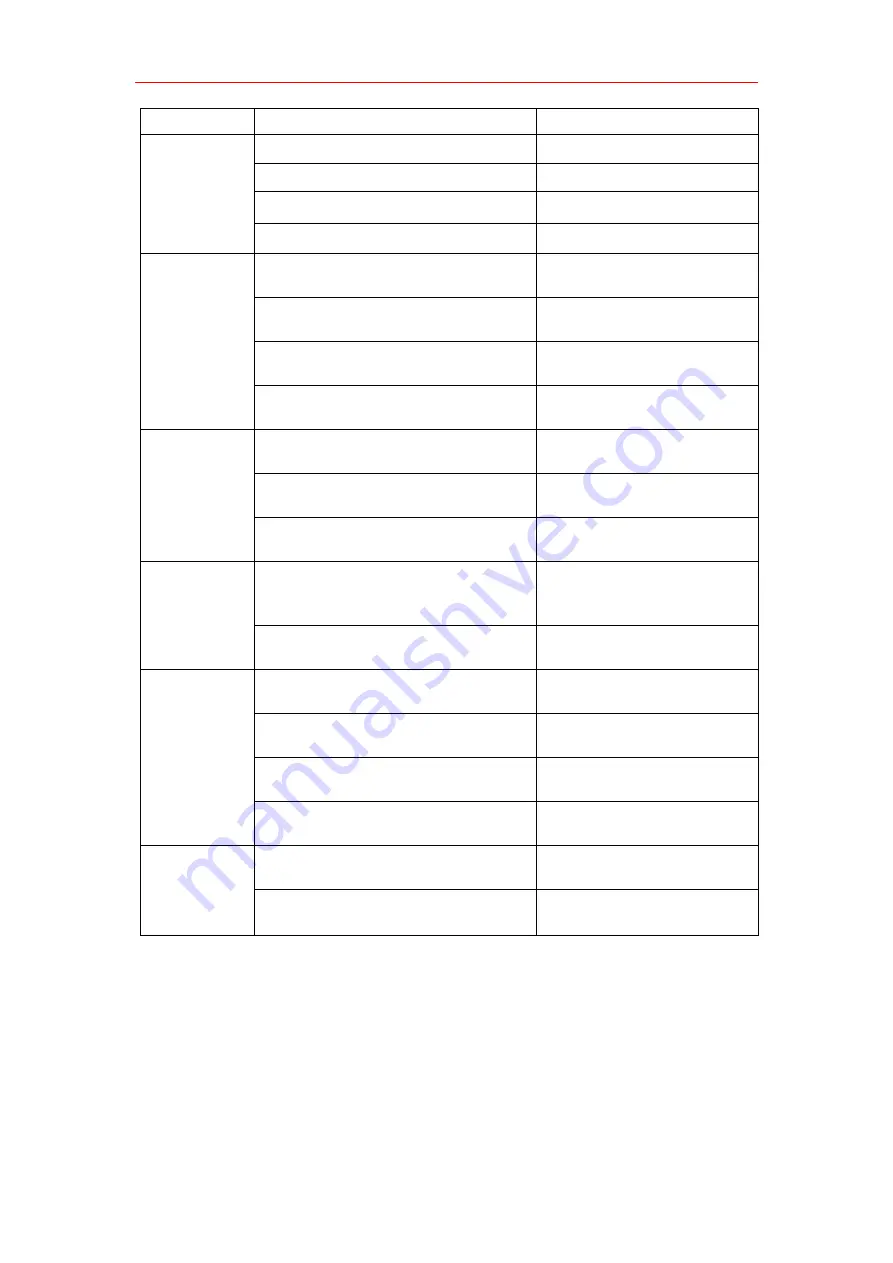
background image

X4

9

Problem

Reason

Solution

Machine

doesn’t work

Battery dead

Charge

Battery failure

Replace the battery

Battery wiring loose

Tighten the battery wiring

Main fuse blown

better fuse

Brush motor

does not work

The brush head is lifted off the

ground

Lower the brush head

Brush disc motor circuit breaker

tripped

Reset brush circuit

breaker button

Main brush switch failure

Please contact the

service center

Motor carbon brush wear

Please contact the

service center

fan not working

Suction motor noise is too loud

Please contact the

service center

Suction motor burned out

Replace the suction

motor

Carbon brush wear

Please contact the

service center

Little or no

water flow out

Clogged water tank drain valve or

water pipe

Clean or replace the

solution tank drain valve

Drain valve closed

Open the drain valve

Inefficient

recycling of

sewage

recovery tank full

Drain the recovery tank

Absorbent strip wear

Replace the absorbent

strip

Suction motor failure

Replace the suction

motor

Damaged recovery tank seal

Replace the seal

Shorter

working hours

The voltages of the two batteries

are not equal

Please contact the

service center

Battery charging failure

Repair or replace the

charger

Chapter 5 Maintenance

Summary of Contents for X4

Page 1: ...X4 FLOOR SCRUBBER Operating instruction ...

Page 2: ...ine Maintenance and Disassembly and Replacement of Wearing Parts 4 Chapter 4 Analysis Table of Common Problems of Floor Scrubber 8 Chapter 5 Maintenance 9 Warranty card 11 Warranty Conditions 11 Floor Scrubber operation instructions X400 Floor Scrubber operation instructions ...

Page 3: ... B Sewage pipe Suction pipe Squeegee Travel switch Performance parameters Category Self propelled Ordinary Drive motor power 300w Fresh water tank capacity 55L Recovery tank capacity 65L Battery capacity 24V 100Ah Operating hours 2 2 5h 2 3h Total Weight 160 5kg 150kg Product Size 1300 820 1070mm Cleaning efficiency 3300 h Brush width 18 inch Squeegee width 840mm Cleaning width 520mm Brush speed 1...

Page 4: ...n silk ropes belts high temperature sundries accumulated water flammable or toxic and harmful substances so as to avoid entanglement burning the main brush and side brush and making them unable to work normally Please keep loose clothing hair fingers and other body parts away from the machine s air vents and any moving parts When the machine stops remember to turn off the power Do not use the mach...

Page 5: ...ch is in the ON position Before removing or installing batteries first disconnect the negative battery wire and then disconnect the positive battery wire When rewiring be sure to pay attention to the polarity of the battery as wrong connection will damage electrical components Avoid direct contact between the positive electrode and the negative electrode because it will cause a large current short...

Page 6: ...he flashing disk Forward and backward switch start this button to control the machine to move forward or backward Speed control switch press the tortoise button the machine runs at low speed press the rabbit button the machine runs at high speed 2 1 2 Charging the battery The charging socket cable requires at least a power cable with a diameter of 4mm Note The charger is placed on a stable platfor...

Page 7: ...machine Before the normal operation of the machine make sure that the squeegee is installed correctly and the sewage suction pipe is inserted into the suction port 1 Use the handle to lower the squeegee tripod 2 Pass the squeegee fixing screw through the tripod eyelet and tighten the plastic knob 3 Insert the conical mouth of the suction pipe into the sewage hole of the water tank and insert the o...

Page 8: ...floor it is necessary to add a cleaning pad to avoid the abrasion of the epoxy floor by the brush The machine is filled with clean water and attention should be paid to the clean water so as not to block the water discharge valve with impurities After the machine works for a period of time it is necessary to discharge the sewage from the sewage tank in time to prevent the sewage from immersing in ...

Page 9: ...eplacement of Wearing Parts 3 1 Periodic Inspection Regular maintenance and inspection Intervals h 4 50 100 200 500 1 Battery level detection 2 Motor carbon brush inspection 3 Whether the main brush is wired the silk is entangled 4 Check for debris in the tank 5 Check the buttons and electronics on the control panel 6 Check the brush for wear 7 Check the filter for impurities 8 Check the sprinkler...

Page 10: ...iness platform The specific replacement is to place the cleaning pad at the bottom of the dial and make it fit firmly with the dial Please refer to the installation of the dial on the machine Notice 3 3 Replacement and installation of the absorbent strip Place the machine on a flat ground turn off the main power switch and ensure that the machine is powered off Put down the squeegee through the ha...

Page 11: ...tective gloves to avoid contact with the acid substance of the battery Check whether the battery connecting wire is worn and the contact parts are loose and replace it if necessary The terminal of the battery should be kept clean and dry and there should be no debris and dust covering it which is extremely unfavorable to the battery and will burn the battery in severe cases Notice In order to make...

Page 12: ...a non slip nut 2 The installation can be completed by plugging the suction motor pair socket with the machine line 3 6 Self propelled drive controller diagnosis and disassembly The first generation self propelled controller is located inside the clean water tank the X4 second generation self propelled controller is located inside the handle Rated voltage 24V Output current 60A During the use of th...

Page 13: ...ne is powered off the sewage is drained and the sewage tank is turned over 2 Remove the handle iron plate fixing screws 3 Loosen the positive and negative wiring of the power supply and drive the positive and negative wiring of the motor 4 Use the M4 Allen wrench to loosen the fixing screws of the controller and the iron plate to complete the removal Note When installing the positive and negative ...

Page 14: ... too loud Please contact the service center Suction motor burned out Replace the suction motor Carbon brush wear Please contact the service center Little or no water flow out Clogged water tank drain valve or water pipe Clean or replace the solution tank drain valve Drain valve closed Open the drain valve Inefficient recycling of sewage recovery tank full Drain the recovery tank Absorbent strip we...

Page 15: ...nvironment front and rear space at least 300mm Maintenance schedule Warranty Warranty is not covered under the following conditions of use Failure to perform maintenance in accordance with the maintenance manual may result in mechanical damage or failure The mechanical appearance or structure is obviously damaged due to improper operation Disassembly or modification not approved by the original fa...

Page 16: ...be guaranteed within the warranty 4 During the warranty period users who do not follow the operating instructions or those who dismantle and repair by themselves will not be covered by the warranty if repair is required a cost will be charged 5 The buyer can go to the designated point of the seller for maintenance with the invoice or send the machine back to our company for repair return freight a...

Page 17: ...X4 1 ...

Reviews: