

3. Troubleshooting
3. TROUBLESHOOTING
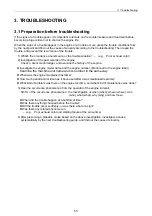
3.1 Preparation before troubleshooting
If the signs of a trouble appear, it is important to lecture on the countermeasure and treatment before
becoming a big accident not to shorten the engine life.
When the signs of a trouble appear in the engine or a trouble occurs, grasp the trouble conditions fully
by the next point and find out the cause of sincerity according to the troubleshooting. Then repair the
trouble, and prevent the recurrence of the trouble.
1) What’s the occurrence phenomenon or the trouble situation?
(e.g. Poor exhaust color )
2) Investigation of the past records of the engine
Check a client control ledger, and examine the history of the engine.
Investigate the engine model name and the engine number. (Mentioned in the engine label.)
Examine the machine unit name and its number in the same way.
When was the engine maintained last time?
How much period and/or time has it been used after it was maintained last time?
What kind of problem was there on the engine last time, and what kind of maintenance was dane?
3) Hear the occurrence phenomenon from the operator of the engine in detail.
5W1H of the occurrence phenomenon : the investigation of when (when), where (where), who
(who), what (what), why (why) and how (how)
When did the trouble happen at what kind of time?
Was there anything changed before the trouble?
Did the trouble occur suddenly, or was there what or a sign?
Was there any related phenomenon.
.(e.g. Poor exhaust color and starting failure at the same time)
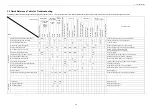
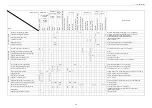
4) After presuming a probable cause based on the above investigation, investigate a cause
systematically by the next troubleshooting guide, and find out the cause of sincerity.
53
Summary of Contents for 3TNV Series
Page 1: ...4TNV106 4TNV106T 4TNV94L 4TNV98 4TNV98T 3TNV82A 3TNV84 T 4TNV84 T 3TNV88 4TNV88 ...
Page 31: ...1 General 1 4 Engine External Views 16 ...
Page 32: ...1 General 1 5 Structural Description 17 ...
Page 156: ...9 Starting Motor 9 1 2 Components 141 ...
Page 157: ...9 Starting Motor 9 1 3 Troubleshooting 142 ...
Page 172: ...9 Starting Motor 9 2 3 Troubleshooting 157 ...
Page 175: ...9 Starting Motor 2 Removal of magnetic switch Remove the M6 bolts 10mm 2 160 ...
Page 185: ...9 Starting Motor 3 Brush 1 Check wear of the brush and the brush spring force 170 ...
Page 194: ...10 Alternator 179 10 1 6 Troubleshooting ...
Page 195: ...11 Electric Wiring 180 11 ELECTRIC WIRING 11 1 Electric Wiring Diagram ...
Page 213: ......


