background image

ENGINE

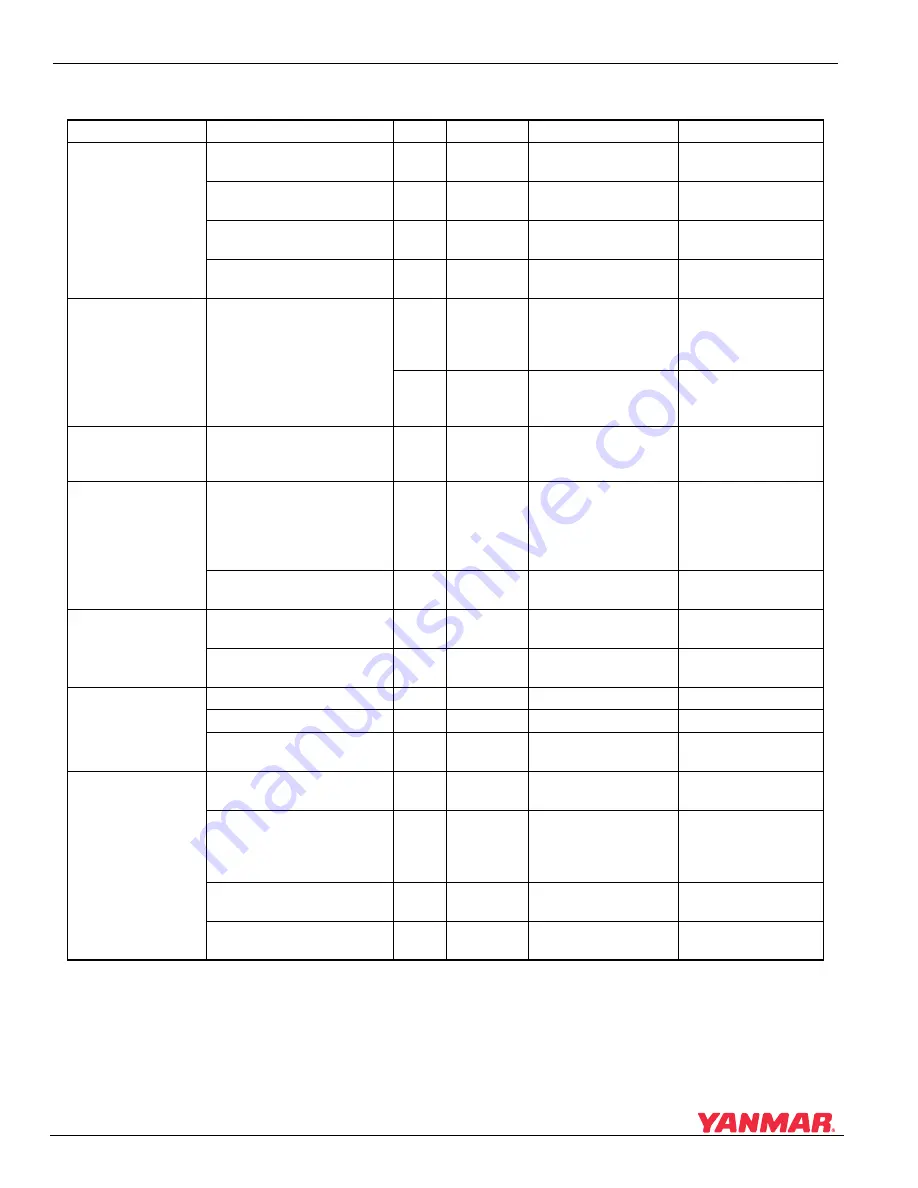
Special Torque Chart

5-8

BY Service Manual

© 2009 Yanmar Marine International

SPECIAL TORQUE CHART

System Component

Model

Thread

Comments

Specification

Engine Block

Main Bearing
Replace, wash and oil

4BY2
6BY2

M10 x 80

Steel Bolts 

Initial Torque

Torque Angle

23 N·m (204 in.-lb)

Plus 90°

Coolant Drain Plug to 
Crankcase

4BY2
6B2Y

M14 x 1.5

Replace Sealing Ring

25 N·m (221 in.-lb)

Clamping and Guide Rails to
Crankcase

4BY2
6BY2

M14

Torque

20 N·m (177 in.-lb)

Engine Mount Nut

4BY2
6BY2

M20

Torque

300 N·m (221 ft-lb)

Torsion Damper

Torsional Vibration Damper 
to Crankshaft

4BY2

M18 x 1.5

Initial Torque

1st Torque Angle

2nd Torque Angle

3rd Torque Angle

100 N·m (74 ft-lb)

60°
60°
30°

6BY2

M10 x 86

Initial Torque

1st Torque Angle 

2nd Torque Angle

40 N·m (30 ft-lb)

60°
60°

Connecting Rod and 

Bearing

Connecting Rod Bolts 
Replace, wash and oil

4BY2
6BY2

M10 x 80

Grade 12.9

Assembly Torque

Initial Torque

Torque angle

 5 N·m (44 in.-lb)

20 N·m (177 in.-lb)

70°

Cylinder Head with 

Cover

Cylinder Head Bolts 
Replace, wash and oil

4BY2
6BY2

M12 x 1.5

Initial Torque then 

Loosen all bolts 180°

2nd Torque

1st Torque Angle

2nd Torque Angle

80 N·m (59 ft-lb)

50 N·m (37 ft-lb)

90°
90°

Seal Plug
Replace screws

4BY2
6BY2

M14 x 1.5

-

30 N·m (22 ft-lb)

Camshaft

Sprocket to Camshaft

4BY2
6BY2

M7 x 19

-

15 N·m (133 in.-lb)

Camshaft Bearing Cap Bolt

4BY2
6BY2

-

-

10 N·m (89 in.-lb)

Oil Sump

Oil Drain Plug

6BY2

M12 x 1.5

Replace Seal

25 N·m (221 in.-lb)

Oil Sump to Crankcase

6BY2

M8 x 26

-

20 N·m (177 in.-lb)

Oil Deflector to Crankcase 
Lower Section

6BY2

M6 x 16

Thread-Tapping Screw

10 N·m (89 in.-lb)

Timing Case Covers

Timing Case Cover Bolt

4BY2
6BY2

-

Initial Torque of 5 N·m 

(44 in.-lb)

14 N·m (124 in.-lb)

Guide Rail Pin

4BY2
6BY2

-

Apply Medium 

Strength Thread Lock 

and Sealer to the 

Threads

20 N·m (177 in.-lb)

Plug to Timing Case Cover

4BY2
6BY2

M30 x 1

Replace Seal

70 N·m (52 ft-lb)

Plug to Timing Case Cover 

4BY2
6BY2

M40 x 1.5

Replace Seal

30 N·m (22 ft-lb)

Summary of Contents for 4BY2

Page 1: ...BY series SERVICE MANUAL BY Service Manual 4BY2 6BY2 P N 0BBY0 U00200 MARINE ENGINES ...

Page 2: ...on the latest information available at the time of publishing The illustrations used in this manual are intended as representative reference views only Moreover because of our continuous product improvement policy we may modify information illustrations and or specifications to explain and or exemplify a product service or maintenance improvement We reserve the right to make any change at any time...

Page 3: ...rn Drive 3 7 Engine Piping Diagrams 3 8 4BY2 3 8 6BY2 3 9 Location of Nameplates 3 11 Engine Nameplates Typical 3 11 Diesel Fuel 3 12 Diesel Fuel Specifications 3 12 Bleeding the Fuel System 3 14 Engine Oil 3 14 Engine Oil Specifications 3 14 Acceptable Engine Oil 3 16 Recommended Marine Gear or Stern Drive Oil 3 18 Recommended Power Steering Fluid 3 18 Engine Coolant 3 19 Engine Coolant Specifica...

Page 4: ...Introduction 4 3 The Importance of Periodic Maintenance 4 3 Performing Periodic Maintenance 4 3 Yanmar Replacement Parts 4 3 Required EPA Maintenance 4 3 EPA Requirements 4 3 Conditions to Ensure Compliance with EPA Emission Standards 4 3 Inspection and Maintenance 4 4 Periodic Maintenance Schedule 4 5 Periodic Maintenance Procedures 4 9 After Initial 50 Hours of Operation 4 9 Every 50 Hours of Op...

Page 5: ...and Disassemble Piston and Connecting Rod 5 31 Inspect Pistons and Piston Rings 5 32 Assemble Piston and Connecting Rod 5 33 Install Piston and Connecting Rod 5 34 Flywheel and Flywheel Housing 5 37 Remove and Install Flywheel Housing 5 37 Remove and Install Drive Coupling 5 38 Remove Flywheel 5 39 Replace Rear Crankshaft Seal 5 40 Install Flywheel 5 41 Camshaft and Timing Gear Train 5 42 Componen...

Page 6: ...ts and Adjustments 6 9 Measure Fuel Feed Pump Pressure 6 9 Test Return Fuel Pressure 6 10 Repair 6 11 Remove Fuel Injector 6 11 Clean Fuel Injector Cavities 6 12 Install Fuel Injector 6 13 Remove and Install High Pressure Fuel Lines 6 14 Replace the Fuel Feed Pump 6 15 Replace High Pressure Fuel Pump 6 15 Replace Fuel Filters 6 19 Remove and Install Fuel Rail 6 20 Replace Injector Return Fuel Line...

Page 7: ...nstall Coolant Pump 7 15 Remove and Install Thermostat 7 16 Seawater Pump 7 18 Lubrication 8 1 Safety Precautions 8 3 Introduction 8 3 Specifications 8 4 Test and Adjustment Specifications 8 4 Special Torque Chart 8 4 Special Service Tools 8 5 Measuring instruments 8 5 Tests and Adjustments 8 6 Engine Oil Flow 8 6 Check Engine Oil Pressure 8 7 Repair 8 8 Engine Lubrication System Components 8 8 Ch...

Page 8: ...move and Install Alternator Belt Tensioner 11 6 Electrical and ECU 12 1 Safety Precautions 12 3 Introduction 12 3 Specifications 12 3 Special Torque Chart 12 3 Function Description Engine Management System 12 4 Component Locations 12 4 Electrical Panel Connector X1 Connections 12 8 Engine Control Unit ECU Assignments 12 10 Component Tests 12 12 Relays 12 12 Oil Pressure Sensor 12 14 Fuel Injector ...

Page 9: ...lace Fuel Volume Regulator 12 27 Replace Oil Pressure Sensor 12 27 Troubleshooting 13 1 Safety Precautions 13 3 Introduction 13 3 Engine Faults and Torque Limitations 13 3 Torque Limitation for Failed Sensors Mode 13 3 Torque Limitation for Smoke Limitation Mode 13 3 Torque Limitation for Overheat Protection Mode 13 5 Troubleshooting Chart 13 6 Starting Trouble 13 6 Exhaust Color 13 6 Vibration Dr...

Page 10: ...TABLE OF CONTENTS x BY Service Manual 2009 Yanmar Marine International This Page Intentionally Left Blank ...

Page 11: ... you read this Service Manual completely before starting repairs Along with standard tools Yanmar recommends the use of special tools necessary to perform repairs correctly Yanmar products are continuously undergoing improvement This Service Manual has been checked carefully in order to avoid errors However Yanmar is not liable for any misrepresentations errors of description or omissions Contact ...

Page 12: ... information If a page or number of pages should be replaced the replacement information is sent along with a revised Revision Control Table Discard the older obsolete information At times the revision involves inserting additional pages in one or more sections Replace the Revision Control Table and insert the new pages This method of revision control represents the most cost effective solution to...

Page 13: ...hem if they are lost or damaged Also if a part needs to be replaced that has a decal attached to it make sure to order the new part and decal at the same time Indicates a hazardous situation which if not avoided will result in death or serious injury Indicates a hazardous situation which if not avoided could result in death or serious injury Indicates a hazardous situation which if not avoided cou...

Page 14: ...ntact your Yanmar RHQ for additional training Crush Hazard When attaching an engine to a repair stand be sure to use a stand of adequate capacity to safely support the engine to be repaired and that it is securely attached to the engine NEVER stand under a hoisted engine If the hoist mechanism fails the engine will fall on you ALWAYS secure the engine solidly to prevent the engine from falling dur...

Page 15: ...engine before beginning service If the engine must be serviced while it is operating remove all jewelry tie back long hair and keep hands other body parts and clothing away from moving rotating parts Piercing Hazard Avoid skin contact with high pressure diesel fuel spray caused by a fuel system leak such as a broken fuel injection line High pressure fuel can penetrate your skin and result in serio...

Page 16: ...mp to the component to be welded and as close as possible to the welding point NEVER connect the weld clamp to the engine or in a manner which would allow current to pass through a mounting bracket When welding is complete reconnect the leads to the alternator and engine control unit prior to reconnecting the batteries ALWAYS keep the electrical connectors and terminals clean Check the electrical ...

Page 17: ... it onto a truck Alcohol and Drug Hazard NEVER operate the engine while under the influence of alcohol drugs or when ill Exposure Hazard ALWAYS wear personal protective equipment including appropriate clothing gloves work shoes and eye and hearing protection as required by the task at hand Tool Hazard ALWAYS remove any tools or shop rags used during maintenance from the area before operation The s...

Page 18: ...ions to this engine may void its warranty Be sure to use Yanmar genuine replacement parts Follow the guidelines of the EPA or other governmental agencies for the proper disposal of hazardous materials such as engine oil diesel fuel and engine coolant Consult the local authorities or reclamation facility NEVER dispose of hazardous materials by dumping them into a sewer on the ground or into groundw...

Page 19: ...tion of Nameplates 3 11 Engine Nameplates Typical 3 11 Diesel Fuel 3 12 Diesel Fuel Specifications 3 12 Bleeding the Fuel System 3 14 Engine Oil 3 14 Engine Oil Specifications 3 14 Acceptable Engine Oil 3 16 Recommended Marine Gear or Stern Drive Oil 3 18 Recommended Power Steering Fluid 3 18 Engine Coolant 3 19 Engine Coolant Specifications 3 19 Acceptable Engine Coolant 3 20 Principal Engine Spe...

Page 20: ...s 3 23 Prepare Engine for Long Term Storage 3 24 Abbreviations and Symbols 3 25 Abbreviations 3 25 Symbols 3 25 Unit Conversions 3 26 Unit Prefixes 3 26 Units of Length 3 26 Units of Volume 3 26 Units of Mass 3 26 Units of Force 3 26 Units of Torque 3 26 Units of Pressure 3 26 Units of Power 3 26 Units of Temperature 3 26 ...

Page 21: ...ized wiring systems can cause an electrical fire Electrical Hazard ALWAYS keep the electrical connectors and terminals clean Check the electrical harnesses for cracks abrasions and damaged or corroded connectors NEVER turn off the battery switch if equipped or short the battery cables during operation Damage to the electrical system will result ...

Page 22: ...ons are metric Contact Yanmar Marine for the most current drawings 4BY2 Inboard Figure 3 1 Figure 3 1 A A 204 719 28 3 469 18 46 240 9 44 709 27 91 332 13 07 848 33 38 608 23 93 732 54 2 13 278 10 94 287 11 29 286 11 25 286 11 25 572 22 5 366 5 14 43 15 5 61 61 5 24 893 35 15 Ansicht S VIEW S C16 Schnitt A A SECTION A A B16 SAE 20 40 26 S 0006537 ...

Page 23: ...9 Yanmar Marine International 4BY2 Stern Drive Figure 3 2 Figure 3 2 0006531 806 31 73 839 33 03 54 2 13 287 11 3 279 10 98 457 5 18 01 671 26 41 709 27 91 700 27 56 469 18 46 761 29 96 149 1 5 87 737 29 02 572 22 52 286 11 26 286 11 26 373 14 69 802 31 57 204 8 03 94 2 3 71 71 1 2 8 ...

Page 24: ... International 6BY2 Inboard Figure 3 3 Figure 3 3 A A Ansicht S VIEW C16 SAE 20 40 26 Schnitt A A SECTION A A G6 S 0006541 847 45 33 36 716 28 19 709 27 91 700 27 56 460 18 11 240 9 45 716 48 28 21 332 13 07 203 7 99 46 1 81 548 5 21 59 279 10 98 145 5 71 1001 39 41 1064 41 89 287 11 3 15 5 61 ...

Page 25: ... 3 7 2009 Yanmar Marine International 6BY2 Stern Drive Figure 3 4 Figure 3 4 0006495 149 1 5 87 71 1 2 8 94 21 3 71 279 10 98 716 28 19 709 27 91 700 27 56 460 18 11 761 29 96 240 9 45 373 14 69 429 16 89 802 31 57 894 35 2 203 99 8 03 287 11 3 145 5 71 1001 39 41 614 5 24 19 ...

Page 26: ... High Pressure Fuel Pump 6 High Pressure Fuel Supply Line 7 High Pressure Fuel Common Rail 8 Fuel Injection Line 9 Fuel Injector 10 Fuel Injector Return Hose 11 Common Rail Return Line 12 Return Fuel Tee with Back Pressure Valve 13 Return Fuel to Fuel Tank with Over Pressure Valve 14 High Pressure Fuel Rail Pressure Sensor 15 High Pressure Fuel Regulator ECU Controlled 16 Fuel Volume Regulator ECU...

Page 27: ... Pressure Fuel Pump 6 High Pressure Fuel Supply Line 7 High Pressure Fuel Rail 8 Fuel Injection Line 9 Fuel Injector 10 Fuel Injector Return Hose 11 Common Rail Return Line 12 Return Fuel Tee with Back Pressure Valve 13 Return Fuel to Fuel Tank with Over Pressure Valve 14 High Pressure Fuel Rail Pressure Sensor 15 High Pressure Fuel Regulator ECU Controlled 16 Fuel Volume Regulator ECU Controlled ...

Page 28: ...gine shown 6BY2 is similar 1 Seawater Supply 2 Seawater Pump 3 Hydraulic Oil Cooler 4 Charge Air Cooler 5 Engine Heat Exchanger 6 Exhaust Seawater Mixing Elbow 7 Exhaust Seawater Exit 8 Engine Coolant Pump 9 Thermostat 10 Engine Oil Cooler 11 Engine Coolant Passages 12 Coolant Recovery Tank 13 Water Cooled Exhaust Manifold 2 1 3 4 5 6 7 12 13 9 8 10 11 0006511 ...

Page 29: ... Drive Information Nameplates Figure 3 8 Figure 3 9Engine Block Serial Identification Figure 3 9 The engine block information identification is etched into the cylinder block and is located behind the engine oil cooler near the end of the starting motor 0006563 Gear Model ENG No Model min 1 min 1 min 1 Speed of prop shaft Fuel stop power kW Continuous power kW 0006567 4 B Y 1 0 8 5 N 0 7 5 1 1 0 0...

Page 30: ...imes Poor quality fuel can reduce engine performance and or cause engine damage Fuel additives are not recommended Some fuel additives may cause poor engine performance Biodiesel Fuels Yanmar approves the use of biodiesel fuels that do not exceed a blend of 5 non mineral oil based fuel with 95 standard diesel fuel Such biodiesel fuels are known in the marketplace as B5 biodiesel fuels B5 biodiesel...

Page 31: ...hing of the fuel system and or fuel storage containers may be necessary The use of biodiesel fuels that do not comply with the standards as agreed to by the diesel engine manufacturers and the diesel fuel injection equipment manufacturers or biodiesel fuels that have degraded as per the precautions and concerns above may affect the warranty coverage of the engine Diesel Fuel Lines Shown is a typic...

Page 32: ...ne components to seize and or shorten engine life NEVER mix different types of engine oil This may adversely affect the lubricating properties of the engine oil Use a full synthetic long life engine oil that meets or exceeds the following guidelines and classifications Service Categories API Service Categories SM SL SJ SH CF and CF ACEA Service Categories A3 B3 and B4 Definitions API Classificatio...

Page 33: ...Viscosity Chart Figure 3 11 Figure 3 11 Figure 3 11 Note Yanmar recommends using genuine Yanmar Marine oil specifically formulated for the BY2 engine See Acceptable Engine Oil on page 3 16 NOTICE If the equipment will be operated at temperatures outside the limits shown special lubricants or starting aids must be used 4 F 14 F 32 F 50 F 68 F 86 F 104 F 20 C 10 C 0 C 10 C 20 C 30 C 40 C 0W 40 5W 40...

Page 34: ...l Limited Castrol Formula RS Power and Protection Castrol Limited Castrol Formula SLX Castrol Limited Castrol Formula SLX LL01 Castrol Limited Castrol Formula SLX Long Tex Castrol Limited Castrol Formula SLX Turbodiesel Castrol Limited Castrol Syntec Castrol Limited Castrol Syntec 0W 30 European Formula Castrol Limited Castrol Super Racing 0W 40 Castrol Limited Castrol TXT Softec LL01 Castrol Limi...

Page 35: ...a Pennzoil Quaker State Ravenol HCL Ravensburger Schmierstoffvertrieb GmbH Repsol Elite Common Rail Repsol YPF Shell Helix Ultra AB Shell International Petroleum Company Shell Helix Ultra AL Shell International Petroleum Company Statoli LazerWay B Statoil Lubricants Tecar Motorenöl Supersyn Techno Einkauf GmbH Titan Supersyn SL Fuchs Petrolub AG Titan Supersyn SL Longlife Fuchs Petrolub AG Tor Syn...

Page 36: ...e Sport Castrol Limited Castrol Edge Turbo Diesel Castrol Limited Castrol Formula RS Castrol Limited Castrol GTX Magnatec Castrol Limited Castrol SLX LL 04 Castrol Limited Castrol TXT LL 04 Castrol Limited Elf Excellium LSX Total Galp Energy Ultra LS Petrogal SA Liqui Moly TopTec 4100 Liqui Moly Midland Synova Oel Brack AG Midland Synova Oel Brack AG Mobil 1 ESP Formula ExxonMobil Motorenöl Low Em...

Page 37: ...ng system Engine Coolant Mixture NOTICE ALWAYS add LLC to soft water especially when operating in cold weather NEVER use hard water Water should be clean and free from sludge or particles Without LLC cooling performance will decrease due to scale and rust in the coolant system Water alone may freeze and form ice it expands approximately 9 in volume Use the proper amount of coolant concentrate for ...

Page 38: ...mierstoff GMBH Hamburg Caltex CX Engine Coolant Caltex Castrol ANTI FREEZE NF Castrol International Fridex G48 Velena s a Glacelf Plus Total Glyco Shell Shell International Glyco Star Bremin Mineralöl GmbH Co Glysantin G48 24 Engine Coolant UNICO Ltd Glysantin Protect Plus G48 BASF GUSOFROST LV 505 Chemische Industrielle Gesellschaft Mobil Frostchutz 600 Mobil Schmierstoff GmbH Havoline AFC BD04 C...

Page 39: ...ximum Output at 4000 rpm 110 kW 150 hp 132 kW 180 hp 162 kW 220 hp 191 kW 260 hp Mean Pressure 1 66 MPa 240 76 psi 1 98 MPa 287 2 psi 1 62 MPa 234 96 psi 1 92 MPa 278 psi Low Idle Speed Warm Engine 88 C 190 F 750 rpm ECU controlled 670 rpm ECU controlled Cold Start Speed 20 C 68 F 1200 rpm gradually decreasing to warm engine idle 88 C 190 F ECU controlled High Idle Speed 4600 rpm Rotation Directio...

Page 40: ... Angles Continuous Front to Rear 5 to 20 Side to Side 20 Peak Front to Rear 10 to 25 Side to Side 30 Height 721 mm 28 4 in Length without marine gear Stern Drive front to middle of engine mount 736 mm 30 0 in 942 mm 37 1 in Marine Gear front to marine gear mounting face 644 mm 25 4 in 827 5 mm 32 5 in Overall Length 839 mm 33 0 in 1001 mm 39 4 in Width 670 mm 26 4 in local exceeding Dry Weight wit...

Page 41: ...er Grade Lubricated 8 8 or 8 10 9 or 10 12 9 or 12 M4 2 7 N m 24 in lb 3 88 N m 34 3 in lb 4 6 N m 41 in lb M5 5 5 N m 48 6 in lb 8 N m 71 in lb 9 5 N m 84 in lb M6 9 5 N m 84 in lb 13 N m 115 in lb 16 N m 142 in lb M7 15 N m 133 in lb 22 N m 195 in lb 26 N m 230 in lb M8 23 N m 204 in lb 32 N m 24 ft lb 39 N m 29 ft lb M8 x 1 25 N m 221 in lb 35 N m 26 ft lb 42 N m 31 ft lb M10 46 N m 34 ft lb 64...

Page 42: ...ng system See Drain and Refill Seawater Cooling System on page 7 8 3 Wipe off any dust or oil from the outside of the engine 4 Drain fuel tank or fill the tank to prevent condensation 5 Grease the exposed areas and joints of the remote control cables and the bearings of the remote control handle 6 Seal the intake silencer exhaust pipe etc to prevent moisture or contamination from entering engine 7...

Page 43: ...ram gal hr gallon U S per hour gal gallon U S GL gear lubricant hp horsepower metric hrs hours I D inside diameter IDI indirect injection in inch in lb inch pound JASO Japanese Automobile Standards Organization kg kilogram kgf cm kilogram force per square centimeter kgf m kilogram force meter km kilometers kPa kilopascal kW kilowatt L liter L hr liter per hour lb pound lbf pound force lb ft pound ...

Page 44: ... kg oz x 28 35000 g kg x 2 20500 lb g x 0 03527 oz lbf x 4 4480 N lbf x 0 4536 kgf N x 0 2248 lbf N x 0 1020 kgf kgf x 2 2050 lbf kgf x 9 8070 N lb ft x 1 3558 N m lb ft x 0 1383 kgf m lb in x 0 1130 N m lb in x 0 0115 kgf m kgf m x 7 2330 lb ft kgf m x 86 8000 lb in kgf m x 9 8070 N m N m x 0 7376 lb ft N m x 8 8510 lb in N m x 0 1020 kgf m psi x 0 0689 bar psi x 6 8950 kPa psi x 0 0703 kgf cm ba...

Page 45: ...cement Parts 4 3 Required EPA Maintenance 4 3 EPA Requirements 4 3 Conditions to Ensure Compliance with EPA Emission Standards 4 3 Inspection and Maintenance 4 4 Periodic Maintenance Schedule 4 5 Periodic Maintenance Procedures 4 9 After Initial 50 Hours of Operation 4 9 Every 50 Hours of Operation 4 10 Every 250 Hours of Operation 4 11 Every 500 Hours of Operation 4 15 Every 1000 Hours of Operati...

Page 46: ...PERIODIC MAINTENANCE 4 2 BY Service Manual 2009 Yanmar Marine International This Page Intentionally Left Blank ...

Page 47: ...ar Replacement Parts Yanmar recommends that you use genuine Yanmar parts when replacement parts are needed Genuine replacement parts help ensure long engine life Required EPA Maintenance To maintain optimum engine performance and compliance with the Environmental Protection Agency EPA Regulation Engines it is essential that you follow the Periodic Maintenance Schedule on page 4 5 and Periodic Main...

Page 48: ...spection and maintenance procedures not shown in the Inspection and Maintenance of EPA Emission Related Parts section are covered in Periodic Maintenance Schedule on page 4 5 This maintenance must be performed to keep the emission values of the engine in the standard values during the warranty period The warranty period is determined by the age of the engine or the number of hours of operation ...

Page 49: ...chever comes first Every 500 hours or 2 years whichever comes first Every 1000 hours or 4 years whichever comes first Every 2000 hours or 8 years whichever comes first Whole Visual inspection of engine exterior c Before starting Fuel System Check for fuel leakage c Before starting Check the fuel level and refill if necessary c Before starting Drain water and sediment from fuel tank c Drain the fue...

Page 50: ...arting Replace turbocharger heat shield Check the exhaust pipe c Check the air intake system c Check the exhaust water mixing elbow c Replace the air filter element c Electrical System Check the electrolyte level in the battery serviceable batteries only c Check the wiring connectors c Before starting Check alternator belt for wear or replace belt c c Check Replace System Item Periodic Maintenance...

Page 51: ...t alignment if equipped with marine gear c Initial 50 c Check hydraulic oil cooler c Check and replace rubberized hoses fuel and water Check flexible engine mounts c c Check anodes periodically Any anode having less than half its original size remaining should be replaced use this to establish a regular replacement interval c Check Replace System Item Periodic Maintenance Interval Daily Every 50 h...

Page 52: ...nspection and Maintenance of EPA Emission Related Parts Parts Interval Clean fuel injection nozzle 1500 hours Check fuel injection nozzle adjustment 3000 hours Check fuel injection pump adjustment Check turbocharger adjustment Check electronic engine control unit ECU and its associated sensors and actuators ...

Page 53: ...hot engine oil Wear protective clothing when handling hot engine oil 1 Turn engine OFF 2 Remove engine cover 3 NOTICE Prevent dirt and debris from contaminating engine oil Carefully clean the dipstick and the surrounding area before you remove the cap Loosen the engine oil filter cap Figure 4 1 2 1 2 turns with a socket wrench Allow to sit a few minutes to allow oil to drain into crankcase Figure ...

Page 54: ...ntake Pipes Checking Battery Electrolyte Level Serviceable Batteries Only Checking Seawater Filter If Equipped and Inlet Refer to boat builder s literature for information on the seawater filter Checking the Air Intake Pipes Check the air intake system for damage or wear Checking Battery Electrolyte Level Serviceable Batteries Only WARNING Fire Hazard ALWAYS turn off the battery switch or disconne...

Page 55: ...mm 3 8 to 9 16 in above the plates Battery fluid tends to evaporate in high temperatures especially in summer In such conditions inspect the battery more often Perform the following maintenance every 250 hours of operation or one year whichever comes first Draining Water and Sediment from Fuel Tank Replacing the Fuel Fine Filter Replacing the Fuel Filter Water Separator Element Changing the Engine...

Page 56: ...e drain cock and drain water and sediment Close the drain cock when the fuel is clean 4 Dispose of waste properly Replacing the Fuel Fine Filter 1 Disconnect the battery negative cable 2 Close the fuel tank cock 3 Unscrew and remove filter cartridge Figure 4 5 1 Figure 4 5 Figure 4 5 4 Replace rubber seal 5 Replace filter NOTICE When replacing fuel filters always pre fill them with fresh clean fue...

Page 57: ... 4 6 4 is securely tightened 11 Connect water sensor Figure 4 6 1 12 Open the fuel cock 13 Connect the battery negative cable 14 Bleed air from the fuel system and check for leaks See Bleed the Fuel System on page 6 22 Changing the Engine Oil and Replacing the Engine Oil Filter Element To change engine oil and replace the engine oil filter element see Changing the Engine Oil and Replacing the Engi...

Page 58: ...ead sealing tape when installing anodes Anodes must make good metal to metal contact to perform properly 3 Install each anode using a new copper gasket and tighten to 25 N m 18 ft lb 4 Start engine and check for water leaks Checking or Replacing the Seawater Pump Impeller See Seawater Pump on page 7 18 Replacing the Turbocharger Heat Shield Remove bolts and replace the turbocharger heat shield Fig...

Page 59: ...ear or damage Checking the Flexible Engine Mounts Check the flexible engine mounts for wear or damage Perform the following maintenance every 500 hours of operation or 2 years whichever comes first Checking the Fuel Pump and Fuel Lines Draining and Refilling Closed Cooling System Engine Coolant Checking the Fuel Pump and Fuel Lines See Fuel System on page 6 1 Also see Engine Piping Diagrams on pag...

Page 60: ...CE Only use the engine coolant specified Other engine coolants may affect warranty coverage cause an internal buildup of rust and scale and or shorten engine life Prevent dirt and debris from contaminating engine coolant Carefully clean the filler cap and the surrounding area before you remove the cap NEVER mix different types of engine coolants This may adversely affect the properties of the engi...

Page 61: ...Engine Mounts Check flexible engine mounts for damage cracks or wear See Checking the Flexible Engine Mounts on page 4 15 Replacing the Seawater Pump Impeller See Checking or Replacing the Seawater Pump Impeller on page 4 14 Perform the following maintenance every 2000 hours of operation or 8 years whichever comes first Replacing Alternator Belt Replacing Alternator Belt See Checking Replacing the...

Page 62: ...PERIODIC MAINTENANCE Periodic Maintenance Procedures 4 18 BY Service Manual 2009 Yanmar Marine International This Page Intentionally Left Blank ...

Page 63: ... and Compounds 5 13 Tests and Adjustments 5 14 Test Compression 5 14 Repair 5 15 Cylinder Head 5 16 Cylinder Head Components 5 16 General Guidelines 5 17 Remove and Install Cylinder Head Cover 5 17 Remove and Install Glow Plugs 5 19 Remove Cylinder Head 5 19 Disassemble Cylinder Head 5 22 Clean Cylinder Head Components 5 24 Pressure Test the Cylinder Head 5 24 Inspect Cylinder Head Components 5 24...

Page 64: ...d Timing Gear Train 5 42 Components 5 42 Check and Adjust Camshaft Timing 5 44 Remove and Install Vibration Damper 4BY2 5 46 Remove and Install Vibration Damper 6BY2 5 47 Remove Timing Case Cover 5 48 Remove and Install Timing Chain 5 49 Install Timing Case Cover 5 49 Remove and Install Timing Chain Tensioner 5 50 Remove Camshafts 5 51 Install Camshafts 5 54 Cylinder Block and Crankshaft 5 56 Comp...

Page 65: ... 5 3 2009 Yanmar Marine International SAFETY PRECAUTIONS Before servicing the engine review the Safety Section on page 2 1 INTRODUCTION This section of the Service Manual describes the disassembly inspection and reassembly of the 4BY2 and 6BY2 engines ...

Page 66: ...pecifications Engine Model 4BY2 6BY2 Number of Cylinders In Line 4 In Line 6 Bore 84 mm 3 31 in 84 mm 3 31 in Stroke 90 mm 3 54 in 90 mm 3 54 in Effective Displacement 1 995 L 122 cu in 2 993 L 183 cu in Compression Ratio 16 5 1 16 5 1 Test Item Remarks Specification Cylinder Compression Test Compression Pressure 28 2 bar 406 29 psi ...

Page 67: ... 0 6240 0 003 in 6BY2 18 85 0 08 mm 0 742 0 003 in Valve Seat Angle 45 Outer Correction Angle 15 Inner Correction Angle 60 Valve Seat Width Intake 1 0 0 1 mm 0 039 0 004 in Valve Seat Width Exhaust 1 2 0 1 mm 0 047 0 004 in Valve Seat Surface Outside Diameter Intake 24 5 0 1 mm 0 965 0 004 in Valve Seat Surface Outside Diameter Exhaust 24 4 0 1 mm 0 961 0 004 in Camshaft Thrust Bearing Width 19 00...

Page 68: ...in Undersize 2 U 0 50 White 59 464 59 469 mm 2 3411 2 3413 in Crankshaft Bearing Clearance Radial 0 019 0 052 mm 0 0007 0 0020 in Crankshaft Thrust Bearings Standard 25 00 0 020 0 066 mm 0 9842 0 0008 0 0026 in Size 1 25 2 0 020 0 066 mm 0 9921 0 0008 0 0026 in Size 2 25 4 0 020 0 066 mm 1 000 0 0008 0 0026 in Crankshaft Axial Play 0 06 0 25 mm 0 0024 0 0098 in Connecting Rod Journals Standard 45 ...

Page 69: ... be measured Engine Cylinder Block Bore Diameter stage 0 84 007 0 007 mm 3 3074 0 0003 in Bore Diameter stage 1 84 257 0 007 mm 3 3172 0 0003 in Permitted out of round of cylinder bore 0 005 mm 0 0002 in Permitted conicity of cylinder bore 0 01 mm 0 0004 in Permitted total wear tolerance piston to cylinder 0 15 mm 0 006 in Oil Change Volume Includes Oil Filters 4BY2 8 0 L 8 5 qt 6BY2 11 0 L 11 5 q...

Page 70: ...80 Grade 12 9 Assembly Torque Initial Torque Torque angle 5 N m 44 in lb 20 N m 177 in lb 70 Cylinder Head with Cover Cylinder Head Bolts Replace wash and oil 4BY2 6BY2 M12 x 1 5 Initial Torque then Loosen all bolts 180 2nd Torque 1st Torque Angle 2nd Torque Angle 80 N m 59 ft lb 50 N m 37 ft lb 90 90 Seal Plug Replace screws 4BY2 6BY2 M14 x 1 5 30 N m 22 ft lb Camshaft Sprocket to Camshaft 4BY2 6...

Page 71: ...place Banjo Bolt and Sealing Rings 22 N m 195 in lb Turbocharger Oil Return to Crankcase 4BY2 6BY2 Hose Clamp 3 N m 27 in lb Exhaust Manifold to Cylinder Head 4BY2 Apply Copper Anti seize to Threads 19 N m 168 in lb 6BY2 13 N m 115 in lb Alternator Wires to Alternator 4BY2 M8 13 N m 115 in lb Alternator to Crankcase 4BY2 M10 38 N m 28 ft lb Belt Pulley with Free Wheel 4BY2 80 N m 59 ft lb Electric...

Page 72: ... Sensor to Fuel Rail 4BY2 6BY2 70 N m 52 ft lb Pressure Regulator to Fuel Rail 4BY2 6BY2 80 N m 59 ft lb Fuel Return to Rail 4BY2 6BY2 Banjo Bolt 25 N m 221 in lb Poly V Belt Drive Idler Pulley to Alternator Bracket 4BY2 M8 x 35 Grade 10 9 28 N m 21 ft lb Thermostat and Coolant Pipes Coolant Return Pipe to Crankcase and Oil Filter Housing 4BY2 M8x18 11 N m 97 in lb Glow Plugs Glow Plugs 4BY2 6BY2 ...

Page 73: ...Part No Tools not having part numbers must be obtained locally No Tool Name Applicable Model and Tool Size Illustration 1 Valve Spring Compressor OEM Part No 11 9 000 2 Valve Stem Seal Installer OEM Part No 11 6 370 Remover 11 1 960 Protector and 11 6 380 Installer 3 Cylinder Compression Tester OEM Part No 11 0 222 and 11 0 236 4 Piston Ring Compressor For Installing Piston Obtain Locally 5 Piston...

Page 74: ...measuring the outside diameters of crankshaft pistons piston pins etc 4 Cylinder Bore Gauge For measuring the inside diameters of cylinder bores bearing bores etc 5 Calipers For measuring outside diameters depth thickness and width 6 Depth Micrometer For measuring valve recession 7 Square For measuring valve spring inclination and straightness of parts 8 Torque Wrench For tightening nuts and bolts...

Page 75: ... ring gaps and piston ring side clearance No Instrument Name Application Illustration 0000841 Sealant Name Use Medium strength thread lock and sealer Timing Case Cover Guide Rail Pins Flywheel Bolts Copper Anti Seize Exhaust Manifold Mounting studs Three Bond 1207F Yanmar Part No 977770 1207F or equivalent Cylinder Head Cover Timing Case Cover Gasket ...

Page 76: ...e 5 19 2 Disconnect electrical connectors from all fuel injectors 3 Turn engine over several times using the starter motor to remove any loose debris in the cylinders 4 Assemble special tools OEM No 11 0 222 and 11 0 236 and install in glow plug port Figure 5 1 Figure 5 1 Figure 5 1 5 Turn engine with the starter motor until reading on gauge stabilizes Note reading on the gauge 6 Reset gauge and r...

Page 77: ...pen fuel connections 4 Drain engine coolant from cylinder block 5 Remove engine from boat Mount engine to a suitable engine repair stand having adequate weight capacity 6 Cap or plug all openings to prevent contamination 7 Remove starter motor and alternator 8 Clean engine by washing with solvent air or steam cleaning Carefully operate cleaning equipment so as to prevent any foreign matter or flui...

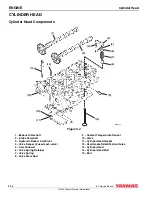
Page 78: ...amshaft 2 Intake Camshaft 3 Hydraulic Rocker Arm Pivot 4 Valve Keeper 2 used each valve 5 Cam Follower 6 Valve Spring Retainer 7 Valve Spring 8 Valve Stem Seal 9 Coolant Temperature Sensor 10 Valve 11 Cylinder Head Gasket 12 Head Gasket Identification Holes 13 Cylinder Head 14 Cylinder Head Bolt 15 Bolt 10 15 14 1 2 3 4 5 4 11 13 6 7 8 9 0003654 12 ...

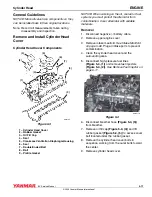
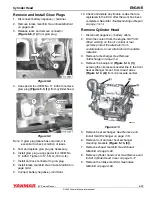
Page 79: ...tor from contamination Cover alternator with suitable materials Removal 1 Disconnect negative battery cable 2 Remove upper engine cover 3 Remove intake manifold See Intake Manifold on page 5 66 Plug all intake ports to prevent contamination 4 Clean the cylinder head cover and the surrounding area 5 Disconnect high pressure fuel lines Figure 5 4 1 and remove fuel injectors Figure 5 4 2 See Remove F...

Page 80: ...evenly from the center towards each end Tighten outer bolts evenly and diagonally 5 Install rubber gasket and oil filler cap 6 Breather blow by spacer is a two part assembly clean mating surfaces and seal the parts together Apply a bead of Loctite 5970 gasket sealant to the upper side of the blow by spacer as shown and assemble both halves Figure 5 7 Figure 5 7 7 Install assembled breather housing...

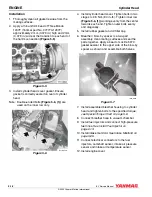
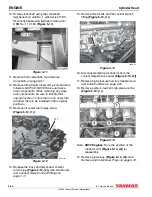
Page 81: ... trouble codes that are registered in the ECU after the work has been completed See After Troubleshooting or Repair on page 13 14 Remove Cylinder Head 1 Disconnect negative battery cable 2 Drain the coolant from the engine NOTICE When working on the oil coolant or fuel systems protect the alternator from contamination Cover alternator with suitable materials 3 Remove turbocharger See Remove Turboc...

Page 82: ...d in their original positions 13 Remove oil cooler return pipe screw Figure 5 12 1 Figure 5 12 Figure 5 12 14 Release the locks and disconnect coolant return pipe Figure 5 12 2 See Disconnect and Connect Quick Connect Fittings on page 7 11 15 Remove three bolts and the coolant branch fitting Figure 5 13 1 Figure 5 13 Figure 5 13 16 Disconnect electrical connector from the coolant temperature senso...

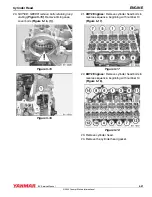
Page 83: ...bolts Figure 5 16 1 Figure 5 15 Figure 5 15 Figure 5 16 Figure 5 16 21 4BY2 Engines Remove cylinder head bolts in reverse sequence beginning with number 10 Figure 5 17 Figure 5 17 Figure 5 17 22 6BY2 Engines Remove cylinder head bolts in reverse sequence beginning with number 14 Figure 5 18 Figure 5 18 Figure 5 18 23 Remove cylinder head 24 Remove the cylinder head gasket ...

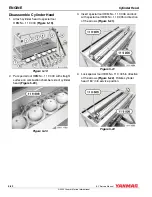
Page 84: ...ool OEM No 11 9 008 with straight surface on combustion chamber side of cylinder head Figure 5 20 Figure 5 20 Figure 5 20 3 Insert special tool OEM No 11 9 006 and lock with special tool OEM No 11 9 005 in direction of the arrows Figure 5 21 Figure 5 21 Figure 5 21 4 Lock special tool OEM No 11 9 005 in direction of the arrows Figure 5 22 Rotate cylinder head 180 into service position Figure 5 22 ...

Page 85: ...ace with special tool OEM No 11 9 011 8 NOTICE Mark all valve train components so they can be installed back in their original locations Remove valve keepers Figure 5 24 Figure 5 24 Figure 5 24 Figure 5 25 Figure 5 25 1 Valve 2 Valve Stem Seal 3 Valve Spring 4 Valve Spring Retainer 5 Valve Keeper 2 used each valve 9 Release tension on valve spring and remove valve spring retainer and valve spring ...

Page 86: ... 6 407 and 11 6 408 3 Connect air source to cylinder head and immerse in water bath Apply pressure and adjust to 4 5 bar 65 psi Figure 5 27 Figure 5 27 Figure 5 27 Note Reduce surface tension of water used for test with a few drops of detergent 4 Inspect cylinder head for discharge of bubbles indicating a crack in the casting Inspect Cylinder Head Components Clean all gasket material sealant and c...

Page 87: ...specification the cylinder head and valves must be replaced Specifications Replace Valve Stem Seals 1 Remove the valve spring It is not necessary to remove valve 2 Press special tool OEM No 11 6 370 onto valve stem seal and turn Figure 5 29 Figure 5 29 Figure 5 29 3 Remove special tool together with valve stem seal 4 Lubricate valve stem and install special tool OEM No 11 1 960 5 Coat new valve st...

Page 88: ...ring compressor OEM No 11 9 015 on lever OEM No 11 9 009 Figure 5 32 6 Install valve spring and retainer 7 Press down to compress valve spring and lock in place with special tool OEM No 11 9 011 Figure 5 32 8 Install valve keepers 9 Allow the valve spring to expand against the keepers Repeat with remaining valves Determine Cylinder Head Gasket Thickness 1 Thoroughly clean all old gasket material f...

Page 89: ...d gasket thickness See Determine Cylinder Head Gasket Thickness on page 5 26 If those items remain unchanged select a gasket that matches the one removed during disassembly 2 Check condition and placement of alignment dowel sleeves Figure 5 36 1 Figure 5 36 Figure 5 36 3 Ensure the gasket surfaces of the cylinder head and cylinder block are clean and dry Transition areas Figure 5 36 2 must be abso...

Page 90: ...lts must be installed whenever they are removed NEVER wash off bolt coating Figure 5 374BY2 Engine Figure 5 37 Figure 5 386BY2 Engine Figure 5 38 Figure 5 39 Figure 5 39 Cylinder Head Torque Specification 7 Install the timing case cover screws Figure 5 40 1 and tighten Figure 5 40 Figure 5 40 Item Specification First Tighten all bolts to 80 N m 59 ft lb Second Loosen all bolts at least 180 Third T...

Page 91: ... Figure 5 42 12 Install coolant branch fitting Figure 5 42 1 with a new seal and tighten bolts 13 Connect oil cooler return pipe Figure 5 43 2 to thermostat housing Figure 5 43 Figure 5 43 14 Install bolt Figure 5 43 1 15 Install fuel injectors See Install Fuel Injector on page 6 13 Connect high pressure lines using special tool OEM No 13 5 020 See Remove and Install High Pressure Fuel Lines on pa...

Page 92: ... Install front and rear heat exchanger brackets Figure 5 45 3 Figure 5 45 Figure 5 45 22 Install oil pressure sender line banjo bolt Figure 5 45 1 and new copper gaskets Tighten securely 23 Connect wires Figure 5 45 2 to oil pressure sender 24 Install intake manifold See Intake Manifold on page 5 66 25 Install heat exchanger See Remove and Install Heat Exchanger on page 7 13 26 Install intake mani...

Page 93: ...p of the cylinder if necessary NOTICE Engines with high operating hours may have a ridge near the top of the cylinders that will catch the piston rings and make it impossible to remove the pistons Use a suitable ridge reamer to remove ridges and carbon prior to removing pistons 6 Mark each piston and connecting rod before removing them They must be installed in the same location and orientation as...

Page 94: ...moved to slide the ring squarely into the cylinder bore Measure the end gap of each piston ring Figure 5 50 Figure 5 50 Figure 5 50 Note Measure cylinder bore to ensure it is within specifications before measuring piston ring end gap See Inspect Cylinder Block on page 5 62 Specifications 2 Clean piston ring grooves using a piston ring groove cleaning tool Follow tool manufacturer s instructions fo...

Page 95: ...Repeat steps for each of the cylinders and the piston rings for that specific cylinder Assemble Piston and Connecting Rod 1 Ensure the piston and rings are clean and the ring grooves are not damaged 2 Oil the wrist pin bore and wrist pin before assembling 3 Check the fit of the wrist pin in the connecting rod The wrist pin should pass through the bushing with little force and not have any signific...

Page 96: ... 2 Second Piston Ring 3 Oil Ring 4 Oil Ring Expander Spring Install Piston and Connecting Rod 1 NOTICE ALL parts that are being reused MUST be installed in their original location and orientation Bearing inserts for the connecting rod and rod cap are different Install bearing inserts having an S and blue dye Figure 5 57 in connecting rod Install bearing inserts having red dye Figure 5 56 in rod ca...

Page 97: ...line with the wrist pin Install piston ring compressor Figure 5 59 Figure 5 59 Figure 5 59 8 Carefully install the connecting rod and piston so that the arrow on the piston points toward the front end of the engine Figure 5 60 NOTICE NEVER force piston or drive piston into cylinder bore Install using only finger pressure Figure 5 60 Figure 5 60 9 Remove special tool OEM No 11 6 330 Figure 5 61 Fig...

Page 98: ...ly open If necessary clean with compressed air WARNING Flying Object Hazard ALWAYS wear eye protection when servicing the engine and when using compressed air or high pressure water Dust flying debris compressed air pressurized water or steam may injure your eyes NOTICE Use care not to damage the piston cooling nozzles The oil spray must hit the piston precisely If it does not the piston will beco...

Page 99: ...ng 5 Remove 11 bolts Figure 5 64 3 and Figure 5 65 3 Remove housing Figure 5 64 4 and Figure 5 65 4 Use care not to lose the two alignment sleeves Figure 5 64 5 and Figure 5 65 5 and the dowel Figure 5 64 6 and Figure 5 65 6 6 Clean mating surfaces Install alignment sleeves and dowel in flywheel housing 7 Install flywheel housing 8 Install washers on the M10 x 130 M8 x 130 and M8 x 40 bolts 9 Inst...

Page 100: ...ing tool 4 Install flywheel housing See Remove and Install Flywheel Housing on page 5 37 Engines with Stern Drive Removal 1 Remove flywheel housing See Remove and Install Flywheel Housing on page 5 37 2 Install flywheel holding tool to prevent flywheel rotation 3 Remove six bolts and washers Figure 5 67 1 Figure 5 67Stern Drive Engines Figure 5 67 4 Remove coupler Figure 5 67 2 5 Remove eight bolt...

Page 101: ...d Install Drive Coupling on page 5 38 2 Remove bolts Figure 5 68 1 retaining the flywheel Figure 5 68 Figure 5 68 Note Flywheel bolts are T 60 Torx head 3 Remove flywheel Inspect guide bushing Figure 5 68 3 in crankshaft and remove if damaged 4 Remove torque plate Figure 5 68 2 5 Inspect the flywheel for damage Install a new flywheel if the ring gear teeth are chipped broken or have become so worn...

Page 102: ...he rear crankshaft seal and housing are available only as an assembly The seal has a protective bushing Figure 5 70 1 installed and is to be used during installation Use only the supplied bushing as an installation tool Keep the bushing as a special tool for use in future service Figure 5 70 Figure 5 70 6 Lubricate the crankshaft outside diameter Push the seal housing squarely onto the crankshaft ...

Page 103: ...dium strength thread lock and sealer to the threads of the flywheel bolts Figure 5 71 1 Install bolts and tighten to initial torque specification NOTICE NEVER reuse flywheel bolts ALWAYS install new flywheel bolts Flywheel Bolt Torque 5 Tighten flywheel bolts to final torque specification 6 Install drive coupling See Remove and Install Drive Coupling on page 5 38 7 Install flywheel housing See Rem...

Page 104: ...ft and Timing Gear Train 5 42 BY Service Manual 2009 Yanmar Marine International CAMSHAFT AND TIMING GEAR TRAIN Components Figure 5 72 Figure 5 72 0004027 19 20 21 5 22 1 2 3 4 5 6 7 8 9 14 16 15 5 13 12 10 11 18 17 ...

Page 105: ...sure Fuel Pump 5 Guide Rail Pin 6 Upper Timing Chain 7 Sprocket 8 Timing Case Cover Gasket 9 Timing Case Cover 10 O Ring 11 Access Plug 12 Plug 13 Seal 14 Guide Rail 15 Sprocket to High Pressure Pump Nut 16 Lower Timing Chain 17 Crankshaft Sprocket 18 Lower Chain Tensioner 19 Hydraulic Tensioner 20 Pivot Pin 21 Upper Chain Tensioner 22 Sprocket Retaining Screw ...

Page 106: ...80 Figure 5 74 NOTICE NEVER rotate the crankshaft backward If the crankshaft is turned past TDC rotate two more turns 720 to bring No 1 piston back to TDC Figure 5 74 Figure 5 74 5 Install special tool OEM No 11 6 321 Figure 5 75 1 on the flats of the intake camshaft Figure 5 75 2 The tool must set firmly on the machined gasket surface Figure 5 75 3 on each side of the cylinder head If it does not...

Page 107: ...marks Figure 5 77 2 will meet Figure 5 77 Figure 5 77 4 Verify position by checking the camshaft timing marks Figure 5 77 2 on gears are aligned The single mark on intake camshaft gear must fall between the two marks on the exhaust camshaft gear NOTICE NEVER rotate the crankshaft backward If the crankshaft is turned past TDC rotate two more turns 720 to bring No 1 piston back to TDC 5 Secure crank...

Page 108: ...ten to 15 N m 133 in lb 11 Install cylinder head cover See Remove and Install Cylinder Head Cover on page 5 17 Remove and Install Vibration Damper 4BY2 1 Disconnect battery negative cable 2 Remove alternator and seawater pump drive belts See Remove and Install Alternator on page 11 5 and Replace Seawater Pump Belt on page 7 19 3 Remove starter motor See Remove and Install Starter Motor on page 10 ...

Page 109: ...emove alternator and seawater pump drive belts See Remove and Install Alternator on page 11 5 and Replace Seawater Pump Belt on page 7 19 3 Remove bolts Figure 5 84 1 Figure 5 84 Figure 5 84 4 Remove the vibration damper 5 Install vibration damper on crankshaft and install new bolts 6 Torque turn tighten bolts diagonally to specification Specifications 7 Install alternator and seawater pump belts ...

Page 110: ...tall Alternator on page 11 5 and Replace Seawater Pump Belt on page 7 19 5 Remove oil sump See Remove and Install Oil Sump on page 8 11 6 Remove cylinder head See Remove Cylinder Head on page 5 19 7 Remove vibration dampener See Remove and Install Vibration Damper 4BY2 on page 5 46 or Remove and Install Vibration Damper 6BY2 on page 5 47 8 Remove front crankshaft seal See Replace Front Crankshaft ...

Page 111: ... Pressure Fuel Pump on page 6 15 6 Remove sprockets and timing chains 7 Install lower chain on sprockets and install as an assembly 8 Install nut Figure 5 87 2 and tighten to 65 N m 48 ft lb 9 Install tensioner rail and guide rail Remove retainer Figure 5 87 1 10 Install timing case cover See Install Timing Case Cover on page 5 49 Install Timing Case Cover Note The front crankshaft seal must be in...

Page 112: ...tor belt tensioner 10 Install cylinder head See Install Cylinder Head on page 5 27 11 Install oil sump See Remove and Install Oil Sump on page 8 11 12 4BY2 Install alternator See Remove and Install Alternator on page 11 5 13 Install alternator belt and belt guard See Remove and Install Alternator on page 11 5 and Replace Seawater Pump Belt on page 7 19 14 Add engine oil See Change Engine Oil and R...

Page 113: ...ad Cover on page 5 17 2 Drain engine coolant 3 Remove alternator drive belt See Remove and Install Alternator on page 11 5 4 Remove cover Figure 5 90 1 and bracket Figure 5 90 2 Figure 5 90 Figure 5 90 5 Rotate the crankshaft until No 1 cylinder intake camshaft lobes are facing down 6 Remove one bolt Figure 5 91 1 Figure 5 91 Figure 5 91 Note One bolt must be removed prior to rotating No 1 piston ...

Page 114: ...until No 1 cylinder is at TDC of the power stroke The front lobe of each camshaft Figure 5 95 1 will be facing toward the exhaust side and the timing marks Figure 5 95 2 will meet Figure 5 95 Figure 5 95 12 Verify position by checking that the camshaft timing marks Figure 5 95 2 on gears are aligned The single mark on intake camshaft gear must fall between the two marks on the exhaust camshaft gea...

Page 115: ...e camshaft Figure 5 98 1 Figure 5 98 Figure 5 98 17 Release guide rails Figure 5 98 2 from mount and remove 18 Remove camshaft sprocket Figure 5 99 2 from chain Figure 5 99 1 as shown by arrow Figure 5 99 Figure 5 99 19 Evenly loosen all camshaft bearing cap bolts Figure 5 100 1 in 1 2 turn increments working from each end towards the center Figure 5 100 Figure 5 100 20 Remove all bearing caps NOT...

Page 116: ...ure 5 102 Figure 5 102 3 Install camshafts Ensure the timing marks Figure 5 103 1 on the gears align as shown When the timing marks are aligned the lobes Figure 5 103 2 for cylinder No 1 will face the exhaust side of the engine Note The valves will hold the camshafts above the bearing seats until all bolts are tightened Figure 5 103 Figure 5 103 Note Bearing caps are numbered beginning at the fron...

Page 117: ...lts to 10 N m 89 in lb 8 Install chain on sprocket and install sprocket on intake camshaft Tighten bolts until snug 9 Install guide rails 10 Apply medium strength thread lock and sealer to the threads of the guide rail bearing pins Install and tighten to 20 N m 177 in lb 11 Adjust camshaft timing See Adjust Camshaft Timing on page 5 45 12 Remove flywheel holding tool and install protective cap 13 ...

Page 118: ...inder Block and Crankshaft 5 56 BY Service Manual 2009 Yanmar Marine International CYLINDER BLOCK AND CRANKSHAFT Components Figure 5 105 Figure 5 105 0004029 1 2 3 4 5 5 6 13 12 12 14 15 16 17 7 8 9 10 11 9 9 18 ...

Page 119: ...el 8 Rear Crankshaft Seal Assembly 9 Lower Main Bearing Inserts 10 Lower Main Thrust Bearing Insert 11 Oil Deflector 12 Upper Main Bearing Inserts 13 Upper Main Thrust Bearing Insert 14 Main Bearing Cap Bolt 15 Dowel Sleeve 16 Timing Chain Oiler 17 Seal 18 Main Bearing Cap Note Service procedures for 4BY2 and 6BY2 engines are similar therefore graphics shown will be representative and might not ma...

Page 120: ...case cover See Remove Timing Case Cover on page 5 48 7 Remove timing chain See Remove and Install Timing Chain on page 5 49 8 Remove oil sump oil suction pipe and strainer and the oil pump See Oil Pump on page 8 12 9 Remove oil deflector Figure 5 106 1 Figure 5 106 Figure 5 106 10 Remove pistons and connecting rods See Remove and Disassemble Piston and Connecting Rod on page 5 31 11 Before removin...

Page 121: ...109 14 Remove crankshaft Inspect and measure crankshaft journals as required Measure Oil Clearance Oil clearance should be checked during disassembly to determine the extent of wear and during reassembly to ensure long engine life The same procedure is done for both connecting rods and main bearings 1 Remove the bearing cap Do not remove the bearing inserts at this time 2 Wipe oil from the bearing...

Page 122: ...gure 5 111 Figure 5 111 7 Figure 5 112 and Figure 5 113 show the relationship of each color coding compared to diameter If necessary install bearing inserts having a different color coding Figure 5 112Main Bearings Figure 5 112 1 Crankshaft 2 Oil Clearance 3 Bearing Inserts Yellow Green White 4 Bearing Cap Ge Yellow Gn Green Ws White Figure 5 113Connecting Rod Bearings Figure 5 113 1 Crankshaft 2 ...

Page 123: ...0 25 Yellow 59 727 to 59 733 mm 2 3514 to 2 3517 in Undersize 1 U 0 25 Green 59 720 to 59 726 mm 2 3512 to 2 3514 in Undersize 1 U 0 25 White 59 714 to 59 719 mm 2 3509 to 2 3511 in Undersize 2 U 0 50 Yellow 59 477 to 59 483 mm 2 3416 to 2 3418 in Undersize 2 U 0 50 Green 59 470 to 59 476 mm 2 3413 to 2 3416 in Undersize 2 U 0 50 White 59 464 to 59 469 mm 2 3411 to 2 3413 in Crankshaft Bearing Cle...

Page 124: ...ts at three places Figure 5 114 a b c and in two directions Figure 5 114 d and e in each cylinder Figure 5 114 Figure 5 114 Cylinder Bore Specifications Install Crankshaft 1 Select the correct bearing as follows a Locate and record the grinding size of crankshaft Figure 5 115 Figure 5 115 Figure 5 115 b The crankshaft will be marked with yellow green or white paint to determine the correct bearing...

Page 125: ... cylinder block and main bearing caps Apply a generous amount of clean engine oil to the bearing inserts Ensure all oil holes are properly aligned Do not lubricate the crankshaft journals at this time 3 Carefully lower the crankshaft into place Do not rotate crankshaft 4 Check bearing oil clearance before proceeding See Measure Oil Clearance on page 5 59 5 Apply clean engine oil to the crankshaft ...

Page 126: ...over using a new gasket See Install Timing Case Cover on page 5 49 18 Install vibration damper See Remove and Install Vibration Damper 4BY2 on page 5 46 or Remove and Install Vibration Damper 6BY2 on page 5 47 19 Install flywheel See Install Flywheel on page 5 41 20 Install flywheel housing See Remove and Install Flywheel Housing on page 5 37 21 Install cylinder head See Install Cylinder Head on p...

Page 127: ...he seal housing 5 Turn center screw in to remove seal 6 Wipe the sealing surface in the cover clean Figure 5 1234BY2 Engines Figure 5 123 Figure 5 1246BY2 Engines Figure 5 124 7 Install seal protector tool OEM No 11 7 400 4BY2 or 11 6 470 6BY2 on end of crankshaft Lubricate surface of tool with clean engine oil 8 Slip seal over seal protector until it contacts case cover Remove seal protector NOTI...

Page 128: ...Damper 4BY2 on page 5 46 and See Remove and Install Vibration Damper 6BY2 on page 5 47 13 Install belts See Remove and Install Alternator on page 11 5 and Replace Seawater Pump Belt on page 7 19 INTAKE MANIFOLD Remove 1 Remove injector harness connectors Figure 5 127 1 from all fuel injectors Figure 5 127 Figure 5 127 2 Remove screws Figure 5 127 2 and move injector harness out of the way 3 Discon...

Page 129: ...e 5 130 1 Figure 5 130 Figure 5 130 9 Remove nuts Figure 5 130 2 10 Remove intake manifold Install 1 Clean all sealing surfaces 2 Install new sealing rings Figure 5 131 1 Figure 5 131 Figure 5 131 3 Check condition of rubber mounts Figure 5 131 2 and replace if damaged 4 Install manifold on engine 5 Install bolts and nuts Tighten to 15 N m 133 in lb 6 Install fuel fine filter Connect inlet Figure ...

Page 130: ...t Figure 5 133 5 Install four screws Figure 5 133 3 and tighten to 9 5 N m 84 in lb Figure 5 133 Figure 5 133 9 Connect electrical connectors to charge air pressure sensor Figure 5 133 1 and charge air temperature sensor Figure 5 133 2 10 Secure injector harness to intake manifold and connect to fuel injectors 11 Bleed the fuel system See Bleed the Fuel System on page 6 22 0003781 1 4 5 3 2 ...

Page 131: ...34 Install 1 Clean mounting surfaces of all gasket material 2 Apply a light coating of copper anti seize to mounting studs 3 Install new gaskets 4 Install exhaust manifold with new nuts 5 Tighten exhaust manifold nuts to the torque specification using a uniform cross pattern starting from the center out to each end Specifications 6 Install turbocharger See Install Turbocharger on page 9 6 7 Instal...

Page 132: ...ENGINE Exhaust Manifold 5 70 BY Service Manual 2009 Yanmar Marine International This Page Intentionally Left Blank ...

Page 133: ...gines 6 6 6BY2 Engines 6 6 Fuel Flow Diagram 6 7 Tests and Adjustments 6 9 Measure Fuel Feed Pump Pressure 6 9 Test Return Fuel Pressure 6 10 Repair 6 11 Remove Fuel Injector 6 11 Clean Fuel Injector Cavities 6 12 Install Fuel Injector 6 13 Remove and Install High Pressure Fuel Lines 6 14 Replace the Fuel Feed Pump 6 15 Replace High Pressure Fuel Pump 6 15 Replace Fuel Filters 6 19 Remove and Inst...

Page 134: ...FUEL SYSTEM 6 2 BY Service Manual 2009 Yanmar Marine International This Page Intentionally Left Blank ...

Page 135: ...nternational SAFETY PRECAUTIONS Before servicing the fuel system review the Safety Section on page 2 1 INTRODUCTION This section of the Service Manual describes the procedures necessary to remove install and repair fuel system components as used on the Yanmar 4BY2 and 6BY2 engines ...

Page 136: ...um All speeds 0 1 bar 3 in Aq Fuel Temperature Maximum before speed reduction begins 80 C 176 F Component Tightening Torque Lubricating Oil Application Thread Portion and Seat Surface Reference Page Fuel Injector Retaining Nut 9 N m 80 in lb Not Applied Install Fuel Injector on page 6 13 High Pressure Fuel Regulator Retaining Nut 80 N m 59 ft lb ReplaceHigh Pressure Fuel Regulator on page 12 25 Hi...

Page 137: ... OEM Part No Tools not having part numbers must be acquired locally No Tool Name Applicable Model and Tool Size Illustration 1 Diagnostic Tool Obtain Locally 2 Union Nut Wrench For Removing and Installing High Pressure Fuel Lines OEM Part No 13 5 020 3 Injector Removal Adapter For Removing Fuel Injectors OEM Part No 13 5 231 13 5 232 and 13 5 233 3 Slide Hammer For Removing Fuel Injectors OEM Part...

Page 138: ... High Pressure Line from Pump 7 Rubber Insulator 8 High Pressure Pump with Fuel Measuring Unit 9 High Pressure Fuel Regulator 6BY2 Engines Figure 6 2 Figure 6 2 1 High Pressure Line Cylinders No 1 3 and 5 2 High Pressure Line Cylinders No 2 4 and 6 3 Fuel Injectors 4 High Pressure Fuel Rail 5 High Pressure Fuel Regulator 6 High Pressure Line from Pump 7 High Pressure Pump with Fuel Measuring Unit ...

Page 139: ...ure Fuel Pump 6 High Pressure Fuel Supply Line 7 High Pressure Fuel Rail 8 Fuel Injection Line 9 Fuel Injector 10 Fuel Injector Return Hose 11 Common Rail Return Line 12 Return Fuel Tee with Back Pressure Valve 13 Return Fuel to Fuel Tank with Over Pressure Valve 14 High Pressure Fuel Rail Pressure Sensor 15 High Pressure Fuel Regulator ECU Controlled 16 Fuel Volume Regulator ECU Controlled 000649...

Page 140: ...p 6 High Pressure Fuel Supply Line 7 High Pressure Fuel Rail 8 Fuel Injection Line 9 Fuel Injector 10 Fuel Injector Return Hose 11 Common Rail Return Line 12 Return Fuel Tee with Back Pressure Valve 13 Return Fuel to Fuel Tank with Over Pressure Valve 14 High Pressure Fuel Rail Pressure Sensor 15 High Pressure Fuel Regulator ECU Controlled 16 Fuel Volume Regulator ECU Controlled 10 9 8 15 2 3 12 4...

Page 141: ...table fuel pressure gauge Figure 6 5 1 to a tee and connect a short length of hose Figure 6 5 3 to one of the remaining two legs of the tee Figure 6 5 2 Figure 6 5 Figure 6 5 2 Disconnect the fuel line from the fuel feed pump outlet Figure 6 6 1 Figure 6 6 Figure 6 6 3 Connect fuel pressure gauge assembly between disconnected ends Install and tighten hose clamps 4 Start engine and set speed to low...

Page 142: ...et restriction and return line pressure are within specifications replace the electric fuel feed pump Test Return Fuel Pressure Note This test is dependent on the fuel supply Test the low pressure fuel system prior to performing this test See Measure Fuel Feed Pump Pressure on page 6 9 1 Assemble a tee hose and 0 to 100 kPa 0 to 15 psi pressure gauge 2 Disconnect the hose from the fuel return line...

Page 143: ...6 4 Remove return fuel line from fuel injector See Replace Injector Return Fuel Line on page 6 21 5 If removing only one fuel injector remove the clamp Figure 6 9 1 joining the fuel injector lines to each other NOTICE Immediately cap or plug all openings to prevent contamination of system Figure 6 9 Figure 6 9 6 Remove high pressure fuel line Figure 6 9 2 from injector and fuel rail See Remove and...

Page 144: ...igure 6 13 4 Ensure O ring Figure 6 13 3 is in place and insert the tip into hole at bottom of injector cavity 5 Remove tool OEM No 13 5 214 from injector cavity leaving the tip in hole at bottom of cavity 6 Push brush Figure 6 13 4 into guide sleeve special tool OEM No 13 5 210 Figure 6 13 5 7 Insert brush and sleeve into injector cavity until it touches the bottom Figure 6 14 Figure 6 14 Figure ...

Page 145: ...en installing an injector Make sure all sealing surfaces are clean 3 Install new gasket Figure 6 17 1 on tip of injector Figure 6 17 2 Figure 6 17 Figure 6 17 4 Place the retainer Figure 6 17 3 on the injector as shown Note If installing used fuel injectors clean the stem and nozzle prior to installation 5 Install the injector and retainer as an assembly 6 Install the two nuts Figure 6 18 1 and ti...

Page 146: ...stallation 6 If removing high pressure line between high pressure pump and fuel rail Figure 6 20 1 disconnect glow plug connector if equipped Figure 6 20 2 4BY2 Engines Rubber mount Figure 6 20 3 will be removed with the line Figure 6 20 Figure 6 20 7 Remove high pressure fuel line s NOTICE Immediately cap or plug all openings to prevent contamination of system 8 Install line s and start all union...

Page 147: ...ine and check for leaks 14 Check and delete any trouble codes that are registered in the ECU after the work has been completed Replace High Pressure Fuel Pump Removal NOTICE When working on the oil coolant or fuel systems you must protect the alternator from contamination Cover alternator with suitable materials 1 Disconnect the battery negative cable 2 Shut off all valves in the fuel supply syste...

Page 148: ... Figure 6 24 11 Thread special tool OEM No 13 5 192 into timing case cover Figure 6 25 Figure 6 25 Figure 6 25 12 Thread special tool OEM No 13 5 191 without jack screw Figure 6 26 1 into sprocket by hand until firmly seated Figure 6 26 Figure 6 26 13 Thread jack screw Figure 6 26 1 into special tool until firmly in contact with end of pump shaft 14 Remove three nuts Figure 6 27 1 Figure 6 27 Figu...

Page 149: ... be held in the correct position for reassembly Figure 6 28 Figure 6 28 Installation 1 Remove jack screw Figure 6 29 1 but leave sleeve Figure 6 29 2 special tool OEM No 13 5 192 installed Figure 6 29 Figure 6 29 2 Ensure gasket surfaces of the engine block and high pressure pump are clean Install new gasket Figure 6 30 1 Figure 6 30 Figure 6 30 3 Install high pressure fuel pump and install three ...

Page 150: ...oat of oil to O ring and install plug Tighten to M30 x 1 0 70 N m 52 ft lb M40 x 1 5 30 N m 22 ft lb Figure 6 34 Figure 6 34 7 NOTICE Start both union nuts on high pressure line before tightening either one Install high pressure line and tighten union nuts Figure 6 35 4 using special tool OEM No 13 5 020 to 23 N m 204 in lb See Remove and Install High Pressure Fuel Lines on page 6 14 Figure 6 35 F...

Page 151: ... Disconnect the battery negative cable 2 Close the fuel tank cock 3 Unscrew and remove filter cartridge Figure 6 36 1 Figure 6 36 Figure 6 36 4 Replace rubber seal 5 Replace filter NOTICE When replacing fuel filters always pre fill them with fresh clean fuel to improve the system ability to be bled 6 Hand tighten cartridge to filter 7 Connect the battery negative cable 8 Bleed the fuel system and ...

Page 152: ... 11 Connect water sensor connector Figure 6 37 1 12 Open the fuel cock 13 Connect the battery negative cable 14 Bleed fuel system and check for leaks See Bleed the Fuel System on page 6 22 Remove and Install Fuel Rail 1 Disconnect the battery negative cable 2 Shut off all valves in the fuel supply system 3 Remove intake manifold See Intake Manifold on page 5 66 4 Use special socket Figure 6 38 2 t...

Page 153: ...uel Line 1 Disconnect the battery negative cable 2 Shut off all valves in the fuel supply system 3 Remove intake manifold See Intake Manifold on page 5 66 NOTICE When working on the oil coolant or fuel systems you must protect the alternator against contamination Cover alternator with suitable materials 4 Push clip Figure 6 40 1 in direction of arrow and remove fitting Figure 6 40 2 from fuel inje...

Page 154: ...ing the fuel filter water separator or replacing a fuel system component The fuel feed pump is ECU controlled and will operate for only 10 seconds when the key switch is turned to ON and the engine is not running or being started For this reason the key switch must be repeatedly turned to ON then to OFF to sufficiently bleed the fuel system 1 Turn the key switch to ON and leave on for 10 seconds 2...

Page 155: ... System and Filler Cap 7 7 Test Thermostat 7 8 Repair 7 8 Drain and Refill Seawater Cooling System 7 8 Check and Replace Anodes 7 9 Drain and Fill Closed Cooling System 7 10 Disconnect and Connect Quick Connect Fittings 7 11 Remove and Install Hydraulic Oil Cooler 7 11 Inspect and Clean Hydraulic Oil Cooler 7 12 Remove and Install Charge Air Cooler 7 12 Disassemble and Assemble Charge Air Cooler 7...

Page 156: ...COOLING SYSTEM 7 2 BY Service Manual 2009 Yanmar Marine International This Page Intentionally Left Blank ...

Page 157: ...EVER allow coolant to come into contact with hot surfaces or insulation material Only use the engine coolant specified Other engine coolants may affect warranty coverage cause an internal buildup of rust and scale and or shorten engine life Prevent dirt and debris from contaminating the engine coolant Carefully clean the radiator cap and the surrounding area before you remove the cap NEVER mix dif...

Page 158: ...t Test Item Model Specification Reference Page Cooling System Test Pressure All 1 4 bar 20 psi Pressure Test Cooling System and Filler Cap on page 7 7 Filler Cap Test Pressure All 1 4 bar 20 psi Thermostat Marking Begins Opening Fully Open Test Thermostat on page 7 8 All 88 C 88 C 190 F 96 C 205 F Coolant Capacity Approximate 4BY2 10 0 L 10 6 qt 6BY2 13 0 L 13 7 qt Component Torque Lubricating Oil...

Page 159: ...W part numbers are referred to as OEM Part No Tools not having part numbers must be obtained locally MEASURING INSTRUMENTS No Tool Name Applicable Model and Tool Size Illustration 1 Cooling System Tester For pressure testing the cooling system and filler cap Obtain locally 2 Belt Tool For removing and installing seawater pump belt 0003828 No Instrument Name Application Illustration 1 Torque Wrench...

Page 160: ...e shown 6BY2 is similar 1 Seawater Supply 2 Seawater Pump 3 Hydraulic Oil Cooler 4 Charge Air Cooler 5 Engine Heat Exchanger 6 Exhaust Seawater Mixing Elbow 7 Exhaust Seawater Exit 8 Engine Coolant Pump 9 Thermostat 10 Engine Oil Cooler 11 Engine Coolant Passages 12 Coolant Recovery Tank 13 Water Cooled Exhaust Manifold 2 1 3 4 5 6 7 12 13 9 8 10 11 0006511 ...

Page 161: ...he engine to cool before attempting to remove the filler cap 2 Check that the lugs and sealing flange on the filler pipe are undamaged and free from anything that might prevent a good seal 3 Install the tester and adapter in place of the filler cap 4 Pump until pressure is 1 45 bar 21 psi Figure 7 2 Figure 7 2 Figure 7 2 5 Pressure should hold steady If the pressure drops there is leakage in the s...

Page 162: ...nd Refill Seawater Cooling System Note If water fails to drain from any open drain cock or port remove the cock completely and probe the opening with a small piece of wire to loosen debris 1 Open the lower seawater drain cock Figure 7 4 1 located in the piping between the seawater pump and hydraulic oil cooler Allow to drain Figure 7 4 Figure 7 4 2 Open the drain cock Figure 7 4 2 on the bottom of...

Page 163: ... should be inspected and replaced periodically See Periodic Maintenance Schedule on page 4 5 for the recommended frequency Anodes are located in the heat exchanger Figure 7 6 2 and the charge air cooler Figure 7 6 1 Figure 7 6 Figure 7 6 An anode is also located in the optional high rise elbow Figure 7 6 3 1 Drain cooling system See Drain and Refill Seawater Cooling System on page 7 8 2 Remove eac...

Page 164: ...emove and Install Heat Exchanger on page 7 13 Ensure the drain cock Figure 7 8 2 on the heat exchanger is closed Figure 7 8 Figure 7 8 7 If not already done remove the filler cap Figure 7 8 1 from the heat exchanger 8 Inspect the cap gasket and flange on the filler neck for damage Replace if necessary 9 Check the rubber hose connecting the coolant recovery tank to the heat exchanger Be sure the ho...

Page 165: ...efill Seawater Cooling System on page 7 8 2 Loosen clamps and remove seawater pipe Figure 7 10 1 Figure 7 10 Figure 7 10 3 Loosen clamps and remove seawater pipe Figure 7 10 2 4 Remove hydraulic lines from ports Figure 7 10 3 Allow fluid to drain into an appropriate container Dispose of waste properly 5 Loosen clamps Figure 7 10 4 completely and remove hydraulic oil cooler 6 Inspect cooler for dam...

Page 166: ...ooler 1 Drain seawater system See Drain and Refill Seawater Cooling System on page 7 8 2 Disconnect seawater pipe between hydraulic oil cooler and charge air cooler Figure 7 12 1 Figure 7 12 Figure 7 12 3 Disconnect seawater pipe between charge air cooler and heat exchanger Figure 7 12 2 4 Disconnect pipe between charge air cooler and turbocharger Figure 7 12 3 5 Remove pipe between charge air coo...

Page 167: ...tubes consult a local radiator repair shop Note ALWAYS install new O rings 9 Install new O rings Figure 7 13 2 on cooler core 10 Install cooler core Figure 7 13 3 and inlet cover Figure 7 13 1 11 Install one O ring Figure 7 13 6 between core and housing Figure 7 13 9 12 Install spacer Figure 7 13 5 remaining O ring Figure 7 13 6 and outlet cover Figure 7 13 4 13 Install new anode Figure 7 13 7 and...

Page 168: ...semble and Assemble Heat Exchanger 1 Remove heat exchanger from engine See Remove and Install Heat Exchanger on page 7 13 2 Remove outlet cover Figure 7 16 1 and spacer Figure 7 16 2 Figure 7 16 Figure 7 16 3 Remove inlet cover Figure 7 16 5 4 Pull core from housing 5 Remove O rings Figure 7 16 3 and 4 6 Remove anode Figure 7 16 7 and copper gasket Figure 7 16 6 7 NOTICE NEVER use caustic soda to ...

Page 169: ...rd 3 Remove seawater pump belt and alternator belt See Remove and Install Alternator on page 11 5 and Replace Seawater Pump Belt on page 7 19 4 Disconnect the coolant hoses from the coolant pump cover 5 Remove coolant pump cover bolts and coolant pump cover from coolant pump housing Figure 7 17 2 Note Coolant pump cover is shown removed for clarity Figure 7 17 6 Remove the four coolant pump bolts ...

Page 170: ... and check for coolant leaks Check the level of the coolant and fill as necessary Remove and Install Thermostat Removal 1 Allow the engine to cool and drain the coolant from the engine block See Drain and Fill Closed Cooling System on page 7 10 WARNING Coolant Hazard ALWAYS wear eye protection and rubber gloves when you handle Long Life engine coolant If contact with the eyes or skin should occur ...

Page 171: ...sealing surface of the thermostat housing and exhaust manifold during cleaning Figure 7 23 Figure 7 23 2 Using a new thermostat housing seal install and tighten the thermostat housing assembly Tighten mounting bolts to 9 5 N m 84 in lb 3 Install and tighten the coolant hose connecting the thermostat housing to the coolant pump To connect the clips on the coolant hose see Disconnect and Connect Qui...

Page 172: ...5 Figure 7 25 4 Remove the impeller Figure 7 25 2 from the housing 5 Inspect the impeller for cracks broken vanes or excessive wear Replace as necessary 6 Inspect the housing and cover for excessive wear Note When installing the new impeller rotate the impeller clockwise to bend the vanes in the direction of rotation Figure 7 26 Figure 7 26 Figure 7 26 7 Install a new O ring Figure 7 26 1 and hold...

Page 173: ...r Pump Belt 1 Disconnect battery negative cable from the battery 2 Remove belt guard 3 Check belt tension If belt is loose it must be replaced 4 Cut seawater belt to remove 5 Install new belt on crankshaft pulley and around seawater pump pulley as far as possible 6 Install belt removal tool Figure 7 28 1 between seawater pump pulley and belt Figure 7 28 Figure 7 28 7 CAUTION Pinch Hazard ALWAYS us...

Page 174: ...COOLING SYSTEM Repair 7 20 BY Service Manual 2009 Yanmar Marine International This Page Intentionally Left Blank ...

Page 175: ...s 8 4 Special Torque Chart 8 4 Special Service Tools 8 5 Measuring instruments 8 5 Tests and Adjustments 8 6 Engine Oil Flow 8 6 Check Engine Oil Pressure 8 7 Repair 8 8 Engine Lubrication System Components 8 8 Change Engine Oil and Replace Engine Oil Filter Element 8 9 Remove and Install Oil Cooler 8 9 Remove and Install Oil Filter Housing 8 11 Remove and Install Oil Sump 8 11 Oil Pump 8 12 ...

Page 176: ...LUBRICATION 8 2 BY Service Manual 2009 Yanmar Marine International This Page Intentionally Left Blank ...

Page 177: ...ar Marine International SAFETY PRECAUTIONS Before servicing the BY2 marine engine lubrication system review the Safety Section on page 2 1 INTRODUCTION This section of the Service Manual describes the procedures necessary to service the 4BY2 and 6BY2 lubrication systems ...

Page 178: ... bar 12 psi 4000 rpm 3 8 to 6 0 bar 55 to 87 psi 6BY2 Idle 0 7 bar 10 psi 4000 rpm 3 8 to 6 0 bar 55 to 87 psi Component Tightening Torque Lubricating Oil Application Reference Page Oil Filter Cap 25 N m 221 in lb Not Applied Change Engine Oil and Replace Engine Oil Filter Element on page 8 9 Oil Sump Bolt 20 N m 177 in lb Not Applied Remove and Install Oil Sump on page 8 11 Oil Sump Drain Plug 25...

Page 179: ...numbers are referred to as Yanmar Part No and BMW part numbers are referred to as OEM Part No Tools not having part numbers must be obtained locally MEASURING INSTRUMENTS No Tool Name Part Number Illustration 1 Oil Pressure Test Gauge Kit OEM Part No 13 6 054 13 6 051 13 3 063 and 13 3 061 No Instrument Name Application Illustration 1 Torque Wrench For tightening nuts and bolts to the specified to...

Page 180: ... Bearings 2 Hydraulic Valve Adjuster 3 Oil Galleys 4 Piston Cooling Jet 5 Crankshaft Bearings 6 Oil Galley for Pressure Regulator Valve 7 Oil Pump 8 Oil Return 9 Oil Filter 10 Timing Chain Lubrication Nozzle 11 Port to Turbocharger Lubrication Line and Oil Pressure Sensor Line 12 Piston Cooling Oil Pressure Regulator 0003789 1 2 3 9 4 5 12 6 5 4 3 8 7 9 10 11 ...

Page 181: ...3 6 054 and 13 6 051 and O ring Figure 8 4 1 are used with a DIS Tester Figure 8 4 Figure 8 4 7 Connect test pressure gauge Figure 8 4 special tool OEM No 13 3 063 and 13 3 061 8 Start the engine and read the pressure gauge at the listed engine speeds Results If the mechanical oil pressure test gauge indicates good oil pressure replace the faulty oil pressure sensor or faulty oil pressure gauge If...

Page 182: ...rication System Components Figure 8 5 Figure 8 5 1 Engine Oil Cooler 2 Oil Filter Housing 3 Oil Pressure Sensor 4 Oil Pressure Sensor Line 5 Turbocharger Lubrication Supply Line 6 Turbocharger 7 Turbocharger Lubrication Return Line 8 Oil Pump 9 Oil Pickup and Screen 0006521 2 1 3 4 5 7 6 8 9 ...

Page 183: ...operly 5 Remove the engine oil filter cap Figure 8 6 2 and filter assembly 6 Remove the filter element from stem 7 Replace the three O rings Figure 8 7 1 on the stem Figure 8 7 Figure 8 7 8 Install a new filter element Ensure the filter fits snugly in the filter cap 9 Install the cap and filter assembly Tighten cap by hand until the seal touches the housing 10 Tighten to 25 N m 225 in lb 11 Fill w...

Page 184: ... 8 9 3 7 Inspect ports for evidence of blockage or corrosion Figure 8 10 Clean or replace oil cooler as necessary Figure 8 10 Figure 8 10 8 Thoroughly clean sealing surfaces 9 Install a new seal Figure 8 11 1 in the oil filter housing Figure 8 11 Figure 8 11 10 Install oil cooler onto oil filter housing 11 Install and connect coolant pipe Secure to cylinder head with screw 12 Install new oil filte...

Page 185: ...t pipe Figure 8 14 1 from engine Figure 8 14 Figure 8 14 8 Remove bolt Figure 8 14 2 securing dipstick tube to oil filter housing 9 Remove three bolts Figure 8 14 3 and remove oil filter housing from engine 10 Install a new seal and install oil filter housing 11 Connect the coolant pipe and secure the dipstick tube 12 Add coolant See Drain and Fill Closed Cooling System on page 7 10 13 Install the...

Page 186: ...ne with clean engine oil 12 Run engine and check for leaks 13 Check oil level and add more as necessary Oil Pump The oil pump contains no serviceable parts If the oil pump is damaged it must be replaced as an assembly Remove Oil Pump 1 Drain oil from oil sump 2 Remove oil sump See Remove and Install Oil Sump on page 8 11 3 Remove bolts Figure 8 17 1 and 2 Remove oil strainer assembly and suction p...

Page 187: ...R Page Safety Precautions 9 3 Introduction 9 3 Specifications 9 3 Test and Adjustment Specifications 9 3 Special Torque Chart 9 3 Special Service Tools 9 4 Sealants and compounds 9 4 Tests and Adjustments 9 5 Measure Charge Pressure 9 5 Repair 9 6 Remove Turbocharger 9 6 Install Turbocharger 9 6 ...

Page 188: ...TURBOCHARGER 9 2 BY Service Manual 2009 Yanmar Marine International This Page Intentionally Left Blank ...

Page 189: ...rence Page Turbocharger Boost Pressure 4BY2 150 Minimum 1600 mbar 23 2 psi Maximum 1750 mbar 25 4 psi Measure Charge Pressure on page 9 5 4BY2 180 Minimum 1650 mbar 23 9 psi Maximum 1800 mbar 26 1 psi 6BY2 220 Minimum 1950 mbar 28 3 psi Maximum 2150 mbar 31 2 psi 6BY2 260 Minimum 2000 mbar 29 0 psi Maximum 2200 mbar 31 9 psi Component Size Comments Specification Turbocharger to Exhaust Manifold 4B...

Page 190: ...anmar part numbers are referred to as Yanmar Part No and BMW part numbers are referred to as OEM Part No Tools not having part numbers must be obtained locally SEALANTS AND COMPOUNDS No Instrument Name Application Illustration 1 Torque Wrench For tightening nuts and bolts to the specified torque 0000840 Sealant Name Use Copper Anti Seize Exhaust Manifold Turbocharger to Exhaust Manifold bolts ...

Page 191: ...9 1 2 Install an M12 x 1 5 adapter and connect a mechanical gauge to the charge air temperature sensor port 3 Operate the engine under normal load conditions at wide open throttle 4000 rpm and take a reading after at least 30 seconds of constant operation Results If the reading is not within specification adjust the control rod 4BY2 or replace the turbocharger Specifications 1 0003769B Limit Inspe...

Page 192: ...t the lubrication supply line Figure 9 2 3 and return line Figure 9 2 4 from the turbocharger 5 Loosen and remove turbocharger to exhaust mixing elbow clamps and pull elbow away from turbocharger 6 Disconnect charge air pipe Figure 9 3 1 from turbocharger Figure 9 3 Figure 9 3 7 Remove four bolts Figure 9 3 2 and remove turbocharger from exhaust manifold 8 Remove gasket Figure 9 3 3 Install Turboc...

Page 193: ...o 23 N m 204 in lb 4 Connect charge air pipe Figure 9 4 1 and tighten clamps securely 5 Install new gaskets and connect lubrication return line Figure 9 5 4 and supply line Figure 9 5 3 Figure 9 5 Figure 9 5 6 Install insulating cover Figure 9 5 2 and connect wastegate control rod Figure 9 5 1 7 Install air filter Figure 9 5 5 8 Connect exhaust mixing elbow to turbocharger and tighten clamps secur...

Page 194: ...TURBOCHARGER Repair 9 8 BY Service Manual 2009 Yanmar Marine International This Page Intentionally Left Blank ...

Page 195: ...nal BY Service Manual Section 10 STARTER MOTOR Page Safety Precautions 10 3 Introduction 10 3 Starter Motor Specifications 10 3 General Specifications 10 3 Special Torque Chart 10 3 Starter Motor Troubleshooting 10 4 Remove and Install Starter Motor 10 5 ...

Page 196: ...STARTER MOTOR 10 2 BY Service Manual 2009 Yanmar Marine International This Page Intentionally Left Blank ...

Page 197: ...icing of the starter motor on 4BY2 and 6BY2 engines STARTER MOTOR SPECIFICATIONS General Specifications Special Torque Chart Item Bosch 4BY2 Denso 6BY2 Nominal Power 2 0 kW 2 0 kW Nominal Voltage 12V 12V Test Voltage 13 0 26V 13 0 26V Maximum Operating Temperature 120 C 248 F 120 C 248 F Rotation Clockwise Clockwise Weight 3 5 kg 7 7 lb 3 5 kg 7 7 lb Item Specification Battery Positive Cable 15 N ...

Page 198: ...cal connections Adjust pinion projection length Inspect shift lever for deformation return spring for fatigue and pinion for sliding Repair meshing between pinion and ring gear or replace as needed Replace engine oil Repair or replace starter motor Solenoid switch assembly contact defective Repair or replace Repair or replace key switch starting motor relay or magnetic switch assembly If a problem...

Page 199: ...tor to the flywheel housing Figure 10 3 Figure 10 3 5 Carefully remove the starter motor NOTICE Check the starter pinion for damage If the starter pinion is damaged the flywheel ring gear must also be checked for damage 6 Clean the starter mounting area of the flywheel housing 7 Install the starter motor 8 Clean the cable connections 9 Connect the positive cable and primary wire to the appropriate...

Page 200: ...STARTER MOTOR Remove and Install Starter Motor 10 6 BY Service Manual 2009 Yanmar Marine International This Page Intentionally Left Blank ...

Page 201: ...ual Section 11 ALTERNATOR Page Safety Precautions 11 3 Introduction 11 4 Specifications 11 4 General Specifications 11 4 Special Torque Chart 11 4 Repair 11 5 Replace Alternator Belt 11 5 Remove and Install Alternator 11 5 Remove and Install Alternator Belt Tensioner 11 6 ...

Page 202: ...ALTERNATOR 11 2 BY Service Manual 2009 Yanmar Marine International This Page Intentionally Left Blank ...

Page 203: ...he electrical harnesses for cracks abrasions and damaged or corroded connectors ALWAYS keep the connectors and terminals clean NEVER operate the engine if the alternator is producing unusual sounds Damage to the alternator will result NEVER remove the positive battery cable from alternator terminal B while the engine is operating Damage to the alternator will result NEVER turn the battery switch O...

Page 204: ... Manual describes servicing of the 4BY2 and 6BY2 charging systems SPECIFICATIONS General Specifications Special Torque Chart Item Specification Manufacturer Valeo Model TG15 150A KSR DF Nominal Voltage 12V Nominal Output 150A Item Specification Alternator Mounting Bolts 38 N m 28 ft lb Positive Cable Nut 13 N m 115 in lb ...

Page 205: ... tensioner and relieve belt tension Remove belt NOTICE If belt is to be reused note direction of travel and install in same direction of travel 5 Installation is the reverse of removal CAUTION Pinch Hazard ALWAYS use care not to pinch a finger between belt and pulley while installing belt Failure to comply may result in minor or moderate injury NOTICE Ensure belt correctly engages all grooves of e...

Page 206: ...t Tensioner 1 Disconnect battery negative cable from the battery 2 Remove belt guard 3 Remove alternator belt See Replace Alternator Belt on page 11 5 4 Remove intake manifold See Intake Manifold on page 5 66 5 Remove alternator See Remove and Install Alternator on page 11 5 6 Remove bolt Figure 11 4 1 securing idler pulley Figure 11 4 2 Remove idler pulley Figure 11 4 Figure 11 4 Note Bolt Figure...

Page 207: ...sure Sensor 12 14 Fuel Injector 12 14 Engine Coolant Temperature Sensor 12 15 High Pressure Fuel Regulator 12 15 Water in Fuel Sensor 12 16 Crankshaft Speed Sensor 12 16 Glow Plug Control Unit 12 17 Fuel Temperature Sensor 12 18 Fuel Volume Regulator 12 18 Charge Air Temperature Sensor 12 19 Charge Air Pressure Sensor 12 19 High Pressure Fuel Rail Pressure Sensor 12 20 Camshaft Speed Sensor 12 20 ...

Page 208: ...onal Replace Crankshaft Sensor 12 24 Replace Camshaft Sensor 12 24 Replace High Pressure Fuel Regulator 12 25 Replace High Pressure Fuel Rail Pressure Sensor 12 26 Replace Fuel Temperature Sensor 12 26 Replace Fuel Volume Regulator 12 27 Replace Oil Pressure Sensor 12 27 ...

Page 209: ...on of the Service Manual describes the operation of and procedures to test and replace the components of the electrical system and engine control unit ECU as used on the Yanmar 4BY2 and 6BY2 marine engines SPECIFICATIONS Special Torque Chart Item Specification High Pressure Fuel Control Valve Retaining Nut 80 N m 59 ft lb High Pressure Fuel Sensor Retaining Nut 70 N m 52 ft lb Fuel Volume Regulato...

Page 210: ...gine Management System 12 4 BY Service Manual 2009 Yanmar Marine International FUNCTION DESCRIPTION ENGINE MANAGEMENT SYSTEM Component Locations 4BY2 Figure 12 1 Figure 12 1 0004119 3 4 2 1 5 6 7 9 8 10 11 13 12 15 14 16 17 18 19 20 21 22 23 24 ...

Page 211: ...rt Switch Connector 8 Instrument Panel 9 Electrical Panel Fuses Relays ECU 10 Starter Motor 11 Crankshaft Speed Sensor 12 Glow Plug Harness Connector 13 Circuit Breaker Boatbuilder Installed Option 14 Battery 15 Battery Negative Cable Black 16 Battery Positive Cable Red 17 Battery Ground Connection 18 Alternator 19 Fuel Temperature Sensor 20 Fuel Volume Regulator 21 Charge Air Temperature Sensor 2...

Page 212: ...L AND ECU Function Description Engine Management System 12 6 BY Service Manual 2009 Yanmar Marine International 6BY2 Figure 12 2 Figure 12 2 1 2 10 11 9 3 4 5 6 7 8 12 13 15 16 17 18 19 20 21 22 23 24 14 0004120 ...

Page 213: ...rt Switch Connector 8 Instrument Panel 9 Electrical Panel Fuses Relays ECU 10 Starter Motor 11 Crankshaft Speed Sensor 12 Glow Plug Harness Connector 13 Circuit Breaker Boatbuilder Installed Option 14 Battery 15 Battery Negative Cable Black 16 Battery Positive Cable Red 17 Battery Ground Connection 18 Alternator 19 Fuel Temperature Sensor 20 Fuel Volume Regulator 21 Charge Air Temperature Sensor 2...

Page 214: ...default is analog fuse out Insert 3 A fuse to configure for CAN 9 K1 Starter Relay 10 K3 Fuel Supply Pump Relay 11 K2 Main Power Relay 12 ECU 13 Connector X1 Communication to Helm Display 14 Connector X21 1 Engine Wiring Harness 15 Connector X22 1 Fuel Injector Wiring Harness 16 Blocking Diode V1 NOTICE The electrical panel cables must be connected directly to the battery and must have a circuit b...

Page 215: ...y Power Power for accessories 5 A X1 H Warning Indicator 0 5 A X1 J GEAR Switch to Ground Start in gear protection 50 mA X1 K FWG2 Throttle Position Second Channel Analog throttle safety channel 5 mA X1 L FWG1 5V Throttle Supply f Main Channel 5 mA X1 M FWG1 GND Throttle Return f Main Channel 5 mA X1 N FWG1 Throttle Position Main Channel Analog throttle main channel 5 mA X1 O FWG2 5V Throttle Supp...

Page 216: ...W X1 V X1 S X1 T X1 E X1 D KL15 KL87 KL31 F6 182 157 132 154 107 106 180 139 187 115 162 114 243 252 256 239 229 230 250 238 183 111 130 156 178 208 202 204 206 233 246 173 149 151 175 103 127 150 174 102 126 101 125 171 172 245 220 232 234 207 201 203 205 KL50 X1 C 224 DRV 124 X1 R X1 U X1 G 251 211 KL87 X1 H F7 F8 X1 Q X1 J 0003303 2 3 5 4 6 44 43 42 7 8 9 11 15 13 14 16 54 12 1 48 46 45 16 41 4...

Page 217: ...Y2 24 Fuel Injector No 1 4BY2 or No 3 6BY2 25 Fuel Injector No 1 6BY2 26 Fuel Injector No 4 6BY2 27 CAN Signal Low 28 CAN Signal High 29 Panel ECU and CAN Ground 30 K Line 31 Neutral Start Switch NC in neutral 32 Jumper Fuse F8 3 A CAN Analog Throttle Selection default is analog fuse out Insert 3 A fuse to configure for CAN 33 Jumper Fuse F7 3 A Single Port Selection default is single port fuse in...

Page 218: ... will reduce the engine power output and the coolant overheat indicator will illuminate If an audible alarm is installed it too will sound Not all inputs are monitored by the ECU Low oil pressure and water in fuel are two examples Either of these conditions will result in a warning indicator and possible audible alarm Low oil pressure will also be indicated by the oil gauge at the helm COMPONENT T...

Page 219: ...short circuit to ground P0690 short circuit to B Note Viewed from bottom of connector Fuel Pump Relay K3 12 V is supplied by fuse F3 to terminal 30 Figure 12 8 4 An internal connection connects one end of the winding to terminal 30 When the key switch is turned to ON a 12 V signal is sent to ECU terminal 87 The ECU then completes the winding ground circuit terminal 85 through ECU terminal 220 Figu...

Page 220: ...arness Note Polarity of wire connections is not important Either wire can be connected to either terminal Fuel Injector The fuel injectors are continuously supplied with high pressure fuel and are electronically triggered by the ECU The ECU controls the frequency duration and timing of injection Results of Failed Injector If an injector related failure occurs the following P codes may be generated...

Page 221: ...re 12 11 Figure 12 11 1 Pin 1 Out ECU pin 182 2 Pin 2 Ground ECU pin 17 High Pressure Fuel Regulator This regulator valve controls the fuel pressure in the fuel rail The ECU uses values supplied by several sensors and sends corresponding signals to control fuel pressure It is mounted on the rear of the fuel rail Results of Failed Valve Failure of the valve results in Limitation of the injection ra...

Page 222: ...t speed by the ECU It is mounted on the rear crankshaft seal housing at the rear of the engine The ECU supplies 5V and ground The sensor signal is used by the ECU for The calculation of the actual rotations of the engine The check of the starting conditions The calculation of the injection rate at the starting procedure The control of the injection start The calculation of the limitation of the in...

Page 223: ...e switched on and off Preheating When the coolant temperature is above 25 C 77 F the unit will operate for 0 5 seconds As temperatures decrease below 25 C 77 F the on time will increase up to a maximum of 2 7 seconds depending on temperature If the key switch is turned to ON but the engine is not started immediately the controller will continue to implement the glowing process for 10 seconds Post ...

Page 224: ... Limitations on page 13 3 Destruction of the sensor if short circuit to B If this sensor is defective the following P codes may be generated P0182 short circuit to B P0183 No connection short to ground Test Values Resistance at 20 C 4 F 20 to 24 k ohm Resistance at 0 C 32 F 16 5 to 8 k ohm Resistance at 20 C 68 F 2 4 to 3 2 k ohm Resistance at 120 C 248 F 0 5 to 0 6 k ohm Figure 12 16 Figure 12 16...

Page 225: ...ance at 20 C 4 F 40 to 48 k ohm Resistance at 0 C 32 F 14 5 to 16 5 k ohm Resistance at 20 C 68 F 6 0 to 6 5 k ohm Resistance at 120 C 248 F 0 18 to 0 22 k ohm Figure 12 18 Figure 12 18 1 Pin 1 Out ECU pin 157 2 Pin 2 Ground ECU pin 16 Charge Air Pressure Sensor This sensor measures the charge air pressure as absolute value charge air pressure atmospheric pressure It is mounted on the charge air p...

Page 226: ...7 fuel rail pressure out of range P0089 fuel rail pressure out of range P0090 fuel rail pressure out of range P0193 no connection short circuit B P0192 short circuit to ground Test Values At 0 bar 0 psi relative 0 5 V At 1800 bar 26107 psi relative 4 5 V Figure 12 20 Figure 12 20 1 Pin 1 Ground ECU pin 178 2 Pin 2 Out ECU pin 156 3 Pin 3 5V ECU pin 130 Camshaft Speed Sensor This sensor measures th...

Page 227: ...ensors engine low idle will increase If this sensor is defective the following P codes may be generated Sensor 1 2 PWG P0122 both throttle signals are missing short circuit to ground P0222 both throttle signals are missing short circuit to ground Sensor 1 only PWG P0123 throttle signal 1 short circuit to B P0122 throttle signal 1 is missing short circuit to ground Sensor 2 only PGS P0223 throttle ...

Page 228: ...s Figure 12 23 3 and remove the ECU 6 Install the new control unit and tighten the screws 7 Connect the electrical connectors to the ECU 8 Connect the electrical panel power cables to the battery 9 Check and delete any trouble codes that are registered in the ECU after the work has been completed Replace Coolant Temperature Sensor 1 Drain engine coolant See Drain and Fill Closed Cooling System on ...

Page 229: ...ct electrical connector 6 Connect battery negative cable 7 Check and delete any trouble codes that are registered in the ECU after the work has been completed Replace Charge Air Temperature Sensor 1 Disconnect battery negative cable 2 Disconnect electrical connector Figure 12 27 1 Figure 12 27 Figure 12 27 3 Remove sensor from charge air pipe 4 Replace sealing ring before installing sensor 5 Insta...

Page 230: ...all connector in bracket and connect engine harness 8 Install starter motor See Remove and Install Starter Motor on page 10 5 9 Connect battery negative cable 10 Check and delete any trouble codes that are registered in the ECU after the work has been completed Replace Camshaft Sensor 1 Disconnect harness connector Figure 12 29 1 Figure 12 29 Figure 12 29 2 Remove screw Figure 12 29 2 and remove c...

Page 231: ...ctrical connector Figure 12 31 1 Figure 12 31 Figure 12 31 5 Hold sensor hex Figure 12 31 2 with wrench and loosen retaining nut Figure 12 31 3 6 Remove regulator from fuel rail 7 Install new regulator in fuel rail Ensure orientation is correct NOTICE The high pressure fuel regulator can be installed ONLY once When installing a new regulator ensure it is correctly positioned before tightening to s...

Page 232: ...lled a maximum of ten times After ten installations a new sensor must be installed 10 Hold hex of sensor and tighten retaining nut to 70 N m 52 ft lb 11 Connect electrical connector to sensor 12 Open all fuel supply valves 13 Connect battery negative cable 14 Bleed fuel system See Bleed the Fuel System on page 6 22 15 Start engine and check for fuel leaks 16 Check and delete any trouble codes that...

Page 233: ...vent contamination of system Figure 12 34 Figure 12 34 6 Remove three screws Figure 12 34 2 7 Remove fuel volume regulator 8 Installation is done in the reverse of removal Tighten screws to 6 6 N m 58 in lb 9 Open all fuel supply valves 10 Connect battery negative cable 11 Bleed fuel system See Bleed the Fuel System on page 6 22 12 Start engine and check for fuel leaks 13 Check and delete any trou...

Page 234: ...ELECTRICAL AND ECU Repair 12 28 BY Service Manual 2009 Yanmar Marine International This Page Intentionally Left Blank ...

Page 235: ...on for Smoke Limitation Mode 13 3 Torque Limitation for Overheat Protection Mode 13 5 Troubleshooting Chart 13 6 Starting Trouble 13 6 Exhaust Color 13 6 Vibration Drive Disengaged 13 7 Vibration Drive Engaged 13 7 Engine Knocks 13 8 Low Power Output 13 8 Engine Overheat 13 8 Engine Runs Cold 13 9 Coolant Loss 13 9 Helm Panel Display 13 9 Trouble Codes 13 10 Working Procedure 13 10 Diagnostic Trou...

Page 236: ...TROUBLESHOOTING 13 2 BY Service Manual 2009 Yanmar Marine International This Page Intentionally Left Blank ...

Page 237: ...or or actuator The following failures activate this mode Coolant temperature sensor Camshaft sensor Boost pressure sensor Rail pressure system Throttle signal missing Sensor supply voltage Metering unit failure Fuel injector failure Rail pressure governor deviation Torque Limitation for Smoke Limitation Mode In the case of this limitation there are two possible situations If an electronic fault oc...

Page 238: ...orque Torque N m Boost pressure abs mbar Torque N m Boost pressure abs mbar Engine 4BY2 150 100 normal operation 265 1600 295 700 90 240 700 265 400 80 215 600 240 250 70 185 300 205 100 60 160 150 180 0 50 135 0 15 0 Engine 4BY2 180 100 normal operation 315 1700 315 900 90 285 1050 285 500 80 250 900 250 350 70 220 600 220 200 60 190 300 190 50 50 160 100 160 0 Engine 6BY2 220 100 normal operatio...

Page 239: ...e of the fuel temperature is fixed at 90 C 194 F and that sets a limitation of approximately 75 from the maximum torque Figure 13 1 Figure 13 1 Figure 13 1 If the coolant temperature is over 108 C 226 F an audible alarm sounds and engine overheat is displayed on the instrument panel display At 120 C 248 F the torque limitation is 30 Figure 13 2 If the fuel temperature is too high over 90 C 194 F t...

Page 240: ...or Replace clogged fine filter Bleed fuel system Blown fuse F3 F4 F5 ECU software problem Low ambient temperature Install block heater Oil viscosity too high Replace with correct viscosity oil for operating conditions Problem Symptom Cause Action White Smoke Cold engine Allow engine to warm to operating temperature Defective thermostat Incorrect fuel Replace fuel with correct type Defective leakin...

Page 241: ...in fuel system Bleed fuel system Faulty fuel injector Replace as necessary Leaking cylinder head gasket Replace Damaged intake or exhaust valves Repair as necessary Incorrect injection pressure Check replace fuel pressure regulator Check replace high pressure fuel pump Vibration Increases with Engine Speed Stern Drive Models Worn or damaged universal joints Replace universal joints Problem Symptom...

Page 242: ...eplace as necessary Faulty fuel supply pump Replace Low Fuel Injection Pressure Defective fuel pressure regulator sensor Check replace Worn high pressure fuel pump Check replace Injection timing is incorrect ECU software problem Low RPM at Wide Open Throttle Propeller pitch too great Replace Engine overheated Reduce load repair cooling system Damaged turbocharger Replace Problem Symptom Cause Acti...

Page 243: ...ve cylinder head gasket external leakage Replace External leakage at connection Repair as necessary Coolant Forced Out of Coolant Recovery Tank Turbocharging pressure enters cooling system via leaking charge air cooler Repair replace as necessary Defective cylinder head gasket internal leakage Replace White Smoke when Engine is Hot Indicates Water Vapor Crack in cylinder head not cracks between va...

Page 244: ...er component sending an out of normal range signal to the ECU An example is a disconnected intake air pressure sensor which would set a P0237 code Code Part or System Mode Run Or Conditi on Engine Can Start Check Engine Alarm No Code Coolant Temp Under 0 C 32 F 1000 rpm yes no No Code Coolant Temp Over 108 C 226 F reduce yes no No Code Coolant Temp Over 110 C 230 F reduce yes alarm No Code Charge ...

Page 245: ...ited to B 1600 yes alarm Throttle Signal Throttle signal 1 short circuit to B reduce yes alarm P0182 Fuel Temperature Sensor Short circuit to B reduce yes alarm P0183 Fuel Temperature Sensor No connection short circuit to Ground reduce yes alarm P0192 Fuel Rail Pressure Sensor Short circuit to Ground reduce yes alarm P0193 Fuel Rail Pressure Sensor No connection short circuit B reduce yes alarm P0...

Page 246: ...t Speed Sensor Disagreement between camshaft speed sensor and crankshaft speed sensor no no alarm P0380 Glow Control Relay Actuator Not connected short circuit yes yes alarm P0562 System Voltage Low yes no alarm P0563 System Voltage High yes yes alarm P0602 Control Module Programming Error Hwemon Overvoltage undervoltage no no alarm Shut Off Path Control module programming error no no alarm P0607 ...

Page 247: ...r Bank 2 Short circuit on high side to Ground B reduce yes P2227 Atmospheric Pressure Plausibility check with BPS boost pressure sensor fail yes yes alarm P2228 Atmospheric Pressure Short circuit low yes yes alarm P2229 Atmospheric Pressure Short circuit high yes yes alarm P2614 Camshaft Speed Sensor No connection short circuit reduce yes alarm P2617 Crankshaft Speed Sensor No connection short cir...

Page 248: ...vice Manual 2009 Yanmar Marine International AFTER TROUBLESHOOTING OR REPAIR The engine control unit ECU may have generated trouble codes due to the current fault or during troubleshooting Remember to check and clear any trouble codes after repairs are complete ...

Reviews: