background image


X K 3 1 9 0

C 602   


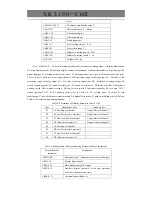
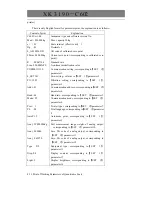
F.3.2 Print of catchweigher working parameter   


There is only English format for parameter print, with explanation as follows


Content of print 

Explanation 

C602 Ver1.00 

Instrument type and software version No. 

Pn : 1 

Parameters No.,  corresponding to 

SET  1

parameter 13

B


A    : 002.000kg 

Upper limit of channel 1, corresponding to

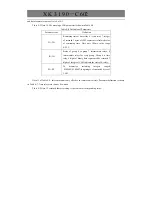
SET  2

parameter 2 

B    : 004.000kg 

Upper limit of channel 2, corresponding to

SET  2

parameter 3 

C    : 006.000kg 

Upper limit of channel 3, corresponding to

SET  2

parameter 4 

D    : 008.000kg 

Upper limit of channel 4, corresponding to

SET  2

parameter 5 

0_Z: 000.010kg 

Zero area setting, corresponding to

SET  2

parameter 6 

T0 : 0.2 s 

Timing 0, corresponding to

SET  2

parameter 7 

T1 : 0.2 s 

Timing 1, corresponding to

SET  2

parameter 8 

T2 : 0.2 s 

Timing 2, corresponding to

SET  2

parameter 9 

T3 : 0.2 s 

Timing 3, corresponding to

SET  2

parameter 10


Summary of Contents for XK3190-C602

Page 1: ...K 3 1 9 0 C 602 XK3190 C602 Weighing Indicator U U Us s se e er r r M M Ma a an n nu u ua a al l l Version 1 03 May 2009 Manufactured by Shanghai Yaohua Weighing System Co Ltd No 00000071 Made in Shanghai ...

Page 2: ... of Quantitative Scale Chapter 7 Operating Instruction of Catchweigher Chapter 8 Application Examples of Catchweigher Annex A Error Prompt Message Annex B Schematic Diagram of Relay Board Annex C Scoreboard Data Waveform Graph and Format Annex D Data Format of Communication Port 1 Annex E Data Format of Command Response Mode of Communication Port 2 Annex F Explanation on Print Format Annex G Troub...

Page 3: ...n it is used to control catchweigher Chapter 8 focuses on the ways and working procedures of the indicator when it is used to control catchweigher which can help installers and operators understand the setting of each parameter The annexes provide information for error prompt message communication format and general problems During use of this manual you may browse it first and then select the con...

Page 4: ...weight is above zero zone For catchweigher the self control catchweigher can start weighing process only when the weight signal is above zero zone and can print and sum when the calculation result of material weight is above zero zone Additive scale is the quantitative scale used for batching control of added material weight in load carrier like hopper etc for example the hopper type quantitative ...

Page 5: ...s the initial zero setting range initial zero setting cannot be carried out The zero setting range generally 2 Max is based on the zero point determined during initial zero setting Main display The 6 digit 0 56 LED digital tube in upper part of display window and the indicators on both sides are main display of C602 indicator which is used to display major contents such as weight and set value etc...

Page 6: ...matic leap year and leap month display not affected by power off 5 Self control function and various operation error messages 6 The standard configuration includes 8 optical isolation switch input of which 2 channels are used as high speed counting input encoder input or interrupt i e quick response input 8 optical isolation switch output with external relay box optional The standard program of in...

Page 7: ...n display has 6 digit LED digital tube with character height of 0 56 in Auxiliary display has 6 digit LED digital tube with character height of 0 4 23 status indicating lamps Display scale interval 1 2 5 10 20 50 optional 0 3 decimal digits Clock Yes To show time and date Keyboard Soft push switch is adopted including 6 buttons Max data memory capacity 8064 weight data or 4032 groups of time weigh...

Page 8: ...signal 12 24V DC the pulse width shall be above 0 2s I0 and I1 can be configured as one of four input modes common input 2 high speed counting input 1 decoder input or 2 interrupt input the maximum counting frequency of high speed counting and coder input mode is 10KHz Expansion of Switch input and output Each expansion module has 8 optical isolation input with input signal 12 24V DC 8 optical iso...

Page 9: ... impedance 1Ω Working power supply 110 230V AC 50 60 Hz Temperature and humidity of working environment 0 40 90 RH Temperature and humidity of transportation and storage 20 50 90 RH External dimension Housing 150 75 105 mm width height depth Panel 172 93 3 mm width height thickness Dimension of installation hole 152 77 mm Weight About 0 8kg ...

Page 10: ...tion Format I Schematic diagram of front panel and back panel of indicator Figure 3 1 Schematic Diagram of Front Panel Indicating lamp for operating status Indicator lamp for output Display window Indicator lamp for weighing Keyboard Indicator lamp for input i l ...

Page 11: ... Panel Connecting terminal of power Connecting terminal of switch output Connection terminal of switch Connection terminal of analogue output Calibration switch Connecting terminal of Interface of parallel printer Connection terminal of weighing load cell ...

Page 12: ...matic diagram of main panel and power panel Figure 3 3 Schematic Diagram of Main Panel IO expansion socket Expansion socket JTAG interface Socket of AD module ISP jumper or toggle switch RS232 RS485 optional jumper Inter panel ...

Page 13: ...X K 3 1 9 0 C 602 Figure 3 4 Schematic Diagram of Power Panel Inter panel connector High voltage area in power panel Setting jumper of analogue output ...

Page 14: ...o static electricity Please get rid of charge in human body before disassembling the indicator by touching wall or other earthed object so as to protect the indicator against damage by static electricity Disassembly method remove all screws in back panel of indicator remove the back panel carefully draw out the upper power panel and the lower main board to adjust corresponding jumper Assembly meth...

Page 15: ...inal The connecting line can not be plugged in and out when the indicator is powered on in order to prevent any damage to the indicator or load cell by static electricity 4 The load cell and indicator are both static sensitive equipments so anti static measures must be taken during the use It is strictly forbidden to carry out welding operation or other operations with high current on the weighing...

Page 16: ... to the printer model and printing language Chinese or English If the printer not listed in the table is to be used try to select the model with similar printing command format with those listed in the table Selection of micro printer It is suggested to adopt the mirco printer with Chinese library available for printing at least 16 English charanters in 1 line When micro printer without Chinese ch...

Page 17: ... be set by SET 1 parameter 5A Refer to appendix D for data format Serial interface 1 can also be used as the drive interface to connect the serial interface printer The XOFF XON flow control protocol can be adopted and Busy signal can be used to control the transmission of printing data VII Serial communication interface 2 Serial communication interface 2 can transmit data to PC as well as receive...

Page 18: ...et as 1 continuous send mode is active See table 3 1 for data format All data are ASCII code each byte is made up of ten bits with the first bit as the start bit and the tenth bit as the stop bit the bits in between are data bits no check bit is available The transmitted data are the current weight value gross weight or net weight measured by the indicator each frame has 9 bytes See table 3 1 for ...

Page 19: ...erface 2 works in continuous send mode when the PC sends correct command to the indicator in command response mode the indicator will automatically switch to command response mode If the PC does not send read in EEPROM command C602 will still work in continuous send mode after next startup With regard to response mode the PC sends setting the communication mode into continuous send mode the indica...

Page 20: ...The signal input terminal of indicator can connect with 12 24V voltage as compared with 0V terminal it can also be shorted with 12V to be effective signal Attention the 0V terminal on back panel is isolated from the indicator housing and weighing load cell interface GND terminal The input and output status indicating lamps on the indicator panel display the actual status of input and output termin...

Page 21: ... In the figure the jumper position is in conformity with these in power panel and X stands for the position of short circuit ring The factory setting of current loop is 4 20mA The output value can be gross weight or net weight by setting SET 1 parameter 1F The analog output switch is controlled by SET 1 parameter 1E Jumper selection Analog output JP3 JP2 JP1 X 4 20mA factory setting X X X 0 5V X X...

Page 22: ...n the display internal code mode select 1 for parameter A of in SET 0 the detection can be done to check the condition of input and output terminals When I0 input terminal signal is effective the corresponding O0 will have control signal output For the same reason the I1 corresponds to O1 I7 corresponds to O7 Attention when external equipment is connected try to avoid using this method to detect i...

Page 23: ...and warning Error 7 will be prompted The contents of parameter table SET 0 and SET 2 depend on the parameter 13 A in parameter table SET 1 Initialization of parameters During the calibration process of SET 3 input 123456 ignore the decimal while inputting the loaded weight press input button the indicator will carry out initialization of parameters all calibration parameters and working parameters...

Page 24: ...group of parameters setting SET 0 inquiry parameters Refer to table 4 3 or 4 4 respectively according to the different SET 1 parameters 13A Table 4 1 SET 0 Parameter Table of Quantitative scale when SET 1 parameter 13A is set as 0 or 1 in table 4 3 Parameter Indicator display Parameter explanation Remarks 1 dAtE Current date setting 2 tIME Current time setting If time or date is modified it still ...

Page 25: ... 6 A Light Brightness of display 0 7 Displayed content A content in main display A 0 1 2 Displayed content Weight Internal code AD code B content in auxiliary display B 0 1 2 3 4 5 7 AB dISP Displayed content accum ulated times accum ulated weight Date Time Worki ng step note1 Note 1 Note 2 Parameter A returns to 0 upon each startup Display of accumulative weight when the effective value is above ...

Page 26: ...emory 4 A A Total accumulated weight 5 n1 A Accumulated times of channel 1 6 A1 A Accumulated weight of channel 1 7 n2 A Accumulated times of channel 2 8 A2 A Accumulated weight of channel 2 13 n5 A Accumulated times of channel 5 14 A5 A Accumulated weight of channel 5 Not to be modified only for inquiry press stop button to stop printing Press input to enter setting of next parameter 15 A dEL Del...

Page 27: ...so return to 0 status Display of accumulative weight when the effective value is above 6 digits the decimal digits will automatically reduce When the integer is above 6 digits it can only display 6 digits the number of left decimal points which are lit on represents the number of digits not displayed Note 1 it displays time in non operation status Note 2 it displays the weight of the previous obje...

Page 28: ...tting upon startup 0 off 1 on B manual zero setting range 0 5 C zero setting range upon startup 0 5 B C 0 1 2 3 4 5 Max 0 2 4 10 20 100 D zero tracking range 0 8 D 0 1 2 3 4 5 6 7 8 2 ABCD 0 Set e 0 0 5 1 1 5 2 2 5 3 3 5 4 AD relevant parameters A filtering algorithm 0 sliding window filter 1 first order low pass filter B AD sampling speed 0 4 C AD filtering strength 0 4 D stable judgment 0 4 Char...

Page 29: ... 1200 2400 4800 A B 4 5 6 5 AB bAud BPS 9600 19 2k 57 6k Communication mode A communication interface 1 B communication interface 2 A 0 1 2 Communicati on mode Continuously send AD code Continuously send weight Used as printing interface B 0 1 2 6 AB t Mode Communicati on mode Command response mode Continuous send mode RS485mode The times of sending data per second by communication interface 1 equ...

Page 30: ...is the corresponding value at max weighing When this value is smaller than the max weighing value the full range of analog output will remain unchanged 11 Aout_0 DA internal code 0 20000 at zero point of analog output output 4 20mA signal about 12520 Output 0 5V 0 10V is 0 The zero point of calibration analog output of this parameter can be modified 12 Aout_F DA internal code 10000 65535 at full r...

Page 31: ...save the current time and weight data with 4032 weighing times and weight data as maximum If the memory is full the new data will overlap the earliest ones When summation is deleted the recorded data is also deleted When the setting of parameter 9B is changed the original accumulative data and saved content shall be deleted or else error may occur to the weighing record Weighing record can be eith...

Page 32: ...dual feed for material shortage 0 no gradual feed 1 gradual feed for material shortage 2 Pt Cycle index Set the cycle index 0 65535 0 means indefinite in the full process from feed to discharge 3 A1 Batching of material 1 4 b1 Quick feed lead of material 1 5 C1 Slow feed lead of material 1 6 d1 Material 1 allowance 7 A2 Additive scale batching of material 2 Subtracting scale weight of feed If mate...

Page 33: ...ht impact at startup 13 t1 Measurement delay of quick feed over 0 0 25 5 seconds When t1 0 quick feed and slow quick are activated at same time 14 t2 Measurement delay of slow feed over 0 0 25 5 seconds 15 t3 Gradual feed output time 0 0 25 5 seconds 16 t4 Interval time of gradual feed 0 0 25 5 seconds 17 t5 Qualified output time 0 0 25 5 seconds 18 t6 Discharge over delay 0 0 25 5 seconds 19 t7 R...

Page 34: ... A X b the indicator outputs signal of channel 2 at t3 4 C Upper limit of channel 3 If b X C the indicator outputs signal of channel 3 at t3 5 d Upper limit of channel 4 If C X d the indicator outputs signal of channel 4 at t3 If X d the indicator will output signal of channel 5 at t3 6 0_Zone Zero zone 1 After sending catchweighing signal it will not enter the next cycle until the weight measured...

Page 35: ... 0 25 5 seconds After t1 calculation is over the indicator remains inactive during t2 time waiting with delay This setting can meet more control site requirements 10 t3 Time for sending signal 0 25 5 seconds After t2 the indicator sends catchweighing signal with length of t3 Please refer to the explanation of parameter 2 parameter 5 11 A Print A whether to print parameter setting 0 No 1 Yes II Cal...

Page 36: ...ess Input after modifying the parameter If the decimal digit is not zero 10 20 50 cannot be selected 3 F Max Weighing Press Input after modifying the parameter 4 A CAL 0 A Save the original zero point 0 Should reconfirm the current zero point 1 Skip the confirmation of current zero point Choose 0 to go to step 5 Choose 1 to skip step 5 and go to step 6 5 noLoAd The confirmation of zero point The u...

Page 37: ...4 7 Table 4 7 Calibration Data Checking Parameter Parameter Display Parameter Instruction Operation Instruction 1 dC Decimal Digits 0 3 Press Input after modifying the parameter 2 e Division 1 2 5 10 20 50 Press Input after modifying the parameter If the decimal digit is not zero 10 20 50 can not be selected 3 F Max Weighing Press Input after modifying the parameter After modifying the max weighin...

Page 38: ...The correction value is 1 2 max weighing position that is the correction amount at the top of the correction curve Nonlinear correction value equals to the negative value of the nonlinear tolerance of 1 2 max weighing position The unit of the nonlinear correction value is 1 of the max weighing value For example for the scale whose Max 10kg if 5kg is added to it and the weight shows 5006g then the ...

Page 39: ...operation of Zero setting button for the first time will be regarded as the initial zero setting II Manual Zero Setting If the display value deviates from zero and is still in the manual zero setting scope while the light is stable ON press Zero setting button to get the display value back to zero and zero point lamp will be ON Please see the setting of parameter B in parameter 2 of Chapter SET 1 ...

Page 40: ... press button Input to print all weighing records Press button Exit to end printing weighing record halfway The communication port 2 of PC can also be used to read the weighing record Accumulated Value Removal Press button Input after the accumulated value is displayed and the indicator will indicate which means whether to remove the accumulated data Press button Input to clear and press Input dir...

Page 41: ...ding is finished and it will wait for discharge terminal to input the valid signal After the signal material discharging is valid the indicator will continue to run The output control signal O5 will be valid after the discharge signal is activated The discharging action will be finished after the hopper weight is back to zero zone and the indicator will wait for the new material feeding signal The...

Page 42: ... is executed for example print the weighing record the button pressed during the command execution period will be stored in the buffer area of key command The new key command will be responded only when the current key command is executed ...

Page 43: ...material feed t1 quick feed over delay t2 Slow feed over delay The indicator during the three periods will not judge the weight d1 Quantitative value of material 1 q1 Quick feed lead of material 1 a1 Slow feed lead of material o1 Allowance of material 1 L Zero zone Notes to working process of additive quantitative scale 1 The Add Signal is needed before material feeding 2 The Discharge Signal is n...

Page 44: ...at same time When T0 is over weight inspection is started If the loaded value reaches to batching value of material 1 minus quick feed lead of material 1 turn off quick feed of material 1 The timer will be T1 and go to program step 3 3 Timing is over go to program step 4 and the timer is T0 4 Start slow feed of material 1 timing is over and weight inspection is started If the loaded value reaches ...

Page 45: ...re to be automatically done timer will be T0 and go to program step 11 11 Start the quick feed of material 2 If T0 is 0 start the slow feed of material 2 at same time When the timing of T0 is over weight inspection is started If the loaded value reaches batching value of material 2 minus quick feed lead of material 1 turn off quick feed of material 2 The time will be T1 and go to program step 12 1...

Page 46: ...o step 18 18 Timing is over close the qualified or out of tolerance signal If material feeding action is started manually then stop the action If it is under the status of automatic cycle then go to program step 19 19 Perform the automatic print and automatic storage operation according to the setting and go to the program step 20 20 If there is an Add Signal go to program step 21 21 Material disc...

Page 47: ... Measurement delay of material feed t1 Quick feed over delay t2 Slow feed over delay The instrument during the three periods will not judge the weight d1 Quantitative value of feed q1 Quick feed lead of material 1 a1 Slow feed lead of material o1 Allowance of material b2 Min remaining weight of material A2 Charging weight of material Note to working process of subtracting quantitative scale 1 The ...

Page 48: ...ht b2 is 20kg If the remaining weight in the hopper is less than 70 kg when the cycle is started the material should be added to the hopper up to over150kg to start the material feeding Table 6 2 describes the working process of the quantitative scale subtraction by program step Display method of program step Set Parameter 7B SET 0 to 4 under the running status the auxiliary display of the instrum...

Page 49: ...m step 7 and the timer will be T3 If the gradual feed is not allowed and the weight is more than the batching value plus tolerance out of tolerance treatment will stop at this step and wait for qualified out of tolerance treatment If the out of tolerance treatment is not done then go to program step 9 the timer will be T5 7 Start the slow feed timing is over the slow feed will be closed and timer ...

Page 50: ...14 Start the material discharging add material to the hopper until the allowed weight is reached and go to program step 15 15 If the material discharging is started manually then stop the action Otherwise go to program step 16 and the timer will be T6 16 Timing is over go to program step 1 to continue the cycle ...

Page 51: ...ing down after startup The operation of Zero setting button for the first time will be regarded as the initial zero setting II Manual Zero Setting If the display value deviates from zero point and is still in the manual zero setting scope while the light is stable ON press the button Zero setting to get the display value back to zero and zero point lamp will be ON Please see the setting of paramet...

Page 52: ...mes of Channel 1 Input search the accumulated weight of Channel 1 Input search the accumulated times of Channel 2 Input search the accumulated weight of Channel 2 Press button or during the query If the option at right side of the lower line shows 1 press button Input to print the accumulated times and accumulated weights If the option shows 2 press button Input to print all the weighing record Th...

Page 53: ...ction as the button Operation or Stop The signal operation and stop will only work at the valid moment on the rising edge Attention The button Stop input signal stop and its function can not be used as the emergent stop of the system VIII Buffer Area of Key Command There is a buffer area of key command with length of 4 in C602 When the key command with long duration is executed For example print t...

Page 54: ...in Self Control Mode Set the parameter 13A of SET 1 to 3 The parameter setting of SET 2 is as follows Parameter Setting Instruction 1 0 CtrL Choose the non peak holding mode 2 20 t0 The time to load the weighing platform is about 2 seconds 3 40 t1 The time for remaining on weighing platform is about 4 seconds 4 20 t2 The time for cargo to be unloaded from weighing platform is about 2 seconds 5 20 ...

Page 55: ...time interval of t1 The value calculated will be the reference for batching scale signal 3 Time t1 is over and the instrument will enter the t2 delay to wait for the cargo to leave the weighing platform 4 Time t2 is over and the instrument will send the sorted channel signal to make the cargo enter the corresponding channel 5 Sending signal is finished and the instrument will judge whether the wei...

Page 56: ...d timer will be T0 2 Timing T0 is over Start to calculate the average weight and go to program step 2 timer will be T1 3 Record the weight data Timing of T1 is over Calculate the average weight at the time interval T1 and go to program step 4 and timer will be T2 4 Timing T2 is over Save the weight data and sort it by the weight Output the batching signal by channel and timer will be T3 5 Timing T...

Page 57: ...e are 2 decimal digits during calibration Table 8 3 Parameter Setting Example of Batching scale in External Control Mode Set parameter 13A in SET 1 to 3 Set parameter in SET 2 as follows Parameter Setting Instruction 1 1 CtrL Choose the peak holding mode 2 02 t0 The cargo is already on the weighing platform when the triggering signal is received Long time delay is not required 3 10 t1 It is enough...

Page 58: ...ives t0 is delayed and waits for the cargo to be stable 3 Time t0 is over and the instrument starts to calculate the average weight of the cargos with time interval of t1 which will serve as reference for batching signal 4 Time t1 is over Send the signal to PLC immediately and PLC will remove the cargos according to the signal 5 Signal sending is finished and the instrument will judge whether the ...

Page 59: ...o to program step 2 and the timer will be T0 2 Timing T0 is over Start to calculate the average weight go to program step 2 and the timer will be T1 3 Record the weight record Timing T1 is over calculate the average weight during the time interval T1 go to program step 4 and the timer will be T2 4 Timing T2 is over Save the weight data and sort it by the weight Output the batching signal by the ch...

Page 60: ...ion parameter modification Turn on calibration switch before recalibration or calibration parameter modification Error 8 The loaded weight is too small or loading weight parameter is input wrong during calibration Weight loaded should be more than 1 5 of max weighing limit the weight around weighing limit is better Error 9 Batching value is too small startup fails Set quantitative scale parameter ...

Page 61: ...XXX Calibration parameter is not appropriate causing weight indication value exceeding indication scope of indicator Recalibrate correctly and set appropriate parameters Lo XXXXXX Gross weight is less than 20e Execute zero setting or restart initialize zero setting Hi XXXXXX Gross weight is more than max weighing value 9e Reduce the load of load carrier ...

Page 62: ...lay The relay is connected with AC powered inductive load such as AC contactor coil electromagnetic valve etc and parallel connected with RC absorption loop on output terminal or load so as to reduce interference and prolong service life of relay contactor Thin film capacitor can be used for the capacitor electric capacity is about 0 5 time of load current Ampere with unit μF voltage resistance sh...

Page 63: ...ut in binary code with baud rate of 600 Each frame of data has 11 bits among which there are 1 initial bit 0 8 data bits low bit ahead 1 sign bit and 1 stop bit 1 4 C602 transmits a group of data every 100ms which includes 3 frames of data Please refer to Figure C 1 The meanings are as follows First frame of data sign bit is 0 X d0 d1 d2 are positions of decimal point 0 3 Y d3 is the symbol of wei...

Page 64: ...X K 3 1 9 0 C 602 Figure C Signal Format of Scoreboard Display Interface ...

Page 65: ... AD code with low bytes ahead End signal Length 1 byte 3 bytes 1 byte Hexadecimal code 02H 03H Code 1 continuous transmission of weight signal Baud rate of communication should be more than AD conversion rate 120 or otherwise unrecognized characters or data loss may occur Table D 2 Weight Data Format Field Start signal Weight data with high bytes ahead New line End signal Length 1byte 6bytes 2byte...

Page 66: ...4 The hexadecimal value of XOR check sum from address field to the last byte of parameter 2 indicated by ASCII characters with higher digits ahead It is recommended to use PC software matching to this instrument which allows very convenient and direct realization of all items of configuration operation Please refer to Table E 2 for meanings and communication formats of all orders for communication...

Page 67: ... by instrument Tare 02H Addr E XH XL 03H 02H AE04 03H Send by PC Zero setting 02H Addr F XH XL 03H 02H AF07 03H F Send by instrument Zero setting 02H Addr F XH XL 03H 02H AF07 03H Send by PC Operate 02H Addr G XH XL 03H 02H AG06 03H G Send by instrument Operate 02H Addr G XH XL 03H 02H AG06 03H Send by PC Stop 02H Addr H XH XL 03H 02H AH09 03H H Send by instrument Stop 02H Addr H XH XL 03H 02H AH0...

Page 68: ...H 02H AO0E 03H Send by PC Print calibration parameter 02H Addr P XH XL 03H 02H AP11 03H P Send by instrument Print calibration parameter 02H Addr P XH XL 03H 02H AP11 03H Send by PC Read calibration parameter 02H Addr Q XH XL 03H 02H AQ10 03H Q Send by instrument Send calibration parameter 02H Addr Q NN XH XL 03H The instrument returns to all calibration parameters See note 2 for details Send by P...

Page 69: ...W XH XL 03H 02H AW16 03H W Send by instrument Return to the date 02H Addr W XH XL 03H 02H AW05 07 2214 03H Send by PC Read the time 02H Addr X XH XL 03H 02H AX19 03H X Send by instrument Return to the time 02H Addr X XH XL 03H 02H AX17 09 27 33 03H Send by PC Write the time 02H Addr Y XH XL 03H 02H AY 03H Y Send by instrument Return to the time 02H Addr Y XH XL 03H 02H AY 03H Send by PC Write the ...

Page 70: ...s is not 1 checksum XH and XL should be changed accordingly If response character string includes en character it means the format of this command is wrong or execution condition is not satisfied Note 2 of Table E 2 The codes of calibration parameter are e verification scale interval Dp decimal digit F maximum capacity B1 CAL coefficient 0P zero point AD code ON current zero point read only NL non...

Page 71: ...inter AP automatic printing switch AM automatic storage EB large screen switch Pf parameters number 0Z zero area T0 T7 timing constant T0 T7 P1 P8 batching value refer to Table E 4 CY cycling times Tq switch of lead modification Cc out of tolerance treatment switch Db gradual feed switch Ff peak value holding switch Refer to Table E 5 for returned data and explanation Table E 4 Meanings of Working...

Page 72: ...n AR2E 1 55 Switch 1 of serial port 2 on AREP 1 37 Printer switch 1 on ARAP 1 33 Automatic printing switch 1 on AREB 1 25 Large screen switch 1 on ARAM 2 2D Automatic storage mode 2 storage time and weight ARPf 1 14 Batching No 1 AR0Z 000 010 76 Zero area 0 01 kg ART0 06 71 T0 0 6s ART1 05 73 T1 0 5s ART2 05 70 T2 0 5s ART3 05 71 T3 0 5s ART4 02 71 T4 0 5s ART5 02 70 T5 0 5s ART6 02 73 T6 0 5s ART...

Page 73: ...presents exiting remote control state represents inquiring remote control state After PC has sent the command of converting to remote control state if C602 is in stop state remote control state will be entered if C602 is in operation state this command will be omitted the returned command parameter is 0 Note 8 of Table E 2 See Table E 6 for the meaning of NN parameter Parameter value is represente...

Page 74: ...A JH States of group 0 to group 7 intermediate relays 8 intermediate relays for every group Group 0 is time relay 8 digits of binary data represented by returned 3 digits of integer of C602 indicate the state of 8 relays PA PZ 26 memories including integers ranged 8388608 8388607 long integer of returned 8 bytes of C602 Note 11 of Table E 2 this command is only effective in remote control state Pa...

Page 75: ...12 07 时间 10 10 31 毛重 010 000 kg 皮重 001 000 kg 净重 009 000 kg Print in English Date 08 12 07 Time 10 10 31 Gross 010 000kg Tare 001 000kg Net 009 000kg F 1 2 Automatic print format same for grader and quantitative scale Print in Chinese 序号 净重 kg 00001 004 999 00002 005 000 00003 005 000 Print in English No Net kg 00001 004 999 00002 005 000 00003 005 000 ...

Page 76: ... 次数 00003 总重 0000014 999kg Print in English Accu Date 08 12 07 Time 15 04 18 No 00003 Total 0000014 999kg F 1 4 Accumulated print of grader Print in Chinese 日期 08 12 07 时间 15 04 18 通道 1 次数 00002 总重 0000003 000 kg 通道 2 次数 00002 总重 0000006 000 kg 通道 3 次数 00000 总重 0000000 000 kg 通道 4 次数 00000 总重 0000000 000 kg ...

Page 77: ...lated value is saved therefore after being energized the total accumulated No total weight and sum of various channels will be inconsistent if the original total value is not cleared Print in English Date 08 12 07 Time 15 04 18 Ch1 No 00002 Tt 0000003 000 kg Ch2 No 00002 Tt 0000006 000 kg Ch3 No 00000 Tt 0000000 000 kg Ch4 No 00000 Tt 0000000 000 kg Ch5 No 00000 Tt 0000000 000 kg ...

Page 78: ...0 003 000 F 2 2 Automatic print same for accumulative scale and grader Print in Chinese 称重单 日期 08 12 07 序号 时间 净重 kg 总重 kg 00001 09 04 13 006 000 0000006 000 00002 09 04 24 006 001 0000012 001 00003 09 04 50 006 000 0000018 001 Print in English Weighing Bill Date 08 12 07 No Time Net kg Total kg 00001 09 04 13 006 000 0000006 000 00002 09 04 24 006 001 0000012 001 00003 09 04 50 006 000 0000018 001...

Page 79: ... 09 15 28 通道 次数 总重 kg 1 00001 0000001 000 2 00002 0000006 000 3 00001 0000005 000 4 00001 0000007 000 5 00001 0000007 999 总计 00006 0000028 999 Print in English Date 08 12 08 Time 09 13 25 Chs No Total kg 1 00001 0000001 000 2 00002 0000006 000 3 00001 0000005 000 4 00001 0000007 000 5 00001 0000007 999 Total 00006 0000028 999 F 3 Print of calibration parameter and general parameter same to micro p...

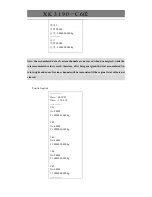
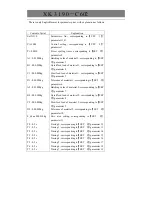
Page 80: ...3 Addr 01 Communication address corresponding to SET 1 parameter 4 Buad 44 Baud rate corresponding to SET 1 parameter 5 Mode 22 Communication mode corresponding to SET 1 parameter 6 Prnt 1 Printer type corresponding to SET 1 parameter 7 PL 00 Print language corresponding to SET 1 parameter 8 AutoP 12 Automatic print corresponding to SET 1 parameter 9 Aout_W 020 000kg Full measurement range weight ...

Page 81: ...r 6 A2 003 000kg Batching value of material 2 corresponding to SET 2 parameter 7 B2 000 500kg Quick feed lead of material 2 corresponding to SET 2 parameter 8 C2 000 020kg Slow feed lead of material 2 corresponding to SET 2 parameter 9 D2 000 020kg Tolerance of material 2 corresponding to SET 2 parameter 10 0_Zone 000 010kg Zero area setting corresponding to SET 2 parameter 11 T0 0 2 s Timing 0 co...

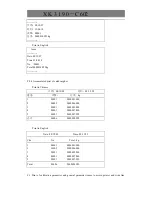
Page 82: ...ponding to SET 2 parameter 2 B 004 000kg Upper limit of channel 2 corresponding to SET 2 parameter 3 C 006 000kg Upper limit of channel 3 corresponding to SET 2 parameter 4 D 008 000kg Upper limit of channel 4 corresponding to SET 2 parameter 5 0_Z 000 010kg Zero area setting corresponding to SET 2 parameter 6 T0 0 2 s Timing 0 corresponding to SET 2 parameter 7 T1 0 2 s Timing 1 corresponding to ...

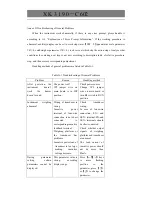
Page 83: ...r doesn t sound The power is off JP2 jumper wire on main board is in ISP position Check power source Change JP2 jumper wire on main board or turn K2 switch to RUN position Instrument weighing abnormal Wiring of transducer is wrong Incentive power terminal of four wire connection is not short connected to corresponding incentive feedback terminal Weighing platform or the transducer has problems Inc...

Page 84: ...cable Check whether printing setting parameters are conforming to the printer Check printer cable and plug or replace printing cable Figure flickering Weighing platform is unstable Weighing platform is vibrating Transducer screening wire is not connected well Electromagnetic inference at site is too large AD shifting speed is too quick Filtration strength is too small Improve loader structure Adop...

Page 85: ...not ON after figures are stable Settings of stability judgment is too small Increase the value of SET 1 parameter 3D Stable light is ON even when the figure is not stable Settings of stability judgment is too large Decrease the value of SET 1 parameter 3D ...

Page 86: ...is trying to improve product s quality and provide high quality product to the users However any electrical equipment may fail thus during system design this kind of possibility should be considered and necessary measures such as redundancy design interlock device for system reliability and safety improvement should be adopted 3 Non professional personnel should not open the instrument to avoid an...

Page 87: ...ent 021 58863788 50840546 50842579 58411284 50842876 50840434 58862570 50823184 58491310 50824201 50824202 50824203 Switchboard 021 50842212 50840671 50840806 Sales department extension 821 822 823 After sales telephone 50825520 Fax 021 58860003 Zip code 200124 Web http www yaohua com cn E mail weighd online sh cn ...

Reviews: