background image

1

DE

INHALT

Produktbeschreibung ....................................................1
Vorbereitung .................................................................. 2
Betrieb ...................................................................10
Technische Daten..........................................................13
Wartung und Lagerung .................................................14
Fehlerbehebung ...........................................................16

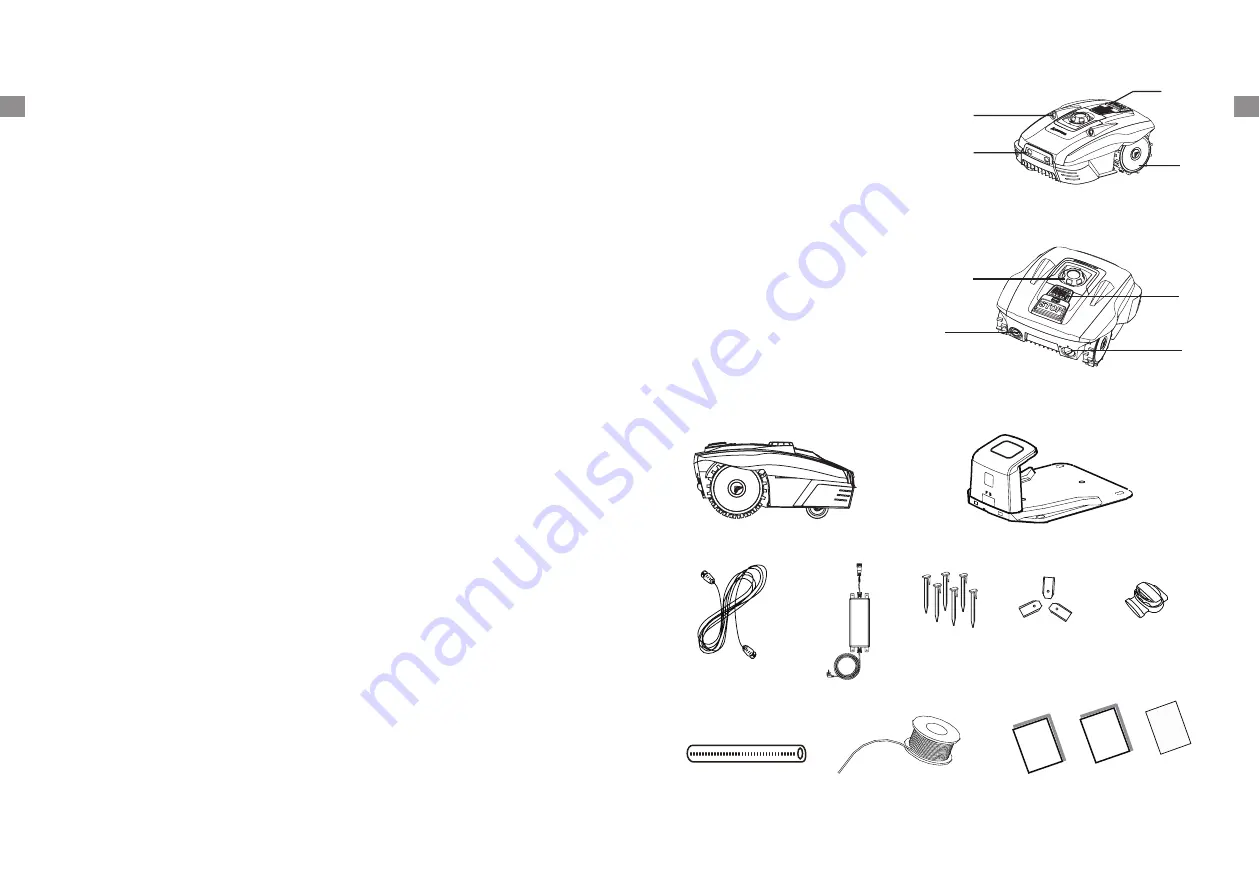
Produktbeschreibung

1.  STOP-Taste
2.  Ultraschallsensor
3.  Ladekontakte
4.  Hinterrad
5.  Drehknopf zur Schnitthöhenverstellung
6.  Bedienfeld
7.  USB-Schnittstelle (Service)
8.  Ein-/Ausschalter

Lieferumfang

Original

 instrcution

Warranty

Installation

guide

Compact Mähroboter

Heringe für das 

Begrenzungskabel

Bedienungsanleitung

Ersatzmesser

Verlängerungskabel

Ladestation

Kabelverbinder

Lineal

Begrenzungskabel

Netzteil

DE

2

1

3

4

5

6

7

8

Summary of Contents for COMPACT 280R

Page 1: ...30cm 10 cm Compact 280R 400Ri ROBOTIC MOWER Installation Guide MÄHROBOTER Installationsanleitung ROBOT TONDEUSE Guide d installation ROBOTMAAIER Gebruiksaanwijzing ROBOSEKAČKA Průvodce instalací ROBOT KOSZĄCY Instrukcja instalacji GB DE FR NL CZ PL ...

Page 2: ...button 2 Ultrasonic sensor 3 Charging port 4 Rear wheel 5 Height adjustment dial 6 Control panel 7 USB interface 8 On Off switch Parts included within this box Original instrcution QSG Installation guide Robotic mower Boundary pegs Manuals Spare blades Extension cord Docking station Connectors Measurement ruler Boundary wire Switching power supply 2 1 3 4 5 6 7 8 ...

Page 3: ...ure you lay the boundary wire correctly to ensure the machine avoids obstacles Trees The Robotic Mower treats trees as common obstacles however if the tree roots are exposed and lower than 100mm they will need to be excluded from the mowing area with the boundary wire This is to avoid damaging the root blades or rear wheels Stones We recommend clearing the lawn of small less than 100mm high rocks ...

Page 4: ...t place the docking station too close to a slope such as at the top of a hill or the bottom of a furrow Avoid left and right inclination in excess of 5 degrees 5 5 If your lawn has a soft or uneven surface we recommend fortifying the area around the docking station with a grass protection mesh Otherwise the repeated stress of the rear wheels can damage the turf Once the position of the docking sta...

Page 5: ...cing an obstacle on the boundary wire around the flowerbed Place the obstacle e g a large rock or pole near position A indicated on the below illustration The obstacle must be surrounded by a flat area of about 1m x 1m without any slopes This obstacle will allow the machine to exit the circle 5 mm Ponds and Pools While the Robotic Mower is protected against rain and spray water being submerged is ...

Page 6: ...the Robotic Mower will remain in the docking station until the battery is fully charged Successful docking and charging indicates that you have found a suitable position for the docking station You should now start fixing pegs into ground fully Take care not to damage or kink the surplus wire stored under the docking station Signal selection There are two signals which can be selected S1 blue indi...

Page 7: ...emain on when ready to connect to Wifi LED will flash quickly when successfully connected to Wifi Start mowing 1 2 Compact 280R Compact 400Ri Rain sensor indicator Robotic Mower will return to docking station when it rains Start button Frist press the Start button and then press the OK button robotic Mower will start to work Home button First press the Home button and the press the OK button robot...

Page 8: ...400Ri APP control Max cutting area 280 m2 400 m2 Battery pack 20V 2000mAh 20V 2000mAh Switch power supply Input 100 240V AC 50 60Hz 42W Output 24VDC CC1 5A Input 100 240V AC 50 60Hz 42W Output 24VDC CC1 5A Mowing time on one charge 60 min 60 min Rated voltage 20 V 20 V Rated power 42 W 42 W No load speed 3500 min 3500 min Cutting width 16 cm 16 cm Cutting height Approx 20 55 mm Approx 20 55 mm Cha...

Page 9: ...cleaning Wipe off any residue after cleaning with a damp cloth Cleaning the underside Ensure the main power switch is in OFF position Wearing protective gloves turn the Robotic Mower onto its side to expose its underside Clean the blade disc and frame using a soft brush or damp cloth Rotate the blade disc to make sure that it can move freely check that the blades can turn on their pivots and that ...

Page 10: ...ower to the alternative boundary signal Driving motor may be damaged please contact our customer support team The Robotic Mower is noisy Inspect the blade fixing screws tighten if necessary Inspect the blades for damage replace if necessary Grass may be too high Try increasing the cutting height or mow the lawn with an ordinary lawnmower first Cutting motor failure please call our customer support...

Page 11: ...or 3 Ladekontakte 4 Hinterrad 5 Drehknopf zur Schnitthöhenverstellung 6 Bedienfeld 7 USB Schnittstelle Service 8 Ein Ausschalter Lieferumfang Original instrcution Warranty Installation guide Compact Mähroboter Heringe für das Begrenzungskabel Bedienungsanleitung Ersatzmesser Verlängerungskabel Ladestation Kabelverbinder Lineal Begrenzungskabel Netzteil DE 2 1 3 4 5 6 7 8 ...

Page 12: ...r Es ist trotzdem ratsam Hindernisse mit dem Begrenzungskabel aus zu grenzen Bäume Der Mähroboter behandelt Bäume wie alle anderen Hindernisse Wenn die Wurzeln des Baums jedoch freiliegen und niedriger als 10 cm sind muss dieser Bereich mit dem Begrenzungskabel abgesteckt werden um die Wurzeln die Messer und Hinterräder vor Schäden zu schützen Steine Wir empfehlen kleine niedriger als 10 cm Steine...

Page 13: ...gneten Witterungsschutz zum Beispiel eine Überdachung oder eine Garage für den Mähroboter Achten Sie darauf dass die Ladestation waagerecht aufgestellt wird Vermeiden Sie Neigungen von mehr als 5 Grad 5 5 Wenn Ihr Rasen eine weiche oder unebene Fläche hat empfehlen wir den Bereich rund um die Ladestation mit einem Rasenschutzgitter zu verstärken Andernfalls kann die wiederkehrende Belastung durch ...

Page 14: ...Begrenzungskabel um das Blumenbeet herum gestellt werden Stellen Sie das Hindernis zum Beispiel einen großen Stein oder Pfahl in der Nähe von Position A auf wie in der folgenden Abbildung gezeigt Das Hindernis muss von einem flachen Bereich von etwa 1 m mal 1 m ohne Neigungen umgeben sein Dieses Hindernis ermöglicht dem Gerät den Kreis zu verlassen 5 mm Teiche und Pools Der Mähroboter ist zwar vor...

Page 15: ...station bis der Akku vollständig aufgeladen ist Erfolgreiches Andocken und Aufladen bestätigt dass Sie einen geeigneten Aufstellort für die Ladestation gefunden haben Nun sollten Sie die Befestigungsheringe ganz in den Boden treiben Bitte verstauen Sie überschüssiges Kabel nicht unter der Ladestation sondern legen Sie es zusammen und positionieren Sie es neben der Ladestation außerhalb des Mähbere...

Page 16: ...t schnell wenn die WLAN Verbindung hergestellt wurde Mähen Betätigen Sie die Start Taste 1 und drücken im Anschluss die OK Taste 2 um den Mähroboter zu starten 1 2 Regensensoranzeige Bei Regen kehrt der Mähroboter zur Ladestation zurück Starttaste Drücken Sie die Start Taste und besätigen Sie den Befehl mit der OK Taste Der Mähroboter beginnt seine Arbeit Home Taste Drücken Sie die Home Taste und ...

Page 17: ...d sichergestellt dass Sie optimale Ergebnisse mit Ihrem Mähroboter erzielen Schnellstopp Technische Daten Modell 280R 400Ri Wifi Max Schnittbereich 280 m2 400 m2 Akku 20V 2000mAh 20V 2000mAh Schaltleistung Input 100 240V AC 50 60Hz 42W Output 24VDC CC1 5A Input 100 240V AC 50 60Hz 42W Output 24VDC CC1 5A Mähzeit mit einer Akkuladung 60 min 60 min Nennspannung 20 V 20 V Nennleistung 42 W 42 W Leerl...

Page 18: ...Haushaltsreiniger für eine gründliche Reinigung Wischen Sie alle Reste nach der Reinigung mit einem feuchten Lappen ab OFF 0 1 ON Reinigung der Unterseite Achten Sie darauf dass der Betriebsschalter auf OFF gestellt ist Tragen Sie Schutzhandschuhe drehen Sie den Mähroboter auf die Seite um auf seine Unterseite zugreifen zu können Reinigen Sie die Messerscheibe und den Rahmen mit einer weichen Bürs...

Page 19: ... Möglicherweise ist der Antrieb beschädigt Wenden Sie sich bitte an den Kundendienst Der Mähroboter ist laut Untersuchen Sie die Befestigungsschrauben der Messer ziehen Sie sie gegebenenfalls nach Untersuchen Sie die Messer auf Schäden ersetzen Sie sie gegebenenfalls Das Gras ist möglicherweise zu hoch Probieren Sie aus die Schnitthöhe zu vergrößern oder den Rasen erst mit einem normalen Rasenmähe...

Page 20: ...ion guide Tondeuse Robomower Piquets pour câble Guides Lames de rechange Rallonge électrique Station de chargement Connecteurs Règle Câble de délimitation Source d alimentation Description du produit 1 Bouton STOP 2 Capteur ultrasonique 3 Prise de chargement 4 Roue arrière 5 Molette de réglage de la hauteur 6 Panneau de commandes 7 Interface USB 8 Bouton Marche Arrêt FR 2 1 3 4 5 6 7 8 ...

Page 21: ...ation Arbres Le Robomower considère les arbres comme des obstacles ordinaires mais si les racines d un arbre sont exposées et d une hauteur inférieure à 100 mm vous devrez exclure cette zone de la surface à tondre en utilisant le câble de délimitation afin de protéger les racines de l arbre ainsi que les lames et les roues arrière de l appareil Pierres Nous vous recommandons de débarrasser la pelo...

Page 22: ...rotection adéquate contre les éléments comme un auvent ou un garage Ne placez pas la station de chargement à proximité d une pente comme en haut d une colline ou en bas d un sillon Évitez toute inclinaison de plus de 5 degrés 5 5 Si votre pelouse possède une surface molle ou irrégulière nous vous conseillons de solidifier la zone autour de la station de chargement avec un filet de protection pour ...

Page 23: ...a par dessus eux Cette option nécessite de placer un obstacle sur le câble de délimitation autour de la plate bande Placez cet obstacle une grosse pierre ou un bâton par exemple près de l emplacement A comme indiqué sur l image ci dessous L obstacle doit être entouré par une zone plate d environ 1 m x 1 m sans pentes Cet obstacle permettra à l appareil de sortir du cercle 5 mm Mares et piscines Mê...

Page 24: ... recharge correctement Après l installation initiale le Robomower restera sur la station de chargement jusqu à ce que la batterie soit complètement rechargée Si l appareil rejoint la station et se recharge correctement cela signifie que vous avez trouvé un emplacement adéquat pour la station de chargement Il est maintenant temps d enfoncer complètement les piquets de fixation Faites attention de n...

Page 25: ...orsqu une connexion WiFi est disponible L indicateur LED clignote rapidement lorsque l appareil est connecté au WiFi Pour commencer à tondre Appuyez sur le bouton de verrouillage en le maintenant puis appuyez sur le bouton Marche Indicateur du capteur de pluie Le Robomower retournera à la station de chargement lorsqu il pleut Bouton Marche Appuyez d abord sur le bouton Démarrer puis sur le bouton ...

Page 26: ... IP67 Plug IP44 Pièces de rechange Lames de rechange x 3 x 3 Piquets de délimitation x 100 x 120 Câble de délimitation x 80 x 100 Connecteurs x 3 x 3 Appuyez sur le bouton de verrouillage en le maintenant puis appuyez sur le bouton Maison Appuyez sur le bouton STOP pour arrêter la tondeuse à tout moment Retour à la station de chargement Réglage de la hauteur de coupe La hauteur de coupe peut être ...

Page 27: ...ulvérisateur d eau manuel avec un détergent domestique doux pour un nettoyage plus intensif Essuyez les résidus à l aide d un chiffon humide après le nettoyage Nettoyage du dessous de la tondeuse Vérifiez que l interrupteur de la source d alimentation principale est bien en position Arrêt Équipé de gants de protection placez le Robomower sur son côté afin d accéder au dessous de l appareil Nettoye...

Page 28: ...rent de celui de l autre appareil Le moteur est peut être endommagé Veuillez contacter le service clientèle Le Robomower fait beaucoup de bruit Vérifiez les vis de fixation des lames et resserrez les si nécessaire Vérifiez que les lames ne sont pas endommagées Remplacez les si nécessaire L herbe est peut être trop haute Essayez d augmenter la taille de coupe ou tondez d abord la pelouse avec une t...

Page 29: ... 2 Ultrasone sensor 3 Oplaadaansluiting 4 Achterwiel 5 Regelaar voor hoogte instelling 6 Bedieningspaneel 7 USB interface 8 Aan uit schakelaar Inhoud van de verpakking Original instrcution Warranty Installation guide Robotmaaier Haringen Gebruiksaanwijzing Reservemesjes Verlengsnoer Laadstation Waterdichte draadklemmen Lineaal Omheiningsdraad Transformator NL 2 1 3 4 5 6 7 8 ...

Page 30: ... aangeraden om de obstakels met de omheiningsdraad te beschermen Bomen De robotmaaier beschouwt bomen als gewone obstakels maar als de wortels van de bomen zichtbaar en lager dan 100mm zijn scherm dit gebied dan af met omheiningsdraad om de boomwortels messen en achterwielen tegen schade te beschermen Stenen We bevelen aan om kleine lager dan 100 mm rotsen en stenen of stenen met een ronde rand ui...

Page 31: ...embad of trap We bevelen een gepaste bescherming voor de elementen aan zoals een dak of garage Plaats het laadstation niet in de buurt van een helling zoals bovenop een heuvel of in een greppel Vermijd een linker of rechter helling van meer dan 5 graden 5 5 Als uw gazon een zachte of oneffen ondergrond heeft raden wij aan om het gebied rondom het laadstation te verstevigen met een beschermnet spec...

Page 32: ...d over Deze optie vereist het plaatsen van een obstakel op de omheiningsdraad rondom het bloemenperk Plaats een obstakel bijv een grote steen of paal in de buurt van positie A zoals in onderstaande afbeelding weergegeven Het obstakel moet worden omgeven door een vlak gebied van circa 1 m x 1 m zonder hellingen Dit obstakel stelt de machine in staat om de cirkel te verlaten 5 mm Vijvers en zwembade...

Page 33: ... geeft aan dat de accu juist wordt opgeladen Na eerste installatie blijft de robotmaaier in het laadstation totdat de accu volledig is opgeladen Een succesvolle verbinding en laadbeurt betekent dat het laadstation op een gepaste plaats is geïnstalleerd Sla de haringen nu volledig in de grond Zorg ervoor dat als er draad overblijft deze word afgeknipt de overgebleven draad mag niet blijven liggen E...

Page 34: ...neer klaar om een verbinding met WiFi te maken LED knippert snel wanneer verbinding met WiFi tot stand is gebracht Start met maaien Regensensor controlelampje De robotmaaier keert terug naar het laadstation wanneer het regent Startknop Druk eerst op de Start knop en vervolgens op de OK knop de robotmaaier begint te werken Huisknop Druk eerst op de Home knop en vervolgens op de OK knop de robotmaai...

Page 35: ...ns Model 280R 400Ri Wifi Max maaigebied 280 m2 400 m2 Accu 20V 2000mAh 20V 2000mAh Schakelvermogen Input 100 240V AC 50 60Hz 42W Output 24VDC CC1 5A Input 100 240V AC 50 60Hz 42W Output 24VDC CC1 5A Maaiduur met één laadbeurt 60 min 60 min Nominale spanning 20 V 20 V Nominaal vermogen 42 W 42 W Snelheid zonder belasting 3500 omw min 3500 omw min Maaibreedte 16 cm 16 cm Maaihoogte Circa 20 55 mm Ci...

Page 36: ...einiging gebruik een handmatige watersproeier met een mild schoonmaakmiddel Na het reinigen veeg eventuele resten weg met een vochtige doek De onderkant reinigen Zorg dat de hoofdschakelaar op de stand OFF uit uitstaat Draag werkhandschoenen en draai de robotmaaier op zijn kant om de onderkant te reinigen Reinig de messenschijf en het frame met een zachte borstel of vochtige doek Draai de messensc...

Page 37: ... omheiningssignaal De aandrijfmotor kan beschadigd zijn neem contact op met de klantenservice De robotmaaier maakt veel lawaai Controleer de vastzetschroeven voor de messen en indien nodig deze vast te draaien Controleer de messen op schade indien nodig zijn deze te vervangen Het gras kan te hoog zijn Verhoog de maaihoogte of maai het gazon eerst met een gewone grasmaaier Defecte motor neem contac...

Page 38: ...y Installation guide Robotická sekačka Vodicí kolíky Návody Náhradní čepele Prodlužovací kabel Nabíjecí stanice Konektor Měřící pravítko Ohraničující kabel Prodlužovací kabel CZ Popis výrobku 1 Tlačítko STOP 2 Ultrazvukový senzor 3 Nabíjecí port 4 Zadní kolo 5 Kolečko pro nastavení výšky 6 Ovládací panel 7 USB rozhraní 8 Tlačítko zap vyp 2 1 3 4 5 6 7 8 ...

Page 39: ...kabelu Stromy Robotická sekačka vyhodnocuje stromy jako běžné překážky ale pokud jsou kořeny stromu odhaleny a jsou menší než 100 mm měla by být tato oblast vyloučena pomocí ohraničujícího kabelu aby se ochránili kořeny stromu řezné čepele nebo zadní kola před poškozením Kameny Doporučujeme odstranit z trávníku malé méně než 100 mm vysoké skály a kameny a jakékoli kameny s kulatým nebo šikmým okra...

Page 40: ... bezpečné vzdálenosti od rybníků bazénů nebo schodů Doporučujeme vhodnou ochranu pomocí například portu robota nebo garáže Neumisťujte nabíjecí stanici příliš blízko ke svahu například na vrchol kopce nebo na dno brázdy Vyhněte se levému a pravému sklonu většímu než 5 stupňů 5 5 Pokud má váš trávník měkký nebo nerovný povrch doporučujeme zpevnění oblasti kolem nabíjecí stanice pomocí ochranné sítě...

Page 41: ...e umístění překážky na ohraničující kabel kolem květinového záhonu Umístěte překážku např velkou skálu nebo tyč do blízkosti polohy A vyznačené na obrázku níže Překážka musí být obklopena plochou oblastí asi 1 m x 1 m bez jakýchkoliv sklonů Tato překážka umožní stroji opustit kruh 5 mm Rybníky a bazény I když je robotická sekačka chráněna před deštěm a postříkáním vodou ponoření způsobí vážné pošk...

Page 42: ...baterie správně nabíjí Po počáteční instalaci robotická sekačka zůstane v nabíjecí stanici až do úplného nabití baterie Úspěšné vrácení a nabíjení znamená že jste nalezli vhodnou polohu pro nabíjecí stanici Nyní můžete kolíky zcela upevnit do země Dbejte na to aby nedošlo k poškození nebo zkroucení přebytečného drátu uloženého pod nabíjecí stanicí Výběr signálu K dispozici jsou dva signály S1 modr...

Page 43: ...čka připravena k připojení k Wifi LED bude rychle blikat po úspěšném připojení k Wifi Start sekání Kontrolka dešťového senzoru Robotická sekačka se vrátí do nabíjecí stanice když prší Tlačítko Start Nejprve stiskněte tlačítko Start a poté stiskněte tlačítko OK robotická sekačka začne pracovat Tlačítko Domů Nejprve stiskněte tlačítko Domů a poté stiskněte tlačítko OK robotická sekačka se vrátí do d...

Page 44: ...jení 100 min 100 min Hmotnost 7 4 Kg 7 4 Kg Stupeň ochrany Robotická sekačka IP24 IP24 Přepínací napájecí zdroj IP67 Plug IP44 IP67 Plug IP44 Náhradní díly Náhradní čepele 3 ks 3 ks Hraniční kolíky 100 ks 120 ks Ohraničující kabel 80 m 100 m Konektor 3 ks 3 ks Kdykoli stiskněte tlačítko STOP k zastavení sekačky Návrat do nabíjecí stanice Nastavení výšky sekání Výšku řezu lze nastavit otočením kole...

Page 45: ...jte ruční vodní sprej s jemným domácím čisticím prostředkem Odstraňte veškeré zbytky po čištění vlhkým hadříkem Čištění spodní strany Ujistěte se že hlavní vypínač je v poloze OFF S ochrannými rukavicemi přetočte robotickou sekačku na boční stranu abyste odkryli její spodní stranu Očistěte čepelový disk a rám měkkým kartáčem nebo vlhkým hadříkem Otáčejte čepelovým diskem abyste se ujistili že se p...

Page 46: ...u sekačku na jiný hraniční signál Mohlo dojít k poškození pohonného motoru obraťte se na zákaznickou podporu Robotická sekačka je hlučná Zkontrolujte upevňovací šrouby čepelí v případě potřeby utáhněte Zkontrolujte zda čepele nejsou poškozené v případě potřeby vyměňte Tráva může být příliš vysoká Zkuste zvýšit výšku řezání nebo nejprve posekat trávník běžnou sekačkou Poškození žacího motoru zavole...

Page 47: ...zujnik ultradźwiękowy 3 Port ładowania 4 Koło tylne 5 Pokrętło regulacji wysokości 6 Panel sterowania 7 Interfejs USB 8 Przełącznik wł wył Zakres dostawy Original instrcution Warranty Installation guide Robokosiarka Kołki do mocowania przewodu Instrukcje Zapasowe ostrza Przedłużacz Stacja ładowania Łączówki Linijka do pomiarów Przewód graniczny Zasilacz PL 2 1 3 4 5 6 7 8 ...

Page 48: ...ca się aby przeszkody zabezpieczyć przewodem granicznym Drzewa Robokosiarka traktuje drzewa jak zwykłe przeszkody ale jeśli korzenie drzewa są odkryte niżej niż 100 mm miejsce to należy wyłączyć z koszenia i ogrodzić przewodem granicznym w celu ochrony korzeni drzewa oraz zabezpieczenia ostrzy tnących i kół tylnych przed uszkodzeniem Kamienie Zalecamy aby z trawnika usunąć małe do 100 mm wysokości...

Page 49: ...chrony przed czynnikami atmosferycznymi np wiatę na robota lub garaż Stacji ładowania nie należy umieszczać zbyt blisko pochyłości np na szczycie pagórka lub na dnie niecki Należy unikać nachylenia przekraczającego 5 stopni w lewo lub w prawo 5 5 Jeśli trawnik ma miękką lub nierówną powierzchnię zalecamy wzmocnienie powierzchni wokół stacji ładowania za pomocą siatki zabezpieczającej trawę Inaczej...

Page 50: ...kody na przewodzie granicznym biegnącym wokół klombu Przeszkodę tę np duży kamień lub palik należy umieścić w pobliżu punktu A zaznaczonego na ilustracji poniżej Przeszkoda musi się znajdować w płaskim miejscu o wymiarach około 1 m x 1 m i nie na pochyłości Przeszkoda ta umożliwi maszynie opuszczenie koła 5 mm Oczka wodne i baseny O ile robokosiarka jest zabezpieczona przed deszczem i bryzgami wod...

Page 51: ...any Po początkowym zainstalowaniu robokosiarka pozostanie w stacji ładowania aż do całkowitego naładowania akumulatora Prawidłowe dokowanie w stacji i ładowanie oznaczają że użytkownik znalazł odpowiednie miejsce dla stacji ładowania Teraz należy do końca wbić kołki mocujące Należy uważać aby nie uszkodzić lub poplątać zapasu przewodu znajdującego się pod stacją ładowania Wybór sygnału Użytkownik ...

Page 52: ... urządzenie jest gotowe go połączenia z siecią Wi Fi Kontrolka LED miga szybko po pomyślnym połączeniu z siecią Wi Fi Rozpoczynanie koszenia Wskaźnik czujnika deszczu Kiedy zacznie padać robokosiarka wróci do stacji ładowania Przycisk Start Najpierw naciśnij przycisk Start a następnie przycisk OK kosiarka zautomatyzowana zacznie działać Przycisk Baza Najpierw naciśnij przycisk Home a następnie prz...

Page 53: ...l 280R 400Ri Wifi Maks powierzchnia koszenia 280 m2 400 m2 Akumulator 20V 2000mAh 20V 2000mAh Zasilacz Input 100 240V AC 50 60Hz 42W Output 24VDC CC1 5A Input 100 240V AC 50 60Hz 42W Output 24VDC CC1 5A Czas koszenia na 1 naładowaniu 60 min 60 min Napięcie znamionowe 20 V 20 V Moc znamionowa 42 W 42 W Prędkość bez obciążenia 3500 obr min 3500 obr min Szerokość koszenia 16 cm 16 cm Wysokość koszeni...

Page 54: ...o czyszczeniu wytrzeć ewentualne osady wilgotną szmatką Czyszczenie od spodu Przełącznik zasilania musi być ustawiony w pozycji włączonej Należy założyć rękawice ochronne i odwrócić robokosiarkę na bok tak aby widać było spód urządzenia Ramę i tarczę z ostrzami należy czyścić miękką szczoteczką lub wilgotną szmatką Tarczę z ostrzami przekręcić aby upewnić się że porusza się bez oporów sprawdzić cz...

Page 55: ...ał Być może uszkodzony jest silnik napędu należy skontaktować się z działem pomocy dla klientów Robokosiarka jest zbyt głośna Jeśli jest taka potrzeba skontrolować śruby mocujące ostrza Skontrolować ostrza pod kątem uszkodzenia a jeśli trzeba wymienić je Być może trawa jest zbyt wysoka Należy spróbować zwiększyć wysokość koszenia lub najpierw skosić trawnik zwykłą kosiarką Usterka silnika koszenia...

Reviews: