background image

8

NOTE:

Do not rest the Bump Head™ on the ground while the
unit is running.

Some line breakage will occur from:

Entanglement with foreign matter

Normal line fatigue

Attempting to cut thick, stalky weeds

Forcing the line into objects such as walls or fence posts

TIPS FOR BEST TRIMMING RESULTS

Keep the cutting attachment parallel to the ground.

Do not force the cutting attachment. Allow the tip of the
line to do the cutting, especially along walls. Cutting with
more than the tip will reduce cutting efficiency and may
overload the engine.

Cut grass over 8 inches (200 mm) by working from top to
bottom in small increments to avoid premature line wear or
engine drag.

Cut from right to left whenever possible. Cutting to the left
improves the unit's cutting efficiency. Clippings are thrown
away from the operator.

Slowly move the trimmer into and out of the cutting area at
the desired height. Move either in a forward-backward or
side-to-side motion. Cutting shorter lengths produces the
best results.

Trim only when grass and weeds are dry.

The life of your cutting line is dependent upon:

Following the trimming techniques

What vegetation is being cut

Where vegetation is cut

For example, the line will wear faster when trimming against a
foundation wall as opposed to trimming around a tree. 

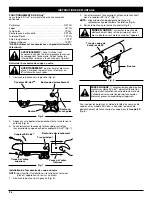
HOLDING THE TRIMMER

Before operating the unit, stand in the operating position (Fig.
12). Check for the following:

The operator is wearing eye protection and proper clothing

With a slightly-bent right arm, the operator’s hand is
holding the shaft grip

The operator’s left arm is straight, the left hand holding the
D-handle

The unit is at waist level

The cutting attachment is parallel to the ground and easily
contacts the grass without the need to bend over

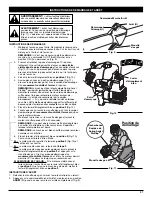
ADJUSTING TRIMMING LINE LENGTH

The Bump Head™ cutting attachment allows you to release
trimming line without stopping the engine. To release more line,
lightly tap the cutting attachment on the ground (Fig. 13) while
operating the trimmer at high speed.

NOTE

: Always keep the trimming line fully extended. Line

release becomes more difficult when the cutting line
gets shorter.

Each time the head is bumped, about 1 inch (25.4 mm) of
trimming line releases. A blade in the cutting attachment shield
will cut the line to the proper length if any excess line is
released.
For best results, tap the bump knob on bare ground or hard
soil. If you attempt a line release in tall grass, the engine may
stall. Always keep the trimming line fully extended. Line release
becomes more difficult when the cutting line gets shorter.

Fig. 13

Fig. 12

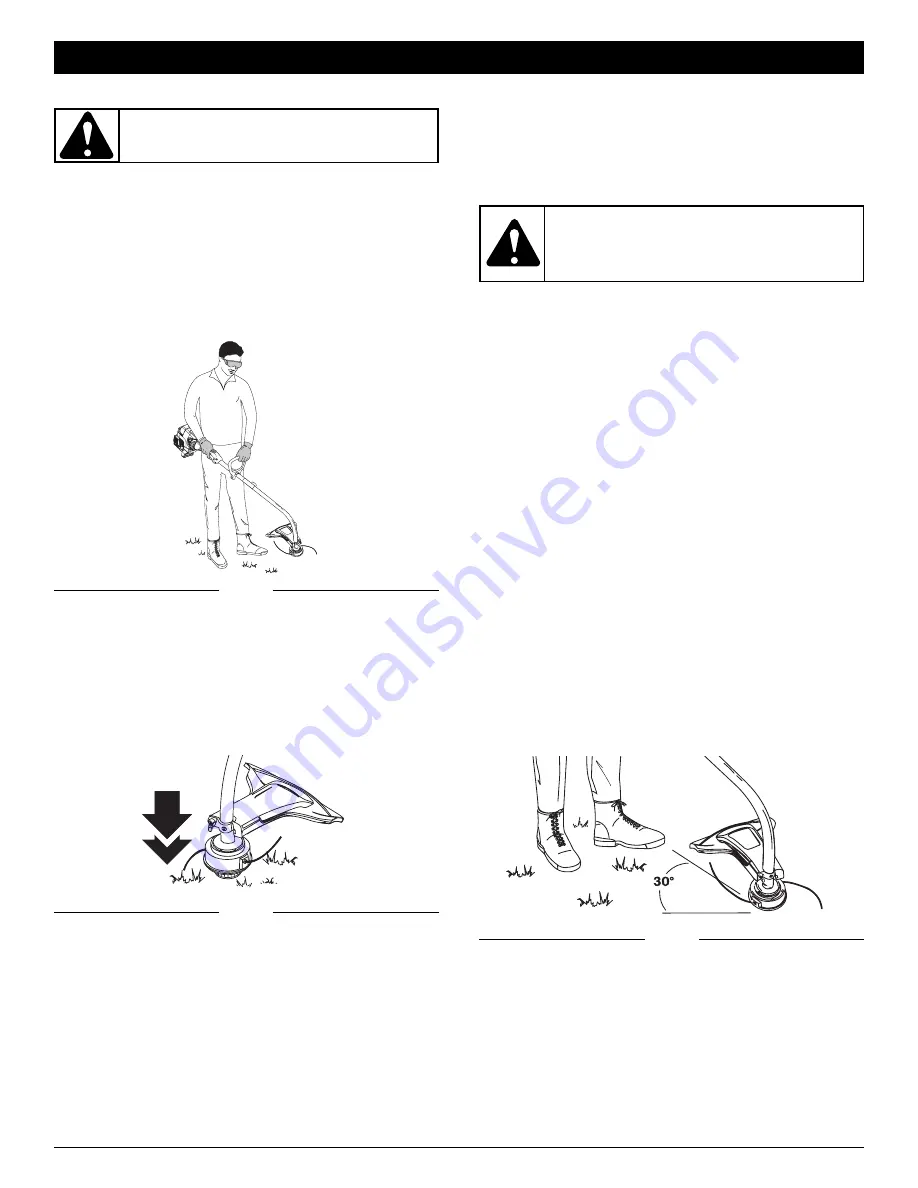
DECORATIVE TRIMMING

Decorative trimming is accomplished by removing all
vegetation around trees, posts, fences and more.
Rotate the whole unit so that the cutting attachment is at a 30°
angle to the ground (Fig. 14).

Fig. 14

OPERATING INSTRUCTIONS

CAUTION: 

Do not remove or alter the line cutting

blade assembly. Excessive line length will make the
clutch overheat. This may lead to serious personal
injury or damage to the unit.

WARNING: 

Always wear eye, hearing, foot and

body protection to reduce the risk of injury when
operating this unit.

Summary of Contents for YM20CS

Page 1: ...For users on U S Forest Land and in the states of California Maine Oregon and Washington All U S Forest Land and the state of California Public Resources Codes 4442 and 4443 Oregon and Washington require by law that certain internal combustion engines operated on forest brush and or grass covered areas be equipped with a spark arrestor maintained in effective working order or the engine be constru...

Page 2: ...achment shield must always be in place while operating the unit as a trimmer Do not operate unit without both trimming lines extended and the proper line installed Do not extend the trimming line beyond the length of the shield This unit has a clutch The cutting attachment remains stationary when the engine is idling If it does not have the unit adjusted by an authorized service technician Adjust ...

Page 3: ... when stored When using alcohol blended fuel use fresh fuel less than 60 days old Using Blended Fuels If you choose to use a blended fuel or its use is unavoidable follow recommended precautions Always use the fresh fuel mix explained in your operator s manual Always agitate the fuel mix before fueling the unit Drain the tank and run the engine dry before storing the unit Using Fuel Additives The ...

Page 4: ...ter Rope Grip Line Cutting Blade EZ Link APPLICATIONS As a trimmer Cutting grass and light weeds Edging Decorative trimming around trees fences etc Other optional accessories may be used with the YM20CS Refer to Operating the EZ Link System for a list of add ons Primer Bulb Blue Choke Lever Spark Plug Engine Stand Muffler Air Filter Muffler Cover ...

Page 5: ...NT SHIELD Use the following instructions if the cutting attachment shield on your unit is not installed 1 Place the cutting attachment shield onto the shaft housing Be sure the guard mounting bracket slides into the slot on the edge of the cutting shield Rotate the shield into place counterclockwise The holes in the guard mounting bracket and cutting attachment shield will line up Fig 3 2 From ins...

Page 6: ... the knob clockwise to tighten Fig 8 Fig 7 Fig 8 Knob Lower Shaft Housing Release Button ASSEMBLY INSTRUCTIONS WARNING Before you begin using any attachment read and understand the manual that came with the attachment Follow all safety information contained within WARNING To avoid serious personal injury and damage to the unit shut the unit off before removing or installing add ons CAUTION The add...

Page 7: ...osition 2 Fig 10 6 While squeezing the throttle control pull the starter rope out with a controlled and steady motion until the engine starts 7 Keep the throttle squeezed and allow the engine to warm up for 15 to 30 seconds NOTE Engine may take longer to warm up and reach maximum operating speed at colder temperatures NOTE Unit is properly warmed up when engine accelerates without hesitation 8 Onc...

Page 8: ...r clothing With a slightly bent right arm the operator s hand is holding the shaft grip The operator s left arm is straight the left hand holding the D handle The unit is at waist level The cutting attachment is parallel to the ground and easily contacts the grass without the need to bend over ADJUSTING TRIMMING LINE LENGTH The Bump Head cutting attachment allows you to release trimming line witho...

Page 9: ...spool with one hand and unscrew the Bump Knob counterclockwise Fig 15 Inspect the bolt inside the Bump Knob to make sure it moves freely Replace the Bump Knob if damaged 2 Remove the inner reel from the outer spool Fig 16 3 Remove spring from the inner reel Fig 16 4 Use a clean cloth to clean the the inner reel spring shaft and inner surface of the outer spool 5 Check the indexing teeth on the inn...

Page 10: ...he direction indicated on the inner reel Place your index finger between the two lines to stop the lines from overlapping Do not overlap the ends of the line Proceed to step 11 Holding Slots 9 Insert the end of the line into the open hole in the inner reel and pull the line tight to make the loop as small as possible Fig 21 10 Before winding split the line back about 6 inches 11 Wind the line in t...

Page 11: ... damage to the unit and possible serious personal injury WARNING To avoid serious personal injury always turn your unit off and allow it to cool before you clean or service it Fig 29 SPARK ARRESTOR MAINTENANCE 1 Remove air filter muffler cover Refer to Removing the Air Filter Muffler Cover 2 Locate the muffler but do not remove it Find the screw on the bottom of the muffler Fig 29 Remove the screw...

Page 12: ...needed until the engine idles smoothly NOTE The cutting attachment should not rotate when the engine idles 3 If the cutting attachment rotates when the engine idles turn the idle speed screw counterclockwise 1 8 of a turn at a time as needed to reduce idle speed Checking the fuel mixture cleaning the air filter and adjusting the idle speed should solve most engine problems If not and all of the fo...

Page 13: ...arburetor Adjustments section or take to an authorized service dealer for an adjustment Fouled spark plug Replace or clean the spark plug Plugged spark arrestor Clean or replace spark arrestor C A U S E A C T I O N Old or improperly mixed fuel Drain gas tank and add fresh fuel mixture Improper carburetor adjustment Adjust according to the Carburetor Adjustments section or take to an authorized ser...

Page 14: ...0 025 in 0 635 mm Lubrication Fuel Oil Mixture Fuel Oil Ratio 40 1 Carburetor Diaphragm All Position Starter Spring Assist Starting Auto Rewind Muffler Baffled with Guard Throttle Manual Spring Return Fuel Tank Capacity 13 oz 384 ml Drive Shaft Housing Steel Tube EZ Link Throttle Control Finger Tip Trigger Approximate Unit Weight No fuel with cutting attachment shield and D handle 13 lbs 6 kg Cutt...

Page 15: ...15 NOTES ...

Page 16: ...Man LLC Yard Man with respect with new merchandise purchased and used in the United States its possessions and territories Yard Man warrants this product against defects in material and workmanship for a period of two 2 years commencing on the date of original purchase and will at its option repair or replace free of charge any part found to be defective in material or workmanship This limited war...

Page 17: ...s États Unis et dans les états de Californie du Maine de l Orégon et de Washington Toutes les terres forestières des États Unis et de l état de Californie Codes sur les ressources publiques 4442 et 4443 de l Orégon et de Washington exigent de par la loi que certains moteurs à combustion interne utilisés dans des zones couvertes de taillis ou d herbe soient équipés d un pare étincelles en parfait é...

Page 18: ...s courts de sandales et ne soyez pas pieds nus Veillez à ce que vos cheveux restent au dessus du niveau des épaules L écran de l accessoire de coupe doit toujours être utilisé lorsque vous vous servez de cet appareil comme débroussailleuse N utilisez jamais cet appareil sans une longueur suffisante des deux fils de coupe ces derniers devant être ceux recommandés par le fabricant La longueur des fi...

Page 19: ...s de 60 jours Usage de carburants mélangés Si vous choisissez d utiliser ou ne pouvez éviter d utiliser un carburant mélangé suivez les conseils suivants Utilisez toujours un mélange de carburant frais selon le manuel de l utilisateur Agitez toujours le mélange de carburant avant d alimenter l appareil Videz le réservoir et faites marcher le moteur jusqu à l assécher avant d entreposer l appareil ...

Page 20: ...u Bougie Support du moteur Commande Marche Arrêt Corps de l arbre Poignée de la corde de démarrage Lame coupante Silencieux EZ LinkMC Couvercle du filtre à air silencieux APPLICATIONS Utilisation comme désherbeuse Coupe d herbe et de mauvaises herbes légères Coupe de bordures Tailler autour des arbres des clôtures etc D autres accessoires peuvent être utilisés avec le YM20CS Voir la liste d access...

Page 21: ...rotecteur d accessoire de coupe n est pas installé sur l appareil 1 Placez l écran de l accessoire de coupe sur le logement de l arbre Veillez à ce que la patte d attache de l écran glisse dans l encoche au bord de l écran de coupe Tournez l écran dans le sens contraire des aiguilles d une montre Fig 3 pour le mettre en place Les trous dans la patte d attache de l écran et l accessoire de coupe s ...

Page 22: ...outon de déclenchement de l accessoire de coupe dans le trou de 90 Fig 8 Coupleur EZ LinkMC INSTRUCTIONS DE MONTAGE MISE EN GARDE verrouillez le bouton de déclenchement dans le trou principal et vissez bien le bouton avant de faire marcher l appareil MISE EN GARDE l accessoire de coupe et autres ajouts du système EZ LinkMD doivent utiliser le trou principal sauf indication contraire de leurs manue...

Page 23: ...démarrage d un mouvement contrôlé et ferme à 5 reprises REMARQUE La machine utilise la technologie Spring Assist StartingMC qui réduit significativement l effort requis pour démarrer le moteur Vous devez tirer le cordon de démarrage suffisamment loin pour entendre le moteur essayer de démarrer Il n est pas nécessaire de tirer le cordon brusquement il n y a pas de véritable résistance lorsque vous ...

Page 24: ...BEUSE Avant de faire marcher l appareil tenez vous en position de fonctionnement Fig 12 Vérifiez les points suivants L opérateur porte une visière et des vêtements appropriés Le bras droit est légèrement plié et la main tient l arbre par sa prise Le bras gauche est droit et la main tient la poignée en D L appareil est au dessous de la ceinture L accessoire de coupe est parallèle au sol et touche f...

Page 25: ...ers la gauche Fig 15 Inspectez le boulon à l intérieur du bouton de butée pour vous assurer qu il se déplace librement Remplacez le bouton de butée s il est endommagé 2 Retirez le moulinet intérieur de la bobine extérieure Fig 16 3 Retirez le ressort du moulinet Fig 16 4 Nettoyez le moulinet intérieur le ressort et l arbre et la surface Fig 17 ENTRETIEN ET RÉPARATIONS AVERTISSEMENT pour éviter tou...

Page 26: ...de retenue Boucle Ressort Fig 23 ENTRETIEN ET RÉPARATIONS 13 Insérez les extrémités du fil dans les œillets de la bobine extérieure et placez le moulinet et le ressort dans la bobine Fig 23 Enfoncez le moulinet et la bobine ensemble Tout en tenant le moulinet et la bobine saisissez les extrémités et tirez fermement pour dégager le fil des fentes de retenue de la bobine REMARQUE le ressort doit êtr...

Page 27: ...vercle du filtre à air silencieux 2 Situez le pot d échappement sans le retirer Trouvez le vis sur la partie inférieure du pot d échappement Fig 29 Retirez le vis en vous servant soit d un tournevis torx 20 ou d un tournevis plat Fig 29 Écran pare étincelles Hottre pare étincelles Vis Silencieux Moteur Pattes Fentes AVERTISSEMENT Si hottre pare étincelles et écran pare étincelles n est pas solidem...

Page 28: ... Le moteur ne se met pas au ralenti Le moteur hésite ou se cale lors d une accélération Le moteur perd de la puissance faites régler le carburateur par un concessionnaire agréé REMPLACEMENT DE LA BOUGIE Utilisez une bougie 610311 ou un Champion RDJ7Y L écartement correct est de 0 635 mm 0 025 po Retirez la bougie après 25 heures de fonctionnement et vérifiez son état 1 Arrêtez le moteur et laissez...

Page 29: ...e de coupe engorgé d herbes Arrêtez le moteur et nettoyez l accessoire Filtre à air sale Remplacez ou nettoyez le Pare étincelles colmaté Nettoyez ou remplacez le pare étincelles C A U S E S O L U T I O N Filtre à air bouché Remplacez ou nettoyez le Carburant vieux ou mal mélangé Drainez le réservoir ajoutez du carburant frais Mauvais réglage du carburateur Ajustez selon l instruction o faites le ...

Page 30: ...ement de la bougie 0 635 mm 0 025 po Lubrification Mélange carburant huile Rapport carburant huile 40 1 Carburateur Membrane toutes positions Démarreur Spring Assist Starting Rembobinage automatique Silencieux Chicane avec protection Accélérateur Rappel manuel Capacité du réservoir de carburant 384 ml 13 oz Logement de l arbre d entraînement Tube acier EZ LinkMC Manette des gaz Détente à portée du...

Page 31: ...F15 REMARQUES ...

Page 32: ...6 0019 La garantie limitée énoncée ci après est accordée par Yard Man LLC Yard Man et concerne les marchandises neuves achetées et utilisées aux États Unis ainsi que dans leurs possessions et territoires Yard Man garantit ce produit contre tout vice de matière ou de façon pendant une période de deux 2 ans à compter de la date d achat initiale et elle se réserve le choix de réparer ou de remplacer ...

Page 33: ...los EE UU y en los estados de California Maine Oregon y Washington Todos los terrenos forestales de los EE UU y el estado de California Códigos de Recursos Públicos 4442 y 4443 Oregon y Washington requieren por decreto que ciertos motores de combustión interna que se hagan funcionar en zonas boscosas y o zonas cubiertas por pastizales estén equipados con un parachispas que sean mantenidos en buen ...

Page 34: ...CIONES IMPORTANTE INFORMACION DE SEGURIDAD LEA TODAS LAS INSTRUCCIONES ANTES DE OPERAR LA UNIDAD Lea las instrucciones cuidadosamente Familiarícese con los controles y el uso adecuado de la unidad No opere esta unidad cuando esté cansado enfermo o bajo la influencia de alcohol drogas o medicamentos Los niños y los adolescentes menores de 15 años de edad no deben usar la unidad Los adolescentes pue...

Page 35: ...0 días Uso de combustibles de mezcla Si usted opta por usar un combustible de mezcla o si su uso es inevitable tome las precauciones recomendadas Use siempre una mezcla fresca de combustible según lo indica su manual del operador Agite siempre la mezcla de combustible antes de cargarlo en la unidad Drene el tanque y haga funcionar el motor en seco antes de guardar la unidad Uso de aditivos en el c...

Page 36: ... encendido Soporte del motor Control de encendido y apagado Bastidor del eje Mango de la cuerda de arranque Cuchilla de corte de línea Silenciador EZ Link Cubierta del silenciador filtro de aire APLICACIONES Como recortadora Corte de césped y hierbas delgadas Recorte de bordes Recorte decorativo alrededor de árboles cercos etc Puede usar otros accesorios con el YM20CS Lea la lista de accesorios ...

Page 37: ...tá instalado en su unidad 1 Coloque el protector del accesorio de corte en el bastidor del eje Cerciórese de que el soporte de montaje de la guardera se deslice en la ranura situada en el borde del protector de corte Gire el protector en sentido antihorario hasta que quede en su lugar Fig 3 Los orificios en el soporte de montaje de la guardera y el protector del accesorio de corte se alinearán Fig...

Page 38: ... botón de desconexión en el orificio lateral de 90 Fig 8 INSTRUCCIONES DE ENSAMBLE PRECAUCIÓN El accesorio de corte y los accesorios con el sistema EZ Link deben ser usados en el orificio primario a menos que se indique lo contrario en el manual del operador del accesorio El usar el orificio incorrecto puede conducir a lesiones personales o daño de la unidad ADVERTENCIA Antes de comenzar a usar es...

Page 39: ...nque Figura 11 oprima el control del regulador y hale de la cuerda de arranque con un movimiento controlado y uniforme 5 veces NOTA La unidad usa Spring Assist Starting lo cual reduce considerablemente el esfuerzo requerido para arrancar el motor Debe halar la cuerda de arranque lo suficiente para oír que el motor trata de arrancar No es necesario halar la cuerda con energía no hay fuerte resisten...

Page 40: ...ER EL RECORTADOR Antes de operar esta unidad párese en posición de operación Fig 12 Verifique lo siguiente El operador tiene protección ocular y ropa adecuada El brazo derecho está levemente doblado y la mano está sosteniendo el mango del eje El brazo izquierdo está recto y la mano sostiene la manija en D La unidad está debajo del nivel de la cintura El accesorio de corte está paralelo al suelo y ...

Page 41: ...senrosque la Bump Knob en sentido antihorario Fig 15 Inspeccione el perno de adentro de la perilla percusiva para verificar que se mueva con libertad Cambie la perilla percusiva si está dañada 2 Saque el carrete interior de la bobina exterior Fig 16 3 Saque el resorte del carrete interior Fig 16 Dientes de posición Fig 17 INSTRUCCIONES DE MANTENIMIENTO Y REPARACIÓN ADVERTENCIA Para evitar lesiones...

Page 42: ...Fig 21 INSTRUCCIONES DE MANTENIMIENTO Y REPARACIÓN 13 Inserte los extremos de la línea a través de los ojalillos de la bobina exterior y coloque el carrete interior con el resorte dentro de la bobina exterior Fig 23 Empuje el carrete interior y la bobina exterior entre sí Mientras sostiene el carrete interior y la bobina exterior tome los extremos y tire con firmeza para soltar la línea de las ran...

Page 43: ... interior del silenciador Reinstalación de la cubierta del silenciador filtro de aire 1 Coloque la cubierta del silenciador filtro de aire sobre la parte posterior del carburador y del silenciador Alinee los orificios de los tornillos 2 Inserte los cuatro 4 tornillos en los orificios de la cubierta del silenciador filtro de aire Fig 24 y ajústelos No los ajuste demasiado Fig 27 Fig 28 INSTRUCCIONE...

Page 44: ... personas no autorizadas y su daño Guarde la unidad en un área seca y bien ventilada Guarde la unidad fuera del alcance de los niños ALMACENAMIENTO PROLONGADO Si planea guardar la unidad durante un largo período de tiempo siga el siguiente procedimiento para su almacenamiento 1 Drene todo el combustible del tanque de combustible en un recipiente que contenga la misma mezcla de combustible de 2 tie...

Page 45: ... hacer un ajuste de carburador El accesorio de corte está atascado de hierba Pare el motor y limpie el accesorio de corte El filtro de aire está sucio Limpie o cambie el filtro de aire Parachispas obstruido Limpie o cambie el parachispas C A U S A A C C I Ó N El filtro de aire está obstruido Cambie o limpie el filtro de aire El combustible es viejo o está mal mezclado Drene el tanque de gasolina A...

Page 46: ...ía de encendido 0 635 mm 0 025 pulg Lubricación Mezcla de combustible y aceite Proporción de combustible aceite 40 1 Carburador Diafragma multiposicional Arranque Spring Assist Starting Rebobinado automático Silenciador Desviado con protección Regulador Retroceso manual a resorte Capacidad del tanque de combustible 384 ml 13 onzas Bastidor del eje impulsor Tubo de acero EZ Link Control del regulad...

Page 47: ...E15 NOTAS ...

Page 48: ...E16 NOTAS ...

Page 49: ...E17 NOTAS ...

Page 50: ...s 10 Crankcase 44 48 51 791 181599 Clutch Springs Qty 2 Items Not Shown Item Part No Description 1 753 04511 Air Cleaner Cover Assembly includes 2 2 791 180350B Air Cleaner Filter 3 791 180351 Carburetor Mounting Screw Assembly 4 791 180226 Wavey Washer 5 791 182202 Choke Knob w Screw 6 753 04418 Choke Lever includes 5 7 753 04419 Choke Plate includes 6 8 753 05133 Carburetor Assembly includes 9 9...

Page 51: ...7 Handle Hardware 9 791 181616B Split Boom Coupler includes 10 13 10 791 182057 Screw 11 791 181617 Bolt 12 791 181618B Adjustment Knob 13 753 04386 Knob Retaining Nut 14 753 04508 Lower Drive Shaft Housing Assembly 15 753 04282 Guard Mounting Hardware 16 753 04283 Guard includes 15 17 791 180553 Blade Assembly 18 753 04284 Outer Spool Assembly includes 19 19 791 610660 Retainer 20 791 610317B Spr...

Page 52: ...ecida a continuación es dada por Yard Man LLC Yard Man con respecto a mercancía nueva que sea comprada y usada en los Estados Unidos sus posesiones y territorios Yard Man garantiza este producto contra defectos en el material y la mano de obra durante un período de dos 2 años a partir de la fecha de compra original y a su entera opción arreglará o substituirá sin costo alguno cualquier pieza cuyo ...

Reviews: