background image

MANUFACTURER’S LIMITED WARRANTY FOR:

No implied warranty, including any implied warranty of
merchantability or fitness for a particular purpose,
applies after the applicable period of express written
warranty above as to the parts as identified. No other
express warranty or guaranty, whether written or oral,
except as mentioned above, given by any person or
entity, including a dealer or retailer, with respect to any
product shall bind MTD. During the period of the
Warranty, the exclusive remedy is repair or replacement
of the product as set forth above. 
(Some states do not
allow limitations on how long an implied warranty lasts, so
the above limitation may not apply to you.)

The provisions as set forth in this Warranty provide the
sole and exclusive remedy arising from the sales. MTD
shall not be liable for incidental or consequential loss or
damages including, without limitation, expenses incurred
for substitute or replacement lawn care services, for
transportation or for related expenses, or for rental
expenses to temporarily replace a warranted product.
(Some states do not allow limitations on how long an implied
warranty lasts, so the above limitation may not apply to you.)

In no event shall recovery of any kind be greater than the
amount of the purchase price of the product sold. Alteration
of the safety features of the product shall void this Warranty.
You assume the risk and liability for loss, damage, or injury
to you and your property and/or to others and their property
arising out of the use or misuse or inability to use the
product.

This limited warranty shall not extend to anyone other than
the original purchaser, original lessee or the person for whom
it was purchased as a gift.

How State Law Relates to this Warranty: This warranty
gives you specific legal rights, and you may also have other
rights which vary from state to state.

To locate your nearest service dealer dial 1-800-345-8746
in the United States or 1-800-668-1238 in Canada.

MTD LLC

P.O. Box 361131

Cleveland, OH 44136-0019

The limited warranty set forth below is given by MTD 
LLC (“MTD”) with respect to new merchandise purchased and
used in the United States, its possessions and territories.

MTD warrants this product against defects in material and
workmanship for a period of two (2) years commencing on the
date of original purchase and will, at its option, repair or
replace, free of charge, any part found to be defective in
material or workmanship. This limited warranty shall only apply
if this product has been operated and maintained in
accordance with the Operator’s Manual furnished with the
product, and has not been subject to misuse, abuse, 
commercial use, neglect, accident, improper maintenance,
alteration, vandalism, theft, fire, water or damage because of
other peril or natural disaster. Damage resulting from the
installation or use of any accessory or attachment not
approved by MTD for use with the product(s) covered by this
manual will void your warranty as to any resulting damage. This
warranty is limited to ninety (90) days from the date of original
retail purchase for any MTD product that is used for rental or
commercial purposes, or any other income-producing purpose.

HOW TO OBTAIN SERVICE: Warranty service is available,
WITH PROOF OF PURCHASE THROUGH YOUR LOCAL
AUTHORIZED SERVICE DEALER. To locate the dealer in your
area, please check for a listing in the Yellow Pages or contact
the Customer Service Department of MTD LLC by calling 
1-800-345-8746 or writing to P.O. Box 361131, Cleveland OH
44136-0019 or if in Canada call 1-800-668-1238. No product
returned directly to the factory will be accepted unless prior
written permission has been extended by the Customer
Service Department of MTD LLC.

This limited warranty does not provide coverage in the 
following cases:

A. Tune-ups - Spark Plugs, Carburetor Adjustments, Filters.

B. Wear items - Bump Knobs, Outer Spools, Cutting Line,

Inner Reels, Starter Pulley, Starter Ropes, Drive Belts.

C. MTD does not extend any warranty for products sold or

exported outside of the United States of America, its
possessions and territories, except those sold through
MTD’s authorized channels of export distribution.

MTD reserves the right to change or improve the design of
any MTD Product without assuming any obligation to modify
any product previously manufactured.

Summary of Contents for YMESV1300

Page 1: ...Operator s Manual SAVE THESE INSTRUCTIONS DO NOT THROW AWAY PRINTED IN U S A PART NO 769 00950A 1 04 English YMESV1300 Electric Mulching Blower Vacuum...

Page 2: ...345 8746 or 1 800 668 1238 in Canada to obtain a list of authorized service dealers near you For more details about your unit visit our website at www yardman com If you have difficulty assembling thi...

Page 3: ...ged cords To reduce the risk of electrical shock this unit has a polarized plug one blade is wider than the other This unit will fit with a polarized plug in one way only If the plug does not fit full...

Page 4: ...ord around sharp edges or corners Keep the cord away from heated surfaces oil and sharp edges Do not unplug by pulling on the cord To unplug grasp the plug not the cord Always remain alert Use common...

Page 5: ...nd guards in place SAFETY AND INTERNATIONAL SYMBOLS This operator s manual describes safety and international symbols and pictographs that may appear on this product Read the operator s manual for com...

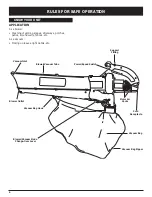
Page 6: ...tlet Vacuum Bag Hook Power Speed Switch Motor Air Vents Vacuum Bag Zipper Support Fitting RULES FOR SAFE OPERATION APPLICATION As a blower Cleaning of yards garages driveways porches patios around wal...

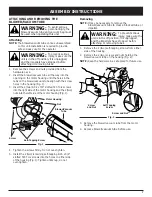
Page 7: ...o the holes on either side of the housing Fig 1 Tighten until snug do not over tighten Removing NOTE It may be necessary to remove the blower vacuum tube to clear a blocked tube or impeller 1 Remove t...

Page 8: ...n the buckle Fig 6 Fig 6 Removing 1 Press the latching tabs on both sides of the vacuum bag tube and pull the vacuum bag down from the unit Fig 5 2 Detach the vacuum bag from the vacuum bag hook Fig 5...

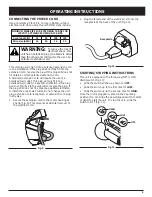
Page 9: ...NNECTING THE POWER CORD Use a minimum 25 foot 7 6 m long 16AWG outdoor electrical cord when using this unit Other sizes include OFF LOW HIGH Fig 9 Fig 11 STARTING STOPPING INSTRUCTIONS This unit is eq...

Page 10: ...t when people might be disturbed Comply with times listed in local ordinances Usual recommendations are 9 00 am to 5 00 pm Monday through Saturday To reduce noise levels limit the number of pieces of...

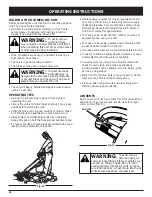
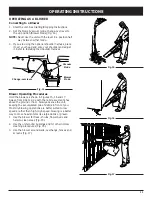
Page 11: ...ERATING INSTRUCTIONS Blower Operating Procedures Hold the blower as shown in Figures 15 16 and 17 Sweep from side to side with the nozzle several inches above the ground or floor Slowly advance the un...

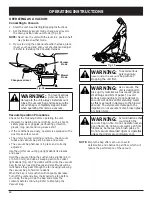
Page 12: ...to the down position Vacuum Mode Fig 18 NOTE Never use the unit with the lever in a position half way between either mode 3 If you are using the optional shoulder harness place it over your head and o...

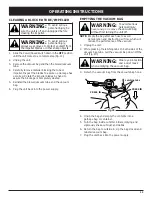
Page 13: ...the Power Speed switch down in the OFF position until the unit comes to a complete stop Fig 11 2 Unplug the unit 3 Remove the vacuum bag and then the blower vacuum tube 4 Carefully remove material blo...

Page 14: ...ent unauthorized use or damage Store the unit in a dry well ventilated area Store the unit out of the reach of children INSPECT EXTENSION CORDS Inspect all extension cords periodically Look closely fo...

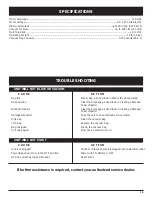
Page 15: ...Torn bag Replace the vacuum bag Bag unzipped Zip up the vacuum bag Unit unplugged Plug into an extension cord UNIT WILL NOT BLOW OR VACUUM Motor Amperage 12 Amps Motor Voltage A C 120 Volts Electric...

Page 16: ...16 NOTES...

Page 17: ...17 NOTES...

Page 18: ...s given by MTD LLC MTD with respect to new merchandise purchased and used in the United States its possessions and territories MTD warrants this product against defects in material and workmanship for...

Page 19: ...Manuel de l utilisateur MANUEL IMPORTANT NE PAS JETER Fran ais YMESV1300 Souffleuse Aspirateur Pailler lectrique IMPRIME AUX TATS UNIS PARTIE NUM RO 769 00950A 1 04...

Page 20: ...appelez le 1 800 345 8746 ou le 1 800 668 1238 au Canada Pour de plus amples informations propos de votre appareil visitez www yardman com NE RETOURNEZ PAS L APPAREIL AU D TAILLANT CHEZ QUI VOUS L AV...

Page 21: ...n aucun cas La grosseur du fil AWG pour l amp rage de 12 19 amp res est de 14 AWG pour 25 pieds de 12 AWG pour 50 pieds et n est pas recommand pour 100 ou 150 pieds Long de cordon pieds 25 50 100 150...

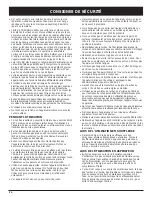
Page 22: ...tement selon les consignes du manuel Ne l utilisez pas pour des t ches autres que celles pour lesquelles il a t con u Utilisez les accessoires recommand s par le fabricant uniquement Cet appareil n es...

Page 23: ...SOUS LA PLUIE AVERTISSEMENT vitez les lieux dangereux N utilisez jamais l appareil sous la pluie ou dans des conditions humides ou mouill es L humidit peut provoquer l lectrocution SOUFFLEUSES LES LAM...

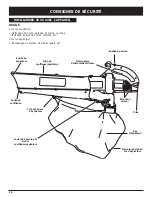
Page 24: ...souffleuse Crochet du sac d aspirateur Interrupteur d alimentation vitesse vents du moteur Fermeture clair du sac d aspirateur Soutien du verrou USAGE Comme souffleuse Nettoyage de cours garages chem...

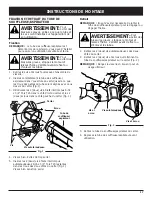
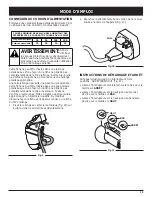
Page 25: ...trous des deux c t s du carter Fig 1 Vissez bien sans trop serrer Retrait REMARQUE Il peut s av rer n cessaire de retirer le tube de souffleuse aspirateur pour le d gager ou d gager l h lice 1 Retirez...

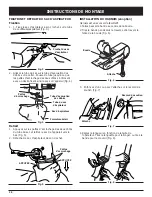
Page 26: ...ube du sac sur le tube d vacuation des d bris sur le carter Poussez le tube jusqu ce que les pattes d accrochage des deux c t s s enfoncent avec un d clic fixant ainsi le sac sur l appareil Fig 4 APPU...

Page 27: ...NTATION Employez une corde lectrique ext rieure minimum 7 6 m ou 25 pieds de long 16 AWG D autres tailles incluent Long de cordon pieds 25 50 100 150 Calibre du cordon AWG 16 16 16 14 CALIBRE MINIMUM...

Page 28: ...iliser le moins possible d outils motoris s en m me temps Pour r duire le niveau sonore utiliser la souffleuse au r gime minimum permettant de s acquitter de la t che V rifier l quipement avant de com...

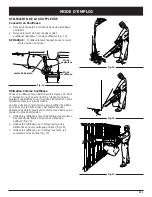
Page 29: ...re en tenant la buse plusieurs centim tres du sol Avancez lentement en vous maintenant face la pile de d bris La basse vitesse convient mieux pour souffler les d bris secs alors que la haute vitesse e...

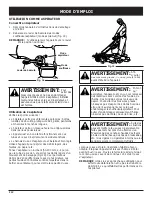
Page 30: ...sac est plein l aspiration faiblit de fa on notable teignez l appareil et laissez l h lice s arr ter avant d ouvrir le sac Ouvrez la fermeture clair et videz le contenu du sac avant de continuer Voir...

Page 31: ...u tube du sac et retirez le sac de l appareil vers le bas Fig 20 2 D tachez le sac d aspirateur de son crochet 3 Ouvrez la fermeture clair et videz le contenu du sac dans un sac de poubelle ou un r ci...

Page 32: ...Suspendez le et laissez s cher f Retournez le sac l endroit et remettez le en place INSPECTION DES FILS DE RALLONGE Inspectez r guli rement les rallonges Soyez l aff t de signes de d t rioration de c...

Page 33: ...h lice bloqu e H lice bouch e D gagez le tube voir D gagement d un e tube h lice bloqu e H lice endommag e Confiez l appareil un concessionnaire agr Sac sale Nettoyez le sac Sac d chir Remplacez le sa...

Page 34: ...F16 REMARQUES...

Page 35: ...F17 REMARQUES...

Page 36: ...OH 44136 0019 La garantie limit e nonc e ci apr s est accord e par MTD LLC MTD et concerne les marchandises neuves achet es et utilis es aux tats Unis ainsi que dans leurs possessions et territoires M...

Page 37: ...Manuel del Due o Operador Espa ol ESTE MANUAL ES IMPORTANTE NO LO DESECHE YMESV1300 Soplador Aspirador Triturador Electrico IMPRESO EN LOS EE UU No de cat logo 769 00950A 1 04...

Page 38: ...informaci n las ilustraciones y las especificaciones contenidas en este manual se basan en la informaci n m s reciente disponible en el momento de impresi n del manual Nos reservamos el derecho de hac...

Page 39: ...ice nicamente cables de extensi n de camisa cil ndrica aprobados para uso al aire libre Esta herramienta tiene doble aislaci n Repare o sustituya los cables da ados Para reducir el riesgo de choques e...

Page 40: ...s tales como la grava arena polvo c sped etc pueden ser absorbidos por la toma de aire y ser lanzados por la avertura de descarga caus ndole da os a la unidad propiedad o caus ndole lesiones graves a...

Page 41: ...o suficientemente alto para que evite el uso no autorizado o da os Mant ngala fuera del alcance de los ni os Nunca remoje o chorree la unidad con agua o cualquier otro l quido Mantenga los mangos seco...

Page 42: ...LLA ROTATIVA PUEDEN CAUSAR GRAVES LESIONES ADVERTENCIA Mant ngase alejado de la salida del soplador Nunca dirija el soplador hacia usted mismo ni hacia los dem s Los objetos pueden salir despedidos de...

Page 43: ...ido velocidad Respiraderos del motor Soporte de sujeci n Palanca de cambio de modo del Soplador Aspirador CONOZCA SU UNIDAD APLICACI N Como soplador Limpieza de jardines cocheras entradas de autom vil...

Page 44: ...los orificios de cualquiera de los lados del bastidor Fig 1 Ajuste hasta que no quede huelgo no los ajuste demasiado Remoci n NOTA Es posible que deba retirar el tubo del soplador aspirador para desbr...

Page 45: ...bolsa del aspirador del tubo del soplador aspirador Fig 3 2 Deslice el tubo de la bolsa del aspirador sobre el tubo de salida de escombros del bastidor Empuje el tubo hasta que las leng etas de sujec...

Page 46: ...ectricidad CONEXION DEL CABLE DE ENERGIA Utilice una cuerda el ctrica al aire libre m nimo 7 6 m o 25 pies de largo 16AWG Otros tama os incluyen Fig 9 Fig 11 INSTRUCCIONES DE ARRANQUE Y APAGADO Esta u...

Page 47: ...el estado del equipo antes del funcionamiento especialmente el tubo de escape tomas de aire y filtros de aire Use rastrillos y escobas para esparcir los desechos antes de soplarlos Remoje ligeramente...

Page 48: ...a Sopladora Sostenga el soplador seg n se ilustra en las Figs 15 16 y 17 Barra de lado a lado con la boquilla a varias pulgadas sobre el suelo o el piso Avance lentamente manteniendo una pila de escom...

Page 49: ...rmitiendo que la bolsa del aspirador cargue m s escombros Fig 19 Cuando la bolsa est llena la aspiraci n disminuir en forma notable Apague la unidad y espere que el propulsor se detenga antes de abrir...

Page 50: ...eci n a ambos lados del tubo de la bolsa del aspirador saque la bolsa del aspirador hacia abajo de la unidad Fig 20 2 Desconecte la bolsa del aspirador del gancho de la bolsa del aspirador Fig 20 Leng...

Page 51: ...1 Vac e la bolsa luego de cada uso para evitar el deterioro y la obstrucci n del flujo de aire lo cual reducir el rendimiento del aspirador 2 Limpie la bolsa seg n sea necesario usando protecci n ocu...

Page 52: ...bo impulsor bloqueado El impulsor est bloqueado Desbroce la obstrucci n lea Desbroce de un tubo impulsor bloqueado El impulsor est da ado Lleve la unidad a un proveedor de servicio autorizado La bolsa...

Page 53: ...E17 NOTAS...

Page 54: ...E18 NOTAS...

Page 55: ...82548 Motor Assembly 9 791 182549 Spacer 10 791 180505 Washer 11 791 182550 Impeller Item Part No Description 12 791 182410 Mode Control Flapper 13 791 182411 Mode Control Lever includes 3 14 791 0005...

Page 56: ...imitada establecida a continuaci n es dada por MTD LLC MTD con respecto a mercanc a nueva que sea comprada y usada en los Estados Unidos sus posesiones y territorios MTD garantiza este producto contra...

Reviews: