background image

model no. 060-3014-6  |  contact us: 1.866.523.5218

model no. 060-3014-6  |  contact us: 1.866.523.5218

3

Kno

w Y

our Hedge T

rimmer

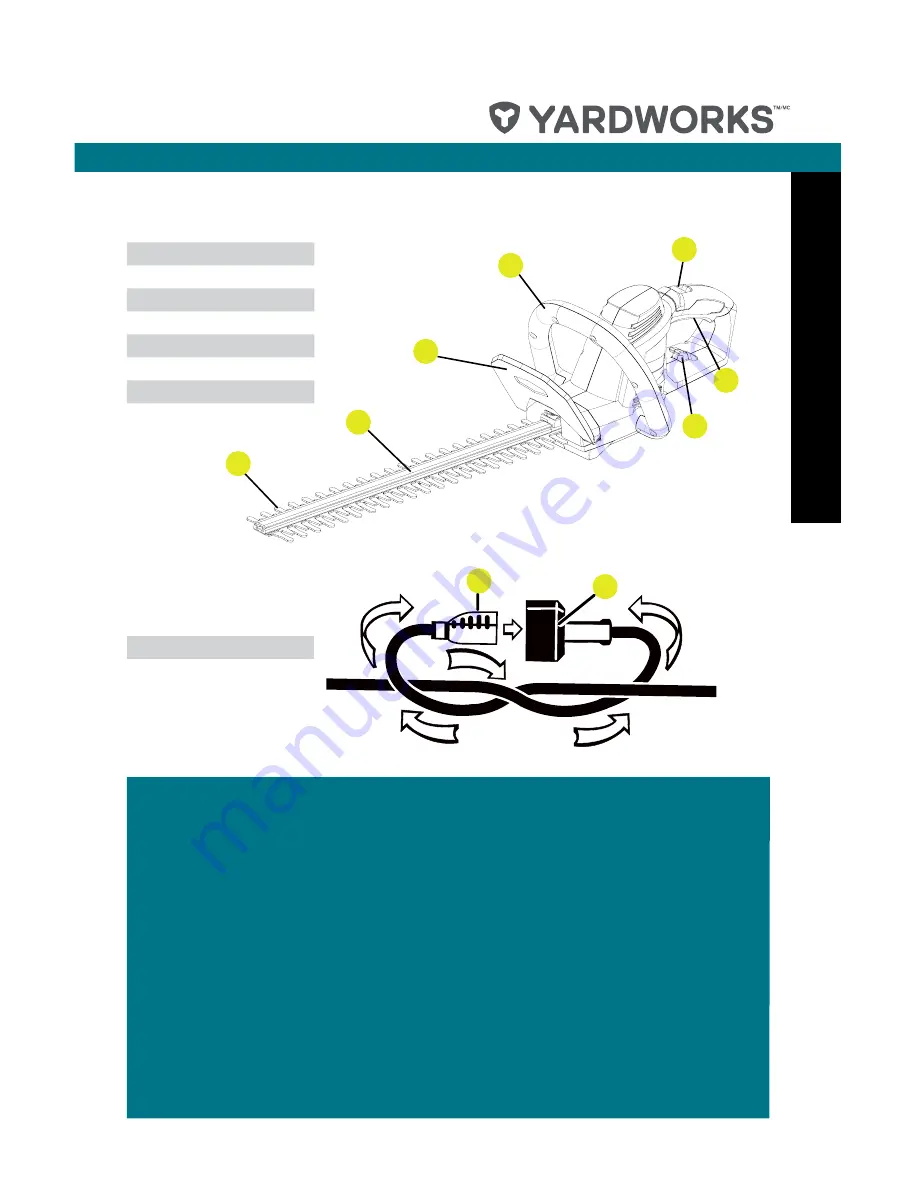
1.  lock-off button
2.  Auxiliary handle
3.  Guard
4.  Blade support rod
5.  Blade
6.  trigger switch
7.  Cord retainer

3

4

5

1

2

6

7


1.  Cord
2.  extension cord

1

2

KNOW YOUR MOWeR

the safe use of this product requires an understanding of the information in this 

operator’s manual as well as a knowledge of the project you are attempting. Before use 

of this product, familiarize yourself with all operating features and safety rules.

CORD ReTAINeR

A convenient cord retainer helps keep the extension cord connection secure during 

trimmer operation.

GUARD

the guard helps to deflect chips or other debris away from the operator’s hands.

TRIGGeR SWITCH AND LOCK-OFF BUTTON

the trigger switch, located beneath the rear handle, and the lock-off button, located 

behind the front handle, must be depressed simultaneously to allow blade movement.

lock-off switch may be released once hedge trimmer is running.

Summary of Contents for 060-3014-6

Page 1: ...model number 060 3014 6 contact us 1 866 523 5218 IMPORTANT Read and follow all safety rules and operating instructions before using this product Instruction Manual Hedge Trimmer...

Page 2: ...3 5 A Blade length 18 45 7 cm Cut capacity 2 3 1 7 cm No load speed 3000 10 SPM Weight 6 lb 2 7 kg Specifications 2 KNOW YOUR mower 3 symbols 4 Safety Rules 6 Exploded View 9 Parts List 10 Electrical...

Page 3: ...you are attempting Before use of this product familiarize yourself with all operating features and safety rules CORD RETAINER A convenient cord retainer helps keep the extension cord connection secur...

Page 4: ...ing this equipment Keep Bystanders Away Keep all bystanders at least 50 15 m away Hot Surface To reduce the risk of injury or damage avoid contact with any hot surface Electric Shock Failure to use in...

Page 5: ...ly hazardous situation which if not avoided could result in death or serious injury WARNING Indicates a potentially hazardous situation which if not avoided could result in death or serious injury CAU...

Page 6: ...aged or entangled cords increase the risk of electric shock E When operating a power tool outdoors use an extension cord suitable for outdoor use Use of a cord suitable for outdoor use reduces the ris...

Page 7: ...ts changing accessories or storing power tools Such preventive safety measures reduce the risk of starting the power tool accidentally D Store idle power tools out of the reach of children and do not...

Page 8: ...g one hand could cause loss of control and result in serious personal injury Keep all parts of the body away from the cutter blade Do not remove cut material or hold material to be cut when blades are...

Page 9: ...model no 060 3014 6 contact us 1 866 523 5218 9 Exploded View 6 7 8 5 4 3 2 1 9 10 11 12 13 17 16 15 14 19 18...

Page 10: ...02161 1 1 6 Lock off spring 32201647 1 7 Lock off button 34109453 11 1 8 4 8 Sheath 34901161 2 9 Terminal 4 8 0 8 36503161 2 10 Micro swtich 36303152 1 11 Screw 3220313 10 12 Wiring cap 36504161 1 13...

Page 11: ...t operate this product on direct current DC A substantial voltage drop will cause a loss of power and the motor will overheat If the product does not operate when plugged into an outlet double check t...

Page 12: ...rd inspect it for loose or exposed wires and cut or worn insulation A proper extension cord is available at an authorized service centre It is possible to tie the extension cord and power cord in a kn...

Page 13: ...please call 1 866 523 5218 for assistance PACKING LIST Electric hedge trimmer Instruction manual WARNING Do not connect to power supply until assembly is complete Failure to comply could result in acc...

Page 14: ...ough opening in the bottom of the rear handle and place over cord retainer Slowly pull loop against cord retainer until the slack is removed Plug product into extension cord WARNING Do not allow famil...

Page 15: ...witch may be released once hedge trimmer is running STOPPING THE HEDGE TRIMMER 1 Release the trigger switch 3 2 Allow at least 5 seconds for the cutting blade to stop moving WARNING Do not use any att...

Page 16: ...owth When trimming new growth use a wide sweeping action so that the stems are fed directly into the cutting blade Older growth will have thicker stems and will be trimmed easiest by using a sawing mo...

Page 17: ...ducts penetrating oils etc come in contact with plastic parts Chemicals can damage weaken or destroy plastic which may result in serious personal injury Only the parts shown on the parts list are inte...

Page 18: ...ld detergent STORING THE TRIMMER Clean all foreign material from the product Store it in a well ventilated place that is inaccessible to children Keep away from corrosive agents such as garden chemica...

Page 19: ...ese parts are warranted to the original purchaser to be free from defects in material and workmanship for a period of one hundred twenty 120 days from the date of retail purchase How to obtain service...

Reviews: