background image

OPERATING INSTRUCTIONS


CONNECTING THE POWER CORD 

Use a minimum 25’ (7.6 m.) long, 16AWG, outdoor electrical cord when using this unit. Other 
sizes include 

MINIMUM WIRE SIZE FOR EXTENSION CORDS FOR 

120 VOLT APPLIANCES USING 0-12 AMPS* 

Cord length (ft.) 

25

50

100

150

Wire size (AWG)*

16

14

12

10

WARNING: 

To reduce the risk of electrical shock, this unit has a polarized plug 

(one blade is wider than the other) and will require the use of a polarized extension 
cord. 

This unit plug will only fit into a polarized extension cord in one orientation. If the plug does not 
fully fit into the extension cord, reverse the plug. If the plug still does not fit, obtain a correct 
polarized extension cord. 
A polarized extension cord will require the use of a polarized wall outlet. This plug will only fit 
into a polarized wall outlet in a specific orientation. If the plug does not fit fully into the wall 
outlet, reverse the plug. If the plug still does not fit, contact a qualified electrician to install the 
proper wall outlet. Do not change the unit plug, extension cord receptacle, or extension cord 
plug in any way. 
1.  Secure  the  extension  cord  to  the  motor  housing using the notch above the handle. 

This  prevents  accidental removal of the electrical cord. 

2.  Plug the female end of the electrical cord into the receptacle at the back of the unit. 

STARTING/STOPPING INSTRUCTIONS 

This unit is equipped with a three-way (OFF/ LOW/ HIGH) switch   

  Slide the switch all the way down for OFF. 
  Slide the switch up to the first position for LOW speeds up to 120 MPH. 
  Slide the switch up to the second position for HIGH speeds up to 150 MPH. 

Once the unit is plugged in, stand in the operating position. Slide the power/speed switch to 
LOW or HIGH to start the unit. To stop the unit, slide the switch to OFF. 

HOLDING THE BLOWER/VAC 

Before operating the unit, stand in the operating position. Check for the following:   

  Operator  is  wearing  proper  clothing,  such  as  boots,  safety  glasses  or  goggles, 

ear/hearing protection, gloves, long pants and a long sleeve shirt. 

WARNING: 

To avoid serious personal injury, wear goggles or safety glasses at all 

times when operating this unit. Wear a face mask or dust mask in dusty locations 

  If the conditions are dusty, the operator is wearing a dust mask or face mask. 
  The unit is in good working condition. 
  The tubes and the bag are in place and secure. 

WARNING:

 To prevent serious personal injury or damage to the unit, make sure 

the blower tube or the vac tubes and the bag are in place before operating the unit.

- 8 - 

Summary of Contents for 60-3866-8

Page 1: ...TOR S MANUAL Electric Blower Vac with Bag 60 3866 8 IMPORTANT Read safety rules and instructions carefully before operating equipment 1 For parts or service please call toll free helpline at 1 866 523...

Page 2: ...tor 120 V 60 Hz 9 A Air volume 240 CFM Air velocity Two Speeds 120 and 150 MPH Mulch ratio 10 1 Collection bag capacity 150 L Operating weight 8 Ib 3 6 kg CONTENTS OF CARTON This unit includes the fol...

Page 3: ...Y WARNINGS When using electric gardening appliances basic safety precautions should always be followed to reduce the risk of fire electric shock and personal injury Carefully read and understand the e...

Page 4: ...marked as meeting ANSI Z87 1 1989 standards Also wear ear hearing protection when operating this unit Wear a face or dust mask when operating in dusty environments Long sleeve shirts are recommended...

Page 5: ...le or pets or in the direction of windows Use extra caution when blowing debris near solid objects such as trees automobiles and walls WHILE OPERATING UNIT AS A VAC z Avoid situations that could catch...

Page 6: ...al injury make sure the unit is in the OFF position it is unplugged and the impellers have stopped before attaching or removing tubes Assemble as a blower 1 Turn off unit and unplug from electric outl...

Page 7: ...clockwise NOTE It may be necessary to remove the blower tube or vac tubes to clear a blocked tube or WARNING To prevent serious personal injury make sure the switch is in the OFF position it is unplu...

Page 8: ...the notch above the handle This prevents accidental removal of the electrical cord 2 Plug the female end of the electrical cord into the receptacle at the back of the unit STARTING STOPPING INSTRUCTIO...

Page 9: ...ny lawn and garden applications including areas such as gutters screens patios grills porches and gardens Watch out for children pets open windows or freshly washed cars and blow debris safely away Cl...

Page 10: ...ould be added to this unit Extreme care and knowledge of the system is required when servicing a double insulated unit Service should be performed by qualified service personnel only Replacement parts...

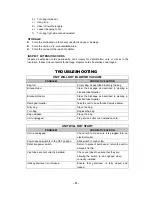
Page 11: ...age as described in clearing a blocked tube impeller Blocked impeller Clear the blockage as described in clearing a blocked tube impeller Damaged impeller Take the unit to an authorized service dealer...

Page 12: ...Cutting Line Inner Reels Starter Pulley and Starter Ropes b YARDWORKS does not extend any warranty for products sold or exported outside of the Canada YARDWORKS reserves the right to change or improv...

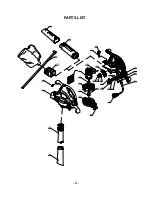
Page 13: ...PARTS LIST 13 30...

Page 14: ...cushion 35 3490552 2 Terminal sheath 14 PARTS LIST Item No Part No Qty Description 1 3411527 1 Front blower tube 2 3411627 1 Rear blower tube 3 3340227 1 1 Spring 4 3410727 3 1 Lock button 5 3411927 1...

Reviews: