background image

WARNING: 

Before carrying out maintenance operations, remove the battery from tool.


Before each use,

 check the condition of the tines and 

ensure that all threaded connections are securely     
tightened. If the tines become dull or blunt, sharpen or 
replace them. Call our customer service help line at     
1

-

800

-

633

-

1501 for assistance.

At the end of the season, check the tiller/cultivator for 
damage prior to storing. Repair or replace damaged or 
broken parts.


CAUTION: 

Always clean the tiller/cultivator after each 

use.  Failure to carry out proper cleaning can result in 
damage to the tiller/cultivator or result in poor     
performance.  


Clean the tines with a scrub brush, and a soft cloth  
dampened with a mild soap and water mixture. 


Never use a water hose to clean the tiller!  

To remove 

soil and debris from the tines, use a stiff brush or a   
dampened cloth. Clean the vents on the motor housing 
and remove any remaining grass or dirt. Once cleaned, 
wipe the tines dry and apply a light coat of oil to prevent 
rust.


WARNING: 

Injury can occur while working on the tines. 

Wear protective gloves.  


Tines maintenance: 

Worn tines invite poor  performance 

and overload of the motor. Check tines before each use. 
Sharpen or replace the tine assemblies with new ones 
when necessary. Call 1

-

800

-

633

-

1501 for assistance.  


Tine Replacement 

Tines are identified with part number JY2201

-

1 or 

JY2201

-

2 stamped on the tine blade. 


Replace only the tines with the identical part number. 

Tine Removal 

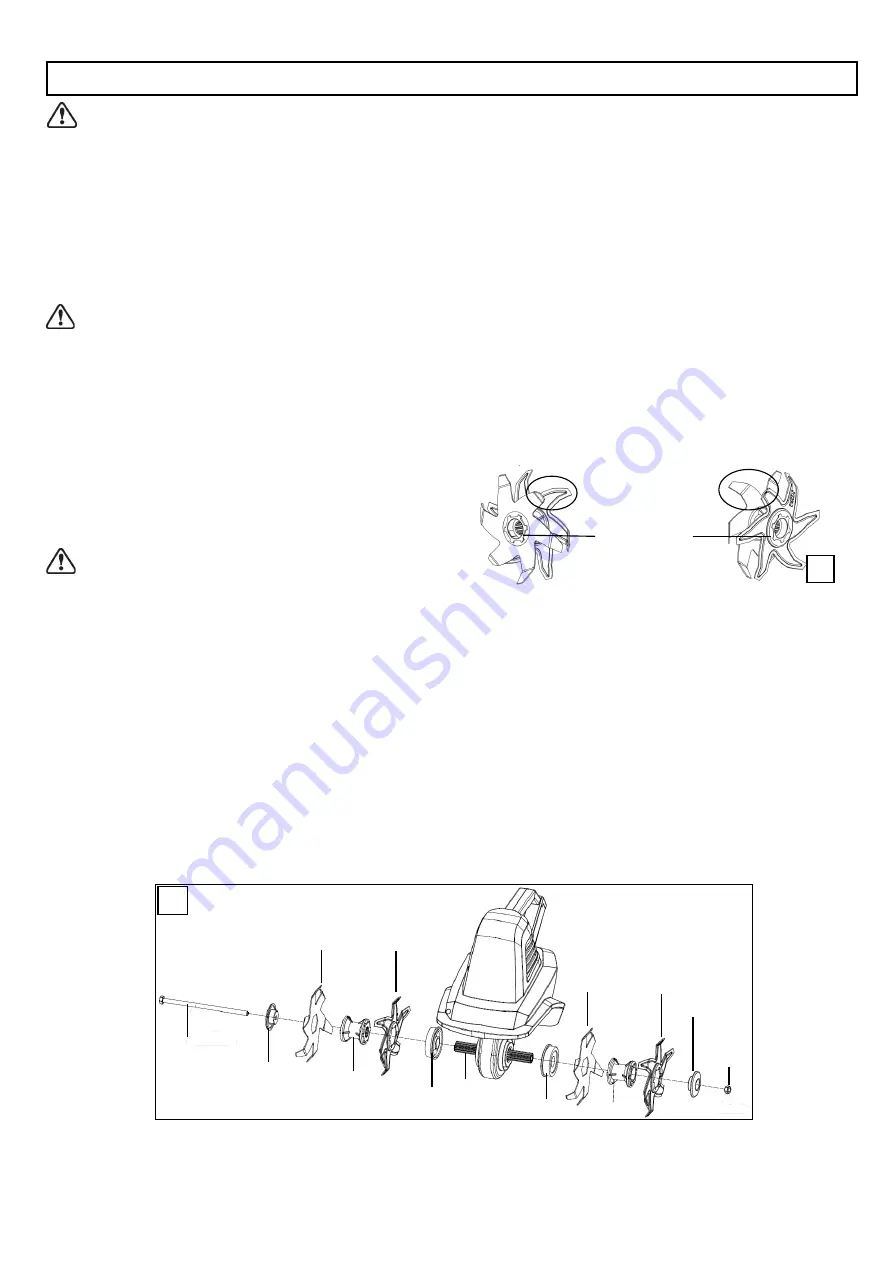
(Fig. 5)


1. Remove the M8 hex locknut with a hex head wrench,
and then remove the M8x170 bolt.

2. Remove the end caps.

3. Remove the tines and hubs at either end of the shaft.

Tine Installation 

(Fig. 5)


1. Install the new tine by pressing it onto the hub. The side
with stamped part number must face outward.  Be sure to
install tines in the same sequence as shown in Fig 5.
Position the hub so that the larger diameter whole is facing
outward. Make sure the two tines on the same hub are
installed symmetrically with the end of the tine blades
facing downward (Fig. 6).

2. Install the tines with hub onto the shaft. Ensure the larger
diameter whole of the hub is facing outward. The left and
right tine assemblies must be installed symmetrically
(Fig. 6)

3. Install the end caps.

4. Install the M8x170 bolt. Secure the assembly by
tightening the M8 hex locknut with a hex head wrench.

Replace worn or damaged parts with original replacement 
parts only. Parts from another tiller/cultivator may not fit 
properly causing an unsafe situation.


Make sure all protective devices are secure and in good 
condition. Repair or replace if necessary.


MAINTENANCE


Tine P/N


JY2201

-

Tine P/N


JY2201

-

Tine P/N


JY2201

-

Tine P/N


JY2201

-

Hub


Hub


End Cap


End Cap


M8x170 
Bolt


M8 Hex 
Locknut


Bushing


Bushing


Symmetrically  
installed tine blades 
facing downward


Larger diameter 
whole of the hub 
facing outward 

Shaft


5


 6


8


Model TC70020

-

1


Summary of Contents for TC70020-1

Page 1: ...se DO NOT RETURN THIS PRODUCT TO THE STORE OPERATING ASSEMBLY PARTS SERVICE QUESTIONS GO TO WWW AMERICANLAWNMOWER COM OR CALL 1 800 633 1501 BETWEEN 8 00 AM 5 00 PM EST FOR ASSISTANCE SAVE THIS MANUAL FOR FUTURE REFERENCE CA Compliant Charger Included Model No CHL82000 1 OWNER S MANUAL 7 5 Inch 20V Lithium ion Tiller Cultivator With 1 20V 2 0Ah Lithium ion Battery Copyright All Rights Reserved Mod...

Page 2: ...od footing Before starting the tiller cultivator make sure the times are not touching any object and are free to move Grip the tiller cultivator firmly with both hands Never operate the tiller cultivator with one hand CAUTION The tiller cultivator may bounce upward and or jump forward if the tines strike extremely hard packed soil frozen ground or buried obstacles such as large stones roots or stu...

Page 3: ... Lithium ion Working depth max 6 in Tine Speed 170 RPM Weight 10 lbs 4 6 kg No Description 1 On Off Switch 2 Safety Button 3 Auxiliary Handle 4 Upper Handle 5 Wing Nut 6 Lower Handle No Description 7 Side Cover 8 Tilling Head 9 Tine 1 JY2201 1 10 Tine 2 JY2201 2 11 Battery Pack 12 Charger 3 Model TC70020 1 ...

Page 4: ...efully inspected and satisfactorily operated the product WARNING Do not install battery until assembly is complete Failure to comply could result in accidental starting and possible serious personal injury WARNING If any parts are damaged or missing do not operate this product until the parts are replaced Failure to heed this warning could result in serious personal injury WARNING Do not attempt t...

Page 5: ...Align the notch on the lower handle with the rib on the tilling head Push the lower handle into the tilling head Align the side cover with the holes on the lower handle shaft and push the cover into place Secure with the two ST3 9x16 screws WARNING When connecting the tilling head and lower handle using the two self tapping screws supplied make sure the screws are securely tightened Screw heads sh...

Page 6: ...isible stones or other foreign bodies from the area CAUTION Before moving the tiller cultivator from one area to another switch off the motor and wait for the tines to come to a complete stop Be careful not to let the tines touch the ground while moving the tiller cultivator The tines as well as the unit itself may be damaged even if the motor is switched off Clearing foreign objects During operat...

Page 7: ... initial charging discharging cycles may be required to achieve maximum run time capacity Do not attempt to open the charger or the unit There are no customer serviceable parts inside Call the customer service help line at 1 800 633 1501 for assistance DO NOT incinerate battery packs even if they are severely damaged or completely worn out They can explode in a fire causing injury Use the battery ...

Page 8: ...with part number JY2201 1 or JY2201 2 stamped on the tine blade Replace only the tines with the identical part number Tine Removal Fig 5 1 Remove the M8 hex locknut with a hex head wrench and then remove the M8x170 bolt 2 Remove the end caps 3 Remove the tines and hubs at either end of the shaft Tine Installation Fig 5 1 Install the new tine by pressing it onto the hub The side with stamped part n...

Page 9: ...ns power off when you turn out the lights Surrounding air temperature too hot or too cold Move charger and tool to a surrounding air temperature of about 39 degree F 4 degree C or below 104 degree F 40 degree c Poor results Working depth too small Worn tines Adjust working depth Replace damaged or worn tines STORAGE Store the Tiller Cultivator in a dry clean area out of reach of children During ex...

Page 10: ...ear and breakage on charger exposure to extreme temperature swings hot or cold battery left on charger too long battery left uncharged for too long and misuse or abuse of the battery This warranty does not cover damage caused by cold heat rain excessive humidity or other environmental extremes This warranty does not cover normal deterioration of the exterior finish or normal wear and tear on the p...

Reviews: