background image

3  Electrical Installation

EN16 

YASKAWA Electric


TOEP C710606 27 AC Drive - J1000 Quick Start Guide

• Always make sure the ground impedance is conformed to the requirements of local safety

and installation regulations.

• Never share the ground wire with other devices such as welding machines, etc.
• Do not loop the ground wire when using more than one drive.

„

Control Circuit Wiring Precautions

Consider the following precautions for wiring the control circuits. 

• Separate control circuit wiring from main circuit wiring and other high-power lines.
• Separate wiring for control circuit terminals MA, MB, MC (contact output) from wiring

to other control circuit terminals.

• For external control power supply use a UL Listed Class 2 power supply.
• Use twisted-pair or shielded twisted-pair cables for control circuits to prevent operating

faults. 

• Ground the cable shields with the maximum contact area of the shield and ground.
• Cable shields should be grounded on both cable ends.

„

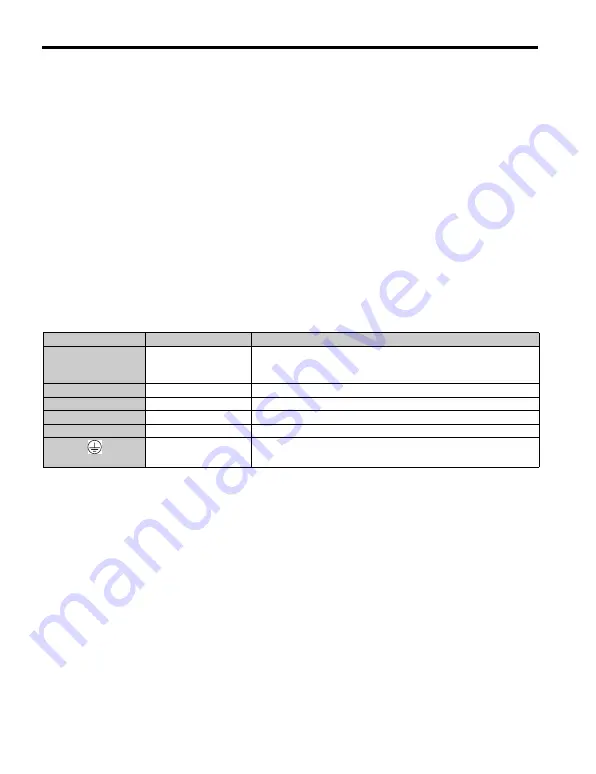
Main Circuit Terminals

Terminal

Type

Function

R/L1, S/L2, T/L3

Main circuit power sup-
ply input

Connects line power to the drive.
Drives with single-phase 200 V input power use terminals R/L1
and S/L2 only (T/L3 is not used).

U/T1, V/T2, W/T3

Drive output

Connects to the motor.

B1, B2

Braking resistor

For connecting a braking resistor.

+1, +2

DC reactor connection

Linked at shipment. Remove the link to install a DC choke.

+1, –

DC power supply input For connecting a DC power supply.

 (2 terminals)

Ground Terminal

For 200 V class: Ground with 100 

Ω

 or less

For 400 V class: Ground with 10 

Ω

 or less

Summary of Contents for CIMR-JC

Page 1: ...put 0 1 to 5 5 kW 200 V Class Single Phase Input 0 1 to 2 2 kW 400 V Class Three Phase Input 0 2 to 5 5 kW MANUAL NO TOEP C710606 27A Type CIMR JC To properly use the product read this manual thorough...

Page 2: ...EN2 YASKAWA Electric TOEP C710606 27 AC Drive J1000 Quick Start Guide...

Page 3: ...Start Guide J1000 Quick Start Guide ENGLISH 1 Safety Instructions and General Warnings 2 2 Mechanical Installation 7 3 Electrical Installation 9 4 Keypad Operation 16 5 Start Up 18 6 Parameter Table 2...

Page 4: ...ded to the end user Yaskawa offers an express warranty only as to the quality of its products in conforming to standards and specifications published in the manual NO OTHER WARRANTY EXPRESS OR IMPLIED...

Page 5: ...result in death or serious injury Maintenance inspection and replacement of parts must be performed only by authorized personnel familiar with installation adjustment and maintenance of AC drives Do n...

Page 6: ...could result in death or serious injury by fire Verify that the rated voltage of the drive matches the voltage of the incoming power supply before applying power Do not use improper combustible materi...

Page 7: ...t in further damage to the equipment Do not connect or operate any equipment with visible damage or missing parts Install adequate branch circuit short circuit protection per applicable codes Failure...

Page 8: ...nd overvoltage category 3 in accordance with IEC664 Ground the neutral point of the main power supply for 400 V Class drives Precautions for UL cUL Standards Compliance This drive is tested in accorda...

Page 9: ...vironment Conditions Installation Area Indoors Ambient Temperature 10 C to 50 C When using an enclosure panel install a cooling fan or air conditioner in the area to ensure that the air temperature in...

Page 10: ...8 128 118 56 118 5 38 5 109 5 M4 1 0 BA0006 108 128 137 5 96 118 5 58 129 M4 1 7 BA0010 108 128 154 96 118 5 58 145 5 M4 1 8 2A0001 68 128 76 56 118 5 6 5 67 5 M4 0 6 2A0002 68 128 76 56 118 5 6 5 67...

Page 11: ...uses Main Switch Forward Stop Reverse Stop External Fault Fault Reset Multi speed 1 Multi function digital inputs default setting Link Thermal relay Braking resistor option J1000 Ground Multi function...

Page 12: ...3 5 BA0002 FS23638 10 07 2 5 M3 5 M3 5 M3 5 BA0003 FS23638 10 07 2 5 M3 5 M3 5 M3 5 BA0006 FS23638 20 07 2 5 M4 M4 M4 BA0010 FS23638 20 07 4 M4 M4 M4 2A0001 FS23637 8 07 2 5 M3 5 M3 5 M3 5 2A0002 FS23...

Page 13: ...ype Manufacturer Ferraz Fuse Ampere Rating A Fuse Type Manufacturer Bussmann 500 Vac 200 kAIR Fuse Ampere Rating A Single Phase 200 V Class BA0001 A6T6 6 FWH 25A14F 25 BA0002 A6T10 10 FWH 25A14F 25 BA...

Page 14: ...es smaller than 1 kW for compliance with the EN61000 3 2 Refer to the instruction manual or contact your supplier for details EMC Standards Compliant Wiring of Single and Three Phase Units Terminal Sc...

Page 15: ...ring the Main Circuit Output Consider the following precautions for the output circuit wiring Do not connect any other load than a 3 phase motor to the drives output Never connect a power source to th...

Page 16: ...control power supply use a UL Listed Class 2 power supply Use twisted pair or shielded twisted pair cables for control circuits to prevent operating faults Ground the cable shields with the maximum c...

Page 17: ...Photocoupler inputs 24 Vdc 8 mA Note Drive preset to sinking mode NPN When using source mode set DIP switch S3 to SOURCE and use an external 24 Vdc 10 power supply SC Multi function input common Seque...

Page 18: ...active during power up Up Arrow Key Scrolls up to select parameter numbers setting values etc Down Arrow Key Scrolls down to select parameter numbers setting values etc STOP Key Stops the drive ENTER...

Page 19: ...ut Frequency Output Current Output Voltage Monitor Display Verify Menu Setup Mode Parameter Setting Mode DRV LED is on A Run command will start the motor The Monitor Displays are used to read out driv...

Page 20: ...parameters if necessary Final check the operation and verify the settings Drive is ready to run the application Intstall and wire the drive as explained Turn the power on Initialize the drive if nece...

Page 21: ...the drive is in the REMOTE mode Mode Heavy Duty Ratings HD Normal Duty Rating ND C6 01 0 1 Application Applications with a constant torque like extruders conveyors and cranes High overload capability...

Page 22: ...analog input Select the input sig nal level in parameter H3 01 NOTICE If the input signal level of input A1 is switched between voltage and current make sure that DIP switch S1 is in the correct posi...

Page 23: ...activated in the C2 parameters for softer accel decel start and end Test Run Perform the following steps to start up the machine after all parameter settings have been done 1 Run the motor without loa...

Page 24: ...ng Current Sets the DC Injection Braking cur rent as a percentage of the drive rated current b2 03 DC Inj Braking Time DC Excitation Time at Start Sets the time of DC Injection Brak ing at start in un...

Page 25: ...rent Magnetizing current in Ampere E2 05 Motor Line to Line Resistance Sets the phase to phase motor resistance in ohms Digital Input Settings H1 01 to H1 05 DI S1 to S5 Function Selection Selects the...

Page 26: ...03 Output Current A U1 06 Output Voltage Reference Vac U1 07 DC Bus Voltage Vdc U1 10 Input Terminal Status Par Name Description 1 Digital input 1 terminal S1 enabled 1 Digital input 2 terminal S2 en...

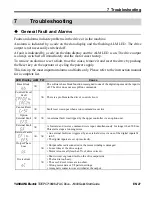
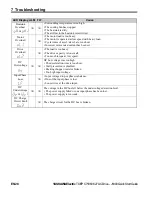
Page 27: ...e block function is assigned to one of the digital inputs and the input is off The drive does not accept Run commands ControlCircuit Fault There is a problem in the drive s control circuit Cannot Rese...

Page 28: ...load is too heavy The drive capacity is too small Too much torque at low speed DC Overvoltage DC bus voltage rose too high The deceleration time is too short Stall prevention is disabled Braking chop...

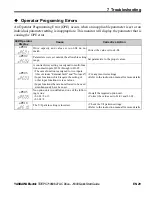
Page 29: ...ers to the proper values oPE03 A contradictory setting is assigned to multi func tion contact inputs H1 01 through to H1 05 The same function is assigned to two inputs this excludes External fault and...

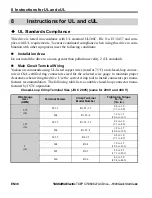
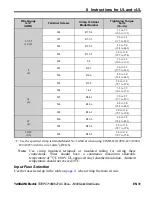
Page 30: ...and closed loop connec tors or CSA certified ring connectors sized for the selected wire gauge to maintain proper clearances when wiring the drive Use the correct crimp tool to install connectors per...

Page 31: ...R5 5 5 2 0 to 2 5 17 7 to 22 1 M6 R5 5 6 4 0 to 5 0 35 4 to 44 3 M8 R5 5 8 9 0 to 11 0 79 7 to 97 4 8 8 M4 8 4 1 2 to 1 5 10 6 to 13 3 M5 R8 5 2 0 to 2 5 17 7 to 22 1 M6 R8 6 4 0 to 5 0 35 4 to 44 3...

Page 32: ...rload Protection Set parameter E2 01 motor rated current to the appropriate value to enable motor overload protection The internal motor overload protection is UL listed and in accordance with the NEC...

Page 33: ...e the motor overload protection L1 01 1 2 or 3 when connecting the drive to a sin gle motor unless there is another means of preventing motor thermal overload The elec tronic thermal overload function...

Page 34: ...l load amp rating E2 01 Adjusting the value of L1 02 can shift the set of OL1 curves up the Y axis of the diagram below but will not change the shape of the curves L1 03 Motor Overload Alarm Operation...

Page 35: ...e back cover Date of Publication Rev No Section Revised Contents January 2008 First edition June 2009 Back cover Revision Address May 2010 Chapter 8 Instructions for UL and cUL MANUAL NO TOEP C710606...

Page 36: ...ITED KINGDOM YASKAWA ELECTRIC EUROPE GmbH Unit 3 Centurion Court Brick Close Kiln Farm Milton Keynes Bucks MK11 3JB United Kingdom Phone 44 0 1908 556815 Fax 44 0 1908 565891 Internet http www yaskawa...

Reviews: