2 Mechanical & Electrical Installation
YASKAWA ELECTRIC
SIEP C710617 19A YASKAWA AC Drive CR700 Technical Manual
41
■
Attach the Protective Cover (Procedure B)
Attach the Top Protective Cover
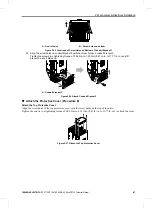
Align the hooks on the rear of top protective cover with the holes on the top of the drive to attach the top
protective cover.
Note:
•
Attach the top protective cover and point the (
) mark on the upper surface of the top protective cover away from the front of the
drive.
•
Put the two small hooks on the rear of the top protective cover into the mounting holes near the back of the drive. Then push down on
the front side of the top protective cover to attach the cover.
A - Mark
B - Rear side of top protective cover
C - Hooks
D - Front of drive
Figure 2.37 Attach the Top Protective Cover
Attach the Conduit Bracket
1.
Align the screw holes on conduit bracket 1 with the screw holes on the drive and push the bracket into
position. Use the screws to attach it at the sides and the bottom.
Tighten the screws to a correct tightening torque:
• Screw A: 1.96 to 2.53 N
∙
m (17.35 to 22.39 lb.
∙
in.)
• Screw B: 0.98 to 1.33 N
∙
m (8.67 to 11.77 lb.
∙
in.)
A - Screw holes on sides
B - Conduit bracket 1
C - Screws A
D - Screws B
Figure 2.38 Attach Conduit Bracket 1
Figure 2.39 shows the locations of the screw holes on the bottom of the drive.
B
C
C
D
C
A


