background image

Communications   D - 3

Using Modbus Communication

Serial communication can be performed with Direct Digital Controllers (DDCs) or similar devices using the Modbus protocol.

‹

Modbus Communication Configuration

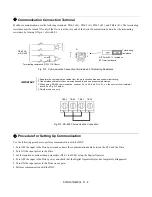
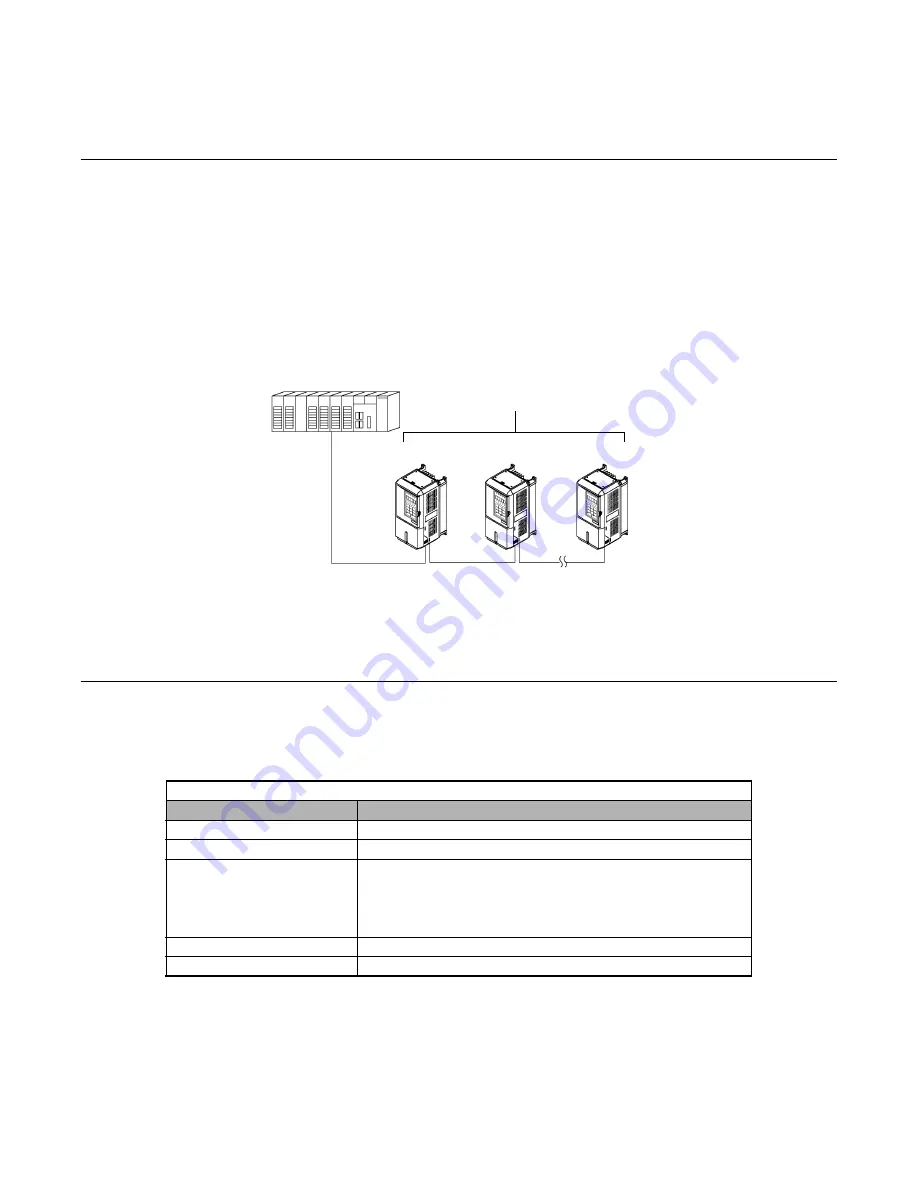
Modbus communication is configured using 1 master (PLC) and a maximum of 31 slaves. Serial communication between
master and slave is normally initiated by the master and responded to by the slaves.

The master performs serial communication with one slave at a time. Consequently, the slave address of each slave must be
initially set, so that the master can perform serial communication using that address. Slaves receiving commands from the
master perform the specified functions, and send a response back to the master.

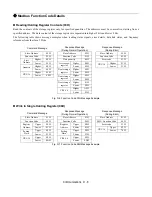
Fig D. 1   Example of Connections between Master and Drive

‹

Communication Specifications

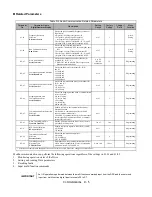
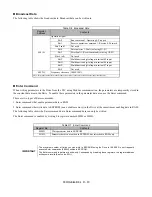
The Modbus communication specifications are shown below:

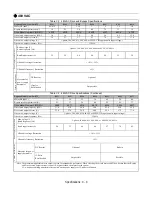
Table D.1 Modbus Communication Specifications

Item

Specifications

Interface

RS-422, RS-485

Communications Cycle

Asynchronous (Start-stop synchronization)

Communications Parameters

Baud rate:

Select from 1200, 2400, 4800, 9600, and 19200 bps.

Data length:

8 bits fixed

Parity:

Select from even, odd, or none.

Stop bits:

1 bit selected

Communications Protocol

Modbus

Number of Connectable Units

31 units max.

Master

E7

E7

E7

Slaves

Summary of Contents for E7LBA002

Page 1: ...E7L Drive Bypass Technical Manual Model E7L Document Number TM E7L 01 ...

Page 2: ... b8 01 0 L8 10 0 A2 23 b8 04 kVA Dep L8 11 300 A2 24 b8 05 20 H3 03 0 L8 12 45 A2 25 b8 06 0 H3 08 See Table 5 1 See Table 5 1 See Table 5 1 See Table 5 1 See Table 5 1 L8 15 1 A2 26 C1 01 30 L8 18 1 A2 27 C1 02 30 L8 19 20 A2 28 C1 03 30 H3 09 n1 01 1 A2 29 C1 04 30 n1 02 1 A2 30 C1 09 10 n3 01 5 A2 31 C1 11 0 H3 10 100 n3 02 150 A2 32 C2 01 0 2 H3 11 0 0 n3 03 1 b1 01 See Table 5 1 C2 02 0 2 H3 ...

Page 3: ... followed All activity must be performed by qualified personnel The Drive must be installed accord ing to this manual and local codes Do not connect or disconnect wiring while the power is on Do not remove covers or touch circuit boards while the power is on Before servicing disconnect all power to the equipment The internal capacitor remains charged even after the power supply is turned off Statu...

Page 4: ... heed the warnings in this manual Intended Use Drives and Bypass Units are intended for installation in electrical systems or machinery For use in the European Union the installation in machinery and systems must conform to the following product standards of the Low Voltage Directive EN 50178 1997 10 Equipping of Power Systems with Electronic Devices EN 60201 1 1997 12 Machine Safety and Equipping...

Page 5: ...ize cost performance benefits and quality the Drive includes numerous built in features such as network communications H O A PI parameter storage and copy functions The Drive has embedded communications for the popular building automation protocols Johnson Controls Metasys N2 and Siemens APOGEE FLN as well as Modbus An optional LONWORKS interface card is also available The LED keypad operator is e...

Page 6: ...Included on CD ROM with product Option Instructions Included on CD ROM with product Definitions of Acronyms and Abbreviations AC Alternating Current LRA Locked Rotor Amperes AIC Amps Interrupting Capacity MCP Motor Circuit Protector CB Circuit Breaker MTBF Mean Time Between Failures CIMR Control Induction Motor Rotation NC Normally Closed CN Connector NEC National Electrical Code CPT Control Power...

Page 7: ...and Bypass Packages PB E7 01 E7 Price Book DRG E7 E7 Drives Resources Guide Binder for Building Automation SG E7 01 EngSpec15172 E7 Specification Guide Section 15172 for Consulting Engineers SG E7 10 SubmittalSpec E7 Submittal Specification SG E7B 10 SubmittalSpec E7 Bypass Submittal Specification SG E7C 10 SubmittalSpec E7 Configured Submittal Specification SG E7E 10 SubmittalSpec E7 Engineered S...

Page 8: ...Introduction vi Notes ...

Page 9: ...olling Installation Site 19 Chapter 2 Electrical Installation 2 1 Termination Configuration Power Wiring 2 Control Wiring 8 Wiring Diagram 22 Electrical Overview 24 Chapter 3 Control Panel 3 1 Digital Operator and Control Panel Display 2 Drive Main Menus 11 Example of Changing a Parameter 22 Chapter 4 Start Up and Operation 4 1 Start Up Introduction 2 Bypass Unit Start Up Preparation 4 Bypass Unit...

Page 10: ...x A Parameters A 1 Parameter List 2 Monitor List 26 Fault Trace List 28 Fault History List 29 Decimal to Hex Conversion 30 Appendix B Capacity Related Parameters B 1 Drive Capacity 2 Appendix C Specifications C 1 Standard Drive and Bypass Specifications 2 Appendix D Communication D 1 E7L and Serial Communication 2 Using Modbus Communication 3 Metasys N2 Point Database 16 APOGEE FLN Point Database ...

Page 11: ...Table of Contents ix Appendix F Replacement Parts F 1 Primary Drive Replacement Parts 208 230 240VAC 2 Primary Drive Replacement Parts 480VAC 3 Bypass Replacement Parts 4 Index Index 1 ...

Page 12: ...Table of Contents x Notes ...

Page 13: ...ion 6 Bypass Product Options 8 Bypass Component Descriptions 10 Bypass Unit Front Control Panel 10 Internal Bypass Panel 12 Exterior and Mounting Dimensions 16 Bypass Unit 30 HP and Below 480 VAC 15 HP and Below 208V 240V 16 Bypass Unit 40 HP to 60 HP 480 VAC 20 HP to 30 HP 208V 240V 17 Dimensions and Weights 18 Checking and Controlling Installation Site 19 Installation Site 19 Controlling the Amb...

Page 14: ...6 E7LBA006 2 6 8 CIMR E7U22P2 E7LVA009 E7LBA009 3 9 6 CIMR E7U22P2 E7LVA015 E7LBA015 5 15 2 CIMR E7U23P7 E7LVA022 E7LBA022 7 5 22 CIMR E7U25P5 E7LVA028 E7LBA028 10 28 CIMR E7U27P5 E7LVA042 E7LBA042 15 42 CIMR E7U2011 E7LVA054 E7LBA054 20 54 CIMR E7U2015 E7LVA068 E7LBA068 25 68 CIMR E7U2018 E7LVA080 E7LBA080 30 80 CIMR E7U2022 480 VAC E7LVB001 E7LBB001 0 5 1 1 CIMR E7U42P2 E7LVB001 E7LBB001 0 75 1 ...

Page 15: ...L_D046 46 2 50 8 578 20 E7U20151 E7L_D059 59 4 65 3 653 40 48 25 63 14 66 Dimension Drawing6 S 5539 208 lbs 25 E7U20181 E7L_D074 74 8 82 3 746 Note 1 Horsepower rating is based on a standard NEMA B 4 pole motor Note 2 The underscore position in these model numbers codes for the enclosure type V NEMA1 B NEMA12 FVFF Note 3 Heat loss is the amount of heat dissipated by the drive at full load with all...

Page 16: ...51 E7L_A054 54 0 59 4 653 40 48 25 63 14 66 Dimension Drawing6 S 5539 208 lbs 25 E7U20181 E7L_A068 68 0 74 8 746 30 E7U20221 E7L_A080 80 0 88 0 939 221 lbs Note 1 Horsepower rating is based on a standard NEMA B 4 pole motor Note 2 The underscore position in these model numbers codes for the enclosure type V NEMA1 B NEMA12 FVFF Note 3 Heat loss is the amount of heat dissipated by the drive at full ...

Page 17: ...42P21 E7L_B001 1 1 1 2 57 29 48 19 06 13 66 Dimension Drawing6 S 5537 115 lbs E7L 00 0 75 42P21 E7L_B001 1 6 1 8 57 1 42P21 E7L_B002 2 1 2 3 62 2 42P21 E7L_B003 3 4 3 7 89 3 42P21 E7L_B004 4 8 5 3 121 5 43P71 E7L_B007 7 6 8 4 155 7 5 45P51 E7L_B011 11 0 12 1 217 10 47P51 E7L_B014 14 0 15 4 318 127 lbs 15 40091 E7L_B021 21 0 23 1 404 20 40111 E7L_B027 27 0 29 7 408 142 lbs 25 40151 E7L_B034 34 0 37...

Page 18: ...ing and provide covering as needed to protect the Bypass unit from construction site dirt water debris and traffic prior to and during construction Nameplate Information A nameplate is attached to the right side of the enclosure and the inside of the door of each Bypass unit The nameplate shown below is an example for a standard Bypass unit Fig 1 1 Bypass Nameplate Example Table 1 5 Checks Item Me...

Page 19: ...15 PSI Transducer Rated Amps 001 080 Current Voltage 208V 230 240V 480V E7L 2 Contactor Bypass Configuration E 7 L 0 2 1 Enclosure NEMA 1 NEMA 12 MCP Circuit Breaker Main Input Disconnect Ex 021 21A Disconnect Switch Drive Keypad LED Style Keypad LCD Style Keypad Drive Input Circuit 3 Bus Reactor 1 5 Bus Reactor 1 3 Input Reactor 2 None Custom Nameplates None None BASE NUMBER OPTIONS None Communic...

Page 20: ...t specific H5 0X parameters are setup by the user Option L Serial Communication Echelon LonWorks An isolated RS 422 485 circuit board provides LonTalk protocol for network communication to a BAS This option plugs into the CN2 connection on the Drive control circuit board Option N Input Capacitive Network Radio Frequency Interference Filter Electronic equipment can be sensitive to low levels of vol...

Page 21: ... carry the controlled equipment tag number Option X 3 DC Bus Reactor Attenuates harmonic distortion by limiting the rate of rise of the input current The bus reactor is wired to the Drive 1 and 2 DC bus terminals to provide the equivalent impedance of a 3 input reactor This option is only used on the low end of the horsepower range where DC bus reactors are not a standard Drive component 25 HP and...

Page 22: ...Auto Run The membrane over the Drive keypad is non removable on these Bypass units In order to use the keypad copy function on a Bypass unit order a separate keypad part number CDR001115 The Keypad Control Operator has a digital alpha numeric display and keypad in the upper portion for Drive operation and programming The row of LEDs above the alpha numeric display indicate Drive operational status...

Page 23: ...onvenient means of disconnecting the Bypass unit from line power for equipment maintenance The disconnect must be in the OFF position in order to open the enclosure door The rotary handle can be padlocked in the OFF position This disconnect switch DOES NOT provide branch short circuit protection A device to provide branch short circuit protection MUST be provided by others upstream of the E7L Bypa...

Page 24: ...actor Contactor PCB A3 Load Connections Line Connections TB4 TB5 and Terminal PE Drive Keypad TB1 through TB5 Disconnect Label Defining Customer Control Circuit Connection Points Jumpers J2 and J3 Analog Output Signal Level DIP Switches S1 S2 S3 and S4 for Field Configuration of Drive Bypass Operation TB1 TB2 and TB3 Jumper J1 Digital Input Voltage Source Selection Hinged Enclosure Door Control Po...

Page 25: ...ircuit and optional functions specified for the unit The CPT primary is fused in both legs the secondary is fused when required by NEC transformer VA and wire size dependent One side of the transformer secondary is grounded to the Bypass enclosure Electronic Bypass Control Logic Operating elements such as indicating LEDs and selector buttons as well as the control logic have been incorporated into...

Page 26: ...nalog input signal level Activate or inactivate functions Auto transfer to Bypass on Drive Fault Safety interlock circuit BAS interlock circuit Power up mode selection Function of 3 SPDT programmable output relays Annunciate Running in Bypass mode Damper actuator energized employed to energize damper actuator Annunciate Auto Transfer to Bypass Annunciate Running in Drive mode Annunciate Run comman...

Page 27: ...Physical Installation 1 15 DIP Switches are ON when moved toward the enclosure door Fig 1 10 DIP Switches S1 to S4 for Drive Bypass Operational Configuration DIP Switch S1 example 2 3 4 1 ...

Page 28: ...ensions Bypass Unit 30 HP and Below 480 VAC 15 HP and Below 208V 240V Fig 1 11 Enclosure 1 for up to 30HP 480 VAC NEMA 1 and NEMA 12 FVFF Enclosures RECOMMENDED CONDUIT ENTRANCE AREA TOP BOTTOM AND SIDE DIMENSIONS IN INCHES MM FOR REFERENCE ONLY TOP VIEW ...

Page 29: ...it 40 HP to 60 HP 480 VAC 20 HP to 30 HP 208V 240V Fig 1 12 Enclosure 2 for 40HP to 60HP 480 VAC NEMA 1 and NEMA 12 FVFF Enclosures DIMENSIONS IN INCHES MM FOR REFERENCE ONLY RECOMMENDED CONDUIT ENTRANCE AREA TOP BOTTOM AND SIDE TOP VIEW ...

Page 30: ... 06 484 1 16 03 407 2 30 5 x 16 5 774 7 x 419 1 S 5537 115 3 2 3 4 A003 4 0 1 A004 6 8 2 A006 9 6 3 A009 15 2 5 A015 22 7 5 A022 28 10 A028 127 42 15 A042 54 20 A054 43 00 1092 2 25 63 651 0 17 03 432 6 41 5 x 23 0 1054 1 x 584 2 S 5539 208 68 25 A068 80 30 A080 221 480V 1 1 1 2 B001 32 00 812 8 19 06 484 1 16 03 407 2 30 5 x 16 5 774 7 x 419 1 S 5537 115 1 6 3 4 2 1 1 B002 3 4 2 B003 4 8 3 B004 7...

Page 31: ...ese units The door is hinged on the left and must open through at least a 90 degree swing with a 120 to 180 degree swing being preferable minimum clearance is 1 5 Install the Bypass unit under the following conditions in UL pollution degree 1 2 environments This excludes wet locations where surfaces may become conductive due to moisture and contaminant loading Observe the following precautions whe...

Page 32: ...he Bypass unit To prevent foreign matter from falling into the Bypass unit place a temporary cover over the unit Always remove the temporary cover from the Bypass unit before start up Otherwise ventilation will be reduced causing the Bypass unit to overheat Installation Orientation and Enclosure Considerations Install the Bypass unit vertically so as not to reduce the cooling efficiency When insta...

Page 33: ...in Circuit Configurations 480 VAC 7 Control Wiring 8 Bypass Field Control Wire Landing 8 Annunciation Contacts 9 Building Automation System Run Stop Circuit 10 Safety Interlock Circuit 10 Building Automation System Interlock Circuit Drive and Bypass enable input 10 Analog Inputs 11 Analog Outputs 13 Serial Communications 14 Remote Transfer to Bypass 16 Smoke Purge Operation 16 Multi Function Digit...

Page 34: ...y OLR is mounted to the contactor assembly or back panel depending on rating just above the bypass contactor The Bypass three phase output power connection to the motor is made to the output terminals of the OverLoad Relay See Figure 2 3 for representative examples Fig 2 3 Typical Output Power Connection Overload Relay Motor Connections Input Power Terminals Input Disconnect Motor Connections Grou...

Page 35: ...01 B002 B003 B004 B007 B011 B014 B021 B027 B034 B040 B052 B065 B077 FAL36003 FAL36007 FAL36030 FAL36015 FAL36050 FAL36100 KAL36150 14 4 12 4 12 1 0 4 350 kcmil 35 35 80 250 TIGHTENING TORQUE LB IN D002 D003 D004 D007 D010 D016 D024 D030 D046 D059 D074 A002 A003 A004 A006 A009 A015 A022 A028 A042 A054 A068 A080 B001 B002 B003 B004 B007 B011 B014 B021 B027 B034 B040 B052 B065 B077 LR2 D13 LR2 D15 LR...

Page 36: ...t this reduce cable length or if necessary adjust the carrier frequency set in C6 02 as shown in Table 2 1 The line side power cables load side power cables and the control wiring should all be run in a separate conduit Careful attention to this recommended design practice will avoid many potential motor and Drive related problems See the limitations on carrier frequency based on Drive capacity an...

Page 37: ...es with technical standards on electrical equipment and minimize the length of the ground wire Leakage current flows through the Drive Therefore if the distance between the ground rod and the ground terminal is too long potential on the ground terminal of the Drive will become unstable 5 When using more than one Drive be careful not to loop the ground wire Fig 2 4 Ground Wiring Examples For ground...

Page 38: ...tion 2 6 Wire Routing The following Figures indicate suggested wire entry and bending areas for representative wall mount enclosures Fig 2 5 Typical Wall Mount Enclosure Input power Motor connection Control circuit wiring ...

Page 39: ...se rectification Table 2 3 Drive Main Circuit Configurations 480 VAC Note 1 Input fuses or molded case circuit breakers are required for proper branch circuit protection for all Drives Failure to use recommended fuses circuit breakers See Appendix E may result in damage to the wiring Drive and or personal injury 2 Control power is supplied internally from the main circuit DC power supply for all D...

Page 40: ...Bypass field control wiring is terminated on the control PCB A2 Terminal blocks TB1 through TB5 The terminal desig nations are labeled on the enclosure adjacent to PCB A2 see Figure 2 6 Route the control wiring as shown in Figure 2 5 Fig 2 6 TB1 Control Terminal Locations All Models ...

Page 41: ...o Auto Transfer Annunciates automatic transfer to Bypass operation due to a Drive fault No Drive Run Annunciates running in Drive mode No Serial Com Run Annunciates that the run command is coming from serial communications No Hand Mode Annunciates that the Drive or Bypass is being operated in Hand local mode Relay 1 Auto Mode Annunciates that the Drive or Bypass is being operated in Auto remote mo...

Page 42: ... TB1 1 and TB1 9 on PCB A2 This method should be used if a Safety Circuit will be added later in the installation 3 De activate these terminals by moving DIP switch S2 7 to the ON position toward the enclosure door This solution is only suggested if a Safety Circuit will never be applied to the drive system Building Automation System Interlock Circuit Drive and Bypass enable input A control termin...

Page 43: ...ter H3 08 TB5 9 is also an analog input terminal it is always connected to Drive terminal A2 See Table 2 8 Figure 2 7 and Schematic Diagram E7L 00 for clarification of the analog input configuration and applications Analog Input PCB A2 Configuration Fig 2 7 Analog Input PCB A2 Configuration Table 2 7 Drive Analog Input Terminals Terminal Signal Level A1 0 to 10 VDC A2 4 to 20 mA or 1 to 10 VDC pro...

Page 44: ...ust be connected on this end only stub and isolate the other end The signal employed is 4 to 20 mA with parameter H3 08 set for 2 4 20 mA For 0 to 10 VDC parameter H3 08 is set for 0 0 10 VDC and the control PCB DIP switch S1 2 must be in the OFF position When setting speed commands from an external speed potentiometer and not from a Digital Operator use shielded twisted pair wires and ground the ...

Page 45: ...ts Terminals Jumper Position Drive Analog Output AC Common Signal Level J2 J3 Terminal Parameter H4 07 Parameter H4 08 TB3 4 TB3 1 4 20 mA 1 2 N A FM 2 4 20 mA N A TB3 4 TB3 1 0 10 VDC 2 3 N A FM 0 0 10 V N A TB5 6 TB5 7 4 20 mA N A 1 2 AM N A 2 4 20 mA TB5 6 TB5 7 0 10 VDC N A 2 3 AM N A 0 0 10 V For Drive programming reference Table 2 10 Analog Output Proportional Variables Setting Description S...

Page 46: ...and error detection time parameter H5 09 Option L LonWorks does not require jumpers and with the exception of H5 07 employs the same parameter settings as Modbus For co ordination with other E7 Technical Manuals the table below provides the equivalency between E7L Control PCB A2 terminal designations and E7 Drive terminal designations used in TM E7 01 TM E7 02 TM E7 21 TM E7 22 and TM E7B 01 Table...

Page 47: ...ng Resistor Fig 2 10 RS 485 Communication Connection IMPORTANT 1 Separate the communication cables from the main circuit cables and control circuit wiring 2 Use shielded cables for the communication wiring and use proper shield clamps 3 When using RS 485 communication connect TB4 1 to TB4 3 and TB4 2 to TB4 4 on the control circuit terminal board See Fig 2 10 below 4 Connect shield at one end only...

Page 48: ... smoke control function When in smoke purge mode during emergency fire smoke situations the motor overloads and safety interlock circuit are overridden to shift the priority to protecting people rather than equipment Note Smoke purge overrides all other control inputs and selector buttons Smoke purge operation can only be terminated by opening the contact closure at terminal TB1 5 or by opening th...

Page 49: ... 3 4 3 4 1 2 3 4 5 6 7 4 6 1 6 8 S1 ON OFF IN OUT FACTORY SETTING 4 20MADC 0 10VDC ON ON OFF YES YES YES YES YES NO INACTIVE ACTIVE INACTIVE ACTIVE DIP SWITCH SETTINGS DESCRIPTION S2 S3 S4 POS SAFETY INTERLOCKS AT TB1 1 BAS DAMPER INTERLOCKS AT TB1 3 TB3 3 CONNECTED TO DRIVE ANALOG INPUT 2 A2 TB3 3 CONNECTED TO DRIVE ANALOG INPUT 1 A1 DRIVE ANALOG INPUT 2 A2 SIGNAL H3 08 0 FOR 0 10VDC 1 2 AUTO TRA...

Page 50: ...R R 1 2 3 J1 J1 3 2 1 DRIVE TERMINAL S7 INPUT DRIVE TERMINAL S6 INPUT AC AM V 15VDC 20mA A2 4 20MADC OR 0 10VDC AS SELECTED BY DIP SW S1 2 FACTORY SETTING IS 4 20MADC TB5 TB4 DRIVE AM MONITOR OUPUT 4 20MADC OR 0 10VDC AS SELECTED BY JUMPER J3 FACTORY SETTING IS 4 20MADC PROGRAMMABLE RELAY 2 PROGRAMMABLE RELAY 3 FACTORY SETTING IS SYSTEM FAULT FACTORY SETTING ELECTRONIC BYPASS CONTROL PCB ELECTRONI...

Page 51: ...e shield wire to terminal PE 6 Insulate the shield with tape to prevent contact with other signal lines and equipment Fig 2 12 Preparing the Termination of Shielded Twisted Pair Cables Table 2 14 Terminal Numbers and Wire Sizes Same for all Bypass Units Terminals Terminal Screws Tightening Torque lb in N m Possible Wire Sizes AWG mm2 Recommended Wire Size AWG mm2 Wire Type TB1 1 to 14 TB2 1 to 6 T...

Page 52: ...al A1 by DIP switches S1 3 and S1 4 0 to 10 VDC 100 0 to 10 V 20 kΩ TB5 9 Multi function analog input connected to Drive terminal A2 4 to 20 mA 100 or 0 to 10 VDC 100 H3 08 and DIP switch S1 2 Function set by H3 09 4 to 20 mA 250Ω 0 to 10 V 20 kΩ TB3 1 Analog input common TB5 7 PE Shield wire optional ground line connection point Digital output signals TB1 10 Motor Run CLOSED During Motor Operatio...

Page 53: ...re RS 485 short TB4 3 to TB4 1 and TB4 4 to TB4 2 Differential input optical isolation TB4 2 TB4 3 Communication output Differential input optical isolation TB4 4 PE Signal common Table 2 15 Bypass Control Circuit Terminals Continued Type No Signal Name Function Signal Level ...

Page 54: ...Electrical Installation 2 22 Wiring Diagram ...

Page 55: ...Electrical Installation 2 23 ...

Page 56: ...le For signals between drive and PCB A2 Cat 5 Cable w RJ 45 connectors Electronic Bypass Control PCB A2 E7 Drive Control Board Control Panel Drive Keypad Membrane Keypad for H O A Control Panel Components Contactors Control Xfmr Motor OL Customer Control Terminal Blocks Ribbon cable for LEDs and switches for H O A control ...

Page 57: ...ital Operator Keypad 4 Control Panel Indicator Lights LEDs 6 Selector Key Indicators 9 Normal Control Panel Indicators 9 Abnormal Control Panel Indicators 10 Fault Control Panel Indicators 10 Drive Main Menus 11 Main Menu Structure 12 DRIVE Operation Menu 13 QUICK Quick Setting Menu 16 ADV Programming Menu 18 VERIFY Modified Constants Parameters Menu 20 A TUNE Auto Tuning Menu 21 Example of Changi...

Page 58: ... an explanation The row of LEDs below the alpha numeric display indicate the Drive menu that is presently active The lower portion of the front control panel displays the operating mode status via LEDs and controls the HAND OFF AUTO functions for both the Drive and Bypass The general rule for LED colors in the lower portion of the control panel is Green Normal Status Amber Abnormal Status Red Faul...

Page 59: ...lues Used to move to the previous item or data SHIFT RESET Key Selects the digit to be changed The selected digit will blink Also resets the Drive when a fault has occurred DATA ENTER Key Pressed to enter menus and parameters as well as to set values Drive Select Key Selects the Drive mode of operation Bypass Select Key Selects the Bypass mode of operation HAND Key Operates the Drive or Bypass via...

Page 60: ...utton is pressed local control providing both the run and speed command from the local control panel The control signals are Local to the Drive and Bypass unit but Remote from the Drive itself An exception to this rule occurs for the REMOTE REF indicator when serial communication is employed See Table 3 3 Table 3 2 Drive Operational Status Indicators Indicator Definition FWD Lit red when a forward...

Page 61: ...relationship between the indicators for RUN and STOP and the Drive status is shown in Fig 3 2 Fig 3 2 RUN and STOP Indicators Table 3 4 RUN Indicator Indicator Status Description On Red Drive is running Blinking Red Drive is decelerating to a stop Off Drive is stopped Table 3 5 STOP Indicator Indicator Status Description On Red Drive is decelerating to a stop or stopped Blinking Red Drive is in a ...

Page 62: ...s The unit may be operating in Bypass mode Table 3 8 Bypass Run Indicator Indicator Status Description On Amber The Bypass has been given a run command in the HAND or AUTO mode Or the operation has been remotely transferred to Bypass using the Remote Transfer to Bypass feature via a BAS contact closure at terminals TB1 4 and TB1 9 Or the operation has been automatically transferred to Bypass after...

Page 63: ...y circuit connected to terminals TB1 1 and TB1 9 has an open circuit condition Off The NC motor safety circuit is satisfied or this function is disabled by DIP switch S2 7 Table 3 11 Drive Fault Indicator Indicator Status Description On Red The Drive has tripped OFF due to an internal Drive fault Off The Drive is ready for operation or operating normally Table 3 12 Smoke Purge Indicator Indicator ...

Page 64: ...ive is ready to run or is running no faults Off The Drive has a fault that will prevent operation Table 3 15 Auto Rem Xfer Status Indicator Indicator Status Description On Amber Auto Transfer to Bypass operation or Remote Transfer to Bypass operation is active Off Auto or Remote Transfer to Bypass are not active Auto Transfer may be disabled by DIP switch S2 1 Table 3 16 Damper BAS Status Indicato...

Page 65: ...er The Bypass mode of operation is selected HAND Amber The Drive or Bypass is operated via the local control panel A Run command is automatic OFF Amber The Run command has been removed from the Drive or Bypass AUTO Green The Drive or Bypass is operated via a remote device DDC or BAS Drive Test Amber The Drive is operated via the local control panel while the motor is operating in Bypass mode Auto ...

Page 66: ...e Smoke Purge LED Amber when Smoke Purge activated Drive Test LED Amber in Drive Test Mode HAND LED Amber in Hand Mode OFF LED Amber in Off Mode Bypass Select LED Amber in Bypass Mode Run Safety Open LED Red when Customer Safety is open Damper BAS LED Red when Damper Circuit or BAS open Fault LED Red when Drive is faulted Motor O L LED Red when Thermal Overload is tripped ...

Page 67: ...nt displaying fault history or displaying the fault traces QUICK Quick Setting The Drive can be programmed in this menu Use this menu to set read the most commonly used parameters ADV Programming The Drive can be programmed in this menu Use this menu to set read every parameter VERIFY Modified Constants Parameters The Drive can be programmed in this menu Use this menu to set read the parameters th...

Page 68: ...tal Operator press the MENU Key to enter the Drive menu DRIVE indicator will flash and then press the DATA ENTER Key from the drive menu display to bring up the monitor display DRIVE indicator will light Monitor display in the drive menu will appear when the power is turned ON Power ON Drive Menu Quick Programming Menu Advanced Programming Menu Verify Menu Autotuning Menu If a user constant is cha...

Page 69: ... 5 1 Example Operations Key operations in drive menu are shown in the following figure Fig 3 4 Operations in Drive Menu Menu Selection Display Monitor Constant Display Deleted Monitor Constant Monitor Display Drive Menu Frequency reference Output frequency Output current Monitor setting for o1 01 Status Monitor Error Trace Fault History Frequency reference setting display unit 01 03 Frequency refe...

Page 70: ...tage U1 08 Output kWatts U1 10 Input Term Sts U1 11 Output Term Sts U1 12 Int Ctl Sts 1 U1 13 Elapsed Time U1 14 FLASH ID U1 15 Term A1 Level U1 16 Term A2 Level U1 18 Mot SEC Current U1 20 SFS Output U1 24 PI Feedback U1 28 CPU ID U1 29 kWh U1 30 MWh U1 34 OPE Detected U1 36 PI Input U1 37 PI Output U1 38 PI Setpoint U1 39 Transmit Err U1 40 FAN Elapsed Time U1 51 Auto Mode Fref U1 52 Hand Mode F...

Page 71: ...03 Frequency Ref U2 04 Output Freq U2 05 Output Current U2 07 Output Voltage U2 08 DC Bus Voltage U2 09 Output kWatts U2 11 Input Term Sts U2 12 Output Term Sts U2 13 AC Drive Status U2 14 Elapsed Time Fault History Parameters U3 01 Last Fault U3 02 Fault Message 2 U3 03 Fault Message 3 U3 04 Fault Message 4 U3 05 Elapsed Time 1 U3 06 Elapsed Time 2 U3 07 Elapsed Time 3 U3 08 Elapsed Time 4 U3 09 ...

Page 72: ...al A1 Gain Setting H3 03 Terminal A1 Bias Setting H3 10 Terminal A2 Gain Setting H3 11 Terminal A2 Bias Setting L2 01 Momentary Power Loss Detection Selection L2 02 Momentary Power Loss Ride thru Time L4 05 Frequency Reference Loss Detection Selection L4 06 Frequency Reference Level at Loss Frequency L5 01 Number of Auto Restarts Attempts L5 03 Maximum Restart Time After Fault L6 01 Torque Detecti...

Page 73: ...ction b1 03 Stopping Method Selection b5 01 PI Mode Selection b5 02 Proportional Gain Setting b5 03 Integral Time Setting b5 31 PI Unit Selection C1 01 Acceleration Time 1 C1 02 Deceleration Time 1 d2 01 Frequency Reference Upper Limit d2 02 Frequency Reference Lower Limit E1 01 Input Voltage Setting E2 01 Motor Rated Current H3 08 Terminal A2 Signal Level Selection H3 09 Auxiliary Terminal Functi...

Page 74: ...ons in Advanced Programming Menu Menu Selection Display Function Selection Display Monitor Display Setting Display Advanced Programming Menu Setup settings A1 xx PID control b5 xx Torque limits L7 xx Copy functions 03 xx Language Access level Control mode selection PID control mode selection Proportional gain PID feedback command loss detection time Forward torque limit Reverse torque limit Revers...

Page 75: ...cel C2 S Curve Acc Dec C4 Torque Comp C6 Carrier Freq d1 Preset Reference d2 Reference Limits d3 Jump Frequencies d4 Sequence d6 Field Weakening E1 V F Pattern E2 Motor Setup F6 Com OPT Setup H1 Digital Inputs H2 Digital Outputs H3 Analog Inputs H4 Analog Outputs H5 Serial Com Setup L1 Motor Overload L2 PwrLoss Ridethru L3 Stall Prevention L4 Ref Detection L5 Fault Restart L6 Torque Detection L8 H...

Page 76: ... INCREASE DECREASE and Shift RESET keys to change the parameters When the DATA ENTER key is pressed after changing the setting the user parameter will be written into memory and the display will return to parameter monitor automatically Example Operations An example of key operations is given below for when the following settings have been changed from their default settings b1 01 Reference Select...

Page 77: ...ypass Drives to auto tune the Drive in order to utilize the bi directional speed search feature Fol low the key operations below to access the Auto Tuning Menu For Reference Purposes Fig 3 8 Operation in Autotuning Menu Autotuning Monitor Display Setting Display Autotuning Motor output power Motor rated current Autotuning start Motor output power Autotuning Stop command input Autotuning completed ...

Page 78: ...ogramming menu 4 MENU Key pressed to enter advanced programming menu 5 DATA ENTER pressed to access monitor display 6 INCREASE or DECREASE Key pressed to display C1 01 Acceleration Time 1 7 DATA ENTER Key pressed to access setting display The setting of C1 01 30 00 is displayed 8 Shift RESET Key pressed to move the flashing digit to the right 9 DECREASE Key pressed to change set value to 20 00 s 1...

Page 79: ...7L Drive and Bypass unit start up Start Up Introduction 2 The Safety Interlock Circuit at Power Up 2 The BAS Interlock Circuit at Power Up 3 Bypass Unit Start Up Preparation 4 Bypass Unit Start Up Procedure 5 Bypass Unit Operation Description 9 Selector Key Functions 11 DIP Switch Selectable Functions 11 Contact Closure Inputs 13 ...

Page 80: ...________________________________ Drive Model Number ______________________ Drive Serial Number _________________________________ In this Start Up chapter when referring to the keypad display the complete description of the parameter setting choices are presented for clarity purposes For example one of the setting choices for parameter b1 02 is 1 terminals Keep in mind that on the standard LED keyp...

Page 81: ...f the following three items needs to be done prior to start up 1 Install a BAS Interlock Circuit between TB1 3 and TB1 9 on PCB A2 2 Install a jumper between TB1 3 and TB1 9 on PCB A2 This method should be used if a BAS Interlock Circuit will be added later in the installation 3 De activate these terminals by moving DIP switch S2 8 to the ON position toward the enclosure door This solution is only...

Page 82: ...the installer s as wired schematic Determine if a driven motor safety circuit is connected This is a series circuit of NC contacts from devices such as a smoke fire sensor freeze up thermostat or high static pressure limit switch Verify that these customer emergency contacts are properly terminated in the Bypass safety shutdown circuit These contacts should be wired between terminal TB1 1 and TB1 ...

Page 83: ... control panel is Green Normal Status Amber Abnormal Status Red Fault Status 1 Before applying power make sure that the following conditions are met The VAV terminal unit dampers in supply fan applications are open to prevent duct flexing or damage in a full speed across the line starting situation The electro mechanical motor OverLoad Relay OLR S10 is adjusted to equal the Full Load Amps FLA valu...

Page 84: ...ded verify that the parameters are correct for the Drive and installation conditions See the Factory Parameter Settings printed in Table 1 and Table 6 on page 2 and 3 of the E7L 00 Schematic Diagram or Chapter 5 Table 5 1 and 5 2 of this manual Consider any additional parameter settings that may be needed by this specific application The Factory Parameter Settings table 1 of E7L 00 documents E7 Dr...

Page 85: ...t terminals of the motor Overload Relay Tighten the terminal lugs reapply the power press the HAND key and re check the rotation direction 7 With correct motor rotation press the MENU key if necessary to return to the DRIVE menu Press DATA ENTER as needed to get F flashing then using the and keys manually run the Drive throughout its entire speed range while observing operation If excessive vibrat...

Page 86: ...rect If the rotation direction in Bypass is correct skip the rest of this step If not carry out the following corrections 1 Turn OFF the incoming power feed to the E7L unit Since the correct rotation in Drive mode was previously established do not change any output wires at the motor 2 Instead verify that power is OFF Then swap the wires for L1 L2 on the input side of the Disconnect Switch or Circ...

Page 87: ...Start Up and Operation 4 9 Notes ...

Page 88: ...Drive 0 0 E 0 X X X Drive 14 A Drive 0 0 0 D X X X None 15 A Drive X 0 0 D X X X Drive On On On 16 A Drive X 0 0 D E 0 X None On 17 A Drive X 0 0 D X E 0 X None On On 18 A Drive X X 0 D X X X X X Bypass On On 19 A Drive X 0 X D X Bypass On 20 A Drive X 0 0 E X X X X Bypass Flash On 21 A Bypass N X 0 0 D X X X Bypass On 22 A Bypass T X 0 0 D X X X Bypass On 23 A Bypass N X 0 0 D E 0 X None On 24 A ...

Page 89: ...lash Flash On On On 16 On On On On On On On On 17 18 On On Flash On On On Flash On On On On On 19 On On Flash On On On On On 20 On On On On On On On 21 On On On On On On On On On On 22 On On On On On 23 On On On On On 24 On On On On On On On On On 25 On On On Flash On On On On On 26 On On On On On On On On On 27 On On On On On On 28 On On On On On On 29 On On On On On On 30 On On On On On 31 On On...

Page 90: ...operated locally from the front control panel by pressing the Bypass Select key In BYPASS mode the Bypass contactor coil can be energized manually by pressing the HAND key In Bypass mode selecting HAND operation causes the motor to run at full speed directly across the line Operating with AUTO selected Bypass mode The Bypass can be operated remotely by pressing the Bypass Select key and selecting ...

Page 91: ...7 to the ON position toward the enclosure door This solution is only suggested if a Safety Circuit will never be applied to the drive system Building Automation System Interlock Circuit This is a Drive and Bypass enable input A control terminal block position TB1 3 is provided to connect Normally Open NO enabling contacts such as damper end switches or occupied cycle timers An open contact will ov...

Page 92: ...es the DRIVE BYPASS selector keys An open contact causes operation in Drive mode and a closed contact results in Bypass mode Smoke Purge This function allows a contact closure between terminals TB1 5 and TB1 9 to transfer motor operation to Bypass for a maxi mum capacity smoke control function When in smoke purge mode during emergency fire smoke situations the motor overloads and safety interlock ...

Page 93: ...2 Virtual Terminals 2 Bypass Unit Basic Programming Parameters 4 Discussion of Table 5 2 Option Dependent Bypass Parameter Settings 7 Drive Parameters 10 A1 Initialization 10 b1 Sequence 12 b2 DC Braking 17 b3 Speed Search 19 b5 PI Function 23 b8 Energy Savings 37 C1 Accel Decel 38 d1 Preset References 39 d2 Reference Speed Command Limits 41 d3 Jump Frequencies 42 d4 Sequence 43 E1 V f Pattern 44 ...

Page 94: ...Option Dependent Bypass Parameter Settings provide details of the unique programming required for the E7L Bypass applications of the Drive with various configurations of options and sources for the control signals Tables 5 3 and 5 4 are similar but add PI control to the configuration possibilities Virtual Terminals The Drive multi function digital inputs and Drive analog inputs have for the most p...

Page 95: ...anying paragraphs explain the programming of the Drive for the E7L Bypass appli cation including these virtual terminals Drive Terminals Correspondence to E7L Terminals Drive Terminal E7L PCB A2 Terminal Drive Function Selection Parameter E7L PCB A2 DIP Switch A1 TB3 3 b1 01 S1 3 S1 4 A2 TB3 3 H3 08 H3 13 S1 2 S1 3 S1 4 S6 TB5 5 H1 04 N A S7 TB5 4 H1 05 N A SN TB5 2 Digital Common N A ...

Page 96: ...8 230 or 460 208 240 or 480 VOLTS Output Volts Setting Set to the nominal Voltage Rat ing of motors Output Voltage range H1 01 70 24 N A Drive Terminal S3 Function Selection Set for Drive run enable Terminal S3 Sel Drive Enable H1 02 SEE TABLE 5 2 14 N A Drive Terminal S4 Function Selection Set for fault reset or Frequency Reference 1 Terminal S4 Sel Multi Step Ref 1 H1 03 SEE TABLE 5 2 3 N A Driv...

Page 97: ...ypass logic circuit have also been stored in the digital keypad memory If there is a need for re initialization re setting to a known factory starting point for trouble shooting purposes of the Bypass unit then the back up file in the digital keypad memory can be copied to the drive In parameter o3 01 select 2 OP INV WRITE to carry out the copy function PARAMETER NUMBER SETTING UNITS DESCRIPTION O...

Page 98: ...dependently Notes Hand mode run stop for Drive and Bypass is always via the front control panel HAND selector key Auto mode run stop for Drive and Bypass without serial com is from terminal TB1 2 Auto mode run stop with serial com is from serial com for both Drive and Bypass modes DIP switch configurable terminal TB3 3 is connected to Drive terminal A2 the default See Chapter 2 Table 2 8 for the a...

Page 99: ...2 and H3 13 0 all other parameters per line 4 5 or 6 of Table 5 2 Options None Bypass with no options Hand mode speed command from Keypad Operator Auto mode speed command input signal 4 20 mA applied to Terminal TB3 3 Drive terminal A2 Auto mode run stop contact closure for Drive and Bypass applied to terminals TB1 2 and TB1 9 Options None Bypass with no options Hand mode speed command from Keypad...

Page 100: ... A2 is programmed for 4 20 mA Transducer output is 4 20 mA Note Control PCB DIP switch S1 2 must also be ON H3 09 0 Frequency Bias Drive Terminal A2 function is set to bias the terminal A1 input Terminal A1 is not used therefore the A2 bias signal becomes the speed command H1 03 3 Multi Step Ref 1 default A Drive terminal S5 input contact closure selects d1 02 keypad as a preset speed This input c...

Page 101: ...ive terminal S5 input contact closure allows b1 01 to select d1 01 keypad as the speed command An open contact selects serial com for the run stop command the serial com speed command is overridden by the preset speed above This input contact is closed when H O A Hand H5 02 Baud Rate Each protocol requires the baud rate indicated in Table 5 2 H5 07 RTS Control Each protocol requires the Request to...

Page 102: ...ey until the ADV MENU is shown in the upper left corner of the digital operator 2 Press the DATA ENTER key to enter the programming menu The first parameter shown is A1 00 Select Language 3 Press the DATA ENTER key again and use the INCREASE and DECREASE arrow keys to choose the preferred language from the list below 0 English 1 Japanese 2 Deutsch German 3 Francais French 4 Italiano Italian 5 Espa...

Page 103: ...when parameter o2 03 1 Set Defaults 2 2 Wire Initialization 2220 The Drive parameters are returned to factory default values with digital inputs S1 and S2 configured as Forward Run and Reverse Run respectively 3 3 Wire Initialization 3330 The Drive parameters are returned to factory default values with digital inputs S1 S2 and S5 configured as Run Stop and Forward Reverse respectively After an ini...

Page 104: ...ng the Drive Parameters involving the Run Command Speed Reference location Stopping Method and Hand Auto changeover are located in this group b1 01 Reference Speed Command Source Selection This is one of the special parameter settings required by the Bypass logic circuit See Table 5 1 In order to run the Drive and motor with the BYPASS DRIVE select keys in the DRIVE Select position the Drive must ...

Page 105: ...command for the Drive will be accepted This parameter is by default set to 1 Terminals This setting is required by the Bypass logic circuit To issue a run command from the control panel Press the HAND key of the Hand Off Auto selector To issue a run command from a remote source such as a BAS The Hand Off Auto selector must be in the AUTO position A contact closure between terminals TB1 2 and TB1 9...

Page 106: ...ll add to the total time to stop 1 Coast to stop When the Run command is removed the Drive will turn off its output and the motor will coast uncontrolled deceleration The friction of the driven equipment will eventually overcome any residual inertia of the sys tem and the rotation will stop Fig 5 3 Coast to Stop IMPORTANT After a stop is initiated a subsequent Run commands input before the Minimum...

Page 107: ...Run command will need to be cycled before operation can occur The time T Operation Wait Time is determined by the output frequency when the Run command is removed and the active deceleration time C1 02 Fig 5 5 Coast to Stop with Timer IMPORTANT If an overcurrent OC fault occurs during DCInj to Stop lengthen the Minimum Baseblock Time L2 03 until the fault no longer occurs 04 E1 Frequency Maximum F...

Page 108: ... H1 04 if using Drive terminal S6 or H1 05 if using Drive terminal S7 is programmed for Reverse Jog 13 d1 17 is programmed for the desired reverse jog speed b1 04 is programmed for 0 reverse enable When the contact is closed the motor will run in reverse at the speed programmed in d1 17 b1 07 Local Remote Run Selection When the Drive is switched between the Local Hand mode the digital operator to ...

Page 109: ...ontains parameters associated with the DC injection braking feature Parameters involving the start ing frequency current level braking time and motor pre heat current level are located here b2 01 DC Injection Braking Start Frequency Setting Range 0 0 to 10 0 Hz Factory Default 0 5 Hz Parameter b2 01 sets the output frequency where the Drive begins DC Injection during Ramp to stop in order to lock ...

Page 110: ... a wind milling fan If DC Injection braking at start or Speed Search is not enabled attempting to Drive a spinning motor may cause nuisance tripping Parameter b2 04 can be used to resist any residual motion of the load after the deceleration has finished Fig 5 7 DC Injection Braking During Starting and Stopping Parameter b2 04 also serves the function of affecting the length of time DC Injection t...

Page 111: ...hod b3 01 0 or 1 The speed estimation method will calculate the speed using measurements of residual motor fields The speed estimation version is bi directional and will determine both the motor speed and direction To enable speed estimation Speed Search at start set b3 01 1 SpdsrchF Enable IMPORTANT When setting the Drive for remote Speed Search input via a contact closure the method of Speed Sea...

Page 112: ... to meet the rotor speed IMPORTANT If a UV1 fault occurs when current detection Speed Search is attempted increase the setting of L2 04 IMPORTANT If an OC fault occurs when Speed Search is attempted after power loss recovery increase the setting of L2 03 AC power supply Output frequency Output current OFF ON Start using speed detected Set frequency reference Minimum baseblock time L2 03 x 0 75 1 1...

Page 113: ... Detection Run command Output frequency Output current OFF ON b3 02 Deceleration time set in b3 03 Set frequency reference Minimum baseblock time L2 03 Maximum output frequency or set frequency Lower limit is set using Speed Search Time b3 05 Search Delay Time b3 05 Speed search current level AC power supply Output frequency Output current OFF ON Output frequency before power loss Set frequency re...

Page 114: ...tion ramp used by the current detection method of Speed Search when searching for the motor s rotor speed Even if Speed Search 2 is selected for Speed Search at start the time entered into b3 03 will be the time to decelerate from maximum frequency E1 04 to minimum frequency E1 09 b3 05 Speed Search Delay Time Setting Range 0 0 to 20 0 Seconds Factory Default 0 2 Seconds In cases where an output c...

Page 115: ...04 PI Limit b5 06 PI delay time b5 08 PI offset b5 07 PI output monitor U1 37 b5 01 0 ON PI control is OFF under the following conditions b5 01 0 During JOG command input H3 xx 19 and the terminal status is ON Upper limit Fmax x109 b5 01 3 b5 01 1 Upper limit Fmax x109 Lower limit Fmax x109 Lower limit 0 4 MEMOBUS Reg 06H PI target value Integral Hold H1 xx 31 Integral Reset H1 xx 30 PI Output Cha...

Page 116: ...ABLE 5 4 4 N A Drive Terminal S6 Function Selection Set for PI Disable turn off PI controller Terminal S6 Sel PI Disable H3 08 SEE TABLE 5 4 SEETABLE 5 2 N A Drive Terminal A2 Signal Level Signal selection 0 to 10 VDC Drive control board switch S1 2 off or 4 to 20 mA Drive con trol board switch S1 2 on Term A2 Signal 0 10 VDC H3 09 B SEETABLE 5 2 N A Drive Terminal A2 Function Selection Selects ho...

Page 117: ... S4 operation On Input S4 operates inversely with input S5 Off Inputs S4 and S5 operate independently Notes Hand mode run stop for Drive and Bypass is always via the front control panel HAND selector key Auto mode run stop for Drive and Bypass without serial com is from terminal TB1 2 Auto mode run stop with serial com is from serial com for both Drive and Bypass modes DIP switch configurable term...

Page 118: ... 15 Drive Display for PI Control HAND Mode Table 5 5 Parameters for Optional LCD Display Setup for PI Control PARAMETER NUMBER SETTING UNITS DESCRIPTION KEYPAD DISPLAY For Bypass Setting For Bypass Drive Default o1 03 1 0 Digital Operator Display Selection Set for percent Display Scaling 0 39999 o1 06 1 0 N A User Monitor Selection Mode Enables a custom display for PI Control monitoring Monitor Mo...

Page 119: ...d Operator Auto mode PI Setpoint from Keypad Operator Auto mode PI Feedback input signal 0 10 VDC applied to Terminal TB3 3 Drive terminal A2 Auto mode run stop contact closure for Drive and Bypass applied to terminals TB1 2 and TB1 9 Significant Parameter Setting Drive Operational Result b1 01 0 Operator Speed command Hand and PI setpoint Auto source Keypad Operator U1 01 b5 01 1 Enable Enable PI...

Page 120: ...serial com for both the run stop command and speed command A Drive terminal S5 input contact closure H O A Hand allows b1 01 to select Keypad Operator as the speed command source This input contact is closed when H O A Hand H1 04 19 Disable Jumpers required TB5 5 to TB1 12 and TB1 13 to TB5 2 A Drive terminal S6 input contact closure disables PI mode H3 08 0 0 10 VDC Drive Terminal A2 is programme...

Page 121: ... parameter b5 01 the Drive will adjust its output to cause the feedback from a transmitter to match the PI setpoint b5 19 The setting of b5 01 will determine whether PI functionality is disabled b5 01 0 Disabled enabled b5 01 1 Enabled or enable with the output of the PI function used to trim a Speed Command b5 01 3 Fref PI b5 02 Proportional Gain Setting Setting Range 0 00 to 25 00 Factory Defaul...

Page 122: ...t large overshoots in the Drive s response to error the difference between the setpoint and the feedback b5 07 PI Offset Adjustment Setting Range 100 0 to 100 0 Factory Default 0 0 The PI Offset Adjustment parameter has two different uses Parameter b5 07 serves different functions depending on whether it is used on a standard PI loop or a Differential PI loop Parameter b5 07 causes an offset to be...

Page 123: ...reasing b5 10 causes the PI function to have a greater regulating affect on the speed command b5 11 PI Reverse Selection Parameter b5 11 determines whether reverse operation is allowed while using PI control b5 01 0 The factory default setting will not allow the Drive to run in reverse This parameter does not need to be changed from factory default for a majority of HVAC applications Refer also to...

Page 124: ...p Function can be Enabled by entering a value in parameter b5 15 If the Drive s output drops below the level set by the Sleep Function Start Level b5 15 and remains there at least as long as the delay time determined by the Sleep Delay Time b5 16 then the Drive s internal Run command drops out and the Drive output ceases Though the Drive s output has ceased all other Drive functions continue Once ...

Page 125: ...g of b1 01 See Table 5 7 Setpoint Options b5 19 PI Setpoint Value Setting Range 0 00 to 100 00 Factory Default 0 00 Parameter b5 19 is for a PI Setpoint value When b5 18 1 Enabled the value of b5 19 will take precedent over any other PI setpoint unless the Drive is set up for Differential Feedback in which case b5 18 and b5 19 have no affect on the PI function b5 20 PI Setpoint Display Scaling The...

Page 126: ...425 then at 100 output the digital operator would display 42 5 for monitor U1 38 or U1 24 b5 21 Sleep Source Parameter b5 21 selects the sleep function characteristic action When b5 21 0 SFS Input the sleep function start level b5 15 is compared to the Drive s output Speed Command after PI block This is the setting that should be used for open loop or closed loop control It is also possible to hav...

Page 127: ... different from the Sleep Function because it is the feedback that must drop below the PI Snooze Deactivation Level b5 24 before normal Drive output will begin again See Figure 5 19 on the following page b5 25 PI Setpoint Boost Setting Setting Range 0 to 100 Factory Default 0 Just before the Snooze Function is activated the PI Setpoint can be temporarily increased to create an overshoot of the int...

Page 128: ...feedback drops below the PI Snooze Deactivation Level b5 24 then normal Drive and PI operation return b5 28 PI Feedback Square Root Function Activation If b5 28 1 Enabled the square root of the PI feedback is compared to the PI Setpoint in order to determine appropriate Drive output to properly regulate the system This is helpful in cases where the measured feedback is pressure but the PI loop nee...

Page 129: ...s the output voltage to the motor below the voltage value specified by the programmed V f pattern whenever the motor load is light Since torque is reduced during this voltage reduction the voltage has to return to normal levels when the load returns The energy savings is realized through improved motor efficiency The reduced output voltage causes increased rotor slipping even with a light load A m...

Page 130: ...eceleration time to avoid high pressure limit trips due to damper closure as the system is shut down an alternate solution in this situation is to set parameter b1 03 to Coast to Stop C1 09 Fast Stop Time Setting Range 0 0 to 6000 0 Seconds Factory Default 10 0 Seconds A special deceleration parameter is available for use with emergency or fault operations Parameter C1 09 will set a special decele...

Page 131: ...he Drive s digital inputs Terminals S3 through S7 need to be programmed via parameters H1 01 to H1 05 and wired to normally open contacts as Multi step Speed Reference 1 Multi step Speed Reference 2 and Jog Frequency Table 5 8 Preset Speed Truth Table Preset Speed Terminal programmed as Multi step Reference 1 Terminal programmed as Multi step Reference 2 Terminal programmed as Jog Reference Detail...

Page 132: ...set speed If b1 01 0 Operator then Frequency Reference 1 will be used If H3 09 2 Aux Reference then the analog input A2 will be used instead of Frequency Reference 2 for the second preset speed If H3 09 2 then Frequency Reference 2 will be used IMPORTANT The programming of d1 01 through d1 04 and d1 17 will be affected by the setting of o1 03 The programming of these parameters will be in the unit...

Page 133: ...r lower frequency limits the Drive programmer can prevent operation of the Drive above or below levels that may cause resonance equipment damage or discomfort see also parameter d3 0X For example limits may be needed to prevent low speed operation of cooling tower fans with gear boxes pumps with pressure dependent seals or AHUs with minimum delivery requirements Fig 5 21 Frequency Reference Upper ...

Page 134: ...d only accept higher speed commands when the commanded speed rises above the upper end of the dead band for increasing references Similarly the Drive will clamp the frequency reference just above the dead band and only accept lower speed commands when the command speed falls below the lower end of the dead band for decreasing references Fig 5 22 Jump Frequency Characteristics Setting the center po...

Page 135: ...ecrease the speed command whenever the MOP Decrease is closed The speed command will remain constant whenever both inputs are open or closed Parameter d4 01 determines whether the last speed command before the Run command was removed is remembered even if the power is cycled to the Drive If d4 01 0 Disabled then when a new Run command is issued the Drive s speed command will be 0 rpm If d4 01 1 En...

Page 136: ...peed There are 14 different preset V f patterns to select from with varying voltage profiles saturation levels frequency at which maximum voltage is reached and maximum frequencies There are also settings for Custom V f patterns that will allow the programmer to manually set Customize the V f pattern using parameters E1 04 through E1 13 Using parameter E1 03 the programmer can select one of the pr...

Page 137: ...ation 1 F 60Hz High Starting Torque 1 A 50Hz Saturation 2 High Starting Torque 2 B 72Hz 3 High Speed Operation 90Hz C Variable Torque 50Hz Variable Torque 1 4 120Hz D Variable Torque 2 5 60Hz Variable Torque 1 6 Variable Torque 2 7 IMPORTANT When a factory Initialization is performed the setting of E1 03 is unaffected but the settings of E1 04 through E1 13 are returned to their factory default se...

Page 138: ...els 0 0 to 510 0V 480V Models Factory Defaults 18 0V 208V Models 18 0V 240V Models 33 6V 480V Models E1 09 Minimum Output Frequency Setting Range 0 0 to 200 0 Hz settings above 120 0 Hz are currently not supported Factory Default 1 5 Hz E1 10 Mid Output Voltage Setting Range 0 0 to 255 0V 208V 240V Models 0 0 to 510 0V 480V Models Factory Defaults 10 8V 208V Models 10 8V 240V Models 16 8V 480V Mod...

Page 139: ... The motor over load protection parameter L1 01 is enabled by default In addition motor rated current is used by the torque compensation func tion to insure optimum torque production Set E2 01 to the full load amps FLA value stamped on the motor s nameplate During Auto tuning it is required for the operator to enter the motor rated current in parameter T1 04 on the Auto Tuning menu If the Auto tun...

Page 140: ... the embedded communication protocols used at the RS 485 422 terminals on the removable terminal board See parameters H5 0X F6 02 Option PCB External Fault Detection Selection F6 03 Option PCB External Fault Stopping Method If an external fault is received from the LonWorks or other communication option card the settings of F6 02 and F6 03 will determine the Drive operation in reaction to the faul...

Page 141: ... S4 Function Selection H1 03 Drive Terminal S5 Function Selection H1 04 Drive Terminal S6 Function Selection H1 05 Drive Terminal S7 Function Selection Setting Range 0 to 6E Factory Default H1 01 70 Bypass Drv Envl This is one of the special parameter settings required by the Bypass logic circuit See Table 5 1 H1 02 This is one of the special parameter settings required by the Bypass logic circuit...

Page 142: ...ing the active speed command via the Multi step References can be done while the Drive is running Table 5 10 Digital Input Functions Parameter setting Function Parameter setting Function 0 3 Wire Control 1C Trim Control Increase 1 Local Remote Selection 1D Trim Control Decrease 2 Option Inv Selection 1 1E Reference Sample Hold 3 Multi step Reference 1 20 2F External Fault 4 Multi step Reference 2 ...

Page 143: ... is removed the fault can be reset by either the RESET key on the digital operator or by closing a digital input configured as a Fault Reset H1 0x 14 Function PI Disable Setting 19 When the PI Function has been enabled by b5 01 PI Mode Selection it can be indefinitely disabled by closing a digital input configured as a PI Disable input H1 0x 19 When disabled the Drive operates as a standard Drive ...

Page 144: ...reversed When a digital input is programmed for the Com Inv Selection function H1 0x 6C that input will function as follows Table 5 12 Option Inv Function Input Status Run and Speed Command Source OPEN From the control circuit and analog input terminals CLOSED From Serial Com port R R S and S embedded protocols Table 5 13 Option Inv Function Input Status Run and Speed Command Source OPEN From Seri...

Page 145: ... of the digital output functions Refer to the Programming Manual for a more detailed description of each of the functions Table 5 14 Digital Output Functions Parameter setting Function Parameter Setting Function 0 During Run1 F Terminal Not Used 1 Zero Speed 10 Minor Fault 2 FREF FOUT Agree 1 11 Reset Cmd Active 3 FREF Set Agree 1 12 Timer Output 4 Frequency Detect 1 17 Torque Detect 1 N C 5 Frequ...

Page 146: ...s 1024 steps Using the factory default settings for the analog input s gain and bias the 0 10Vdc or 4 20mA signal at the analog input will yield a 0 100 speed command span Fig 5 24 Output Frequency as Commanded Via Analog Input If a different span of analog input signal is desirable it will be necessary to adjust the gain the bias or both to allow the analog input level to generate the desired fre...

Page 147: ...span Fig 5 26 Output Frequency with Reduced Bias Setting As a further example for an inverse acting speed command set the bias 100 and the gain 0 The minimum analog input level 0Vdc or 4mA will produce a 100 speed command and the maximum analog input level 10Vdc or 20mA will produce a 0 speed command Fig 5 27 Output Frequency with Inverted Gain and Bias Settings 4mA 20mA 0V 10V Bias 0 Output Frequ...

Page 148: ...nce The E7L also has a DIP switch S1 on the PCB A2 that must be set for the proper reference signal into the A2 analog input The S1 2 DIP switch setting determines the internal resistance of the Drive A2 input while parameter H3 08 determines how the Drive interprets the measured signal Fig 5 28 DIP Switch S1 Setting Description 0 0 10VDC 2 4 20mA Default Table 5 15 DIP Switch S1 2 Name Function S...

Page 149: ...efer to the section covering the PI parameters for more information regarding specifying the setpoint source PI parameters are listed in section b5 Parameters H3 10 Terminal A2 Gain and H3 11 Terminal A2 Bias can be used to configure the A2 analog input to match the signal from the Feedback Transmitter The U1 24 monitor PI Feedback can be used to check the PI Feedback level with the digital operat...

Page 150: ...minal A2 and AC This field calibration may be needed if there is a job site variation from the typical 3 to 15 PSIG pneumatic signal input range H3 12 Analog Input Filter Time Constant Setting Range 0 0 to 2 00 Seconds Factory Default 0 30 Seconds An analog input filter can be used to prevent erratic Drive control when a noisy analog reference is used Parameter H3 12 sets the time constant for a f...

Page 151: ...eed source b1 01 1 Terminals or Terminal is selected as the reference source for the Hand mode b1 12 1 Terminals For the A2 analog input to be an effective selection for the H3 13 parameter param eter H3 09 must be configured as Aux Reference H3 09 2 Aux Reference If H3 09 2 then the A1 analog input will be used regardless of the setting of parameter b1 12 Setting Description 0 Main Fref A1 factor...

Page 152: ...ified in L2 02 the Momentary Power Loss Ride thru Time During the power loss but before the fault trip the digital operator will display a UV alarm If L2 02 is set for a time longer than the control power supply can be sustained a UV1 fault will not occur and the Drive restarts upon the return of AC power The time that the control power supply can be maintained varies with Drive size The larger th...

Page 153: ...ring acceleration the output current comes within 15 of the level set by parameter L3 02 the acceleration time is lengthened Once the output current level has dropped below the L3 02 level acceleration will begin again with the acceleration rate reaching the programmed rate once again 15 below the L3 02 level Fig 5 30 Detailed Time Chart for Stall Prevention During Acceleration If L3 01 2 Intellig...

Page 154: ...ed If during deceleration the DC Bus voltage exceeds the stall prevention level see table below the Drive will discontinue decelerating and maintain speed Once the DC Bus voltage has dropped below the stall prevention level the deceleration will continue down to the Speed Command level See figure below If L3 01 2 Intelligent the intelligent stall prevention is enabled The active deceleration time ...

Page 155: ...t current level drops below the L3 06 level less a 2 hysteresis Once the output current drops below the L3 06 2 level the Drive will begin to accelerate at the currently active acceleration rate either C1 01 or C1 03 If L3 05 2 Decel Time 2 the Drive will function as described above except C1 04 will be used instead of C1 02 as the deceleration rate used when the output current exceeds L3 06 for m...

Page 156: ... less Fig 5 34 Loss of Frequency Reference Timing Diagram To enable Frequency loss detection set L4 05 1 Enabled of PrevRef If Frequency Reference Loss Detection is enabled and the reference is lost the Drive continues to operate at the speed commanded by parameter L4 06 When the speed command returns the Drive again follows the speed command Setting H2 01 H2 02 C Loss of Ref configures a digital ...

Page 157: ...ven if the restart fails the restart count is increased by one as long as the Drive attempted to rotate the motor The restart count will not be incremented if the restart is not attempted due to a continuing fault condition i e an OV fault The Drive waits L5 03 seconds before attempting another restart Fig 5 35 Automatic Restart Timing Diagram The auto restart count is reset back to 0 if any of th...

Page 158: ...to initiate OC Overcurrent LF Output Open Phase PF Input Phase Loss PUF DC Bus Fuse OL1 Motor Overload OL3 Overtorque OL2 Drive Overload OV DC Bus Overvoltage GF Ground Fault UV1 DC Bus Undervoltage OH1 Overheat In order for auto restart after a UV1 fault Momentary Power Loss Ride thru must be enabled L2 01 1 PwrL Ride Thru t or 2 CPU Power Active Setting H2 01 or H2 02 equal to 1E configures a di...

Page 159: ... wish to check for an overtorque condition or an undertorque condition 2 Do you wish to check for the torque condition whenever the Drive is running or only at speed agree Nuisance detection during acceleration when variable torques are normally required can be avoided 3 Do you want the Drive to fault if the torque condition is detected or only alarm and continue operation The following table can ...

Page 160: ...7 Trq Det 1 N C Fig 5 36 Over Torque Detection Fig 5 37 Under Torque Detection Output Curren Normally Open Torque Detection Digital Output t CLOSED L6 03 L6 03 L6 02 When the output current drops below the Torque Detection Level by approximately 10 of the Drive s rated output current the digital output is reset Closed Open Torque detection level 10 TIME Current L6 02 Output Current Normally Open T...

Page 161: ...rate L8 03 0 Ramp to Stop coast to stop L8 03 1 Coast to Stop ramp to stop using the C1 09 fast stop deceleration rate L8 03 2 Fast Stop alarm OH and continue running L8 03 3 Alarm Only alarm OH and continue running but at a reduced speed L8 03 4 Alarm Reduce If L8 03 4 Alarm and Reduce the Drive will continue to run but will reduce the speed to the level determined by parameter L8 19 Refer to the...

Page 162: ... cooling fan to run for up to 5 minutes factory default after the run command is removed Both parameters are intended to extend fan life while still providing sufficient cooling for proper Drive operation Fig 5 38 Heatsink Cooling Fan Operation Timing Diagram L8 19 Overheat Frequency Reference Reduction Level Setting Range 0 0 to 100 0 of maximum frequency Factory Default 20 0 of maximum frequency...

Page 163: ...n Status 13 Cumulative Operation Time 14 Software Number 15 Terminal A1 Input Voltage 16 Terminal A2 Input Voltage 18 Motor Secondary Current Iq 20 Output Frequency After Soft Start 24 PI Feedback Value 28 CPU Number 34 First Parameter Causing an OPE 36 PI Input 37 PI Output 38 PI Setpoint 39 Memobus Communication Error Code 40 Heatsink Cooling Fan Operation Time 51 Auto Mode Frequency Reference V...

Page 164: ...ult for o1 01 is the Output Voltage monitor U1 06 The active monitor displayed when the Drive is powered on can be changed to either be U1 01 Speed Command U1 02 Output Frequency U1 03 Output Current or the User Monitor For example if the Drive needs to display the Elapsed Timer as the Power On monitor then o1 01 must be set to 13 and o1 02 must be set to 4 The next time Drive power is cycled the ...

Page 165: ...valent synchronous motor RPM set o1 03 the number of motor poles If another engineered unit such as fpm or gpm is desired set o1 03 xxxx where X X X X X Digit 5 Digit 4 Digit 3 Digit 2 Digit 1 Digits 1 through 4 set the desired number to be displayed at 100 speed Digit 5 determines the number of decimal places in the displayed number If Digit 5 0 number format is XXXX If Digit 5 1 number format is...

Page 166: ...Monitor Optional LCD Operator only Setting Range 1 to 53 Factory Default 3 Normally the monitors shown directly below the active monitor are the next two sequential monitors If o1 06 User Monitor Selection Mode is set to 1 3 Mon Selectable those two monitors are locked as specified by parameters o1 07 and o1 08 and will not change as the top parameter is scrolled with the INCREASE and DECREASE key...

Page 167: ...od Selection The factory default setting of the Frequency Reference Setting Method parameter o2 05 1 Enabled dictates that when setting a Speed Command via the digital operator Hand mode it is not necessary to press the DATA ENTER key before the Drive will begin to accelerate or decelerate to the new set speed This is referred to as MOP Motor Operated Potentiometer type functionality When o2 05 1 ...

Page 168: ...disturbing Drive operation o2 07 Cumulative Operating Time Setting Setting Range 0 to 65535 Hours Factory Default 0 Hours o2 08 Cumulative Operation Time Selection The Drive features an Elapsed Timer monitor that records in units of hours The Elapsed Timer monitor is U1 13 Parameter o2 08 programs this function to either accumulate elapsed hours based on time the Drive is powered o2 08 0 Power On ...

Page 169: ...he event of fan replacement o2 12 Fault Trace Fault History Clear Function The operator can clear the Fault Trace U2 and Fault History logs by setting o2 12 1 Enabled Clearing the Fault Trace and Fault History logs erases all the information o2 14 kWh User Monitor Initialization The kWh monitors U1 29 and U1 30 track the power usage of the Drive and are not reset by powering down the Drive To rese...

Page 170: ... may occur while saving the parameter values to the digital operator s memory If an error is displayed press any key to cancel the error display and return to parameter o3 01 To COPY parameter values into a Drive set o3 01 2 OP INV WRITE During the writing of the parameter values into the Drive the digital operator will display CPy An error may occur while writing the parameter values to the Drive...

Page 171: ... read from and the Drive that the parameters are to be written to Model Number e g CIMR E7U2015 Software Number e g 03011 also known as FLASH ID Yaskawa offers DriveWizard software that can also READ COPY and VERIFY Drive parameter values DriveWizard lists all discrepancies between the Drive and a pre saved parameter file when verifying is performed To use DriveWizard first select o2 15 0 Disabled...

Page 172: ...with the digital operator keypad removed Start DriveWizard and setup the PC communications by setting the appropriate communications port and Baud rate Typical settings are Com Port 1 and 9600 Baud Once the communications port is set connect to the Drive by clicking on the pull down menu Inverter and selecting Connect This can also be done by typing Ctrl C on your keyboard or by clicking on the ye...

Page 173: ...he Motor Does Not Operate 20 The Direction of the Motor Rotation is Reversed 21 If the Motor Does Not Put Out Torque or If Acceleration is Slow 21 If the Motor Operates at a Higher Speed Than the Speed Command 21 If the Motor Overheats 22 If Peripheral Devices Like PLCs or Others are Influenced by Starting or Running Drive 22 If a Stand Alone Ground Fault Interrupter Operates When the Drive is Run...

Page 174: ...ternal faults might be caused by bypass system and will be resolved later in this section If the problem is more complex such as a Bypass not responding or the interaction between the PCB A2 and the Drive is not normal then the procedure in this section will help resolve the issue Specifications Inputs TB1 pins 1 6 6 x 24VDC 15 4mA or 120VAC 15 4mA Auto Detect CN104 pins 2 5 4 x 120VAC 15 4mA CN10...

Page 175: ...fy that K1 to K10 are cycling by monitoring the connected devices such as contactors cabinet blowers and any customer wired outputs Cycling of the Drive input commands to Drive terminals S1 S3 S5 can be verified through the Drive keypad by monitoring U1 10 The first and third to fifth digits should cycle with half the speed of the bypass keypad LEDs Test the H O A keypad itself for properly functi...

Page 176: ...tion 2 3 and supply control power externally Add RC filters to TB1 1 through 6 and or use shielded cables Recycle the power Powers up to Off mode Check S2 2 to be on and S4 4 to be off All LEDs always lit Check keypad wiring Bad board and or voltage Off mode locked and Auto or Hand mode not working If Power LED blinks check keypad wiring and recycle the power Replace the H O A keypad and or its ca...

Page 177: ...ontrol Board Layout Customer Connection Terminals Connector For cable to Keypad Customer 120V Circuit Fuse Customer Configuration Switches Connector For cable to Drive CPLD Logic Processor Option Port Connector Option Port Connector Connectors to Panel Wiring Harnesses Main Control Fuse Power Supply Circuits Mounting Holes 5 Places ...

Page 178: ...cause the support associate may refer to this Complete nameplate information from the Drive and the motor Confirm that Drive Nameplate Output amps is equal to or greater than Motor Nameplate amps Α list with your parameter settings A sketch of the electrical power train from AC line to motor including filters and disconnects Field Service Start Up Assistance Factory Repair Replacement Parts and Ot...

Page 179: ...user side software configurations CE Memobus Com Err Modbus Communication Error Control data was not received correctly for two seconds Connection is broken master has stopped communicating Check all connections verify all user side software configurations CPF00 COM ERR OP INV Operator Communication Fault 1 Transmission between the Drive and the digital operator cannot be established within 5 seco...

Page 180: ... Drive CPF10 ASIC Err ASIC Version Fault ASIC Control circuit damage Replace the Drive CPF20 Option A D Error Option Card Fault Option card connector connection fault Remove all inputs to the option board Option card A D converter fault Perform a factory initialization Cycle power off and on to the Drive Replace the option board Replace the Control board CPF21 Option CPU Down Self diagnosis Fault ...

Page 181: ...dback Loss PI Feedback Loss This fault occurs when PI Feedback Loss Detection is programmed to fault b5 12 2 and the PI Feedback PI Feedback Loss Detection Level b5 13 for the PI Feedback Loss Detection Time b5 14 PI Feedback source e g transducer sensor building automation signal is not installed correctly or is not working Verify Drive is programmed to receive the PI Feedback source signal Check...

Page 182: ...ing fins Reduce the ambient temperature around the Drive Drive Internal Cooling Fan Remove the heating unit Replace the cooling fan OH3 Motor Overheat 1 Motor Overheating Alarm The Drive stops or continues operation according to the setting of L1 03 Overheating of motor as measured by motor thermistor Recheck the cycle time and the size of the load Recheck the accel decel time C1 01 and C1 02 Rech...

Page 183: ...240VAC Trip point is 400Vdc 480VAC Trip point is 800Vdc High input voltage at R L1 S L2 and T L3 Check the input circuit and reduce the input power to within specifications The deceleration time is set too short Extend the time in C1 02 Power factor correction capacitors are being used on the input to the Drive Remove the power factor correction capacitors PF Input Pha Loss Input Phase Loss Drive ...

Page 184: ...o large Check the input voltage UV2 CTL PS Undervolt Control Power Supply Undervoltage Undervoltage of the control circuit when running External load connected pulling down the Drive power supplies Cycle power off and on to the Drive Repair or replace the Power PCB Gate Drive PCB Remove all control wiring and test Drive UV3 MC Answerback Soft Charge Circuit Fault The pre charge contactor opened wh...

Page 185: ...munication signal EF3 Ext Fault S3 Flashing External Fault at Terminal S3 An external fault condition exists connected to a multi function digital input Eliminate the cause of an external fault condition EF4 Ext Fault S4 Flashing External Fault at Terminal S4 EF5 Ext Fault S5 Flashing External Fault at Terminal S5 EF6 Ext Fault S6 Flashing External Fault at Terminal S6 EF7 Ext Fault S7 Flashing Ex...

Page 186: ...Fan Overheat The temperature of the Drive cooling fin exceeded the temperature programmed in parameter L8 02 Cooling fan s are not working high ambient temperature a heating unit in close proximity to Drive is present Check for dirt build up on the fans and cooling fins Reduce the ambient temperature around the Drive Drive Internal Cooling Fan Remove the heating unit OH2 Over Heat 2 Flashing Drive...

Page 187: ...ip point is 190Vdc 480VAC Trip point is 380Vdc Low input voltage at R L1 S L2 and T L3 Check the input circuit and increase the input power to within specifications The acceleration time is set too short Extend the time in C1 01 Voltage fluctuation of the input power is too large Check the input voltage UV2 CTL PS Undervolt Control Power Supply Undervoltage of the control circuit when running Exte...

Page 188: ...ot set simultaneously Speed search from maximum frequency and set frequency are set simultaneously Verify program settings H1 01 H1 05 OPE05 Sequence Select Run command is selected through serial communication at 2CN but option board is not installed Serial communication option board is not installed option board is installed incorrectly The run com mand selection parameter B1 02 is set to 3 and o...

Page 189: ... around the machine Check the load Er 03 STOP key The STOP key is pressed during auto tuning and the auto tuning is interrupted Er 04 Resistance Auto tuning is not completed within the specified time The auto tuning result became other than the parameter set range Check input data Check motor wiring If a motor and a machine are connected disconnect the motor from the machine Er 12 I det Circuit Cu...

Page 190: ... Inverter voltage has been detected Repeat the read Replace Digital Operator COPY Function CPE ID UNMATCHED The Drive product code or software number is different Use COPY function for the same product code and software number VAE INV KVA UNMATCH The capacity of the Drive being copied and the capacity in the Digital Operator are different Use COPY function for the same Drive capacity CRE CONTROL U...

Page 191: ... is set for a multi function digital input terminal H1 01 to H1 05 If the parameter write enable input is OFF the parameters cannot be changed Turn it ON and then set the parameters Passwords do not match Only when a password is set If the parameter A1 04 Password and A1 05 Password Setting numbers are different the parameters for the initialize mode cannot be changed Enter the correct password in...

Page 192: ...1 09 Minimum Output Frequency the Drive will not operate Raise the Speed Command to at least the minimum output frequency The motor does not operate when an external run command is input The following causes are possible The Drive is not in Drive mode If the Drive is not in Drive mode it will remain in ready status and will not start Press the MENU key once and press the DATA ENTER key The Drive i...

Page 193: ... and the motor type so be sure to check the specifications The direction of rotation can be reversed by switching any two wires among U TI V T2 and W T3 If the Motor Does Not Put Out Torque or If Acceleration is Slow Use the following information if the motor does not output torque or if acceleration is too slow The stall prevention level during acceleration is too low If the value set for L3 02 S...

Page 194: ...es are generated by standing waves that can occur with certain combinations of Drive carrier frequency and motor cable length Normally the maximum surge voltage is three times the Drive s input power supply voltage i e 1200VAC for a 480VAC Be sure to use a motor with a withstand voltage between the motor phases that is greater than the maximum surge voltage In particular when using a 480VAC Drive ...

Page 195: ...ystem s natural frequency and the carrier frequency This is characterized by the motor running with no noise generation but the machinery vibrates with a high pitched whine To prevent this type of resonance adjust the carrier frequency with parameters C6 02 to C6 05 There may be resonance between an applications characteristic frequency and the output frequency of the Drive To prevent this from oc...

Page 196: ...tor is turning when it is started and the DC injection braking is insufficient This can be prevented by slowing motor rotation by DC injection braking before starting Increase parameter b2 03 DC injection braking time at start setting If the Accepted Speed Command Does Not Rise to the User Speed Command Input The Speed Command is within the jump frequency range When the jump frequency function is ...

Page 197: ...is 10Vdc it is safe to work inside the Drive If not wait until the DC Bus has completely discharged Input Diodes D1 D12 or Q1 The input diodes rectify or transform the three phase input AC voltage into a DC voltage 1 Set a digital multi meter to the Diode Check setting 2 Place the positive red meter lead on terminal R L1 Place the negative black meter lead on terminal 1 Expected reading is about 0...

Page 198: ...5 On Drives without a board mounted contactor release the plunger and verify that the resistance is the ohmic value of the soft charge resistor 6 On Drives with a board mounted contactor verify that the contactor coil measures about 300 ohms The coil can be tested by applying the appropriate voltage to verify the con tacts change states 7 On Drives without a board mounted contactor verify that the...

Page 199: ...itive red meter lead on terminal Place the negative black meter lead on terminal U T1 Expected reading is about 0 5 Volts 9 Place the positive red meter lead on terminal Place the negative black meter lead on terminal V T2 Expected reading is about 0 5 Volts 10 Place the positive red meter lead on terminal Place the negative black meter lead on terminal W T3 Expected reading is about 0 5 Volts 11 ...

Page 200: ...l inspection to ensure the fan turns freely 2 If there is no physical evidence that the fan is bad the motor can be checked with a digital mutli meter 3 Set a digital multi meter to the R x 1 scale 4 Measure across the fan motor terminals If the fan motor is good the measured value should be about 500 ohms If zero ohms are measured conclude that the fan motor is shorted If infinite ohms are measur...

Page 201: ...s information is used to determine when a Drive was built to see if it is within its warranty period The date stamp is located on the lower right side of the Drive Fig 6 2 Date Stamp Location PRD INSP2 96 3 31 YEA Production Manufacture Date Inspector Number 00 7 22 ...

Page 202: ...Diagnostic Troubleshooting 6 30 Notes ...

Page 203: ...nstructions to ensure that the Drive receives the proper maintenance to maintain overall performance E7L Maintenance 2 Periodic Inspection 2 Preventive Maintenance 3 Replacing the H O A Control Panel 4 Replacing The Controller PCB A2 4 Drive Heatsink Cooling Fan Replacement 5 Removing and Replacing the Drive in a Bypass Unit 7 Drive Replacement 7 ...

Page 204: ...Power Applied Item Inspection Corrective Action External terminals mounting bolts connectors etc Are all screws and bolts tight Tighten loose screws and bolts firmly Are connectors tight Reconnect the loose connectors Cooling fins Are the fins dirty or dusty Clean off any dirt and dust with an air gun using clean and dry air at a pressure between 55 85 psi Bypass Operator Interface PCB Bypass Cont...

Page 205: ... Main circuit control voltage 9 AC Power Circuit Devices Conductors Wire Connections Loose lugs screws wires Hot spots on parts Corrosion Bent conductors Breakage cracking or discoloration Check spacing 9 9 9 9 9 9 Transformers Reactors Discoloration or Noise 9 Terminal Blocks Loose damaged 9 DC Bus Capacitors Leakage Ruptures broken expansion Capacitance insulation resistance 9 9 9 Relays Contact...

Page 206: ...the PCB See Fig 6 1 Replacing The Controller PCB A2 The Bypass Controller PCB A2 assembly may be replaced see appendix F for part numbers The Bypass Controller PCB A2 is located on the left hand side of the wall mount enclosure adjacent to the door hinge See Fig 1 8 and Fig 6 1 To remove PCB A2 disconnect the ribbon cable connectors at CN102 and CN110 Mark and disconnect the connectors from CN101 ...

Page 207: ...fan from the fan cover and disconnect the power connector See Figure 7 2 4 Open the fan cover on the left and right sides in the direction of arrows 3 and remove the fan cover from the fan Fig 7 2 Cooling Fan Replacement Procedure Installing the Drive Heatsink Cooling Fan 1 Attach the fan cover to the cooling fan Be sure that the air flow direction indicated by the arrows above faces into the Driv...

Page 208: ...B bracket if necessary to which the cards are mounted Remove all cables connected to the Control PCB and remove the cooling fan power connector from the fan board 13 PCB positioned near the top of the Drive 4 Remove the cooling fan power connectors from the gate Drive board 3PCB positioned at the back of the Drive 5 Remove the fan assembly screws and pull out the fan assembly from the Drive 6 Remo...

Page 209: ...ay also be reached through e mail at DriveSupport yaskawa com A Yaskawa distributor should be contacted to replace a Drive that is no longer under warranty When the Drive arrives verify that the Drive is the correct model number Removing the Drive Before installing the new Drive the old Drive must be removed from the Bypass assembly As a safety precaution disconnect the AC power line coming into t...

Page 210: ... Observe the wire and terminal markings for all power wires to ensure correct re wiring to the new Drive The wires are labeled from the factory but re label any wires where labels may no longer be legible Refer to Chapter 2 Electrical Installation and the schematic diagram that was shipped with the original Bypass unit Once all wiring has been disconnected from the Drive the Drive is ready to be r...

Page 211: ... opening in the rear of the Bypass enclosure Line up the holes on the mounting brackets with the holes in the back panel of the Bypass assembly Use the mounting bolts previously removed to re affix the Drive to the Bypass back panel When the new Drive has been mounted in the Bypass enclosure reconnect all power wiring and verify by checking the Bypass schematic Re mount the control ribbon cable to...

Page 212: ...have a file of parameter settings for the PC software DriveWizard which can be used to download these values to the Drive Information and instructions for DriveWizard are available at www drives com 3 Page 2 of the Bypass Schematic has a table of Drive Factory Parameter Settings for Bypass applications of drives The Bypass schematic was delivered as part of the original Bypass assembly and is re p...

Page 213: ...imal to Hex Conversion 30 NOTE 1 Factory settings listed in this appendix are for the Drive only See Table 5 1 and Table 5 2 for E7L Bypass factory settings NOTE 2 In this parameter list the second column Parameter Name LCD Digital Operator Display contains information that appears on the optional LCD display The standard LED display does not show this level of detail For the LED display only the ...

Page 214: ...n be restored by setting A1 03 to 1110 2220 2 Wire Initial 3330 3 Wire Initial 0 to 3330 0 Programming A1 04 Password 1 Enter Password When the value set into A1 04 does NOT match the value set into A1 05 parameters A1 01 thru A1 03 and A2 32 cannot be changed All other parameters determined by A1 01 can be changed Parameter A1 05 can be accessed by displaying parameter A1 04 then press and hold t...

Page 215: ...arameter 17 User Param 17 Programming A2 18 User Parameter 18 User Param 18 Programming A2 19 User Parameter 19 User Param 19 Programming A2 20 User Parameter 20 User Param 20 Programming A2 21 User Parameter 21 User Param 21 Programming A2 22 User Parameter 22 User Param 22 Programming A2 23 User Parameter 23 User Param 23 Programming A2 24 User Parameter 24 User Param 24 Programming A2 25 User P...

Page 216: ...2 Hand Frequency Reference Selection HAND Fref Source Selects the speed command input source in hand mode 0 Operator Digital preset speed d1 01 1 Terminals Analog Input Terminal A1 or Terminal A2 see parameter H3 13 0 or 1 0 Programming b1 13 HAND AUTO During Run Selection HAND AUTO Run Selects if drive will permit switching between HAND and AUTO modes while running 0 Disabled 1 Enabled 0 or 1 0 P...

Page 217: ... input is closed and the digital output is energized 0 0 to 3000 0 0 0sec Programming b4 02 Timer Function OFF Delay Time Delay OFF Timer Used in conjunction with a multi function digital input and a multi function digital output This sets the amount of time the output stays energized after the digital input is opened 0 0 to 3000 0 0 0sec Programming PI Control b5 01 PI Mode Setting PI Mode This p...

Page 218: ... 0 to 25 5 0 0sec Programming b5 18 PI Setpoint Selection PI Setpoint Sel 0 Disabled 1 Enabled 0 or 1 0 Programming b5 19 PI Setpoint Value PI Setpoint Depends on b5 20 0 00 to 100 00 0 00 Programming b5 20 PI Setpoint Display Scaling Setpoint Scaling Set display setting Unit of b5 19 U1 24 and U1 38 0 to 39999 1 Programming b5 21 PI Sleep Input Source PI Sleep Source Input Source Selection for Sl...

Page 219: ...Decel C1 01 Acceleration Time 1 Accel Time 1 Sets the time to accelerate from zero to maximum frequency 0 0 to 6000 0 30 0sec Quick Setting C1 02 Deceleration Time 1 Decel Time 1 Sets the time to decelerate from maximum frequency to zero 30 0sec Quick Setting C1 03 Acceleration Time 2 Accel Time 2 Sets the time to accelerate from zero to maximum frequency when selected via a multi function input 3...

Page 220: ...imit CarrierFreq Min Minimum carrier frequency allowed when C6 02 F 0 4 to 15 0 kHz kVA Dependent Programming C6 05 Carrier Frequency Propor tional Gain CarrierFreq Gain Sets the relationship of output frequency to carrier frequency when C6 02 F 0 to 99 0 Programming Preset Reference Speeds d1 01 Frequency Reference 1 Reference 1 Digital preset speed command 1 Used when b1 01 0 and when in hand mo...

Page 221: ... Programming Jump Frequencies d3 01 Jump Frequency 1 Jump Freq 1 These parameters allow programming of up to three prohibited frequency points for eliminating problems with resonant vibration of the motor machine This feature does not actually eliminate the selected frequency values but will accelerate and decelerate the motor through the prohibited bandwidth 0 0 to 200 0 0 0Hz Programming d3 02 J...

Page 222: ... 480V 230 0V 460 0V Programming E1 06 Base Frequency Base Frequency 0 0 to 200 0 60 0Hz Programming E1 07 Mid Output Frequency A Mid Frequency A 0 0 to 200 0 3 0Hz Programming E1 08 Mid Output Voltage A Mid Voltage A 0 to 255 0 240V 0 to 510 0 480V 18 0VAC Programming E1 09 Minimum Output Frequency Min Frequency 0 0 to 200 0 1 5Hz Programming E1 10 Mid Output Voltage Min Voltage 0 to 255 0 240V 0 ...

Page 223: ...t Active only when a communications option PCB is installed and when b1 01 or b1 02 3 0 Ramp to Stop 1 Coast to Stop 2 Fast Stop 3 Alarm Only 0 to 3 1 Programming F6 02 Detection Selection of Exter nal Fault from Communica tion Option Card EF0 Detection 0 Always detected 1 Detected only during run 0 or 1 0 Programming F6 03 Stopping Method for External Fault from Communication Option Card EF0 Faul...

Page 224: ...xt BaseBlk N O Closed Output transistors forced off Open Normal operation 9 Ext BaseBlk N C Closed Normal Operation Open Output transistors forced off A Acc Dec Ramp Hold Closed Acceleration suspended and speed held Open Normal Operation C Term A2 Enable Closed Terminal A2 is active Open Terminal A2 is disabled F Term Not Used Terminal has no effect 10 MOP Increase Closed Speed Command Increases O...

Page 225: ...a multi function digital output 19 PI Disable Turns off the PI controller and PI setpoint becomes speed command 1B Program Lockout Closed All parameter settings can be changed Open Only speed command at U1 01 can be changed 1C TrimCtl Increase Closed Increase motor speed by value in d4 02 Open Return to normal speed command Not effective when using d1 01 thru d1 04 as a speed command Must be used ...

Page 226: ...ply amount of current as set in parameter b2 09 61 Speed Search 1 When closed as a run command is given drive does a speed searchstartingatmaximumfrequency E1 04 currentdetection 62 Speed Search 2 When closed as a run command is given drive does a speed search starting at speed command current detection 64 Speed Search 3 When opened the Drive performs a baseblock motor coasts When closed the Drive...

Page 227: ... value set in parameter L6 02 for more time than is set in parameter L6 03 C Loss of Ref Closes when the drive has detected a loss of analog speed command Speed command is considered lost when it drops 90 in 0 4 seconds Parameter L4 05 determines drive reaction to a loss of speed command D DB Overheat E Fault Closes when the drive experiences a major fault F Not Used 10 Minor Fault Closes when dri...

Page 228: ...Bias 2 0 100 bias E Motor Temperature See parameters L1 03 L1 04 16 PI Differential 1F Not Used 0 to 1F 2 Programming H3 10 Terminal A2 Gain Setting Terminal A2 Gain Sets the level of the A2 function corresponding to a 10V input in 0 0 to 1000 0 100 0 Programming H3 11 Terminal A2 Bias Setting Terminal A2 Bias Sets the level of the A2 function corresponding to a 0V input in 100 0 to 100 0 0 0 Prog...

Page 229: ... 10V when selected monitor is at 100 output 0 0 to 1000 0 100 0 Programming H4 03 Terminal FM Bias Setting Terminal FM Bias Sets terminal FM output voltage in percent of 10V when selected monitor is at 0 output 110 0 to 110 0 0 0 Programming H4 04 Terminal AM Monitor Selection Terminal AM Sel Selects which monitor will be output on terminals AM and AC 1 Frequency Ref 100 max output frequency 2 Out...

Page 230: ...op 3 Alarm Only 4 Run at d1 04 available when H5 08 1 N2 METASYS or 2 FLN APOGEE 0 to 3 3 Programming H5 05 Communication Error Detection Selection Serial Flt Dtct Enables or disables the communications timeout detection function 0 Disabled A communications loss will NOT cause a communications fault 1 Enabled If communications are lost for more than the time specified in parameter H5 09 a communic...

Page 231: ...ive trips on UV1 fault when power is lost 1 PwrL Ride Thru t Drive will restart if power returns within the time set in L2 02 2 CPU Power Active Drive will restart if power returns prior to internal power supply shut down In order for a restart to occur the run command must be maintained throughout the ride thru period 0 to 2 2 Programming L2 02 Momentary Power Loss Ride thru Time PwrL Ridethru t ...

Page 232: ...l the output frequency will clamp Deceleration will continue once the DC bus level drops below the stall prevention level 2 Intelligent The active deceleration rate is ignored and the drive decelerates as fast as possible w o hitting OV fault level 0 to 3 1 Programming L3 05 Stall Prevention Selection During Run StallP Run Sel 0 Disabled Drive runs a set frequency A heavy load may cause the drive ...

Page 233: ...tinuing fault condition e g an OV fault the Drive waits L5 03 seconds before attempting another restart 0 5 to 600 0 180 0sec Quick Setting Torque Detection L6 01 Torque Detection Selection 1 Load Detection Determines the drive s response to an overtorque undertorque condition Overtorque and Undertorque are determined by the settings in parameters L6 02 and L6 03 0 Disabled 1 OL SpdAgree Alm Overt...

Page 234: ...unning and for L8 11 seconds after RUN is removed 1 Fan Always On Cooling fan operates whenever drive is powered up 0 or 1 0 Programming L8 11 Heatsink Cooling Fan Operation Delay Time Fan Delay Time When L8 10 0 this parameter sets a delay time for Cooling Fan de energization after the run command is removed 0 to 300 300sec Programming L8 12 Ambient Temperature Setting Ambient Temp When the drive...

Page 235: ...p is complete and the Drive output is shut off 0 0 to 10 0 1 0sec Programming n3 04 High Slip Braking Overload Time HSB OL Time Sets the time required for a HSB Overload Fault to occur when the Drive output frequency does not change for some reason during a HSB stop Normally this does not need to be adjusted 30 to 1200 40sec Programming Monitor Select o1 01 User Monitor Selection User Monitor Sel ...

Page 236: ...ows storing of current parameter values as a User Initialization Selection at parameter A1 03 0 No Change No user parameter set active 1 Set Defaults Saves current parameter settings as user initialization A1 03 now allows selecting 1110 for user initialization 2 Clear All Clears the currently saved user initialization A1 03 no longer allows selecting 1110 0 to 2 0 Programming o2 04 Drive kVA Sele...

Page 237: ...d Key Enables or disables the Hand key on the digital operator 0 Disabled 1 Enabled 0 or 1 1 Programming COPY Function o3 01 Copy Function Selection Copy Function Sel This parameter controls the copying of parameters to and from the digital operator 0 COPY SELECT no function 1 INV OP READ All parameters are copied from the drive to the digital operator 2 OP INV WRITE All parameters are copied from...

Page 238: ...al Status Input Term Sts Displays Drive input terminal status U1 11 Output Terminal Status Output Term Sts Output terminal ON OFF Check U1 12 Drive Operation Status Int Ctl Sts 1 0 1 FWD run Terminal S1 is ON 1 REV run Terminal S2 is ON 1 Multi function input 1 Terminal S3 is ON 1 Multi function input 2 Terminal S4 is ON 1 Multi function input 3 Terminal S5 is ON 1 Multi function input 4 Terminal ...

Page 239: ...OPE Detected Displays the parameter number causing an OPE fault U1 36 PI Input PI Input Displays the error in the PI regulator U1 36 PI Setpoint PI Feedback U1 37 PI Output PI Output Displays the output of the PI as a percentage of maximum frequency E1 04 U1 38 PI Setpoint PI Setpoint Displays the setpoint of the PI regulator U1 38 PI reference PI bias U1 39 Memobus Communication Error Code Transm...

Page 240: ...put Voltage U2 08 DC Bus Voltage at Most Recent Fault DC Bus Voltage U2 09 Output Power at Most Recent Fault Output kWatts U2 11 Input Terminal Status at Most Recent Fault The format is the same as for U1 10 Input Term Sts U2 12 Output Terminal Status at Most Recent Fault The format is the same as for U1 11 Output Term Sts U2 13 Drive Operation Status at Most Recent Fault The format is the same as...

Page 241: ...ault Message 5 U3 10 6th Most Recent Fault Fault Message 6 U3 11 7th Most Recent Fault Fault Message 7 U3 12 8th Most Recent Fault Fault Message 8 U3 13 9th Most Recent Fault Fault Message 9 U3 14 10th Most Recent Fault Fault Message 10 U3 15 Cumulative Operation Time at 5th Most Recent Fault Elapsed Time 5 U3 16 Cumulative Operation Time at 6th Most Recent Fault Elapsed Time 6 U3 17 Cumulative Op...

Page 242: ... 65 41 16 10 66 42 17 11 67 43 18 12 68 44 19 13 69 45 20 14 70 46 21 15 71 47 22 16 72 48 23 17 73 49 24 18 74 4A 25 19 75 4B 26 1A 76 4C 27 1B 77 4D 28 1C 78 4E 29 1D 79 4F 30 1E 80 50 31 1F 81 51 32 20 82 52 33 21 83 53 34 22 84 54 35 23 85 55 36 24 86 56 37 25 87 57 38 26 88 58 39 27 89 59 40 28 90 5A 41 29 91 5B 42 2A 92 5C 43 2B 93 5D 44 2C 94 5E 45 2D 95 5F 46 2E 96 60 47 2F 97 61 48 30 98 ...

Page 243: ...arameters B 1 Appendix B Capacity Related Parameters This appendix lists the parameters affected by the Drive Capacity setting of o2 04 Drive Capacity 2 Parameters Affected by o2 04 3 Capacity Related Parameter Values 4 ...

Page 244: ...ection Voltage Model Number o2 04 Setting Nominal Hp 208 240VAC CIMR E7U20P4 0 0 5 0 75 CIMR E7U20P7 1 1 CIMR E7U21P5 2 1 5 2 CIMR E7U22P2 3 3 CIMR E7U23P7 4 5 CIMR E7U25P5 5 7 5 CIMR E7U27P5 6 10 CIMR E7U2011 7 15 CIMR E7U2015 8 20 CIMR E7U2018 9 25 CIMR E7U2022 A 30 CIMR E7U2030 B 40 208 230VAC CIMR E7U2037 C 50 CIMR E7U2045 D 60 CIMR E7U2055 E 75 CIMR E7U2075 F 75 100 CIMR E7U2090 10 125 CIMR E...

Page 245: ...rier Frequency Selection CarrierFreq Sel E2 01 Motor Rated Current Motor Rated FLA E2 03 Motor No Load Current No Load Current E2 05 Motor Line to Line Resistance Term Resistance L2 02 Momentary Power Loss Ride thru Time PwrL Ridethru t L2 03 Momentary Power Loss Minimum Base Block Time PwrL Baseblock t L2 04 Momentary Power Loss Voltage Recovery Ramp Time PwrL V F Ramp t L8 02 Overheat Pre Alarm ...

Page 246: ...27P5 10 72 69 15kHz 26 6 8 0 0 288 1 0 0 7 0 3 95 C 17 2011 15 70 44 8kHz 39 7 11 2 0 230 1 0 0 8 0 3 95 C 21 2015 20 63 13 10kHz 53 0 15 2 0 138 2 0 0 9 0 3 90 C 17 2018 25 57 87 10kHz 65 8 15 7 0 101 2 0 1 0 0 6 100 C 15 2022 30 51 79 10kHz 77 2 18 5 0 079 2 0 1 0 0 6 90 C 24 2030 40 46 27 10kHz 105 0 21 9 0 064 2 0 1 1 0 6 90 C 20 2037 50 38 16 5kHz 131 0 38 2 0 039 2 0 1 1 0 6 95 C 18 2045 60 ...

Page 247: ... 4018 30 115 74 10kHz 52 3 7 8 0 403 2 0 1 0 0 6 98 C 17 4030 40 92 54 8kHz 65 6 10 9 0 269 2 0 1 1 0 6 85 C 20 4030 50 92 54 8kHz 65 6 10 9 0 269 2 0 1 1 0 6 85 C 20 4037 60 76 32 8kHz 79 7 19 1 0 155 2 0 1 1 0 6 85 C 20 4045 75 71 56 8kHz 95 0 22 0 0 122 2 0 1 2 0 6 90 C 20 4055 100 67 20 5kHz 130 0 24 0 0 088 2 0 1 2 1 0 90 C 20 4075 125 46 20 5kHz 130 0 36 0 0 092 2 0 1 3 1 0 98 C 16 4090 150 ...

Page 248: ...Capacity Related Parameters B 6 Notes ...

Page 249: ...Specifications C 1 Appendix C Specifications This appendix details the standard Drive Specifications Standard Drive and Bypass Specifications 2 208 240 VAC 2 480 VAC 3 All Voltages 4 ...

Page 250: ... 23 0 31 0 46 2 59 4 74 8 88 0 Drive max output voltage V 3 phase 200 208 220 230 or 240VAC Proportional to input voltage Drive max output frequency Hz 120 Hz Rated voltage V Rated frequency Hz 3 phase 200 208 220 230 240VAC 50 60 Hz Rated input current A 4 3 5 5 9 4 13 20 24 37 53 70 89 98 Allowable voltage fluctuation 10 15 Allowable frequency fluctuation 5 Measures for power supply harmonics DC...

Page 251: ...7 Motor HP 460V 15 20 25 30 40 50 60 Bypass rated output current A 21 27 34 40 52 65 77 Drive Model Number CIMR E7U 4009 4011 4015 4018 4024 4030 4037 Drive rated output capacity kVA 17 0 21 0 26 0 30 0 41 0 51 0 59 0 Drive rated output current A 21 0 27 0 34 0 40 0 52 0 67 2 77 0 Drive max output voltage V 3 phase 380 400 415 440 460 or 480VAC Proportional to input voltage Drive max output freque...

Page 252: ...rmer motor circuit protector disconnect motor overload relay selector switches and indicating lights Motor protection Protection by electronic thermal overload relay Fuse blown protection Stops for fuse blown Overload capacity and maximum current 110 of rated output current for 60 seconds Overvoltage protection 208 240VAC Stops when main circuit DC voltage is above 410 V 480VAC Stops when main cir...

Page 253: ...n 2 Using Modbus Communication 3 Modbus Communication Configuration 3 Communication Specifications 3 Communication Connection Terminal 4 Procedure for Setting Up Communication 4 Modbus Function Code Details 8 Modbus Data Tables 10 Modbus Self Diagnosis 15 Metasys N2 Point Database 16 Metasys N2 Analog Input AI Summary 16 Metasys N2 Analog Output AO Summary 17 Metasys N2 Binary Input BI Summary 18 ...

Page 254: ...ters Control Drive Auto Run Stop Bypass Auto Run Stop Drive Auto Speed Command Drive Auto PI Setpoint If DIP switch S2 2 is set to power up the E7L in the OFF mode the factory default and a serial communication run command exists then a DNE Drive Not Enabled alarm will be displayed when the unit is first powered Pressing HAND or AUTO will eliminate the alarm Pressing Reset or Menu will temporarily...

Page 255: ...hat the master can perform serial communication using that address Slaves receiving commands from the master perform the specified functions and send a response back to the master Fig D 1 Example of Connections between Master and Drive Communication Specifications The Modbus communication specifications are shown below Table D 1 Modbus Communication Specifications Item Specifications Interface RS ...

Page 256: ...and the Drive 2 Turn ON the input power to the Drive 3 Set the required communication parameters H5 01 to H5 09 using the Digital Operator 4 Turn OFF the input to the Drive power and check that the Digital Operator display has completely disappeared 5 Turn ON the input power to the Drive once again 6 Perform communication with the DDC IMPORTANT 1 Separate the communication cables from the main cir...

Page 257: ...5 03 Communication Parity Selection Serial Com Sel Selects the communication parity for terminals R R S and S 0 No Parity 1 Even Parity 2 Odd Parity 0 to 2 0 Programming H5 04 Stopping Method after Communication Error Serial Fault Sel Selects the stopping method when a communication error is detected 0 Ramp to Stop 1 Coast to Stop 2 Fast Stop 3 Alarm Only 4 Run at D1 04 0 to 3 3 Programming H5 05 ...

Page 258: ...es as shown below Data Configure consecutive data by combining the storage register address test code for a loopback address and the data the register contains The data length changes depending on the command details Slave address Function code Data Error check Table D 3 Modbus Function Codes Function Code Hexadecimal Function Command Message Response Message Min Bytes Max Bytes Min Bytes Max Byte...

Page 259: ...tory setting for CRC 16 communication is typically zero but when using the Modbus system set the factory setting to one e g set all 16 bits to 1 2 Calculate CRC 16 using MSB as slave address LSB and LSB as the MSB of the final data 3 Calculate CRC 16 for response messages from the slaves and compare them to the CRC 16 in the response messages ...

Page 260: ...ress 02H Slave Address 02H Slave Address 02H Function Code 03H Function Code 03H Function Code 83H Start Address Higher 00H Data quantity 08H Error code 03H Lower 20H 1st storage register Higher 00H CRC 16 Higher F1H Quantity Higher 00H Lower 65H Lower 31H Lower 04H Next storage register Higher 00H CRC 16 Higher 45H Lower 00H Lower F0H Next storage register Higher 00H Lower 00H Next storage regist...

Page 261: ...sage Response Message During Normal Operation Response Message During Error Slave address 01H Slave address 01H Slave address 01H Function code 08H Function code 08H Function code 89H Test Code Higher 00H Test Code Higher 00H Error Code 01H Lower 00H Lower 00H CRC 16 Higher 86H Data Higher A5H Data Higher A5H Lower 50H Lower 37H Lower 37H CRC 16 Higher DAH CRC 16 Higher DAH Lower 8DH Lower 8DH Com...

Page 262: ...ts B to F Not used 0002H Frequency reference Set units using parameter o1 03 0003H to 0005H Not used 0006H PI Setpoint 0007H Analog output 1 setting 11 V 726 to 11 V 726 10V 660 0008H Analog output 2 setting 11 V 726 to 11 V 726 10V 660 0009H Multi function contact output setting Bit 0 Digital output 1 Terminal M1 M2 1 ON 0 OFF Bit 1 Digital output 2 Terminal M3 M4 1 ON 0 OFF Bit 2 Not Used Bits 3...

Page 263: ...eat OH1 OH2 Bit 4 Not used Bit 5 Fuse blown PUF Bit 6 PI feedback reference lost FbL Bit 7 External error EF EFO Bit 8 Hardware error CPF Bit 9 Motor overload OL1 or overtorque 1 OL3 detected Bit A PG broken wire detected PGO Overspeed OS Speed deviation DEV Bit B Main circuit undervoltage UV detected Bit C Main circuit undervoltage UV1 control power supply error UV2 inrush prevention circuit erro...

Page 264: ...e detection 1 Detected Bit C Frequency reference lost 1 Lost Bit D Retrying error 1 Retrying Bit E Error including Modbus communications time out 1 Error occurred Bit F Modbus communications time out 1 Timed out 002DH Multi function digital output status Bit 0 Multi function digital output 1 terminal M1 M2 1 ON 0 OFF Bit 1 Multi function digital output 2 terminal M3 M4 1 ON 0 OFF Bit 2 Not used Bi...

Page 265: ...ignal Bit 0 Run command 1 Operating 0 Stopped Bit 1 Reverse operation command 1 Reverse 0 Forward Bits 2 and 3 Not used Bit 4 External error 1 Fault set using H1 01 Bit 5 Error Fault 1 Reset command set using H1 02 Bits 6 to B Not used Bit C Multi function digital input terminal S5 input Bit D Multi function digital input terminal S6 input Bit E Multi function digital input terminal S7 input Bit F...

Page 266: ...ackets being read or written is outside the range of 1 to 16 In write mode the number of data packets in the message is not No of packets x 2 21H Data setting error Upper limit or lower limit error has occurred in the control data or when writing parameters When writing parameters the parameter setting is invalid 22H Write mode error Attempting to write parameters to the Drive during run Attemptin...

Page 267: ... 05 Terminal S7 Function Selection to 67 Com Test Mode 2 Turn OFF the power supply to the Drive 3 Perform wiring according to the following diagram while the power supply is turned OFF 4 Turn ON the terminating resistance Turn ON pin 1 on DIP switch 1 5 Turn ON the power supply to the Drive again Fig D 10 Communication Terminal Connection for Self Diagnosis Function 6 During normal self diagnostic...

Page 268: ...TION ERROR CODE U1 39 AI 16 PI DEVIATION 0 01 U1 36 AI 17 PI OUTPUT CAPACITY 0 01 U1 37 AI 18 PI REFERENCE 0 01 U1 38 AI 19 LAST FAULT CODE U2 02 AI 20 FREQ REF FAULT 0 01Hz U2 03 AI 21 OUTPUT FREQ FAULT 0 01Hz U2 04 AI 22 OUTPUT CURRENT FAULT 0 1A U2 05 AI 23 OUT VOLT REF FAULT 0 1VAC U2 07 AI 24 DC BUS VOLTS FAULT 1Vdc U2 08 AI 25 OUTPUT POWER FAULT 0 1Kw U2 09 AI 26 INPUT TERM STATUS FAULT U2 1...

Page 269: ...ATED CURRENT A Motor model dependent E2 01 AO 14 JUMP FREQUENCY 1 0 1Hz 0 0 d3 01 AO 15 JUMP FREQUENCY 2 0 1Hz 0 0 d3 02 AO 16 JUMP FREQUENCY 3 0 1Hz 0 0 d3 03 AO 17 JUMP FREQUENCY BANDWIDTH 0 1Hz 1 0 d3 04 AO 18 NUMBER OF AUTO RESTARTS 0 L5 01 AO 19 OPERATOR DISPLAY MODE 0 o1 03 AO 20 POWER LOSS RIDE THROUGH SEC Drive model dependent L2 02 AO 21 CABLE LOSS TIME OUT SEC 2 0 H5 09 AO 22 CABLE LOSS ...

Page 270: ...CLOSED SAFETY SET TERMINAL 3 OPEN BI 14 HAND AUTO REFERENCE MONITOR 0 REMOTE LOCAL BI 15 MULTI FUNCTION INPUT 1 MONITOR 0 OFF ON BI 16 MULTI FUNCTION INPUT 2 MONITOR 0 OFF ON BI 17 MULTI FUNCTION INPUT 3 MONITOR 0 OFF ON BI 18 MULTI FUNCTION INPUT 4 MONITOR 0 OFF ON BI 19 MULTI FUNCTION INPUT 5 MONITOR 0 OFF ON Table D 12 Metasys N2 Binary Output Summary Metasys N2 to E7 Object ID Object Name Defa...

Page 271: ...troller Writing to a Drive Parameter Two points are defined for writing to any Drive parameter AO 31 Specifies the parameter to be written to AO 32 Entry location of the value to be written to the parameter specified in AO 31 When this point is written to it will write the value to the Drive An ENTER or ACCEPT command does not need to be sent for the data to be taken by the Drive The behavior of t...

Page 272: ...0 U1 03 07 LAI TORQUE 0 PCT 0 1 0 08 LAI POWER 0 KW 0 1 0 U1 08 09 LAI DRIVE TEMP 0 DEG F C 1 0 U1 41 10 LAI DRIVE KWH 0 KWH 0 1 0 U1 29 11 LAI MWH 0 MWH 1 0 U1 30 12 LAI RUN TIME 0 HRS 1 0 U1 13 13 LAI DC BUS VOLT 0 PCT 1 0 U1 07 14 LAI AC OUT VOLT 0 VOLTS V 0 1 0 U1 06 15 LAI PAR N9 01 0 AMPS A 0 01 0 N9 01 16 LAI RUN TIMEX10K 0 10K HR 1 0 U1 13 17 LAI FAULT CODE 0 1 0 U2 01 18 LDI MINOR FLT NO ...

Page 273: ...DISP MD 0 1 0 o1 03 58 LDI MF IN 1 MON OFF 1 0 ON OFF U1 10 Bit 2 59 LDI MF IN 2 MON OFF 1 0 ON OFF U1 10 Bit 3 60 LAO INPUT REF 1 0 HZ 0 01 0 61 LAO INPUT REF 2 0 HZ 0 01 0 d1 02 62 LAI PID FEEDBACK 0 PCT 0 01 0 U1 24 63 LAO PID P GAIN 1 0 01 0 b5 02 64 LAO PID I TIM 1 SEC 0 1 0 b5 03 65 LDO PID MODE SEL DISABLE 1 0 ENABLE DISABLE b5 01 66 LAI LST FLT CODE 0 1 0 U2 02 67 LAI FREF FLT 0 HZ 0 01 0 ...

Page 274: ... OUT CAP 0 PCT 0 01 0 U1 37 88 LAI PID REF 0 PCT 0 01 0 U1 38 89 LAI COM ERR CD 0 1 0 U1 39 90 LDO COM FLT ENA DISABLE 1 0 ENABLE DISABLE H5 05 91 LAO CBL LOSS FRQ 0 HZ 0 01 0 d1 04 92 LAO CBL LOSS TMR 2 SEC 0 1 0 H5 09 93 LDI OK FAULT OK 1 0 FAULT OK U1 12 Bit 7 94 LDO RESET FAULT NO 1 0 RESET NO 95 LDI DRV COM ERR NO FLT 1 0 FAULT NO FLT 96 LDO EXTERNAL FLT OK 1 0 FAULT OK 97 LDI MF IN 5 MON OFF...

Page 275: ... 32767 U1 30 12 RUN TIME HR 1 0 0 0 32767 U1 13 13 DC BUS VOLT VOLTS 1 0 kVA Dep 0 4000 U1 07 14 AC OUT VOLT VOLTS 1 0 0 0 kVA Dep U1 06 15 DRV RATED AMP AMPS 0 01 or 0 1 0 0 0 kVA Dep n9 01 16 RUN TIME x 10K 10K HR 1 0 0 0 32767 U1 13 17 FAULT CODE ERR CD 1 0 0 0 U2 01 62 PID FEEDBACK HZ 0 01 0 0 0 40 U1 24 66 LST FLT CODE 1 0 0 U2 02 67 FREF FLT HZ 0 01 0 0 0 400 U2 03 68 OUT FREQ FAULT HZ 0 01 ...

Page 276: ...0 1 0 0 0 400 d3 01 50 JUMP FREQ 2 HZ 0 1 0 0 0 400 d3 02 51 JUMP FREQ 3 HZ 0 1 0 0 0 400 d3 03 52 JUMP FREQ BW HZ 0 1 0 1 0 20 d3 04 53 NUM AUTOSTRT 1 0 0 0 10 L5 01 54 PWR LOSS RT SEC 0 1 0 0 0 25 5 L2 02 55 RUN OP MODE 1 0 1 0 3 b1 02 56 REF OP MODE 1 0 1 0 3 b1 01 57 OPER DISP MD 1 0 0 0 32767 o1 03 60 INPUT REF 1 HZ 0 01 0 0 0 400 61 INPUT REF 2 HZ 0 01 0 0 0 400 d1 02 63 PID P GAIN 0 01 0 1 ...

Page 277: ...43 SAFETY ILOCK 1 0 0 0 1 OFF ON 58 MF IN 1 MON 1 0 0 0 1 OFF ON U1 10 Bit 2 59 MF IN 2 MON 1 0 0 0 1 OFF ON U1 10 Bit 3 74 MF IN 3 MON 1 0 0 0 1 OFF ON U1 10 Bit 4 78 MF IN 4 MON 1 0 0 0 1 OFF ON U1 10 Bit 5 93 OK FAULT 1 0 0 0 1 NO FLT FAULT U1 12 Bit 7 95 DRV COM ERR 1 0 0 0 1 NO FLT FAULT 97 MF IN 5 MON 1 0 0 0 1 OFF ON U1 10 Bit 6 Table D 17 APOGEE FLN Application 2721 Logical Digital Output ...

Page 278: ...o 73 Entry location of the value to be written to the parameter specified in Point 72 When this point is written to it will write the value to the Drive An enter or accept command does not need to be sent for the data to be taken by the Drive The behavior of the write is the same as with the digital operator If the Drive is running there are a limited number of Drive parameters that can be written...

Page 279: ...Communications D 27 Note ...

Page 280: ...Communications D 28 ...

Page 281: ...ppendix E Peripheral Devices This appendix describes recommended branch short circuit protection and peripheral devices Branch Circuit Short Circuit Protection E 2 Branch Circuit Overload Protection E 5 Peripheral Devices E 6 ...

Page 282: ...e Time MCCB or Instantaneous Trip MCP Voltage Rating 600V Table E 1 Recommended Fuse and Circuit Breaker Ratings per NEC 208 240Vac Input Model CIMR E7U Hp Input Amps 1 Continuous Rating Output Amps 1 Continuous Rating Fuse Selection Criteria Circuit Breaker Selection Criteria Maximum Time Delay Fuse Rating A Maximum Non Time Delay Fuse Rating A Maximum CB Rating A 20P4 0 5 0 75 4 3 3 6 6 12 15 20...

Page 283: ...12 5 25 30 30 47P5 10 20 17 30 30 40 4011 15 33 27 45 50 60 4011 20 33 27 45 50 60 4015 25 40 34 60 70 80 4018 30 48 40 70 80 90 4022 55 50 4 80 80 100 4030 40 74 67 2 100 100 125 4030 50 74 67 2 100 100 125 4037 60 85 77 125 125 150 4045 75 106 96 150 150 200 4055 100 134 125 200 200 225 4075 125 172 156 250 250 300 4090 150 198 180 300 300 400 4110 200 264 240 350 350 450 4132 286 260 400 400 60...

Page 284: ...S70 4 500V 70A Bussmann FWH 80B 500V 80A 2011 Ferraz A50P80 4 500V 80A Ferraz A50QS100 4 500V 100A Bussmann FWH 100B 500V 100A 2015 Ferraz A50P125 4 500V 125A Ferraz A50QS150 4 500V 150A Bussmann FWH 175B 500V 175A 2018 Ferraz A50P150 4 500V 150A Ferraz A50QS175 4 500V 175A Bussmann FWH 200B 500V 200A 2022 Ferraz A50P150 4 500V 150A Ferraz A50QS200 4 500V 200A Bussmann FWH 200B 500V 200A 2030 Ferr...

Page 285: ...A70P50 4 700V 50A Ferraz A50QS50 4 500V 50A Bussmann FWH 80B 500V 80A 4015 Ferraz A70P70 4 700V 70A Ferraz A50QS80 4 500V 80A Bussmann FWH 100B 500V 100A 4018 Ferraz A70P80 4 700V 80A Ferraz A50QS100 4 500V 100A Bussmann FWH 125B 500V 125A 4022 Ferraz A70P80 4 700V 80A Ferraz A50QS100 4 500V 100A Bussmann FWH 125B 500V 125A 4030 Ferraz A70P100 4 700V 100A Ferraz A50QS125 4 500V 125A Bussmann FWH 1...

Page 286: ...0P4 thru E7U4018 on a power supply transformer with a capacity of 600kVA or more install an AC or DC reactor The reactor improves the input power factor and provides protection to the rectifier circuit within the Drive Noise filter Use a noise filter exclusively for the Drive if radio noise generated from the Drive causes other control devices to malfunction CAUTION Never connect a general LC RC n...

Page 287: ...8 230 240 VAC 2 Primary Drive Replacement Parts 480 VAC 3 Bypass Replacement Parts 4 Note Part numbers listed in Appendix F are for units being produced at the date of publication When purchasing replacement parts confirm with Yaskawa Customer Service Center 800 927 5297 that part numbers ordered are compatible with the Drive or Bypass unit serial numbers specific to the installation ...

Page 288: ...1 S3010 SID003108 D1 D12 Table F 1 208 240VAC Primary Parts Continued Drive Model CIMR E7U Nominal Hp Power Module Transistor Module DC Bus Fuse Heat Sink Fan Internal Fan 20P4 0 5 0 75 STR001297 Q1 Inside the Power Module FU 002029 F1 N A N A 20P7 1 STR001297 Q1 Inside the Power Module FU 002029 F1 N A N A 21P5 1 5 2 STR001299 Q1 Inside the Power Module FU 002029 F1 N A N A 22P2 3 STR001301 Q1 In...

Page 289: ... F 2 480VAC Primary Parts Continued DriveModel CIMR E7U Nominal Hp Power Module Transistor Module DC Bus Fuse Heat Sink Fan Internal Fan 40P4 0 5 0 75 STR001298 Q1 Inside the Power Module FU 002029 F1 N A N A 40P7 1 STR001298 Q1 Inside the Power Module FU 002029 F1 N A N A 41P5 1 5 2 STR001298 Q1 Inside the Power Module FU 002029 F1 N A N A 42P2 3 STR001298 Q1 Inside the Power Module FU 002029 F1 ...

Page 290: ...5P32 95 5P37 177 5P58 1008 5P17 0356 FNQ R 1 1 2 UFU000029 FWH 25A14F URX000048 5P652 0213 5P620 0134 UFI000035 E7U23P7QA 5 A015 USW000121 5P32 95 5P32 95 5P37 179 5P58 1008 5P17 0356 FNQ R 1 1 2 UFU000131 FWH 45B URX000052 URX000048 5P620 0136 UFI000036 E7U25P5QA 7 5 A022 USW000121 5P32 96 5P32 96 5P37 180 5P58 1008 5P17 0356 FNQ R 1 1 2 5P617 0347 FWH 80B URX000053 URX000052 URX000083 UFI000037 ...

Page 291: ... DIGITAL OPERATOR JVOP161 CDR001104 OPTIONAL LCD DIGITAL OPERATOR JVOP162 CDR001115 FRONT CONTROL PANEL WITH LED DRIVE KEYPAD UTC000046 FRONT CONTROL PANEL WITH LCD DRIVE KEYPAD UTC000047 CONTROL PCB A2 UTC000044 W1 AND W2 RIBBON CABLE 26 PIN H O A KEYPAD TO PCB A2 CN110 UWR00562 1 W1 RIBBON CABLE 44 PIN DRIVE CONTROL PCB CN8 TO PCB A2 CN102 UWR00563 1 W2 RIBBON CABLE 44 PIN DRIVE CONTROL PCB CN8 ...

Page 292: ...Spare Parts F 6 ...

Page 293: ... 4 Selector Key 1 10 3 2 3 3 SEQ Indicator 3 4 Speed Command 2 11 5 6 5 12 5 25 Auto Restart 5 65 Faults Covered 5 66 Restart Time After Fault 5 5 5 65 Number of Attempts 5 65 Parameters A 21 Auto Tuning Fault Displays and Processing 6 17 How to 5 80 Line to Line Resistance A 11 Menu 3 11 3 21 Motor Rated Current 5 47 5 80 A 25 Motor Rated Power 5 80 A 25 DriveWizard 5 80 Auto Transfer to Bypass 1...

Page 294: ...onnector CN8 7 8 Fuses 6 3 to 6 5 Inspecting 7 2 Layout 6 5 Spare Parts F 5 Specification 6 2 Testing 6 3 Maintenance Mode 6 2 Troubleshooting 6 4 Power Fuse 1 13 F 4 Indicator 3 6 3 9 Transformer 1 13 Troubleshooting Drive 6 6 6 26 Terminal Functions 1 12 2 20 Wiring 2 5 2 6 2 8 2 12 2 20 Precautions 2 19 Control Panel 1 10 3 1 to 3 22 6 2 7 4 F 5 Indicating Lights 3 2 3 9 3 10 4 10 Selector Keys...

Page 295: ...18 Keys 3 3 LCD Brightness Adjustment 5 74 A 24 LEDs Lights 3 2 3 4 3 5 Operational Status Indicators 3 4 Optional LCD 5 2 5 26 Power up Monitor Selection 5 72 Preventive Maintenance 7 3 Replacement Part F 5 Write protected 5 78 6 18 A 25 Digital Outputs 2 9 Connection Diagram 2 19 2 20 2 24 Control Circuit Terminals 2 15 Parameters 5 53 A 15 Programming via DIP Switches 2 9 Troubleshooting 6 4 Di...

Page 296: ...ield Service 6 6 Field Wiring 1 12 2 2 2 3 2 8 2 18 FLA Motor 1 3 4 4 4 7 5 47 5 80 A 11 A 25 B 3 Flash ID A 27 Floating Point Control Up Down Control 6 16 MOP Increase Decrease 5 43 5 50 A 9 A 12 Forward Run Stop Command 2 10 2 18 2 20 4 14 5 11 A 4 Frequency Detection A 15 Frequency Output Accuracy C 4 Command Selection 5 7 5 12 Jump 5 42 6 23 6 24 A 9 Lower Limit 5 46 6 16 A 9 Max Output 5 45 A...

Page 297: ...8 Humidity 1 19 7 3 C 4 Hunting Prevention Parameters A 23 Troubleshooting 6 23 I IGBT Transistor Module Inspecting 7 2 Spare Parts F 2 F 3 Testing 6 27 INCREASE Key 3 3 3 22 5 75 Troubleshooting 6 19 Indicator Charge 2 3 4 7 6 25 7 7 7 8 C 4 Indicating LEDs 3 2 to 3 10 Abnormal 3 10 Fault 3 10 Normal 3 9 Initialization kWh Monitor 5 77 Parameters 5 10 5 11 A 2 User 4 6 5 5 5 75 A 24 Input Control...

Page 298: ...4 Stopping Method at Error D 5 Terminals 2 14 2 21 Mode Selection 1 12 3 2 3 4 5 6 5 25 Model Number 1 2 to 1 7 C 2 Drive 1 2 1 7 7 7 A 24 A 25 B 2 C 2 Modified Constants Parameters Menu 3 11 3 20 Molded Case Circuit Breaker MCCB 2 7 Momentary Power Loss Ride thru 5 21 5 60 5 66 A 5 A 19 B 3 C 4 Monitor 2 20 3 14 A 17 D 10 Configuration 2 13 5 26 5 71 Parameter List 3 14 A 26 A 27 Power On Monitor...

Page 299: ...F 2 F 3 Testing 6 27 Voltage Monitor U1 06 A 26 Outputs Analog 2 13 2 20 A 17 A 18 Outputs Digital 2 9 2 15 2 19 2 24 5 53 A 15 Over Current OC 4 6 5 66 6 10 Overheat OH Alarms Faults 5 69 6 10 6 14 A 19 A 22 B 3 And Auto Restart 5 66 Cooling Fin Heatsink 6 10 6 14 7 2 A 22 C 4 Drive 1 19 A 22 Motor 6 10 6 14 6 22 A 19 Parameters A 19 A 22 Pre Alarm 6 14 A 22 Overload Alarms Faults 2 9 3 10 6 10 6...

Page 300: ...to 5 32 6 9 6 14 A 6 Differential 5 57 A 16 Loss Detection 5 32 A 6 Reference Missing Detection 5 31 A 5 Square Root Activation 5 36 A 6 Integral Limit Setting 5 30 A 5 Integral Time Setting 5 29 A 5 Offset Adjustment 5 30 A 5 Output 5 30 A 5 Gain Setting 5 31 A 5 Level Selection 5 31 A 5 Limit 5 30 A 5 Primary Delay Time Constant 5 31 A 5 Square Root Monitor 5 37 A 6 Parameters 5 23 to 5 37 A 5 A...

Page 301: ... 21 RUN Indicator 3 2 3 5 Running Signal Digital Output 2 9 Stall Prevention during 5 63 6 21 A 20 S Safety Circuit 2 10 2 20 3 7 4 2 4 4 4 13 A 14 Scaling Display Digital Operator 5 73 A 23 PI Setpoint 5 33 A 6 Schematic Diagram 2 7 2 18 2 22 S Curve Characteristic A 7 SEQ 3 4 Selector Keys 1 10 3 2 4 10 4 12 Sequence Parameters A 4 Serial Communications D 2 to D 26 Address D 5 APOGEE FLN D 20 to...

Page 302: ... 7 Inspecting 7 2 Screw Sizes 2 3 Wiring 2 3 Terminals Control Circuit 1 12 2 6 2 8 2 20 Terminating Resistance 2 15 D 3 Three Wire Operation 5 11 Timers Delay A 4 A 5 Timers Elapsed 3 15 5 76 5 77 A 24 A 25 A 27 to A 29 Timer On Delay 5 17 A 4 Top Bracket 7 8 Torque Compensation A 8 Torque Detection 5 67 6 11 6 12 A 21 Torque Output 6 21 Transistor Module Inspecting 7 2 Replacement Parts F 2 F 3 ...

Page 303: ...4 Routing 2 6 Size 2 3 2 19 Wiring Electrical Installation 2 1 Control Circuit 2 8 Diagrams 2 18 2 22 Distances 2 4 Ground 2 5 Main Circuit Configurations 2 7 Terminals 2 2 to 2 6 Shielded Twisted Pair Wires 2 19 Three Wire Control 5 11 Two Wire Control 5 11 Z Zero speed output signal A 15 ...

Page 304: ...Index 12 ...

Page 305: ......

Page 306: ... Fax 44 12 3645 8182 YASKAWA ELECTRIC KOREA CORPORATION Paik Nam Bldg 901 188 3 1 Ga Euljiro Joong Gu Seoul Korea Phone 82 2 776 7844 Fax 82 2 753 2639 YASKAWA ELECTRIC SINGAPORE PTE LTD Head Office 151 Lorong Chuan 04 01 New Tech Park Singapore 556741 Singapore Phone 65 282 3003 Fax 65 289 3003 TAIPEI OFFICE AND YATEC ENGINEERING CORPORATION 10F 146 Sung Chiang Road Taipei Taiwan Phone 886 2 2563...

Reviews: