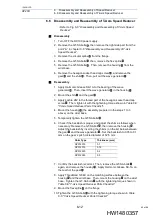
6 Disassembly and Reassembly of Speed Reducer
6.2 Disassembly and Reassembly of L-Axis Speed Reducer
6-3
159281-1CD
HW1480357
HP20D
6.2 Disassembly and Reassembly of L-Axis Speed Reducer
• Refer to
2 “Disassembly and Reassembly of L-Axis Speed
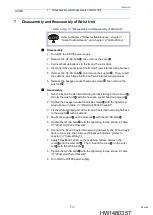
Disassembly
1. Turn OFF the DX100 power supply, then drain grease.
2. Before removing the L-arm , support the L-arm with a chain block,
etc. to prevent it from falling.
3. Remove the hexagon socket head cap screws and . Then,
remove the L-arm from the speed reducer .
4. Remove the GT-SA bolts . Then, remove the speed reducer from
the S-head. (When removing the speed reducer , make sure to pull it
out straight to avoid load on the input gear. If the input gear is
subjected to a load, damage to the motor may result.)
5. Remove the old sealing bond on the L-arm and the S-head.
Reassembly
1. Apply ThreeBond 1206C on the matching surface between the speed
reducer and the S-head. Then, mount the speed reducer on the
S-head. (When mounting, make sure not to apply a load on the input
gear.)
2. Tighten the GT-SA bolts with the tightening torque shown in
2 "L-Axis Speed Reducer Parts Checklist"
.
3. Apply ThreeBond 1206C on the matching surface between the speed
reducer and the L-arm . Then, mount the L-arm on the speed
reducer .
4. Tighten the hexagon socket head cap screws and with the
5. Replenish grease (VIGO Grease RE No.0) through the grease inlet.
6. Turn ON the DX100 power supply.
3
3
4
5
3
1
2
1
1
3
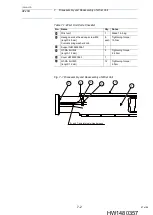
Table 6
-
2: L-Axis Speed Reducer Parts Checklist
No. Name
Qty. Notes
Speed reducer HW0387753-C
1
GT-SA bolt M10
(length: 40 mm)
14
Tightening torque:
82 N•m
L-arm HW0100546-2
1
Hexagon socket head cap screw M12
(length: 40 mm)
Conical spring washer 2H-12
12
each
Tightening torque:
142 N•m
Hexagon socket head cap screw M10
(length: 35 mm)
Conical spring washer 2H-10
6
each
Tightening torque:
82 N•m
1
1
2
1
3
3
1
4
5
1
2
3
4
5
54 of 96


