background image


vi

HW0481893

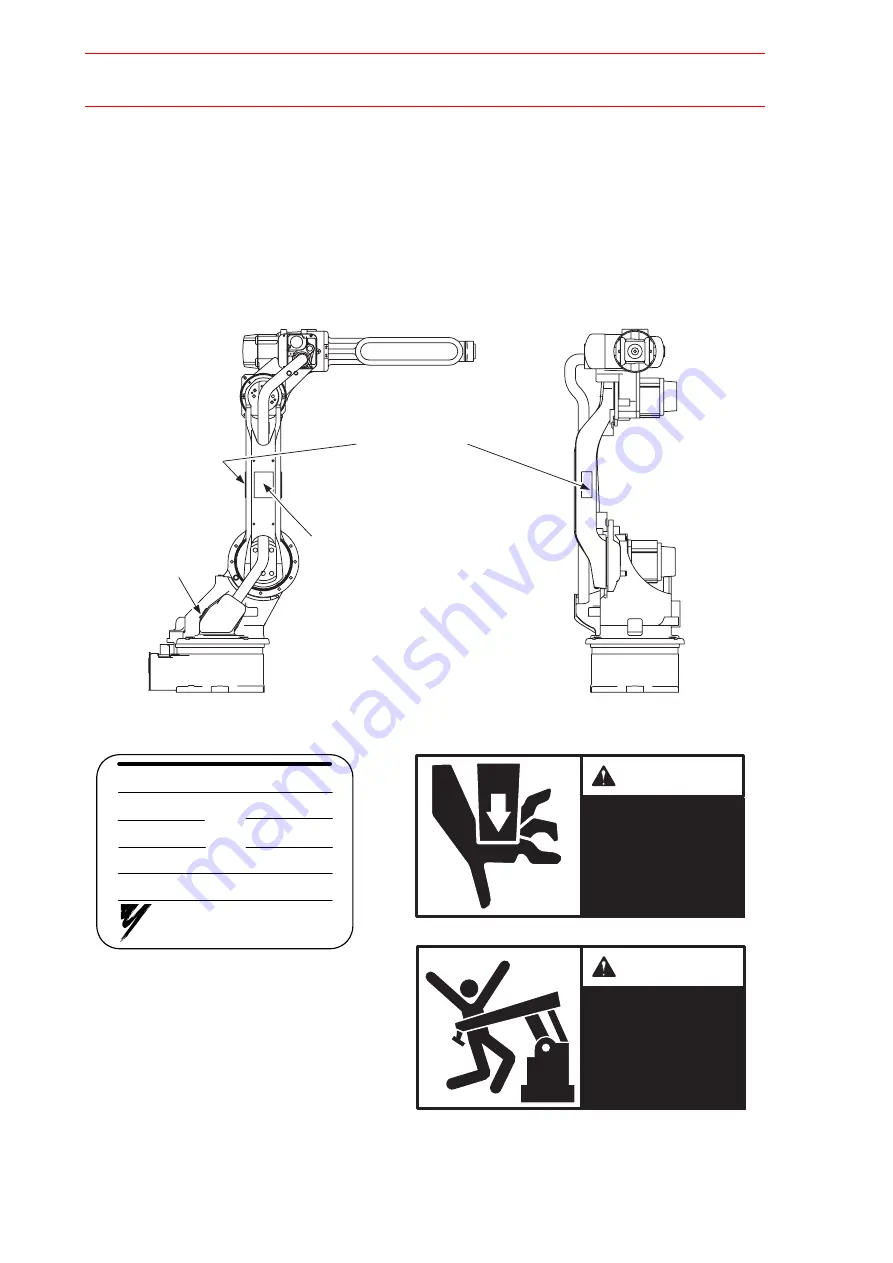
Explanation of Warning Labels

The following warning labels are attached to the manipulator.
Always follow the warnings on the labels.
Also, an identification label with important information is placed on the body of the manipula-
tor. Prior to operating the manipulator, confirm the contents.

Nameplate

WARNING


label


A

WARNING


label


B

MOTOMAN

TYPE

ORDER NO.
      

PAYLOAD


kg

MASS


kg

SERIAL NO.
      

DATE
       

YASKAWA ELECTRIC CORPORATION
JAPAN

Nameplate:

WARNING

Moving parts
may cause
injury

WARNING

Do not enter
robot 
work area.

WARNING label A:

WARNING label B:

Summary of Contents for MOTOMAN-HP6 YR-HP6-A00

Page 1: ...ES Upon receipt of the product and prior to initial operation read these instructions thoroughly and retain for future reference MOTOMAN INSTRUCTIONS MOTOMAN HP6 INSTRUCTIONS NX100 INSTRUCTIONS NX100...

Page 2: ...and photos in this manual are representative examples and differences may exist between them and the delivered product YASKAWA may modify this model without notice when necessary due to product impro...

Page 3: ...es a potentially hazardous situation which if not avoided could result in death or serious injury to personnel Indicates a potentially hazardous situation which if not avoided could result in minor or...

Page 4: ...motion Release of Emergency Stop Observe the following precautions when performing teaching operations within the working envelope of the manipulator View the manipulator from the front whenever possi...

Page 5: ...her necessary processing has been performed Check for problems in manipulator movement Check for damage to insulation and sheathing of external wires Always return the programing pendant to the hook o...

Page 6: ...with important information is placed on the body of the manipula tor Prior to operating the manipulator confirm the contents Nameplate WARNING label A WARNING label B MOTOMAN TYPE ORDER NO PAYLOAD kg...

Page 7: ...le 3 3 3 3 Types of Mounting 3 4 3 3 1 S Axis Operating Range 3 4 3 3 2 Fixing the Manipulator Base 3 4 3 3 3 Precautions to Prevent the Manipulator from Falling 3 4 3 4 Location 3 5 4 Wiring 4 1 Grou...

Page 8: ...ig 28 S Axis Speed Reducer Diagram 9 8 9 2 3 Grease Replenishment Exchange for L Axis Speed Reducer 9 9 Grease Replenishment Refer to Fig 29 L Axis Speed Reducer Diagram 9 9 Grease Exchange Refer to F...

Page 9: ...Maintenance 9 19 Wrist Axes 9 19 Battery Pack Connector with CAUTION label 9 19 10 Recommended Spare Parts 11 Parts List 11 1 S axis Unit 11 1 11 2 L Axis Unit 11 3 11 3 U Axis Unit 11 5 11 4 R Axis U...

Page 10: ...Information for the content of optional goods is given separately Manipulator NX100 Programing Pendant Manipulator Cable Between Manipulator and NX100 Confirm that the manipulator and the NX100 have t...

Page 11: ...50Hz kVA 3PHASE 220V 50 60Hz NJ2484 1 MADE IN JAPAN DATE SERIAL No ERCR TYPE POWER SUPPLY ORDERNO NJ1529 N P O E T R G Y C M S E E SELECT THE MANIPULATOR AND THE CONTROLLER SHOULD HAVE SAME ORDER NUMB...

Page 12: ...bserve this caution may adversely affect the performance as the system con sists of precision components The weight of the manipulator is approximately 135kg including the shipping bolts and brackets...

Page 13: ...The manipulator should be lifted using wire rope Be sure the manipulator is fixed with the shipping bolts and brackets before transporting and lift it in the posture as shown in Fig 2 Transporting Pos...

Page 14: ...Shipping Bolts and Brackets The manipulator is provided with a shipping bracket and 2 screws See Fig 2 Transporting Position Fig 4 Shipping Bolts and Brackets The shipping bracket and screws are paint...

Page 15: ...injury or damage When mounting the manipulator on the ceiling or wall the base section must have sufficient strength and rigidity to support the weight of the manipulator Also it is necessary to consi...

Page 16: ...foundation strong enough to support the manipulator and withstand repulsion forces during acceleration and deceleration Construct a solid foundation with the appropriate thickness to withstand maximum...

Page 17: ...s M16 mm The plate is tapped for M16 length 50mm screws Tighten the screws and anchor bolts securely so that they will not work loose during operation See Fig 4 Mounting the Manipulator Baseplate for...

Page 18: ...ng the Manipulator Base For the wall or ceiling mounted types be sure to use four hexagon socket head cap screws M16 when fixing the manipulator base Use a torque of 206N m when tightening the bolts 3...

Page 19: ...ned environmental conditions Ambient Temperature 0 to 45 C Humidity 20 to 80 RH non condensing Free from dust soot or water Free from corrosive gas or liquid or explosive gas Free from excessive vibra...

Page 20: ...Before wiring make sure to turn the primary power supply off and put up a warning sign ex DO NOT TURN THE POWER ON Failure to observe this warning may result in fire or electric shock Wiring must be p...

Page 21: ...anipulator as in Fig 6 Grounding Method Fig 7 Gounding Method Do not use this line in common with other ground wires or grounding electrodes for other electric power motor power welding devices etc Wh...

Page 22: ...e numbers 1BC and 2BC on both the cables and the manipulator base connectors Connect 2BC first and then 1BC After inserting the cables set the lever until it clicks 4 2 2 Connection to the NX100 Befor...

Page 23: ...onnection 4 4 HW0481893 Fig 9 a Details of the Manipulator Cable Connectors Manipulator Side Fig 9 b Manipulator Cable Connections to the NX100 2BC 1BC 3BC 1BC 2BC 3BC Connector details Manipulator si...

Page 24: ...m 250 175 R Axis wrist roll 180 B Axis wrist pitch yaw 225 45 T Axis wrist twist 360 Maximum Speed S Axis 2 62 rad s 150 s L Axis 2 79 rad s 160 s U Axis 2 97 rad s 170 s R Axis 5 93 rad s 340 s B Axi...

Page 25: ...seplate Dimensions Fig 11 Baseplate Dimensions Wrist Rotary head Manipulator base L arm U arm Wrist flange S S L L U U R R B B T T 20 A View A 132 0 1 102 0 1 153 0 1 260 240 216 300 260 132 0 1 102 0...

Page 26: ...int Maximum Envelope Fig 12 Dimensions and Operating Range R387 R1378 170 130 R 2 8 5 170 294 144 380 170 134 210 P point 1678 681 725 277 204 10 494 459 387 1378 328 192 1078 612 270 95 640 P point m...

Page 27: ...he S Axis can be altered as in Table 4 S Axis Operating Range in accordance with the operating conditions If alteration is necessary contact your Yaskawa representative in advance Table 4 S Axis Opera...

Page 28: ...shown in Fig 12 Moment Arm Rating The allowable total inertia is calculated when the moment is at the maximum Contact your Yaskawa representative when only inertia moment or load moment is small and i...

Page 29: ...Fig 15 The Diagram Moment Inertia for B Axis Fig 16 The Diagram Moment Inertia for T Axis Moment N m 11 8 15 10 5 0 0 24 0 483 0 0 2 0 4 0 6 GD2 4 Kg m2 Moment N m 9 8 10 7 5 5 2 5 0 0 17 0 37 0 GD2 4...

Page 30: ...tside fittings must be 5mm or less Fig 17 Wrist Flange Wash off anti corrosive paint solid color on the wrist flange surface with thinner or light oil before mounting the tools Mount the attachment wi...

Page 31: ...onditions should be observed to attach or install peripheral equipments 7 1 1 Allowable Load The allowable load on the U Axis is a maximum of 15 kg including the wrist load For instance when the mass...

Page 32: ...ripheral Equipment Fig 19 Allowable Load on U Axis Z direction X direction View A W2 A W1 230 U axis rotation center 70 70 Tapped holes M6 length 12mm 4 holes Units mm Z direction restriction 350mm or...

Page 33: ...ug Tapped hole PT3 8 with pipe plug Air inlet View A Connector for internal user I O wiring harness on S axis JL05 2A20 29PC pin connector with a cap Prepare socket connector JL05 6A20 29S A Connector...

Page 34: ...pecification the pins No 7 and No 8 of 3BC connector on the U Arm are respectively connected with the shock sensor power supply and shock sensor signal input port of the NX100 controller The pins No 7...

Page 35: ...nal and are located as shown in Fig 22 Location of Limit Switches The overrun limit switches for the the S Axis and L Axis and LU Axes interfer ence limit switch are applied to the robot type YR HP6 A...

Page 36: ...ee Fig 22 Location and Numbers of Connectors Fig 23 Location and Numbers of Connectors Table 6 List of Connector Types Name Type of Connector Base Connector for Internal User I O Wiring Harness JL05 2...

Page 37: ...FG6 DATA 6 0V BAT OBT 5V DATA 6 BAT OBT T AXIS A A FOR LAMP OPTIONAL P P P 0V FG6 0V DATA 6 5V DATA 6 B P P P P P 6 4 11 5 10 9 16CN 1 No 16CN 17CN 1 BAT1 0BAT2 BAT2 0BAT1 20 18 19 17 BAT3 0BAT3 0BAT...

Page 38: ...8 SPG 6 24V SPG 5 SPG 6 SPG 5 P P P P LB1 SS2 BC2 CN4 6 CN4 3 CN4 8 CN2 4 CN4 2 CN4 7 0V 5V 5V 0V 5V CN2 5 CN3 4 CN3 5 CN2 9 CN2 10 0V 5V 0V FG7 CN4 4 CN4 5 CN4 9 CN3 9 CN3 10 E SPG 7 SPG 7 P P P P P...

Page 39: ...11 6 3BC 1 16 15 E 15 16 BA1 ME2 BB1 ME1 BA2 MW2 MW3 MU3 MV3 MU1 MU2 MV2 MW1 MV1 14 14 MW5 ME5 MU6 MW6 ME3 ME4 MV6 MU4 MW4 MU5 MV5 MV4 BA3 BA5 BA6 BA4 BB4 ME6 E PE U AXIS B AXIS R AXIS T AXIS No 18CN...

Page 40: ...in power sup ply off and put up a warning sign ex DO NOT TURN THE POWER ON Failure to observe this warning may result in electric shock or injury Maintenance and inspection must be performed by specif...

Page 41: ...anner Wrench Tighten loose bolts Replace if necessary Cover mount ing screws Screw driver Wrench Tighten loose bolts Replace if necessary Base connec tors Manual Check for loose con nectors BT axes ti...

Page 42: ...peed Reducer RBT axes speed reduc ers Grease Gun Check for malfunc tion Replace if nec essary Supply grease 3 6000H cycle See Par 9 2 5 Grease Replenish ment for R Axis Speed Reducer 9 2 6 Grease Repl...

Page 43: ...tion Parts and Grease Used 4 Inspection No correspond to the numbers in Fig 25 Inspection Parts and Inspection Numbers 5 The occurrence of a grease leakage indicates the possibility that grease has se...

Page 44: ...2 4 16 14 T axis B axis 15 4 5 4 8 B axis 9 Note The home position of the manipulator takes the B axis folded to a 90 degree downward position to the manipulators illustrated in Fig 25 Inspection Part...

Page 45: ...off the NX100 main power supply 2 Uninstall the plate from the base connector and pull the battery pack out to replace with a new battery pack 3 Remove the battery pack from the battery holder 4 Conn...

Page 46: ...ucer Diagram Remove the old battery pack after connecting the new one so that the encoder absolute data does not disappear Do not pinch the cable when the plate is installed For ceiling mounted manipu...

Page 47: ...T1 8 to the grease inlet The grease zerk is provided at fac tory 3 Inject the grease into the grease inlet using a grease gun 4 The grease replacement is complete when new grease appears in the exhaus...

Page 48: ...rge the excess grease 7 Remove the grease zerk from the grease inlet and reinstall bolts Apply Three Bond 1206C to screwed parts when installing the bolts 8 Wipe the waste grease with a cloth and rein...

Page 49: ...s in the exhaust ports The new grease can be distinguished from the old grease by its color 7 Move the L Axis for a few minutes to discharge the excess grease 8 Remove the grease zerk from the grease...

Page 50: ...grease 7 Remove the grease zerk from the grease inlet and reinstall the plug Apply Three Bond 1206C to screwed parts when installing the plug 8 Wipe the waste grease with a cloth and reinstall the bol...

Page 51: ...appears in the exhaust ports The new grease can be distinguished from the old grease by its color 7 Move the U Axes for a few minutes to discharge the excess grease 8 Remove the grease zerk from the g...

Page 52: ...install the grease zerk PT1 8 The grease zerk is provided at factory 3 Inject grease into the grease inlet using a grease gun Refer to Fig 31 a R Axis Speed Reducer Diagram For Serial Numbers S3W120...

Page 53: ...a grease gun Refer to Fig 31 b R Axis Speed Reducer Diagram For Serial Numbers S3W120 7 to RH9520 3112 4 Reinstall the cover plug 5 Reinstall the plug on the exhaust port Apply Three Bond 1206C to scr...

Page 54: ...nject grease into the grease inlet using a grease gun Refer to Fig 31 c R Axis Speed Reducer Diagram For Serial Numbers RH9520 3121 and Over 4 Reinstall the cover plug 5 Reinstall the plug on the exha...

Page 55: ...s when installing the bolts 5 Reinstall the plugs to the exhaust ports Apply Three Bond 1206C to screwed parts when installing the plugs Remove the U arm cover side of the B axis speed reducer Grease...

Page 56: ...ease gun Refer to Fig 33 T Axis Gear Diagram 4 Remove the grease zerk from the grease inlet and reinstall the bolts Apply Three Bond 1206C to screwed parts when installing the bolts 5 Reinstall the pl...

Page 57: ...oss Roller Bearing Diagram 4 Remove the grease zerk from the grease inlet and reinstall the bolts Apply Three Bond 1206C to screwed parts when installing the bolts 5 Reinstall the bolts to the exhaust...

Page 58: ...ealing bond Three Bond 1206C refer to Table 9 Spare Parts for YR HP6 A00 and YR HP6 A01 Fig 35 Sealing Part of Wrist Unit Battery Pack Connector with CAUTION label Connect the battery pack with refere...

Page 59: ...T BAT BAT4 0BT4 b a a b BAT 0BT Motor Power connector Internal wire CAUTION label Encoder connector Motor cable etc Encoder Battery pack a insertion type pin terminal Socket b insertion type pin termi...

Page 60: ...ame Type Manufacturer Qty Qty per Unit Remarks A 1 Grease Molywhite RE No 00 Yaskawa Electric Corporation 16kg A 2 Grease Harmonic Grease SK 1A Harmonic Drive System Co Ltd 2 5kg A 3 Grease Alvania EP...

Page 61: ...ver The products which were manu factured since November 2004 B 19 Wire Harness in Manipulator HW0171196 A Yaskawa Electric Corporation 1 1 B 20 B and T Axes Wire Harness in Manipulator HW0270875 A Ya...

Page 62: ...Parts List 11 1 S axis Unit 1033 1001 1011 1011A 1021 1032 1041 1042 1024 1020 1002 1003 1004 1006 1009 1010 1030 1017 1025 1043 1036 1007 1026 1005 1022 1023 1039 1040 1012 1034 1035 1035 1015 1018...

Page 63: ...Spring washer 1 1017 M6X30 Socket screw 16 2H 6 Spring washer 16 1018 M6X15 Socket screw 2 2H 6 Spring washer 2 1020 M8X30 Socket screw 3 1021 2H 8 Spring washer 3 1022 M4X80 Socket screw 1 1023 2H 4...

Page 64: ...11 2 L Axis Unit 11 3 HW0481893 11 2 L Axis Unit 2001 2002 2003 2004 2012 2013 2014 2005 2026 2025 2006 2009 1004 2007 2008 2022 2023 2024 2011 2010 2016 2021 2020...

Page 65: ...Cover 1 2006 HW0304457 1 Cover 1 2007 M14X35 Socket screw 6 2008 M14 Washer 6 2009 M8X40 Socket screw 12 2H 8 Spring washer 12 2010 M6X60 Socket screw 1 2011 2H 6 Spring washer 1 2012 M8X30 Socket scr...

Page 66: ...U Axis Unit 11 5 HW0481893 11 3 U Axis Unit 3001 3023 3027 3030 3012 3021 3018 3019 3002 3003 3004 3005 3006 3010 3032 2004 3025 3031 3026 3007 3007 3028 3028 3024 3009 3029 3013 3015 3016 3017 3020...

Page 67: ...15 M10X30 Socket screw 6 2H 10 Spring washer 6 3016 M4X50 Socket screw 1 3017 2H 4 Spring washer 1 3018 PT1 8 Plug 1 3019 M10X35 Socket screw 1 3020 M6X6 Socket screw 1 3021 M10X20 Socket screw 2 2H 1...

Page 68: ...4028 4030 4033 4031 4059 4001 4021 4023 4038 3004 4024 4002 4003 4003 4012 4010 4015 4017 4018 4019 4042 4043 4013 4014 4016 4020 4004 4011 4005 4006 4007 4008 5003 4009 4035 4036 4037 4029 4039 4040...

Page 69: ...screw 6 2H 4 Spring washer 6 4027 HW0404333 1 Serial No RH9520 3112 HW0404478 1 Serial No RH9520 3121 Plate Cover 1 1 4028 M4X12 Socket screw 2 2H 4 Spring washer 2 4029 HW0404503 1 Saddle 2 4030 M4X...

Page 70: ...5074 5007 5046 5006 5039 5068 5069 5070 5037 5041 5040 5001 5001 5011 5065 5030 5066 5033 5036 5061 5018 5067 5060 5062 5004 5029 5055 5028 5027 5026 5002 5002 5054 5053 5035 5051 5016 5025 5034 5031...

Page 71: ...Socket screw 2 2H 4 Spring washer 2 5040 M4X20 Socket screw 2 5041 2H 4 Spring washer 2 5042 M5X12 Socket screw 12 2H 5 Spring washer 12 5043 M4X16 Socket screw 4 2H 4 Spring washer 4 5044 M4X12 Socke...

Page 72: ...r Sweden Phone 46 480 417800 Fax 46 480 417999 MOTOMAN ROBOTEC GmbH Kammerfeld strasse 1 DE 85391 Allershausen Germany Phone 49 8166 90100 Fax 49 8166 90103 YASKAWA ELECTRIC KOREA CORPORATION 1F Samya...

Reviews: