background image

11-13

175873-1CD

HW1483557

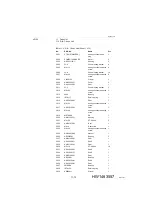
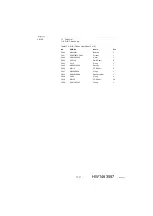
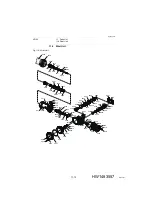
11 Parts List
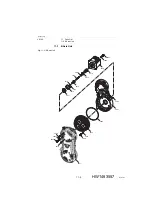
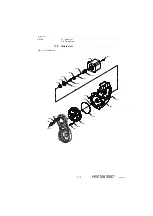
11.6 Wrist Unit

VS100

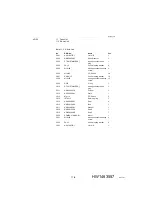
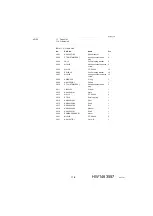
Table 11-6: Wrist Unit  (Sheet 1 of 2)

No.

DWG No.

Name

Pcs

6001

HW1304009-1

Shaft

1

6002

6808LLU

Bearing

2

6003

ISTW-40

Retaining ring

1

6004

HW9405445-1

B nut

1

6005

M4x6

H set screw

1

6006

HW9481234-A

Bearing

1

6007

HW9405880-1

B cover

1

6008

HW1100626-1

Wrist base

1

6009

M4x12

GT-SA bolt

22

6010

HW1304004-1

Shaft

1

6011

HW1404932-1

Shaft

1

6012

2L-4

Conical spring washer

12

6013

M4x15

Hexagon socket head cap 
screw

8

6014

60/22

Bearing

2

6015

HW1405046-1

B nut

1

6016

M5x6

H set screw

1

6017

HW1404912-1

Shaft

1

6018

PT1/8 (STAINLESS)

Hexagon socket head 
plug

2

6019

2L-8

Conical spring washer

61

6020

M8x60

Hexagon socket head cap 
screw

21

6021

HW1404914-*

Shim

1

6022

HW1304005-1

Gear

1

6023

HW9405883-2

Collar

1

6024

HW0412696-*

Shim

1

6025

HW1304000-1

Gear

1

6026

6905

Bearing

1

6027

STW-25

Retaining ring

1

6028

HW1400695-2

Washer

1

6029

FU00SC

Fine U nut

2

6030

HW1405049-1

Cover

1

6031

M4x10

GT-SA bolt

4

6032

HW1382809-A

Speed reducer

1

6033

HW0401517-*

Shim

1

6034

HW1304006-1

Gear

1

6035

M8x18

Hexagon socket head cap 
screw

22

6036

ARP568-258

O-ring

1

6037

HW1405047-1

Cover

1

6038

2L-6

Conical spring washer

19

6039

M6x55

Hexagon socket head cap 
screw

19

6040

HW1405050-1

Cover

1

89 of 91

Summary of Contents for MOTOMAN-VS100

Page 1: ...prior to initial operation read these instructions thoroughly and retain for future reference MOTOMAN INSTRUCTIONS MOTOMAN VS100 INSTRUCTIONS DX200 INSTRUCTIONS DX200 OPERATOR S MANUAL for each purpose DX200 MAINTENANCE MANUAL The DX200 operator s manual above corresponds to specific usage Be sure to use the appropriate manual 1 of 91 ...

Page 2: ...ghted property of Yaskawa and may not be sold or redistributed in any way You are welcome to copy this document to your computer or mobile device for easy access but you may not copy the PDF files to another website blog cloud storage site or any other means of storing or distributing online content Printed in the United States of America First Printing 2016 Yaskawa America Inc Motoman Robotics Di...

Page 3: ...l CAUTION Some drawings in this manual are shown with the protective covers or shields removed for clarity Be sure all covers and shields are replaced before operating this product The drawings and photos in this manual are representative examples and differences may exist between them and the delivered product YASKAWA may modify this model without notice when necessary due to product improvements...

Page 4: ...ible for providing adequately trained personnel to operate program and maintain the equipment NEVER ALLOW UNTRAINED PERSONNEL TO OPERATE PROGRAM OR REPAIR THE EQUIPMENT We recommend approved Yaskawa training courses for all personnel involved with the operation programming or repair of the equipment This equipment has been tested and found to comply with the limits for a Class A digital device pur...

Page 5: ...l CAUTION Indicates a potentially hazardous situation which if not avoided could result in minor or moderate injury to personnel and damage to equipment It may also be used to alert against unsafe practices MANDATORY Always be sure to follow explicitly the items listed under this heading PROHIBITED Must never be performed NOTE To ensure safe and efficient operation at all times be sure to follow a...

Page 6: ...mum envelope of the manipulator Be sure to use a lockout device to the safeguarding when going inside Also display the sign that the operation is being performed inside the safeguarding and make sure no one closes the safeguarding View the manipulator from the front whenever possible Always follow the predetermined operating procedure Keep in mind the emergency response measures against the manipu...

Page 7: ... or brand names for each company or corporation The indications of R and TM are omitted CAUTION Perform the following inspection procedures prior to conducting manipulator teaching If problems are found repair them immediately and be sure that all other necessary processing has been performed Check for problems in manipulator movement Check for damage to insulation and sheathing of external wires ...

Page 8: ... on the body of the manipulator Prior to operating the manipulator confirm the contents Fig Warning Label Locations Nameplate WARNING Label B WARNING Label A 31 Nameplate WARNING Do not enter robot work area WARNING Moving parts may cause injury Warning Label A Warning Label B MADE IN JAPAN YASKAWA ELECTRIC CORPORATION Kitakyushu 806 0004 Japan 2 1 Kurosakishiroishi Yahatanishi ku SERIAL NO PAYLOA...

Page 9: ...t is not in use In accordance with ANSI RIA R15 06 2012 section 4 2 5 Sources of Energy use lockout tagout procedures during equipment maintenance Refer also to Section 1910 147 29CFR Part 1910 Occupational Safety and Health Standards for General Industry OSHA Mechanical Safety Devices The safe operation of this equipment is ultimately the users responsibility The conditions under which the equipm...

Page 10: ...ackup must always be made before any service procedures are done and before any changes are made to options accessories or equipment Any modifications to the controller unit can cause severe personal injury or death as well as damage to the robot Do not make any modifications to the controller unit Making any changes without the written permission from Yaskawa will void the warranty Some operation...

Page 11: ...fied personnel Summary of Warning Information This manual is provided to help users establish safe conditions for operating the equipment Specific considerations and precautions are also described in the manual but appear in the form of Dangers Warnings Cautions and Notes It is important that users operate the equipment in accordance with this instruction manual and any additional information whic...

Page 12: ...y 24 to 36 hours for a response to your inquiry Please have the following information ready before you call Customer Support techsupport motoman com NOTE Please use e mail for routine inquiries only If you have an urgent or emergency need for service replacement parts or information you must contact Yaskawa Customer Support at the telephone number shown above System VS100 Primary Application _____...

Page 13: ... 4 3 4 Location 3 4 4 Wiring 4 1 4 1 Grounding 4 1 4 2 Cable Connection 4 2 4 2 1 Connection to the Manipulator 4 2 4 2 2 Connection to the DX200 4 2 5 Basic Specifications 5 1 5 1 Basic Specifications 5 1 5 2 Part Names and Working Axes 5 2 5 3 Manipulator Base Dimensions 5 2 5 4 Dimensions and P Point Maximum Envelope 5 3 5 5 Stopping Distance and Time for S L and E Axes 5 4 5 5 1 General Inform...

Page 14: ...1 8 1 1 Specification of Limit Switch 8 1 8 1 2 Position of Limit Switch 8 1 8 1 3 Setting of Operation Range 8 2 8 1 3 1 S Axis Operation Range 8 2 8 1 3 2 L Axis Operation Range 8 2 8 1 3 3 Setting Range of L and E Axes Interference Angle 8 3 8 1 3 4 Setting Range of E and U Axes Interference Angle 8 3 8 2 Internal Connections 8 4 9 Maintenance and Inspection 9 1 9 1 Inspection Schedule 9 1 9 2 ...

Page 15: ... 6 2 Grease Replenishment for R Axis Speed Reducer 9 17 9 3 6 3 Grease Exchange for R B T Axes Gears in the Casing 9 18 9 3 6 4 Grease Exchange for R Axis Speed Reducer 9 19 9 3 7 Grease Replenishment Exchange for B and T Axes Speed Reducers and Gears 9 20 9 3 7 1 Grease Replenishment 9 20 9 3 7 2 Grease Exchange 9 21 9 4 Notes for Maintenance 9 22 9 4 1 Battery Pack Connection 9 22 10 Recommended...

Page 16: ...ludes the following four items Information for the content of optional goods is given separately Manipulator DX200 Programming Pendant Manipulator cables CAUTION Confirm that the manipulator and the DX200 have the same order number Special care must be taken when more than one manipulator is to be installed If the numbers do not match manipulators may not perform as expected and cause injury or da...

Page 17: ... corresponds to the DX200 The order number is indicated on a label as shown below Fig 1 1 Location of Order Number Labels 0 7 6 ࢩࣕ 0 7 6 ࢩࣕ 7 6 0 ࢩࣕ ORDER No Check that the manipulator and the DX200 have the same order number a DX200 Front View Label Enlarged View THE MANIPULATOR AND THE CONTROLLER SHOULD HAVE SAME ORDER NUMBER b Manipulator Top View 17 of 91 ...

Page 18: ...ect performance NOTE Check that the eyebolts are securely fastened The weight of the manipulator is approximately 810kg including the shipping bolts and brackets Use a wire rope strong enough to withstand the weight The attached eyebolts are designed to support the manipulator mass Never use them for anything other than transporting the manipulator Mount the shipping bolts and brackets before tran...

Page 19: ...sure that the manipulator is fixed with the shipping bolts and brackets before transport and lift it in the posture as shown in Fig 2 1 Transport Using a Crane Fig 2 1 Transport Using a Crane Shipping bolts and brackets Fixed to the manipulator before shipment Hexagon socket head cap screw M12 8 screws 0 0㺽 136192 107008 S L U R B T 45㺽 70㺽 90㺽 90㺽 0㺽 127377 0 124599 E 45㺽 102912 Factory setting f...

Page 20: ...wn in Fig 2 2 Transport Using a Forklift Insert forks under the pallet and lift it The pallet must be strong enough to support the manipulator Transport the manipulator slowly with due caution in order to avoid overturning or slippage Fig 2 2 Transport Using a Forklift Shipping bolts and brackets Fixed to the manipulator before shipment Bolt M20 8 bolts Pallet Forklift fork entries 20 of 91 ...

Page 21: ...ipping bolts and brackets fixing screws Table 2 1 Shipping Bolts and Brackets Fixing Screws Shipping Bolts and Brackets Qty Shipping Bolts and Brackets Fixing Screw Specification Fixing Screw Qty 2 Hexagon Socket Head Cap Screw M12 length 25 mm Tensile strength 1200 N mm2 4 screws x 2 places NOTE Before turning ON the power check to be sure that the shipping bolts and brackets are removed The ship...

Page 22: ...his warning may result in injury or damage Do not start the manipulator or even turn ON the power before it is firmly anchored The manipulator may overturn and cause injury or damage CAUTION Do not install or operate a manipulator that is damaged or lacks parts Failure to observe this caution may cause injury or damage Before turning ON the power check to be sure that the shipping bolts and bracke...

Page 23: ... Procedures for Manipulator Base The manipulator should be firmly mounted on a baseplate or foundation strong enough to support the manipulator and withstand reaction forces during acceleration and deceleration Construct a solid foundation with the appropriate thickness to withstand maximum reaction forces of the manipulator referring to Table 3 1 Manipulator Reaction Force and Torque A baseplate ...

Page 24: ...or larger size The manipulator base is tapped for eight mounting holes securely fix the manipulator base to the baseplate with eight hexagon head screws M20 70 mm long is recommended Next fix the manipulator base to the baseplate Tighten the hexagon head bolts and anchor bolts firmly so that they will not work loose during the operation Refer to Fig 3 2 Mounting the Manipulator on the Baseplate Fi...

Page 25: ...Location When installing a manipulator it is necessary to satisfy the following environmental conditions Ambient temperature 0 to 45 C Humidity 20 to 80 RH non condensing Free from exposure to dust soot oil or water Free from corrosive gas or liquid or explosive gas or liquid Free from excessive vibration Vibration acceleration 4 9 m s2 0 5 G or less Free from large electrical noise plasma Flatnes...

Page 26: ...turn OFF the primary power supply and put up a warning sign ex DO NOT TURN THE POWER ON Failure to observe this warning may result in fire or electric shock CAUTION Wiring must be performed by authorized or certified personnel Failure to observe this caution may result in fire or electric shock NOTE Never use this wire sharing with other ground lines or grounding electrodes for other electric powe...

Page 27: ... verify the numbers on both manipulator cables and the connectors on the connector base of the manipulator When connecting adjust the cable connector positions to the main key positions of the manipulator and insert cables in the order of 2BC then 1BC After inserting the cables depress the lever until it clicks 4 2 2 Connection to the DX200 Before connecting cables to the DX200 verify the numbers ...

Page 28: ... Manipulator Side Fig 4 3 b Manipulator Cable Connection DX200 Side 6 7 1 7 5 3 UHDVH 0RO KLWH 5 1R 1 0 7 6 0 7 6 0 7 6 ࢩࣕ 0 7 6 ࢩࣕ 0 7 6 0 7 6 0 7 6 ࢩࣕ 0 7 6 ࢩࣕ ࢩࣕ 0 7 6 ࢩࣕ 7 6 0 ࢩࣕ 0 7 6 ࢩࣕ 0 7 6 ࢩࣕ ࢩࣕ 7 6 0 0 7 6 0 7 6 7 6 0 ࢩࣕ 6 7 1 7 5 3 UHDVH 0RO KLWH 5 1R 1 75 5 75 5 75 5 75 5 X21 X11 28 of 91 ...

Page 29: ...5 rad s 175 s B Axis 3 05 rad s 175 s T Axis 4 45 rad s 255 s Allowable Moment4 4 Refer to section 6 1 Allowable Wrist Load for details on the permissible moment of inertia R Axis 721 N m 73 5 kgf m 696 N m 71 kgf m B Axis 721 N m 73 5 kgf m 696 N m 71 kgf m T Axis 294 N m 30 kgf m Allowable Inertia GD2 4 R Axis 60 kg m2 58 kg m2 B Axis 60 kg m2 58 kg m2 T Axis 33 7 kg m2 33 kg m2 Approx Mass 780 ...

Page 30: ...s 5 3 Manipulator Base Dimensions Fig 5 2 Manipulator Base Dimensions S S L U U R R B B E E T T T T R R S S Middle arm L armB Lower arm L arm A Base Rotary head S head Upper arm U arm Wrist Wrist flange A 22dia hole 8 holes 30 195 0 2 280 153 455 608 455 230 0 2 385 320 195 0 2 195 0 2 230 0 2 195 0 2 400 230 View A 12 dia hole 0 018 0 2 holes 30 of 91 ...

Page 31: ...aximum Envelope VS100 5 4 Dimensions and P Point Maximum Envelope Fig 5 3 Dimensions and P Point Maximum Envelope P point 0 258 584 320 1020 200 540 435 435 235 613 2457 1336 3793 1469 2236 3705 1 5 5 45 4 5 7 0 9 0 685 R2236 316 270 314 258 31 P point Maximum envelope 31 of 91 ...

Page 32: ...me are measured in accordance with ISO 10218 1 Annex B Stop categories According to IEC60204 1 Stop category 0 Stop category 1 The values specified for Stop category 0 are the reference values that are determined by tests and simulations The actual stopping distance and stopping time may differ The stopping distance and stopping time are measured using the manipulator internal measuring technique ...

Page 33: ...s VS100 5 5 4 Stopping Distance and Time for Stop Category 1 S L and E Axes 5 5 4 1 Extension Refer to Fig 5 4 S Axis Extension Fig 5 5 L Axis Extension and Fig 5 6 E Axis Extension for each axis arm extension Fig 5 4 S Axis Extension Fig 5 5 L Axis Extension 33 66 100 2236 33 66 100 1917 33 of 91 ...

Page 34: ...5 Basic Specifications 5 5 Stopping Distance and Time for S L and E Axes 5 6 175873 1CD HW1483557 VS100 Fig 5 6 E Axis Extension 66 100 1482 34 of 91 ...

Page 35: ...㻢㻢㻑 㻸㼛㼍㼐㻟㻟㻑 㻜 㻟㻜 㻢㻜 㻥㻜 㻝㻞㻜 㻝㻡㻜 㻿㼜㼑㼑㼐㼇㼐㼑㼓㻛㼟㼉 㻸㼛㼍㼐㻝㻜㻜㻑 㻸㼛㼍㼐㻢㻢㻑 㻸㼛㼍㼐㻟㻟㻑 㻸㼛㼍㼐㻝㻜㻜㻑 㻸㼛㼍㼐㻢㻢㻑 㻸㼛㼍㼐㻟㻟㻑 㻜 㻟㻜 㻢㻜 㻥㻜 㻝㻞㻜 㻝㻡㻜 Extension 66 Extension 66 㻜 㻝㻜 㻟㻜 㻞㻜 㻠㻜 㻡㻜 㻢㻜 㻿㼠㼛㼜㼜㼕㼚㼓㻌㼐㼕㼟㼠㼍㼚㼏㼑㼇㼐㼑㼓㼉 㻿㼜㼑㼑㼐㼇㼐㼑㼓㻛㼟㼉 㻜㻚㻜 㻜㻚㻞 㻜㻚㻠 㻜㻚㻤 㻜㻚㻢 㻝㻚㻜 㻿㼠㼛㼜㼜㼕㼚㼓㻌㼠㼕㼙㼑㼇㼟㼑㼏㼉 㻸㼛㼍㼐㻝㻜㻜㻑 㻸㼛㼍㼐㻢㻢㻑 㻸㼛㼍㼐㻟㻟㻑 㻜 㻟㻜 㻢㻜 㻥㻜 㻝㻞㻜 㻝㻡㻜 㻿㼜㼑㼑㼐㼇㼐㼑㼓㻛㼟㼉 㻿㼠㼛㼜㼜㼕㼚㼓㻌㼠㼕㼙㼑㼇㼟㼑㼏㼉 Extension 33 Extension 33 㻜 㻝㻜 㻟㻜 㻞㻜 㻠㻜 㻡㻜 㻿㼠㼛㼜㼜㼕㼚㼓㻌㼐㼕㼟㼠㼍㼚㼏㼑㼇㼐㼑㼓㼉 㻸㼛㼍㼐㻝㻜㻜㻑 㻸㼛㼍㼐㻢㻢㻑 㻜 㻟...

Page 36: ... 㻝㻜㻜 㻜 㻞㻜 㻢㻜 㻤㻜 㻝㻞㻜 㻠㻜 㻝㻜㻜 㻸㼛㼍㼐㻝㻜㻜㻑 㻸㼛㼍㼐㻢㻢㻑 㻸㼛㼍㼐㻟㻟㻑 㻿㼜㼑㼑㼐㼇㼐㼑㼓㻛㼟㼉 Extension 66 Extension 66 㻜 㻡 㻝㻜 㻝㻡 㻟㻡 㻟㻜 㻞㻡 㻞㻜 㻿㼠㼛㼜㼜㼕㼚㼓㻌㼐㼕㼟㼠㼍㼚㼏㼑㼇㼐㼑㼓㼉 㻜 㻞㻜 㻢㻜 㻤㻜 㻝㻞㻜 㻠㻜 㻝㻜㻜 㻸㼛㼍㼐㻝㻜㻜㻑 㻸㼛㼍㼐㻢㻢㻑 㻸㼛㼍㼐㻟㻟㻑 㻿㼜㼑㼑㼐㼇㼐㼑㼓㻛㼟㼉 㻜㻚㻜 㻜㻚㻝 㻜㻚㻞 㻜㻚㻠 㻿㼠㼛㼜㼜㼕㼚㼓㻌㼠㼕㼙㼑㼇㼟㼑㼏㼉 㻜㻚㻟 㻜㻚㻡 㻜㻚㻢 㻜 㻞㻜 㻢㻜 㻤㻜 㻝㻞㻜 㻠㻜 㻝㻜㻜 㻿㼜㼑㼑㼐㼇㼐㼑㼓㻛㼟㼉 㻸㼛㼍㼐㻝㻜㻜㻑 㻸㼛㼍㼐㻢㻢㻑 㻸㼛㼍㼐㻟㻟㻑 㻜 㻡 㻝㻜 㻝㻡 㻟㻜 㻞㻡 㻞㻜 Extension 33 Extension 33 㻿㼠㼛㼜㼜㼕㼚㼓㻌㼐㼕㼟㼠㼍㼚㼏㼑㼇㼐㼑㼓㼉 㻜 㻞㻜 㻢㻜 㻤㻜 㻝㻞㻜 㻠㻜 㻝㻜㻜 㻿㼜㼑㼑㼐㼇㼐...

Page 37: ...㻌㼐㼕㼟㼠㼍㼚㼏㼑㼇㼐㼑㼓㼉 㻜 㻞㻜 㻢㻜 㻤㻜 㻝㻞㻜 㻠㻜 㻝㻜㻜 㻿㼜㼑㼑㼐㼇㼐㼑㼓㻛㼟㼉 㻸㼛㼍㼐㻝㻜㻜㻑 㻸㼛㼍㼐㻢㻢㻑 㻸㼛㼍㼐㻟㻟㻑 㻜㻚㻜 㻜㻚㻝 㻜㻚㻞 㻜㻚㻠 㻿㼠㼛㼜㼜㼕㼚㼓㻌㼠㼕㼙㼑㼇㼟㼑㼏㼉 㻜㻚㻟 㻜㻚㻡 㻜㻚㻢 㻜 㻞㻜 㻢㻜 㻤㻜 㻝㻞㻜 㻠㻜 㻝㻜㻜 㻿㼜㼑㼑㼐㼇㼐㼑㼓㻛㼟㼉 㻸㼛㼍㼐㻝㻜㻜㻑 㻸㼛㼍㼐㻢㻢㻑 㻸㼛㼍㼐㻟㻟㻑 Extension 66 Extension 66 㻜 㻡 㻝㻜 㻝㻡 㻟㻜 㻞㻡 㻞㻜 㻿㼠㼛㼜㼜㼕㼚㼓㻌㼐㼕㼟㼠㼍㼚㼏㼑㼇㼐㼑㼓㼉 㻜 㻞㻜 㻢㻜 㻤㻜 㻝㻞㻜 㻠㻜 㻝㻜㻜 㻸㼛㼍㼐㻝㻜㻜㻑 㻸㼛㼍㼐㻢㻢㻑 㻸㼛㼍㼐㻟㻟㻑 㻿㼜㼑㼑㼐㼇㼐㼑㼓㻛㼟㼉 㻜㻚㻜 㻜㻚㻝 㻜㻚㻞 㻜㻚㻠 㻿㼠㼛㼜㼜㼕㼚㼓㻌㼠㼕㼙㼑㼇㼟㼑㼏㼉 㻜㻚㻟 㻜㻚㻡 㻜㻚㻢 㻜 㻞㻜 㻢㻜 㻤㻜 㻝㻞㻜 㻠㻜 㻝㻜㻜 㻸㼛㼍㼐㻝㻜㻜㻑 㻸㼛㼍㼐㻢㻢㻑 㻸㼛㼍㼐...

Page 38: ... the already delivered parts 1 Hexagon socket head cap screw M20 length 40 mm Tensile strength 1200N mm2 x 1 screw for the mechanical stopper 2 Collar drawing No HW9405875 1 x 1 3 Pin drawing No HW9405032 2 x 1 Necessary only when the manipulator is equipped with the S axis overrun limit switch Fig 5 7 S Axis Mechanical Stopper Table 5 2 S Axis Operating Range Item Specifications S Axis Operating ...

Page 39: ...cal Stopper mount the S axis mechanical stopper to the S head using the collar with the screws with the tightening torque of 167 N m 17 kgf m The S axis mechanical stopper can be mounted in every 15 degree pitch as shown in Fig 5 8 S Axis Stopper Mounting Position When the manipulator is equipped with the S axis overrun limit switches install the pins drawing No HW9405032 2 to the same degree posi...

Page 40: ...limit negative direction of the S axis S1CxG408 Degree 0 15 15 30 30 45 45 60 60 Pulse 0 21203 21203 42406 42406 63609 63609 84812 84812 Degree 75 75 90 90 105 105 120 120 135 135 Pulse 106015 106015 127217 127217 148420 148420 169623 169623 190826 190826 Degree 150 150 165 165 180 180 Standard Pulse 212029 212029 233232 233232 254434 254434 NOTE Please do not alter the range of motion with the so...

Page 41: ...tive for further information or assistance When the volume load is small refer to the moment arm rating shown in Fig 6 1 Moment Arm Rating The allowable total moment of inertia is calculated when the moment is at the maximum Contact your YASKAWA representative beforehand when only moment of inertia or load moment is small and moment of inertia is large Also when the load mass is combined with an o...

Page 42: ...00 1200 1400 1600 400 200 600 400 LT mm LB mm 100kg 80kg 60kg 50kg 80kg 60kg 200 600 LT mm 400 600 800 1000 1200 1400 1600 400 200 600 400 LT mm LB mm 110kg P point Without YASKAWA standard external cable With YASKAWA standard external cable B axis center of rotation R T axis center of rotation P point B axis center of rotation R T axis center of rotation 42 of 91 ...

Page 43: ...nable an easy grease exchange for the B and T axis gears mount the attachment inside the fitting Fitting depth of inside and outside fittings must be 5 mm or less Fig 6 2 Wrist Flange without YASKAWA standard external cable NOTE Wash off anti corrosive paint yellow on the wrist flange surface with thinner or light oil before mounting the tools 10 dia depth 15 0 2 holes 0 015 0 Tapped hole M10 dept...

Page 44: ...wing conditions shall be observed to attach or install peripheral equipment Fig 7 1 Installing Peripheral Equipment 50 50 16 16 60 60 180 98 5 100 110 110 45 27 5 12 5 246 2 holes Tapped hole M5 depth 9 4 holes Tapped hole M8 depth 14 2 holes Tapped hole M6 depth 11 4 holes Tapped hole M8 depth 16 Mount the peripheral equipment within this range 82 191 Table 7 1 Constraint for Attaching Applicatio...

Page 45: ...ring harness 0 5 mm2 12 wires 0 75 mm2 11wires 0 5 mm2 3 5A or less per wire 0 75 mm2 5 0A or less per wire The total current value must be 59 8A or less Encoder cable for external axis 0 2 mm2 6 cables 3 9A or less per wire Power cable for external axis 2 mm2 4 cables 0 75 mm2 2 cables 2 mm2 16 1A or less per wire 0 75 mm2 9 0A or less per wire The total current value must be 55 7A or less Cable ...

Page 46: ... Terminal A R14 8 Connector for the D NET CM02 8DR5P CF Prepare pin connector CM02A 8DP5S D View B Rc 1 2 Tap Cooling water 4 Rc 1 2 Tap Cooling water 2 Rc 1 2 Tap Cooling water 1 Rc 1 2 Tap Cooling water 3 Rc 3 8 Tap Air Cooling water 4 Rc 3 8 Tap Connector for the external axis encoder cable JL05 2A20 29SC socket connector with a cap Prepare pin connector JL05 6A20 29P Connector for 24V 1R4030 P...

Page 47: ...res 0 3 mm2 2 wires 0 2 mm2 2 wires 1 25 mm2 3 wires 1 25 mm2 4 wires 2 mm2 4 wires 0 2 mm2 6 wires 14 mm 2 1 wires 22 mm 2 2 wires 0 5 mm2 12 wires 0 75 mm2 11 wires Shield wire Drain wire Pin Used Pin Used Pin Used Pin Used Pin Used Pin Used Pin Details for Connectors for D NET Pin Details for Connectors for 24V 16 12 15 2 1 4 13 9 11 7 5 3 10 14 6 8 9 1 11 12 2 P P 10 P 5 6 1 3 4 2 6 9 7 8 4 3 ...

Page 48: ...DX200 INSTRUCTIONS for releasing the status of this overrun 2 The range of S L E and U axes limit switches are set to the maximum operating range before shipping 8 1 2 Position of Limit Switch The limit switches are optional For the S L E and U Axes with limit switches specifications L S are located on S L E and U Axis respectively For the location refer to Fig 8 1 Location of Limit Switches The i...

Page 49: ...e S axis limit switch S axis operation range can be set to those ranges mentioned in Table 5 2 S Axis Operating Range 8 1 3 2 L Axis Operation Range By the L axis limit switch the L axis operation range can be set to any angles within 46 to 156 as mentioned in the figure below Fig 8 2 L Axis Overrun Limit Switch Setting Range r r Positive side Negative side 49 of 91 ...

Page 50: ... to any angles within 46 to 121 as the interference angle with L axis Fig 8 3 L and E Axes Interference Angle 8 1 3 4 Setting Range of E and U Axes Interference Angle E and U axes interference limit switches are designed to check the interference angle of E and U axes As shown in Fig 8 4 E and U Axes Interference Angle the operation range of U axis can be set to any angles within 91 to 71 as the i...

Page 51: ... 27 BAT6 BAT7 0BAT7 0BAT6 20 BAT2 23 22 25 24 21 BAT3 0BAT5 0BAT3 17 19 18 0BAT1 BAT1 0BAT2 PG L AXIS OBT BAT 9 0V 10 FG5 T AXIS 5 6 9 4 10 OBT BAT 0V FG6 5V PG 2 OBT DATA 6 BAT DATA 6 B AXIS DATA 5 2 4 5 6 9 DATA 5 0V 5V OBT BAT PG 10 BAT OBT FG4 U AXIS R AXIS 2 6 4 5 5V BAT OBT DATA 4 DATA 4 PG PG PG S AXIS CN4 10 0V CN4 10 CN4 9 CN3 10 CN3 9 CN2 9 CN2 5 CN2 4 CN3 5 CN3 4 CN2 10 CN3 9 CN3 10 5V ...

Page 52: ...V8 A 5 C 8 C 5 ME1 ME1 ME4 ME5 B 2 B 9 B 11 B 12 B 8 B 7 BA4 BB4 BA5 BA6 BA1 BB1 BA8 BB8 ME6 MU4 MW1 MU1 MW1 MV1 MV1 MU1 MV6 MW4 MW6 MV4 MU6 MU5 MV5 MW5 MW7 ME7 MU7 MV7 ME1 ME1 ME4 ME5 BA4 BB4 BA5 BA6 BA1 BB1 BA7 BB7 ME6 E 2 E 1 E 6 E 5 E 4 E 3 B 5 B 10 F 8 BB2 ME2 BA2 2 D MV2 MU2 MW2 B 20CN A No 20CN C YB SM L AXIS F 7 MW2 MU2 MW2 MV2 MV2 MU2 ME2 ME2 BA2 F 2 F 1 F 6 F 5 F 4 F 3 B 4 MW2 MU2 MW2 MV...

Page 53: ...med by specified personnel Failure to observe this caution may result in electric shock or injury For disassembly or repair contact your YASKAWA representative Do not remove the motor and do not release the brake Failure to observe these safety precautions may result in death or serious injury from unexpected turning of the manipulator s arm WARNING Before maintenance or inspection be sure to turn...

Page 54: ...xes motor connectors Manual Check for loose connectors and tighten if necessary 8 Connector base Manual Check for loose connectors 9 Wire harness in manipulator Visual Multimeter Check for conduction between the main connector of base and intermediate connector by manually shaking the wire Check for wear of protective spring 3 Replace at 2400H inspection 10 Limit switches and dogs For S L E and U ...

Page 55: ...ct your YASKAWA representative 3 When checking for conduction with multimeter connect the battery to BAT and OBT of connectors on the motor side for each axis and then remove connectors on detector side for each axis from the motor Otherwise the home position may be lost Refer to section 9 4 Notes for Maintenance 4 The application that requires highly frequent operation such as handling may cause ...

Page 56: ...n Numbers 1 6 15 15 1 1 1 7 6 7 1 7 5 3 UHDVH 0RO KLWH 5 1R R axis B axis T axis 1 4 6 8 2 7 13 13 11 4 2 7 13 7 4 4 4 7 9 R axis B axis U axis U axis U axis E axis L axis L axis S axis S axis S axis T axis T axis T axis B axis B axis R axis 5 10 14 2 10 10 1 S axis E axis E axis U axis L axis 10 8 12 4 6 4 7 1 7 56 of 91 ...

Page 57: ...place the battery in accordance with the following procedures Fig 9 2 Battery Location Fig 9 3 Battery Connection Battery pack HW0470360 A Plate b Top View a Back View 6 3 7 1 7 5 UHDVH 0RO KLWH 5 1R 1 Cross head APS bolt M4 length 10mm 4 bolts For cover plate fixing Cross head APS bolt M6 length 12mm 8 bolts Connector base Connector Circuit board See step 5 below Battery pack before replacement S...

Page 58: ...th a new one 3 Remove the old battery pack from the battery holder 4 Connect the new battery pack to the unoccupied connector on the board 5 Remove the old battery pack from the board 6 Mount the new battery pack to the holder 7 Reinstall the plate NOTE Remove the old battery pack after connecting the new one so that the encoder absolute data does not disappear NOTE Do not allow plate to pinch the...

Page 59: ...st port the grease will leak inside a motor or an oil seal of a speed reducer will come off which may result in damage to the motor Make sure to remove the plug screw Do not install a joint a hose etc to the grease exhaust port Failure to observe this instruction may result in damage to the motor due to coming off of an oil seal Make sure to use a grease pump to inject grease Set air supply pressu...

Page 60: ...ew minutes to discharge excess grease 5 Wipe the discharged grease with a cloth and reinstall the plug PT3 8 on the grease exhaust port Apply ThreeBond 1206C to the thread part of the plug and tighten the plug with a tightening torque of 23 N m 2 3 kgf m 6 Remove the grease zerk from the grease inlet and reinstall the plug PT1 4 Apply ThreeBond 1206C to the thread part of the plug and tighten the ...

Page 61: ...scharge excess grease 6 Wipe the discharged grease with a cloth and reinstall the plug PT3 8 on the grease exhaust port Apply ThreeBond 1206C to the thread part of the plug and tighten the plug with a tightening torque of 23 N m 2 3 kgf m 7 Remove the grease zerk from the grease inlet and reinstall the plug PT1 4 Apply ThreeBond 1206C to the thread part of the plug and tighten the plug with a tigh...

Page 62: ...or less 5 Move the L axis for a few minutes to discharge excess grease 6 Wipe the discharged grease with a cloth and reinstall the plug PT3 8 on the grease exhaust port Apply ThreeBond 1206C to the thread part of the plug and tighten the plug with a tightening torque of 23 N m 2 3 kgf m 7 Remove the grease zerk from the grease inlet and reinstall the plug PT1 8 Apply ThreeBond 1206C to the thread ...

Page 63: ... few minutes to discharge excess grease 7 Wipe the discharged grease with a cloth and reinstall the plug PT3 8 on the grease exhaust port Apply ThreeBond 1206C to the thread part of the plug and tighten the plug with a tightening torque of 23 N m 2 3 kgf m 8 Remove the grease zerk from the grease inlet and reinstall the plug PT1 8 Apply ThreeBond 1206C to the thread part of the plug and tighten th...

Page 64: ...or less 5 Move the E axis for a few minutes to discharge excess grease 6 Wipe the discharged grease with a cloth and reinstall the plug PT3 8 on the grease exhaust port Apply ThreeBond 1206C to the thread part of the plug and tighten the plug with a tightening torque of 23 N m 2 3 kgf m 7 Remove the grease zerk from the grease inlet and reinstall the plug PT1 8 Apply ThreeBond 1206C to the thread ...

Page 65: ... few minutes to discharge excess grease 7 Wipe the discharged grease with a cloth and reinstall the plug PT3 8 on the grease exhaust port Apply ThreeBond 1206C to the thread part of the plug and tighten the plug with a tightening torque of 23 N m 2 3 kgf m 8 Remove the grease zerk from the grease inlet and reinstall the plug PT1 8 Apply ThreeBond 1206C to the thread part of the plug and tighten th...

Page 66: ...ase injection rate 8 g s or less 5 Move the U axis for a few minutes to discharge excess grease 6 Wipe the discharged grease with a cloth and reinstall the plug PT3 8 on the grease exhaust port Apply ThreeBond 1206C to the thread part of the plug and tighten the plug with a tightening torque of 23 N m 2 3 kgf m 7 Remove the grease zerk from the grease inlet and reinstall the plug PT1 8 Apply Three...

Page 67: ...y color 6 Move the U axis for a few minutes to discharge excess grease 7 Wipe the discharged grease with a cloth and reinstall the plug PT3 8 on the grease exhaust port Apply ThreeBond 1206C to the thread part of the plug and tighten the plug with a tightening torque of 23 N m 2 3 kgf m 8 Remove the grease zerk from the grease inlet and reinstall the plug PT1 8 Apply ThreeBond 1206C to the thread ...

Page 68: ...se injection rate 8 g s or less 4 Move the R B T Axes for a few minutes to discharge excess grease 5 Wipe the discharged grease with a cloth and reinstall the plug PT3 8 on the grease exhaust port Apply ThreeBond 1206C to the thread part of the plug and tighten the plug with a tightening torque of 23 N m 2 34 kgf m 6 Remove the grease zerk from the grease inlet and reinstall the plug PT1 8 Apply T...

Page 69: ... injection rate 8 g s or less 4 Move the R axis for a few minutes to discharge excess grease 5 Wipe the discharged grease with a cloth and reinstall the plug PT3 8 on the grease exhaust port Apply ThreeBond 1206C to the thread part of the plug and tighten the plug with a tightening torque of 23 N m 2 3 kgf m 6 Remove the grease zerk from the grease inlet and reinstall the plug PT1 8 Apply ThreeBon...

Page 70: ...e R B and T axes for a few minutes to discharge excess grease 6 Wipe the discharged grease with a cloth and reinstall the plug PT3 8 on the grease exhaust port Apply ThreeBond 1206C to the thread part of the plug and tighten the plug with a tightening torque of 23 N m 2 34 kgf m 7 Remove the grease zerk from the grease inlet and reinstall the plug PT1 8 Apply ThreeBond 1206C to the thread part of ...

Page 71: ... axis for a few minutes to discharge excess grease 6 Wipe the discharged grease with a cloth and reinstall the plug PT3 8 on the grease exhaust port Apply ThreeBond 1206C to the thread part of the plug and tighten the plug with a tightening torque of 23 N m 2 3 kgf m 7 Remove the grease zerk from the grease inlet and reinstall the plug PT1 8 Apply ThreeBond 1206C to the thread part of the plug and...

Page 72: ...ove the B axis for a few minutes to discharge excess grease 5 Wipe the discharged grease with a cloth and reinstall the screw M6x6 on the grease exhaust port Apply ThreeBond 1206C to the thread part of the set screw and tighten the set screw with a tightening torque of 6 N m 0 6 kgf m 6 Remove the grease zerk from the grease inlet and reinstall the plug PT1 8 Apply ThreeBond 1206C to the thread pa...

Page 73: ... discharge excess grease 6 Wipe the discharged grease with a cloth and reinstall the screw M6x6 on the grease exhaust port Apply ThreeBond 1206C to the thread part of the set screw and tighten the set screw with a tightening torque of 6 N m 0 6 kgf m 7 Remove the grease zerk from the grease inlet and reinstall the plug PT1 8 Apply ThreeBond 1206C to the thread part of the plug and tighten the plug...

Page 74: ...m all connectors are connected and remove the battery pack Reinstall the cap onto the battery backup connectors of the motor Fig 9 10 Encoder Connector Diagram NOTE When performing maintenance such as replacement of a wire harness in the manipulator the encoder connector may be necessary to be removed In this case be sure to connect the battery pack to the battery backup connector before removing ...

Page 75: ...rease Molywhite RE No 00 YASKAWA Electric Corporation 16 kg For all axes speed reducers A 2 Liquid Gasket Three Bond 1206C ThreeBond Co Ltd A 3 Battery Pack HW9470932 A YASKAWA Electric Corporation 1 1 For replacing the wire harness in the manipulator A 4 Battery Pack HW0470360 A YASKAWA Electric Corporation 1 1 For inside the connector base B 5 S axis Speed Reducer Replacement Kit Y005C VS00100A0...

Page 76: ...1 HW0388670 A YASKAWA Electric Corporation 1 1 C 15 AC Servomotor for U axis SGMRV 30ANA YR1 HW0388669 A YASKAWA Electric Corporation 1 1 C 16 AC Servomotors for R B and T axes SGMRV 13ANA YR2 HW0388667 A YASKAWA Electric Corporation 1 3 C 17 Wire Harness in Manipulator HW1172076 A YASKAWA Electric Corporation 1 1 C 18 Connector Base Unit HW1372046 A YASKAWA Electric Corporation 1 1 C 19 Circuit B...

Page 77: ... 11 Parts List 11 1S Axis Unit VS100 11 Parts List 11 1 S Axis Unit Fig 11 1 S Axis Unit 1001 1002 1003 1004 1005 1006 1007 1008 1009 1013 1014 1010 1011 1012 1010 1015 1016 1018 1019 1020 1021 1022 1004 1017 1017 1023 77 of 91 ...

Page 78: ...B 1075 0 43 Nylon tube 1 1009 MSTH10 25 Pin 1 1010 2H 12 Conical spring washer 28 1011 M12 55 Hexagon socket head cap screw 12 1012 HW1100622 1 S head 1 1013 HW9405875 1 Collar 1 1014 M20 40 Hexagon socket head cap screw 1 1015 M12 50 Hexagon socket head cap screw 16 1016 PT3 8 STAINLESS Hexagon socket head plug 1 1017 M12 35 GT SA bolt 6 1018 SGMRV 30ANA YR1 Motor 1 1019 HW0312836 1 Gear 1 1020 S...

Page 79: ...873 1CD HW1483557 11 Parts List 11 2L Axis Unit VS100 11 2 L Axis Unit Fig 11 2 L Axis Unit 2002 2007 2008 2009 1012 2010 2011 2012 2013 2014 2021 2020 2016 2017 2018 2019 2015 2003 2004 2005 2001 2006 79 of 91 ...

Page 80: ...ad plug 1 2007 SW 2H 12 Conical spring washer 32 2008 M12 75 Hexagon socket head cap screw 32 2009 AS568 275 O ring 1 2010 PT3 8 STAINLESS Hexagon socket head plug 1 2011 HW9482447 A Oil seal 1 2012 HW1404909 1 Plate 1 2013 M4 10 GT SA bolt 4 2014 SGMRV 44ANA YR2 Motor 1 2015 M12 35 GT SA bolt 4 2016 HW1404911 1 Collar 1 2017 HW1303989 1 Gear 1 2018 HW1404554 1 Shaft 1 2019 HW1303991 1 Shaft 1 202...

Page 81: ... 1CD HW1483557 11 Parts List 11 3E Axis Unit VS100 11 3 E Axis Unit Fig 11 3 E Axis Unit 3020 3021 3019 3018 3017 3016 3014 3012 3013 3011 2001 3001 3002 3007 3008 3006 3005 3004 3009 3003 3010 3015 3022 81 of 91 ...

Page 82: ...7 SW2H 12 Conical spring washer 16 3008 M12 55 Hexagon socket head cap screw 16 3009 G270 O ring 1 3010 PT1 8 STAINLESS Hexagon socket head plug 1 3011 HW9482447 A Oil seal 1 3012 HW1404909 1 Plate 1 3013 M4 10 GT SA bolt 4 3014 ISTW 12 Retaining ring 1 3015 HW1303890 1 Gear 4 3016 HW0481083 A Bolt 1 3017 HW0408806 1 Washer 1 3018 HW9481343 A Shaft 1 3019 HW9482306 E Shaft 1 3020 SGMRV 37ANA YR1 M...

Page 83: ... 1CD HW1483557 11 Parts List 11 4U Axis Unit VS100 11 4 U Axis Unit Fig 11 4 U Axis Unit 4001 4006 4007 4008 4009 4010 4010 4002 4011 4012 4013 4020 4021 4014 4015 4016 4017 4018 4019 4005 4004 4003 4002 83 of 91 ...

Page 84: ... SW 2H 12 Conical spring washer 12 4007 M12 45 Hexagon socket head cap screw 12 4008 AS568 269 O ring 1 4009 HW1100624 1 Casing 1 4010 PT1 8 STAINLESS Hexagon socket head plug 2 4011 Y426012 5 Oil seal 1 4012 HW1404910 1 Plate 1 4013 M4 10 GT SA bolt 4 4014 STW 9 Retaining ring 1 4015 HW0409102 1 Gear 1 4016 HW9481648 A Shaft 1 4017 HW0483473 A Bolt 1 4018 HW0408806 2 Washer 1 4019 HW1304212 1 Sha...

Page 85: ...9 5015 5011 5016 5019 5020 5021 5022 5024 5006 4526 5026 5023 5025 5036 5037 5038 5039 5040 5041 5042 5030 5043 5044 5045 5046 5047 5048 5049 5050 5028 5029 5030 5031 5032 5030 5033 5030 5034 5035 5027 5005 5004 5006 5007 T axis 5017 5011 5018 5002 5003 5004 5006 5007 5008 5009 5010 5011 5012 5013 5014 B axis R axis 5003 5003 5008 5009 5002 5005 85 of 91 ...

Page 86: ...ew 1 5013 6003 Bearing 1 5014 ISTW 17 Retaining ring 1 5015 HW1303992 1 Gear 1 5016 M6 35 Hexagon socket head cap screw 1 5017 HW1301229 1 Gear 1 5018 M6 30 Hexagon socket head cap screw 1 5019 MSTH8 20 Pin 1 5020 HW0312837 1 Housing 1 5021 M6 20 GT SA bolt 6 5022 HW0412720 1 B nut 1 5023 M4 6 H set screw 1 5024 M8 25 Hexagon socket head cap screw 1 5025 HW0404196 8 Washer 1 5026 HR32005XJ Bearing...

Page 87: ...l 1 5042 HW1100625 1 U arm 1 5043 M12 35 GA SA bolt 8 5044 G110 O ring 1 5045 HW1303999 1 Housing 1 5046 M6 15 GT SA bolt 6 5047 ARP568 258 O ring 1 5048 HW1382808 A Speed reducer 1 5049 G105 O ring 1 5050 M6 40 GT SA bolt 28 4009 HW1100624 1 Casing 1 Table 11 5 R B T Axes Unit Sheet 2 of 2 No DWG No Name Pcs 87 of 91 ...

Page 88: ...20 6021 6022 6009 6023 6024 6025 6027 6026 6028 6029 6030 6031 6032 6033 6034 6019 6035 6037 6018 6038 6039 6019 6035 6012 6040 6041 6042 6043 6044 6045 6046 6048 6029 6049 6050 6019 6051 6036 6047 6051 6052 6054 6052 6055 6056 6059 6060 6061 6062 6063 6052 6064 6052 6009 6065 6060 6061 6057 6058 6066 6067 6004 6005 6006 6007 6002 6002 6003 6009 6001 6053 6068 6069 88 of 91 ...

Page 89: ...6016 M5x6 H set screw 1 6017 HW1404912 1 Shaft 1 6018 PT1 8 STAINLESS Hexagon socket head plug 2 6019 2L 8 Conical spring washer 61 6020 M8x60 Hexagon socket head cap screw 21 6021 HW1404914 Shim 1 6022 HW1304005 1 Gear 1 6023 HW9405883 2 Collar 1 6024 HW0412696 Shim 1 6025 HW1304000 1 Gear 1 6026 6905 Bearing 1 6027 STW 25 Retaining ring 1 6028 HW1400695 2 Washer 1 6029 FU00SC Fine U nut 2 6030 H...

Page 90: ...ng 1 6052 HR32004XJ Bearing 4 6053 TC72888 Oil seal 1 6054 HW1304001 1 Gear 1 6055 6814ZZ Bearing 1 6056 WR70 Circlip 1 6057 2L 5 Conical spring washer 6 6058 M5x35 Hexagon socket head cap screw 6 6059 HW1304003 1 Gear 1 6060 HW0401514 1 B nut 2 6061 M5x7 Magic screw 4 6062 HW1404913 1 Housing 1 6063 HW1404916 Shim 1 6064 HW1304007 1 Gear 1 6065 HW1304002 1 Gear 1 6066 HW1200308 1 Cover 1 6067 M5x...

Page 91: ... Gurgaon Haryana India Fax 91 124 475 8542 Phone 91 124 475 8500 YASKAWA India Private Ltd Robotics Division YASKAWA Electric China Co Ltd 22F One Corporate Avenue No 222 Hubin Road Huangpu District Shanghai 200021 China Phone 86 21 5385 2200 Fax 㸩86 21 5385 3299 YASKAWA Electric Thailand Co Ltd 59 1st 5th Floor Flourish Building Soi Ratchadapisek 18 Ratchadapisek Road Huaykwang Bangkok 10310 THAI...

Reviews: