background image

C-4

166006-1CD

166006-1CD

Appendix C  

C

RM2-755/1255SL 

Positioner

Centrifugal Force

When a body rotates about an axis other than one at it's center of mass, it 

exerts an outward radial force called centrifugal force upon the axis, which 

restrains it from moving in a straight tangential line. To offset this force, 

the robot must exert an opposing torque at the joint of rotation.

Circular Motion Type

A calculated path that the robot executes, and is circular in shape.

Clamp

An end-effector which serves as a pneumatic hand that controls the 

grasping and releasing of an object. Tactile, and feed-back force sensors 

are used to manage the applied force to the object by the clamp. See 

"End-effector"

.

Clamping

The maximum permissible force acting on a body region, resulting from a 

Manipulator collision where the period of contact results in a plastic 

deformation of a person’s soft tissue.

Clamping Force

When contact can cause a body part(s) to be clamped.

Closed-loop

Control achieved by a by means of feedback information. As a 

Manipulator is in action, its sensors continually communicate information 

to the Controller, which is used to further guide the Manipulator within the 

given task. Many sensors are used to feed back information about the 

Manipulator's placement, speed, torque, applied forces, as well as the 

placement of a targeted moving object, etc. See 

"Feedback"

.

Command Interpreter

A module or set of modules that determines what the received command 

means. The command is broken down into parts (parsed) and processed.

Command Position

The endpoint position of a robot motion that the Controller is trying to 

achieve.

Compliance

Displacement of a Manipulator in response to a force or torque. A high 

compliance means the Manipulator moves a good bit when it is stressed. 

This is called spongy or springy. Low compliance would be a stiff system 

when stressed.

Configuration

The arrangement of links created by a particular set of joint positions on 

the robot. Note that there may be several configurations resulting in the 

same endpoint position.

Contact Sensor

A device that detects the presence of an object or measures the amount 

of applied force or torque applied on the object through physical contact 

with it. Contact sensing can be used to determine location, identity, and 

orientation of work pieces.

121 of 145

Summary of Contents for RM2-755/1255SL

Page 1: ...to initial operation read these instructions thoroughly and retain for future reference MOTOMAN RM2 755 1255SL POSTIONER INSTRUCTIONS CONTROLLER INSTRUCTIONS CONTROLLER OPERATOR S MANUAL CONTROLLER M...

Page 2: ...manual is copyrighted property of Yaskawa and may not be sold or redistributed in any way You are welcome to copy this document to your computer or mobile device for easy access but you may not copy...

Page 3: ...UTION or NOTICE DANGER Indicates an imminently hazardous situation which if not avoided will result in death or serious injury Safety Signs identified by the signal word DANGER should be used sparingl...

Page 4: ...ction to explain operating instructions and maintenance procedures Be sure to read and understand this instruction manual thoroughly before installing and operating the manipulator Any matter not desc...

Page 5: ...ce when going into the area enclosed by the safety fence In addition the operator of the teaching operation must display the sign that the operation is being performed so that no other person closes t...

Page 6: ...awings and photos in this manual are representative examples and differences may exist between them and the delivered product Yaskawa is not responsible for incidents arising from unauthorized modific...

Page 7: ...pendant to the hook on the cabinet of the Controller after use The programming pendant can be damaged if it is left in the manipulator s work area on the floor or near fixtures NOTICE The drawings and...

Page 8: ...w the safety labels Also an identification label with important information is placed on the body of the Positioner Prior to operating the manipulator confirm the contents Fig Warning Labels Location...

Page 9: ...ograms or jobs a backup must always be made before any service procedures are done and before any changes are made to options accessories or equipment Any modifications to the Controller unit can caus...

Page 10: ...section 4 2 5 Sources of Energy use lockout tagout procedures during equipment maintenance Refer also to Section 1910 147 29CFR Part 1910 Occupational Safety and Health Standards for General Industry...

Page 11: ...OW UNTRAINED PERSONNEL TO OPERATE PROGRAM OR REPAIR THE EQUIPMENT We recommend approved Yaskawa training courses for all personnel involved with the operation programming or repair of the equipment Th...

Page 12: ...acter Keys The keys which have characters printed on them are denoted with ex ENTER Symbol Keys The keys which have a symbol printed on them are not denoted with but depicted with a small picture ex P...

Page 13: ...rademark RM2 755 1255SL Positioner Registered Trademark In this manual names of companies corporations or products are trademarks registered trademarks or bland names for each company or corporation T...

Page 14: ...ntact information Please allow approximately 24 to 36 hours for a response to the inquiry techsupport motoman com DANGER Maintenance and inspection must be performed by specified personnel Failure to...

Page 15: ...ipment 2 2 2 2 Materials Required 2 3 2 2 1 Customer Supplied Items 2 3 2 2 2 Customer Supplied Items 2 3 2 3 Positioner Installation 2 4 2 3 1 Site Preparation 2 4 2 3 1 1 Location 2 5 2 3 2 Shipping...

Page 16: ...pecifications 5 1 6 Maintenance and Inspection 6 1 6 1 Inspection Interval 6 2 6 2 Battery Pack Replacement 6 4 6 3 Grease Replenishment Exchange for Speed Reducers 6 5 6 3 1 Main Axis 6 5 6 3 1 1 Red...

Page 17: ...the Tooling Axis S2 S3 to Home Zero Position 6 25 6 12 3 1 Re Homing Tooling Axes S2 S3 to Flat at the Manipulator and Operator 6 26 6 13 Troubleshooting 6 27 6 13 1 Positioner 6 27 6 13 2 MotoMount 6...

Page 18: ...ecifications that may be required during installation and setup Chapter 5 Load Specifications and Jig Mounting This chapter provides guidelines for customer supplied tooling design Chapter 6 Maintenan...

Page 19: ...e orbital axes are rotated by individual Sigma 5 servomotors working through gear reduction units that are controlled by circuitry in the Controller All three axes can be driven simultaneously during...

Page 20: ...ium Ion keep alive battery pack that maintains servo positioning data in memory should the main cables between the Positioner and Controller be disconnected This battery pack is a part of each cable a...

Page 21: ...to the welding power source is connected to a ground block located inside the Positioner headstock swingarm assembly 1 5 Major Components The Positioner includes the following major components One to...

Page 22: ...th the system Manipulator Manipulator Instructions Manipulator Maintenance Positioner RM2 755 1255SL Positioner Manual 166006 1CD MHT Series SIGMA 5 Positioner Manual 168961 1CD Controller Manual READ...

Page 23: ...on must be performed by specified personnel Failure to observe this caution may result in electric shock or injury For disassembly or repair contact your representative Do not remove the motor and do...

Page 24: ...allation of the Positioner Failure to use a qualified personnel and established safety procedures can result in serious injury or death CAUTION Sling applications and crane or forklift operations must...

Page 25: ...ller servo packs etc Shipping bracket lifting bracket 2 1 2 Optional Equipment This manual documents a standard Positioner assembly If Positioner assembly is modified or incorporates optional equipmen...

Page 26: ...tallation 2 2 1 Customer Supplied Items Servo motion control unit Incoming power supply Two earth ground cables with two earth ground stakes 2 2 2 Customer Supplied Items Safety Glasses Forklift and o...

Page 27: ...Make sure the thickness of the floor is 200mm or more because any thickness less than 200mm is insufficient for mounting even if the floor is concrete Before mounting the Positioner on the floor check...

Page 28: ...ibration acceleration 4 9m s2 0 5G or less Free from large electrical noise plasma Flatness for installation 0 5mm or less Ensure appropriate space for equipment by reviewing Fig 2 1 Mounting the Posi...

Page 29: ...the Positioner to the Floor 280 0 B 283 550 500 0 450 0 250 0 50 0 25 0 25 0 1240 1190 0 8X M20 2 5 THRU 12X 20 0 THRU 0 7 0 0 25 0 50 0 140 0 230 0 330 PLAN VIEW POSITIONER MOUNTING DIMENSIONS SWING...

Page 30: ...ing skid and inspecting for shipping damage Fig 2 2 Shipping Bolt Removal The Positioner is provided with shipping bolts and nuts Fig 2 2 Shipping Bolt Removal 1 Extend the M20 leveling bolts to a poi...

Page 31: ...result in injury or damage Never place any part of your body under a suspended load or move a suspended load over any part of another person s body A shifted or dropped load could result in serious in...

Page 32: ...itioner in the posture as shown in Fig 2 4 Fig 2 4 Transporting the Positioner Crane or Hoist CAUTION Check that the eyebolts are securely fastened on Positioner The weight of the Positioner is approx...

Page 33: ...ith the forklift pockets when the Positioner is in the shipping position and with the shipping brackets installed Make sure the Positioner is in the fixed position with the shipping brackets before tr...

Page 34: ...floor is 200mm or more because any thickness less than 200mm is insufficient for mounting even if the floor is concrete Before mounting the Positioner on the floor check the flatness cracks etc of th...

Page 35: ...olt plate and the underside of the headstock See Fig 2 6 as a reference only Fig 2 6 Headstock Installation on Floor 2 Place a machinists level on the front of the machined surface of the Headstock wi...

Page 36: ...the tailstock frame Fig 2 8 Tailstock Installation on Floor 2 Remove the shipping brackets qty 2 that are attached between the tailstock and the Z beam frame 3 Place a level on top of the tailstock wi...

Page 37: ...ion 2 3 Positioner Installation 2 14 166006 1CD 166006 1CD RM2 755 1255SL Positioner Fig 2 9 Distance between points on Tailstock and Headstock A A B B SECTION A A SECTION B B 275 275 275 275 1050 100...

Page 38: ...nts and Equipment Anchoring for more details Before mounting the Positioner on the floor check the flatness cracks etc of the floor If there are any cracks on the floor they should be repaired before...

Page 39: ...choring The Customer or designated Contractor shall provide and install all required Hilti Anchors or equivalent For the applications listed with Kwik Bolt II Expansion type Anchors other proposed man...

Page 40: ...mounted systems The MotoMount system also minimizes headstock tailstock bearing loads induced by tooling and headstock tailstock misalignment up to a maximum of 2 degrees transmitting only the predic...

Page 41: ...ces barriers interlock barriers perimeter guarding awareness barriers and awareness signals WARNING Install all safeguarding Failure to observe this warning may result in injury or damage Install the...

Page 42: ...the wedge blocks proceed as follows 1 Starting with the tailstock side of the Positioner rotate the swingarm until the stop block on the swingarm on the A side just touches the top of the shock absor...

Page 43: ...ng the plunger bolt rotate the adjustable bolt hardstop so it is only touching the plunger bolt and tighten the lock nut on the adjustable bolt hardstop to 250Nm 4 Rotate the swingarm to the B side an...

Page 44: ...turn OFF the primary power supply and put up a warning sign ex DO NOT TURN ON THE POWER Failure to observe this warning may result in fire or electric shock Wiring must be performed by authorized or c...

Page 45: ...from the Positioner to the Controller that supplies power to the valves and low level sensor 3 2 1 Connection to the Positioner Before connecting the cables to the Positioner check the numbers on the...

Page 46: ...ir Connections The shop air connections is used to operate the valves of the Positioner Air pressure for the Positioner should be between 75 to 120psi to operate the Positioner assembly efficiently MU...

Page 47: ...2 1 3 0M After August 2018 184301 1 2 0M 184302 1 3 0M 184616 1 2 0M 184617 1 3 0M Rated Payload kg lb 755 1665 1255 2767 Load Height floor to centerline mm 894 894 Sweep Motor Power Before Nov 2017 k...

Page 48: ...epeatability mm in 0 1 004 0 1 004 Tooling Shaft to Shaft mm 2 0M 1943 4 3 0M 2943 4 Tooling Pin to Pin mm 2 0M 2000 3 0M 3000 Max Tooling Length mm 2 0M 2064 3 0M 3064 Weight of Positioner Assembly k...

Page 49: ...rt Names and Working Axes 4 3 Mounting Dimensions Fig 4 2 Mounting Dimensions swingarms removed for clarity FORKLIFT POCKETS HEADSTOCK ARC SCREEN ASSY TAILSTOCK SWINGARM ASSEMBLY TOOLING PLATE MOTOMOU...

Page 50: ...6006 1CD RM2 755 1255SL Positioner 4 4 Dimensions and Working Envelope Fig 4 3 Dimensions and Working Envelope OPERATOR SIDE ROBOT SIDE 1300 MAX TOOLING ENVELOPE 1476 WORK 1446 2522 25 475 MAX TOOLING...

Page 51: ...12 bolts 10 9 or 8 8 grade Fig 5 4 Details of Jig Mounting Face all measurements in mm 5 2 Fixture Specifications Weight of tool and parts are not to exceed rated Positioner capacity Length of the fix...

Page 52: ...ric shock or injury CAUTION Maintenance and inspection must be performed by specified personnel Failure to observe this caution may result in electric shock or injury For disassembly or repair contact...

Page 53: ...the bottom Apply three squeezes of grease gun lever approximately 4g In TEACH mode rotate the Gear Reducer pinion 180 degrees and apply grease to the grease fitting that is located on bottom a 2 Mult...

Page 54: ...the first time Refer to Grease Fittings on page 6 7 Inspection Item Frequency Inspection Operation NOTICE The inspection interval depends on the total servo operation time For axes which are used very...

Page 55: ...into the Encoder Battery Pack assembly 5 Install the new battery pack into the motor Fig 6 1 Battery Replacement CAUTION Do not remove power from the main power supply Removing the main power while re...

Page 56: ...s and lock washers holding the S1 axis Motor Cover Fig 6 2 S1 axis Motor Cover Removal 3 Pump Mobil CM P Lithium Complex grease through the reducer from the motor side and vented on the gear side Fig...

Page 57: ...on Teeth The two ways are either using grease fittings or using a Multiport Lubricator system Grease Fittings If the Positioner is retrofitted with the optional remote main axis kit the lubrication pr...

Page 58: ...of the grease hose outlets The hose outlets should be aligned with the center of the gear as shown in Fig 6 7 If the alignment of the grease hose outlet is not aligned with the gear loosen the hose c...

Page 59: ...S1 axis motor cover by reinstalling the screws and washers to 12 2 Nm removed from step 2 Weekly Lubrication 1 Turn the Positioner so the S1 gear and pinion cover is pointing down Fig 6 8 S1 Gear and...

Page 60: ...0144 1 Mobil CM P Lithium Complex grease Fig 6 9 Multiport Lubricator CAUTION Do not allow grease to go under the fill line on the MultiPort Lubricator Allowing grease to go below the fill line can ca...

Page 61: ...Reducer 1 Remove the button head screws in the vent located in the flat surface at the top of the drive assembly Fig 6 10 Tooling Greasing 2 Install the M6 grease fitting in the faceplate and pump Mo...

Page 62: ...is Apply Mobil CM P grease to the grease fitting by using a standard grease gun and pressing the lever 10 times 1 25 g x 10 Fig 6 11 Tailstock Main Axis Grease Fitting 6 3 3 2 Motomount Lubrication If...

Page 63: ...spection or replacement on a regular basis Do NOT disassemble a Sigma 5 servomotor If suspecting that the servomotor requires maintenance or overhaul contact Customer Support refer to section 1 7 Cust...

Page 64: ...s two different ways to set the Axis Backlash The older Positioners require adding and removing shims while the newer Positioners use a backlash tool The Axis Backlash is a measurement of free movemen...

Page 65: ...teeth and mark See Fig 6 13 Fig 6 13 Marking Dots and Teeth 2 Insert four base screws tight enough to hold ring gear in place Fig 6 14 Four base Screws NOTICE When marking the ring gear teeth align to...

Page 66: ...M12 guide pins onto the ring gear Fig 6 15 Installing Guide Pins 4 Wipe grease off the gear teeth 5 Attach the test indicator ensuring the tip of the test indicator is parallel to the ring gear Fig 6...

Page 67: ...to Fig 6 14 9 Repeat step 7 NOTICE If the Positioner is a RM2 755SL place 755 on the backlash adjustment tool in the up position and if the Positioner is a RM2 1255SL place OTHER on the backlash adju...

Page 68: ...of the ring gear When backlash is set re torque the bracket retaining bolts and re check the lash Torque of the retaining bolts to 490Nm 6 8 Tooling Axis Reduction Gear Units RV 80E X Two Reduction G...

Page 69: ...anel of the drive assembly 3 Use a flathead screwdriver to disconnect the brush cable s from the ground post Fig 6 18 Fig 6 18 Brush Cable Post 4 Release the spring tensioner on the brush by squeezing...

Page 70: ...e the brush retaining spring and push the brush against the faceplate then release The spring must hold the brush firmly against the face plate Fig 6 19 7 Insert the ground cables onto the ground post...

Page 71: ...atteries have a long life in this particular application However should one or more of these batteries drop below a certain charge level an indicator will appear on the Programming Pendant display scr...

Page 72: ...ress SELECT 5 Cursor to HOME POSITION and press SELECT 6 Press the PAGE OVER key to S1 indicated in top right corner of Programming Pendant display panel 7 Press SELECT 8 Cursor to YES then press SELE...

Page 73: ...R1 Mid EX044 170 000 S2 Sweep to Manipulator mid position S2 To R1 Mid EX045 10 000 S3 Sweep to Operator mid position S3 To Oper Mid EX050 0 000 S1 B Side At Manipulator S1 B Side Robot EX051 180 000...

Page 74: ...is 20 5 Press the TOP MENU key on the programming pendant 6 Cursor to ROBOT and press SELECT 7 Cursor to HOME POSITION and press SELECT 8 Press the PAGE OVER key to S1 indicated in top right corner o...

Page 75: ...flash reset can be done later in the homing procedures NOTICE When making changes on the B side also adjust the A side Variable Value Descriptions Variable Name EX040 180 000 a S1 A Side At Manipulato...

Page 76: ...ling plate is accessible 4 Install the plastic homing pin see Fig 6 22 Homing Pin Details into the homing pin hole in the tooling plate see Fig 6 23 Tooling Plate Home Zero Position Fig 6 22 Homing Pi...

Page 77: ...homing pin from the tooling plate 13 Reinstall the cover 6 12 3 1 Re Homing Tooling Axes S2 S3 to Flat at the Manipulator and Operator 1 Jog S3 to EX60 S3 HPIN TO FLAT using the Forward key not Test S...

Page 78: ...red correctly Overload Reduce load or reduce unbalanced load Unstable operation Incorrect wiring Inspect and correct wiring across motor terminals L1 L2 L3 and PE Motor overheats Excessive ambient tem...

Page 79: ...NOTICE To replace parts in Rank B or Rank C contact Customer Support Refer to section 1 7 Customer Support Information on page 1 6 Table 7 1 Spare Parts for the RM2 755 1255SL Positioner Rank Part No...

Page 80: ...284 450 182 273 475 174 262 500 168 252 Note HTS Applications assume 1 2 load on headstock 50 mm using MotoMount 2 Rated load based upon 50 maximum bearing moment 3 Maximum load based upon 75 maximum...

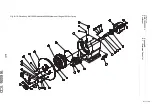
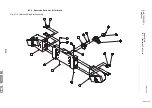
Page 81: ...g Arm Assembly with Grease Fittings Prior to August 2018 Fig B 4 Main Drive Assembly with Grease Fittings Prior to August 2018 Fig B 5 a Major Assemblies RM2 755SL 2 0M with MultiPort Lubricator Augus...

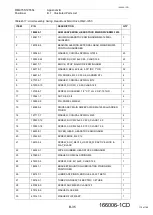
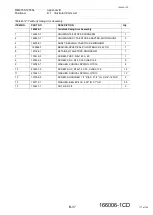
Page 82: ...e item number listed in this column is the same as the item number shown on the illustration Item numbers on the illustration are identified by a circled number and leader line that points to the part...

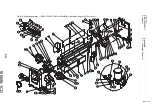
Page 83: ...Fittings Prior to August 2018 Fig B 1 Major Assemblies RM2 755SL and 1255SL 2 0M with Grease Fittings Prior to August 2018 27 24 2 6 1 24 21 3 10 22 37 19 4 DETAIL T 33 34 33 30 32 30 35 30 23 21 17 1...

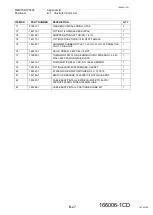
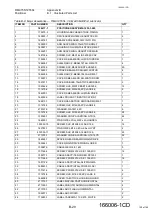
Page 84: ...148102 5 SCREW SHC M6X20 W CAPTIVE FLAT LOCK WASHER 18 10 11 175287 1 COVER Z BEAM END RH 1 12 166721 1 CVR CBL TSTOCK SWINGARM 2 13 152364 2 SCREW HHC M5X12 12 15 175285 1 175286 1 COVER Z BEAM END...

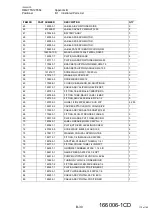
Page 85: ...HC M16 X 60 ZP CLASS 8 8 2 38 166408 2 COVER TAILSTOCK HOUSING ROUND HOLE 2 50 155235 2 LABEL PATENT IDENTIFICATION 1 52 143047 7 PLATE GLAND XRC MRC BLANK 4 53 157171 1 PLATE GLAND POSITIONER 1 54 17...

Page 86: ...755SL and 1255SL 3 0M with Grease Fittings Prior to August 2018 29 26 2 6 1 26 23 2 3 9 11 10 12 11 9 24 12 22 23 11 10 9 24 22 23 9 39 21 20 5 4 27 28 T DETAIL T 35 36 35 32 33 34 32 37 32 25 23 15 1...

Page 87: ...4 10 148102 5 SCREW SHC M6X20 W CAPTIVE FLAT LOCK WASHER 34 29 11 175289 1 STRAP Z BEAM ARC SHIELD 4 12 166426 3 SHIELD ARC Z BEAM 1563mm RM2 755 1255SL 2 13 175287 1 COVER Z BEAM END RH 1 14 166721...

Page 88: ...H M5X12 JIS B 1188 W CAPTIVE LOCK FLAT WASHERS 4 39 131274 8 SCREW HHC M16 X 60 ZP CLASS 8 8 2 40 166408 2 COVER TAILSTOCK HOUSING ROUND HOLE 2 52 155235 2 LABEL PATENT IDENTIFICATION 1 54 143047 7 PL...

Page 89: ...1CD RM2 755 1255SL Positioner Fig B 3 Main Drive Headstock Swing Arm Assembly with Grease Fittings Prior to August 2018 4 3 2 9 11 10 5 13 6 12 13 5 6 12 9 11 10 1 15 16 17 18 19 20 20 19 21 19 22 25...

Page 90: ...10 471075 1 WASHER CONICAL SPRING M12 1 9 11 na 472303 10 SCREW SHC M12 X 55 CLASS 12 9 8 12 na 137298 7 SCREW SHOULDER 1 2 X 3 LG X 3 8 16 THD 2 13 na 130441 7 NUT HEX 3 8 2 15 132652 9 PIN DOWEL M2...

Page 91: ...RM2 755 1255SL Positioner 31 130431 3 CLAMP WIRE PLASTIC P STYLE 1 4 2 32 137147 2 SCREW PPH M5X8 JIS B 1188 W CAPTIVE LOCK FLAT WASHERS 2 33 472303 3 SCREW SHC M12x20 CLASS 12 9 1 ITEM NO RM2 755SL P...

Page 92: ...006 1CD 166006 1CD RM2 755 1255SL Positioner Fig B 4 Main Drive Assembly with Grease Fittings Prior to August 2018 12 10 15 20 19 18 17 14 13 1 16 9 9 10 13 3 2 21 22 23 5 7 4 2 3 6 RM2 1255SL ONLY 5...

Page 93: ...EW SHC M12X50 CLASS 12 9 16 10 471075 1 WASHER CONICAL SPRING M12 20 11 156009 6 156009 6 MOTOR AC SERVO 3 7kW SIGMA 5 Before Nov 2017 1 156009 5 MOTOR AC SERVO 2 9kW SIGMA 5 Nov 2017 or later 12 4723...

Page 94: ...jor Assemblies RM2 755SL 2 0M with MultiPort Lubricator August 2018 or Later T DETAIL T W DETAIL W 47 46 52 53 49 48 54 21 22 42 43 1 56 38 39 2 28 17 11 12 3 13 14 15 11 4 69 33 17 16 67 68 70 20 19...

Page 95: ...ricator August 2018 or Later T DETAIL T W DETAIL W 47 46 52 53 49 48 54 21 22 42 43 1 56 38 39 2 28 17 11 12 3 13 14 15 11 4 69 33 17 16 67 68 70 20 19 18 20 21 22 18 20 19 20 16 17 34 35 36 33 32 37...

Page 96: ...8 149053 3 LABEL POSITIONER S2 1 9 149053 4 LABEL S3 1 10 149053 2 LABEL POSITIONER S1 1 11 148102 4 SCREW_SHC_M6X16_JIS 0209_W CAPTIVE LOCK FLAT_BLACK 17 12 175284 1 COVER Z BEAM END LH W STUDS RM2...

Page 97: ...9 WASHER FLAT M16 ZP 6 34 170543 1 BRACKET SHIPPING FORMED RM2 755 1255SL 1 35 479147 7 WASHER FLAT M12 ZP 3 36 131272 11 SCREW HHC M12 X1 75x 20 LG 3 37 170544 1 BRACKET SHIPPING ANGLE RM2 755 1255S...

Page 98: ...12 JIS B1188 W CAPTIVE LOCK FLAT WASHER 12 58 158277 1 CABLE ASSY P T ENCODER DX100 3 EXT AXIS MALE SLIM LINE 1 59 157171 1 PLATE GLAND POSITIONER 1 60 137147 4 SCREW PPH M5X12 JIS B 1188 W CAPTIVE LO...

Page 99: ...1 LABEL YASKAWA 110 X 675 WHITE 2 76 472268 18 LABEL CAPACITY WEIGHT 755kg 2 77 173463 1 FITTING PLUG 37 FLARED 3 8 2 78 145790 3 FITTING_SWIVEL_FEMALE PIPE 5 79 145759 3 HOSE 1 2 ID 250 PSI BLACK US...

Page 100: ...t B 20 166006 1CD 166006 1CD RM2 755 1255SL Positioner Fig B 6 RM2 755 Drive Assembly MH555 Headstock with Motomount August 2018 or Later 18 17 2 15 9 10 24 3 13 13 8 5 7 4 5 6 9 10 12 16 10 14 22 21...

Page 101: ...REW BHSC M6 X 10 2 10 470602 1 WASHER CONICAL SPRING GTS6 YS 3 11 156009 3 MOTOR AC SERVO 1 3kW SIGMA 5 1 12 133963 3 BOLT EYE M10 DIN 580 2 13 146123 1 SEAL KIT RV80E 1 14 166944 1 GEAR INPUT GEAR RE...

Page 102: ...st B 22 166006 1CD 166006 1CD RM2 755 1255SL Positioner Fig B 7 Arm Assembly Swing Headstock Main Drive with Lube RM2 755SL August 2018 or Later 3 4 2 1 16 17 9 8 9 7 7 7 19 19 7 6 18 5 13 14 12 27 15...

Page 103: ...M20 8 10 184298 2 TUBING LUBRICATION LINE LH 25 OD SSTL MAIN DRIVE W LUBE RM2 755SL 1 11 184799 1 FITTING STRAIGHT MALE CONNECTOR FLARELESS 1 8 27 NPTF 0 25 TUBE STEEL 2 12 184217 1 BLOCK MANIFOLD 3...

Page 104: ...er Fig B 8 Major Assemblies RM2 1255SL 2 0M with MultiPort Lubricator August 2018 or Later 27 24 2 1 49 24 21 2 3 9 10 22 20 21 22 20 21 36 19 5 4 25 26 T DETAIL T 32 33 32 30 31 34 30 23 21 17 13 7 7...

Page 105: ...CK SWINGARM RM2 755 1255SL 2 13 152364 2 SCREW HHC M5 X 12 12 14 131275 4 SCREW HHC M20X55 ZP CLASS 8 8 8 15 184290 1 COVER Z BEAM END LH MAIN DRIVE W STUDS RM2 1255SL W PINION LUBE 1 16 164532 2 LABE...

Page 106: ...TENT IDENTIFICATION 1 50 166006 1CD MANUAL RM2 SL DX200 1 51 143047 7 PLATE GLAND XRC MRC BLANK 4 52 157171 1 PLATE GLAND POSITIONER 1 53 170543 1 BRACKET SHIPPING FORMED RM2 755 1255SL 1 54 170544 1...

Page 107: ...A HOLE 1 76 184615 1 GAGE PRESS 0 600 PSI 1 8 NPT 1 77 179885 1 TUBING NYLON 14 OD SEMIRIGID HIGH STRENGTH 0 050 WALL 625 PSI WORKING BLACK 1 78 184614 1 PUMP MULTIPORT 24 VDC NO LEVEL SENSOR 1 79 145...

Page 108: ...Port Lubricator August 2018 or Later 29 26 2 6 1 51 26 23 2 9 10 12 9 24 12 22 23 10 9 24 22 23 9 38 21 20 20 21 5 4 27 28 T 34 35 34 32 33 32 36 32 25 23 19 15 7 7 59 39 39 59 7 18 14 15 14 15 25 7 3...

Page 109: ...VE 1 18 164532 2 LABEL PRODUCT IDENTIFICATION T 1 19 166410 1 COVER HEADSTOCK SWINGARM RM2 7 1 20 131274 3 SCREW HHC M16X35 ZP CLASS 8 8 4 21 479147 9 WASHER FLAT M16 ZP 6 22 131274 4 SCREW HHC M16X40...

Page 110: ...LARE 1 2BSP 3 64 145790 3 FITTING SWIVEL FEMALE PIPE 1 2 5 65 145759 3 HOSE 1 2ID 250PSI BLACK US W P 6 200 66 166012 2 CAP RECEPTACLE WITH CHAIN SIZE 1 67 173035 1 CABLE ASSY DUAL ETHERNET M12 M 1 68...

Page 111: ...B 31 166006 1CD 166006 1CD RM2 755 1255SL Positioner Fig B 10 Drive Assy MH1655 Headstock With Motomount August 2018 or Later 26 3 5 7 4 6 2 12 13 11 19 8 9 10 1 15 14 16 22 23 24 20 18 13 25 17 15 21...

Page 112: ...1 BRUSH ASSY GROUND MTG BRKT 4 POS 1 11 151592 7 REDUCER RV RV 320E 185 1 12 472303 9 SCREW SHC M12 X 50 CLASS 12 9 16 13 471075 1 WASHER CONICAL SPRING M12 20 14 130425 2 SCREW BHSC M6 X 10 2 15 4706...

Page 113: ...Appendix B B 1 Illustrated Parts List RM2 755 1255SL Positioner 31 168961 1CD MANUAL DRASSY HS TOOLING W MOTOMOUNT MH185 555 1655 DX200 1 32 130887 11 CABLE WELD 4 0 1FT 2 33 180544 1 LABEL GREASE MOL...

Page 114: ...st B 34 166006 1CD 166006 1CD RM2 755 1255SL Positioner Fig B 11 Arm Assembly Swing Headstock Main Drive RM2 1255 August 2018 or Later 2 7 9 8 5 11 6 10 11 5 6 10 7 9 8 1 12 15 16 17 19 22 20 20 21 21...

Page 115: ...8 10 137298 7 SCREW SHOULDER 1 2 X 3 LG X 3 8 16 THD 2 11 130441 7 NUT HEX 3 8 2 12 132652 9 PIN DOWEL M20X40 2 15 163889 2 DRIVE ASSY MAIN SWEEP AXIS RM2 1255SL HARDEN PINION 1 16 147177 1 WASHER CON...

Page 116: ...Illustrated Parts List B 36 166006 1CD 166006 1CD RM2 755 1255SL Positioner B 1 6 Illustrated Parts List for Tailstock Fig B 12 Tailstock Swing Arm Assembly 1 2 2 5 6 7 10 11 4 8 9 9 8 12 13 12 13 14...

Page 117: ...165038 1 SHAFT BEARING TAILSTOCK SWINGARM 1 5 163886 1 BEARING SPHERICAL PILLOW BLOCK 2 437 ID 1 6 157188 1 RETAINER TAILSTOCK SWINGARM 1 7 132619 3 SCREW FHSC M8x1 25 X 20 1 8 130532 2 SCREW SHC M16...

Page 118: ...ristic and the attained characteristic R15 05 2 or the precision with which a computed or calculated Manipulator position can be attained Accuracy is normally worse than the arm s repeatability Accura...

Page 119: ...otion Automatic Mode See Play Mode Axis A direction used to specify the Manipulator motion in a linear or rotary mode ISO 8373 Axis Backlash Play between drive train gears Axis Interference The Axis I...

Page 120: ...hree dimensional Cartesian coordinate system A robot s TCP position is specified in a Cartesian Coordinate Cartesian Manipulator A Cartesian Manipulator is a Manipulator arm with prismatic joints whic...

Page 121: ...ors continually communicate information to the Controller which is used to further guide the Manipulator within the given task Many sensors are used to feed back information about the Manipulator s pl...

Page 122: ...switch R15 06 Control Mode The means by which instructions are communicated to the robot Controllability The property of a system by which an input signal can take the system from an initial state to...

Page 123: ...l circle with a prismatic joint to raise or lower the circle Not popular in industry D Danger Indicates an imminently hazardous situation which if not avoided will result in death or serious injury Sa...

Page 124: ...ated equipment that may present a hazard R15 06 Encoder A feedback device in the robot arm that provides current position and orientation of the arm data to the Controller A beam of light passes throu...

Page 125: ...rol Flexibility The ability of a robot to perform a variety of different tasks Force Feedback A sensing technique using electrical signals to control a robot end effector during the task of the end ef...

Page 126: ...to the desired position Gripper An end effector that is designed for seizing and holding ISO 8373 and grips or grabs an object It is attached to the last link of the arm It may hold an object using s...

Page 127: ...iled movement instructions INFORM The robot programming language for Yaskawa robots is INFORM INFORM language allows the robot user to instruct the robot to use its basic capabilities to fulfill a def...

Page 128: ...obots and robotic devices Safety requirements for industrial robots Part 1 Robots A robot specific safety specification that addresses manufacturer requirements functionality required safety performan...

Page 129: ...eing at 0 degrees b The set of joint positions Joints The parts of the robot arm which actually bend or move K Kinematics The relationship between the motion of the endpoint of a robot and the motion...

Page 130: ...or may be by an operator a programmable electronic Controller or any logic system for example cam device wired etc ISO 8373 See Wrist and End effector Manual Mode See Teach Mode Material Handling The...

Page 131: ...ssage not related to personal injury O Off line Programming A programming method where the task program is defined on devices or computers separate from the robot for later input of programming inform...

Page 132: ...ipulator because it can be used to reduce the amount of work involved in teaching by shifting a taught path or position In the example in the figure below the taught position A is shifted in increment...

Page 133: ...ion and deceleration phases of a particular task The robot movement is controlled from one point location in space to another in a Point to Point PTP motion system Each point is programmed into the ro...

Page 134: ...linear and angular position The linear position includes the azimuth elevation and range of the object The angular position includes the roll pitch and yaw of the object See Roll Pitch and Yaw Positi...

Page 135: ...e most favorable position to observe control and record the desired movements in the robot s memory Proximity Sensor A non contact sensing device used to sense when objects are a short distance away a...

Page 136: ...hape of the work envelope forms a rectangular figure See Work Envelope Reliability The probability or percentage of time that a device will function without failure over a specified time period or amo...

Page 137: ...Coordinate System will be relative to the base of the robot Note that by default the Base Coordinate System and Robot Coordinate System are the same Robot Integrator See Integrator Robot Programming...

Page 138: ...ate risks within the robot system Second Home Position Apart from the home position of the Manipulator the second home position can be set up as a check point for absolute data The initial value of th...

Page 139: ...y motions and signals the amount of the motion back to the Controller This process is continued many times per second until the arm is repositioned to the point requested See Servo controlled Robot Sh...

Page 140: ...risks within the robot system Spline A smooth continuous function used to approximate a set of functions that are uniquely defined on a set of sub intervals The approximating function and the set of f...

Page 141: ...ng items line numbers cursor instructions additional items comments etc Through beam An object detection system used within a robot s imaging sensor system A finely focused beam of light is mounted at...

Page 142: ...r relative to the base frame Total Index Time Sum of the main axis sweep time and the secondary axis sweep times Tooling Envelope Volume in which the tooling can be present when rotated on its own axi...

Page 143: ...or dimensions of an object through visual feedback such as a television camera W Warning Indicates a potentially hazardous situation which if not avoided will result in death or serious injury Hazard...

Page 144: ...tem continually updates the World Model Robots use this World Model to aid in determining its actions in order to complete given tasks Wrist A set of rotary joints between the arm and the Manipulator...

Page 145: ...on Haryana India Fax 91 124 475 8542 Phone 91 124 475 8500 YASKAWA India Private Ltd Robotics Division YASKAWA Electric China Co Ltd 22F One Corporate Avenue No 222 Hubin Road Huangpu District Shangha...

Reviews: