background image

BASIC OPERATION

1.3.3 Examples of Connecting Host Controllerscont.

— 1-20 —

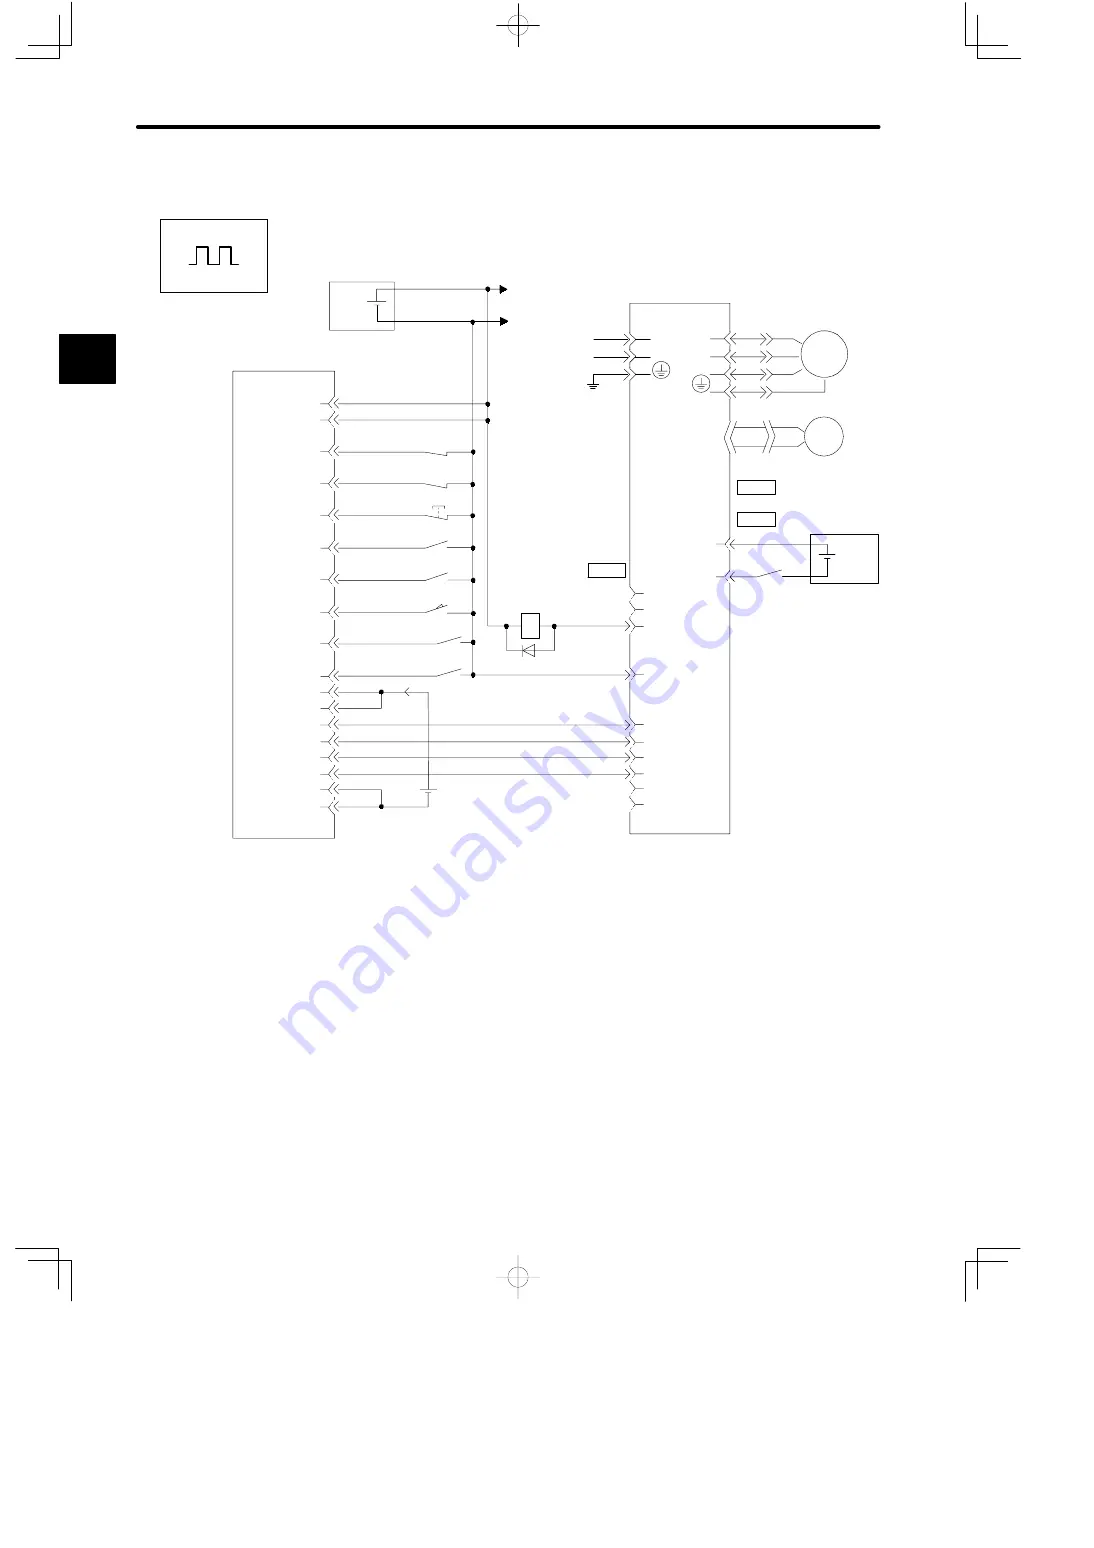
Example of Connecting to OMRON C500-NC112 Position Control Unit

Servopack for Position Control

+12V

+

+24V

1A
1B

2A

2B

3A

3B

4A

4B

5A

5B
8A
8B
9A
9B
10A
10B
7A
7B

+24V

CN2

CN1

CN1

+24VIN

/S-ON

PCO
SG
ALM

SG-COM

PULS
/PULS
SIGN
/SIGN

CLR
/CLR

9

1

10

13

7

3

14
15
16
17
18
19

+24V

1Ry

*1

1Ry

0

24

V

C500-NC112

(Made by OMRON)

Servomotor

Servopack

I/O power supply

CW LIMIT

CCW LIMIT

EMERGENCY

STOP
EXTERNAL

INTERRUPT

ORIGIN

ORIGIN

PROXIMITY

LOCAL

READY

+5V
+5V

PULSE OUTPUT

CW+CCW

DIRECTION
OUTPUT

CW

External

power supply

+5V

+5V

*1 The ALM signal is output for approximately two seconds when the power is turned ON. Consider this when

designing the power ON sequence.

Use the ALM signal to operate the alarm detection relay (Relay 1Ry) and turn OFF the power supply to the

Servopack.

Note

Only signals for the OMRON C500-NC112 Position Control Unit and the Yaskawa Servopack are

shown here.

DC24V
GND

U

V

W

M

PG

1

Positions

Artisan Technology Group - Quality Instrumentation ... Guaranteed | (888) 88-SOURCE | www.artisantg.com

Summary of Contents for Sigma Mini GMM-A1S312 Series

Page 1: ...ss underutilized and idle equipment along with credit for buybacks and trade ins Custom engineering so your equipment works exactly as you specify Critical and expedited services Leasing Rentals Demos In stock Ready to ship TAR certified secure asset solutions Expert team I Trust guarantee I 100 satisfaction All trademarks brand names and brands appearing herein are the property of their respectiv...

Page 2: ...YASKAWA YASKAWA MANUAL NO SIE S800 27C AC Servomotors and Driver SGMM Servomotor SGDF Servopack Artisan Technology Group Quality Instrumentation Guaranteed 888 88 SOURCE www artisantg com ...

Page 3: ...ated equipment and systems WARNING Indicates precautions that if not heeded could result in loss of life or serious injury CAUTION Indicates precautions that if not heeded could result in relatively serious or minor injury damage to the product or faulty operations In some instances items described in CAUTION may also result in a serious accident Artisan Technology Group Quality Instrumentation Gu...

Page 4: ... SGDF jjCS If neither this icon nor the following icon appears the description is applicable to both types of Servopack Indicates information that is applicable only to Servopacks for position control Model SGDF jjCP If neither this icon nor the previous icon appears the description is applicable to both types of Servopack Indicates information explaining the operating procedure using Hand held Di...

Page 5: ...0 CHAPTER 2 APPLICATIONS 2 1 2 1 Setting Parameters According to Machine Characteristics 2 4 2 1 1 Changing Motor Rotation Direction 2 4 2 1 2 Torque Limit 2 5 2 2 Setting Parameters According to Host Controller 2 9 2 2 1 Speed References 2 9 2 2 2 Position References 2 13 2 2 3 Encoder Output 2 17 2 2 4 Contact I O 2 21 2 2 5 Electronic Gear 2 24 2 2 6 Contact Input Speed Control 2 28 2 2 7 Torqu...

Page 6: ...73 2 8 4 Connector Terminal Layouts 2 74 CHAPTER 3 USING THE DIGITAL OPERATOR 3 1 3 1 Basic Operations 3 2 3 1 1 Connecting the Digital Operator 3 2 3 1 2 Resetting Servo Alarms 3 3 3 1 3 Basic Functins and Mode Selection 3 4 3 1 4 Operation in Status Display Mode 3 5 3 1 5 Operation in Parameter Setting Mode 3 7 3 1 6 Operation in Monitor Mode 3 9 3 2 Applications 3 13 3 2 1 Operation in Alarm Tr...

Page 7: ...4 6 1 Cable Specifications and Peripheral Devices 4 50 4 6 2 Motor Cables 4 51 4 6 3 Encoder Cables 4 54 4 6 4 Connector Kits 4 56 4 6 5 Cable with CN1 Connector at One End Only 4 61 4 6 6 Circuit Breaker 4 61 4 6 7 Noise Filter 4 62 4 6 8 Magnetic Contactor 4 62 4 6 9 Surge Suppressor 4 64 4 6 10 Variable Resistor for Speed Setting 4 64 4 6 11 Encoder Signal Converter Unit 4 65 4 6 12 Cables for ...

Page 8: ... Series AC Servopack Gain Adjustment A 2 A 1 1 Σ Series AC Servopacks and Gain Adjustment Methods A 2 A 1 2 Basic Rules for Gain Adjustment A 3 A 2 Adjusting a Speed control Servopack A 4 A 2 1 Adjusting Using Autotuning A 4 A 2 2 Manual Adjustment A 5 A 3 Adjusting a Position control Servopack A 8 A 3 1 Adjusting Using Autotuning A 8 A 3 2 Manual Adjustment A 9 A 4 Gain Setting References A 13 A ...

Page 9: ...ers explaining maintenance For users who are going to maintain and troubleshoot Σ Series products Chapter Title Page Area CHAPTER 1 Basic Operation 1 1 B Describes steps to take when product is received plus basic wiring and application methods CHAPTER 2 Applications 2 1 B Describes the effective usage of Σ Series features according to application CHAPTER 3 Using the Digital Operator 3 1 B Describ...

Page 10: ...vopack Servo Drive A set including an SGMM SGDF Servomotor and an SGDF Servopack Servo System A complete Servo control system consisting of Servo Drive host controller and peripheral devices Description of Technical Terms Technical terminology that appears as bold in text is explained briefly at the bottom of the page Artisan Technology Group Quality Instrumentation Guaranteed 888 88 SOURCE www ar...
Page 11: ...rrosive gases inflammable gases or combustibles Doing so may result in electric shock or fire J Wiring WARNING D Ground the equipment ground terminal according to electrical codes ground resistance 100 Ω or less Improper grounding may result in electric shock or fire CAUTION D Do not connect a three phase power supply to the U V or W output terminals Doing so may result in injury or fire D Securel...

Page 12: ...efore starting operation with a machine connected make sure that an emergency stop can be applied at any time Not doing so may result in injury D Do not touch the heat sinks during operation Doing so may result in burns due to high temperatures J Maintenance and Inspection WARNING D Never touch the inside of the Servopacks Doing so may result in electric shock D Do not touch terminals for five min...

Page 13: ...nt specification modification and manual improvement When this manual is revised the manual code is updated and the new manual is published as a next edition The edition number appears on the front and back covers S If the manual must be ordered due to loss or damage inform your nearest Yaskawa representa tive or one of the offices listed on the back of this manual S Yaskawa will not take responsi...

Page 14: ...se of the information contained herein Moreover because Yaskawa is constantly striving to improve its high quality products the information contained in this manual is subject to change without notice Every precaution has been taken in the preparation of this manual Nevertheless Yaskawa as sumes no responsibility for errors or omissions Neither is any liability assumed for damages resulting from t...

Page 15: ...pack 1 9 1 2 4 Power Loss 1 11 1 3 Connection and Wiring 1 12 1 3 1 Connecting to Peripheral Devices 1 12 1 3 2 Main Circuit Wiring and Power ON Sequence 1 14 1 3 3 Examples of Connecting Host Controllers 1 16 1 4 Conducting a Test Run 1 23 1 4 1 Test Run in Two Steps 1 23 1 4 2 Step 1 Test Run for Servomotor without Load 1 24 1 4 3 Step 2 Test Run with the Servomotor Connected to the Machine 1 28...

Page 16: ...e power is turned OFF residual volt age still remains in the capacitor inside the Servo pack If inspection is to be performed after the power is turned OFF always wait at least 5 min utes to avoid the risk of an electrical shock Install the Servopack at least 10 mm from other devices The Servopack generates heat Configure the system layout so that the Servopack is located where it can radiate heat...

Page 17: ... operation cannot be performed by ro tating the motor from the load and applying regen erative braking Regenerative braking by the Ser vopack can be applied only for a short period such as when the motor is stopped Do not operate the Servomotor by turning the power ON and OFF Frequentlyturningthepower ONand OFFcauses theinternalcircuitelementstodeteriorate Always start or stop the Servomotor by us...

Page 18: ...the following table Check if the motor shaft rotates smoothly If the motor shaft is smoothly turned by hand it is normal If the motor has brakes however it cannot be turned manually Check for damage Check the overall appearance and check for damage or scratches resulting from transportation Check screws for looseness Check for looseness by using a screwdriver If any of the above items are faulty o...

Page 19: ...ars Option C With brake 24 VDC 2 Straight without key 6 Straight with key and tap Encoder specifications Σ Series SGMM Servomotor Supply voltage 3 2048 P R incremental encoder With reduction gears A 1 5 1 1 5 B 1 16 2 1 16 C 1 25 3 1 25 10 20 W 30 W Rated output Gear ratio Shaft specifications A1 10 W A2 20 W A3 30 W B 100 VAC C 24 VDC S EC safety standards 24 VDC 10 W 20 W A Servo packs SGDF A1CS...

Page 20: ...ing Note Do not get thinner on any other parts of the Servomotor when cleaning the shaft Storage Temperature When the Servomotor is to be stored with the power cable disconnected store it within the following temperature range Between 20 and 60 C Installation Site The Servomotors are designed for indoor use Install the Servomotor in an environment which meets the following conditions Free from cor...

Page 21: ...ircumference The difference between the maximum and minimum measurements must be 0 03 mm or less Turn together with couplings Measure this distance at four different positions in the circumference The difference between the maximum and minimum measurements must be 0 03 mm or less Turn together with couplings Note If the shafts are not aligned properly vibration will occur resulting in damage to th...

Page 22: ... Standard A1C31jj 34 1 7 7 14 7 3 3 A2C31jj 44 1 9 9 A3C31jj B3CF1j 8 1 8 4 0 0 90 F B5CF1j Fr B9CF1j 10 2 2 Fs With Gears A1C3JAjj 51 9 11 7 47 0 10 5 Fs A2C3JAjj A1C3JBjj 76 4 17 2 A2C3JBjj A1C3JCjj 89 2 20 1 A2C3JCjj Note a The box j at the end of the model number is for the shaft specifications b The allowable load is applied to the shaft end TERMS Thrust load and radial load Thrust load Fs Sh...

Page 23: ...the Servopack does not exceed 50 C Installed near a source of vibration Install a vibration isolator underneath the Servopack to prevent it from receiving vibration Installed in a place subject to corrosive gases Corrosive gases do not immediately affect the Servopack but will eventually cause contactor related devices to malfunction Take appropriate action to prevent corrosive gases Others Do not...

Page 24: ...tion or fans as shown in the above diagram Adjacent Installation When installing Servopacks side by side provide at least 10 mm space between them and at least 50 mm space above and below them as shown in the figure above Install cooling fans above the Servopacks to prevent the temperature around each Servopack fromincreasingexcessivelyandalsotomaintainthetemperature insidethecontrolpanel evenly C...

Page 25: ...llowing table Servopack Type Capacity W Inrush Current Aop Output Current A rms Power Loss W SGDF A1C 10 3 8 2 1 7 SGDF A2C 20 3 8 2 0 7 SGDF A3C 30 3 8 2 9 7 SGDF B3C 3 3 8 1 3 7 SGDF B5C 5 3 8 1 3 7 SGDF B9C 10 3 8 1 5 7 1 Artisan Technology Group Quality Instrumentation Guaranteed 888 88 SOURCE www artisantg com ...

Page 26: ... main circuit It also describes an example of connecting to main host controllers 1 3 1 Connecting to Peripheral Devices This section shows a standard example of connecting Σ Series products to peripheral de vices and briefly explains which peripheral devices can be connected and in which locations to connect them 1 Artisan Technology Group Quality Instrumentation Guaranteed 888 88 SOURCE www arti...

Page 27: ...r Model HI Series Magnetic contactor AC DC power supply Supplies Servopack with 24 VDC AC DC power supply Power supply ground line Digital Operator Allows the user to set parameters or operation references and display operation status or alarm status Personal computers can also be used Personal computer Connecting cable JZSP CFS01 to 03 Encoder cable Motor cable JUSP OP02A 3 Host Controller Connec...

Page 28: ...Circuit breaker FIL Noise filter MC Contactor Ry Relay PL Patrol light SUP Surge suppressor D Flywheel diode Overview and Functions of Main Circuit Terminals The following tables show the name and description of each main circuit terminal function Terminal Symbol Name Description CN3 Main input terminal 24 VDC 10 CN4 Motor connection terminal Connect U to the red motor terminal V to the white moto...

Page 29: ...on is required to initialize the Servopack Servo alarm ALM output signal Power supply Wiring Precautions After turning the power OFF do not touch the power terminals for 5 minutes Residual volt age may remain in the Servopack Avoid frequently turning the power ON and OFF The Servopack has a capacitor in the pow er supply so a high charging current flows when the power is turned ON Therefore fre qu...

Page 30: ...e Servopack only For other signals refer to the relevant technical documentation Example of Connecting to PROGIC 8 Servopack for Speed Torque Control PA PA PB PB PC PC D A GND 24OUT SVON PCON Reserved SVALM O24OUT FG connector frame PAO PAO PBO PBO PCO PCO V REF T REF SG 24VIN S ON 2 P CON 2 ALMRST 2 ALM SG COM 14 15 16 17 18 19 12 13 9 7 3 1 2 3 4 5 6 7 8 19 11 12 16 15 17 24VDC GND 1 These pin n...

Page 31: ... 6 7 25 2 3 45 46 47 30 31 32 48 49 50 10 11 12 0V 5V 12V 12V 1Ry 20 33 1 24 V 024V 1 The ALM signal is output for approximately two seconds when the power is turned ON Consider this when designing the power ON sequence Use the ALM signal to operate the alarm detection relay relay 1Ry and turn OFF the power supply to the Servopack ALARM D A OUTPUT 0V 0V Yaskawa JAMSC B2833 Servomotor Servopack SER...

Page 32: ...der this when desigining the power ON sequence Use the ALM signal to operate the alarm detection relay Relay 1Ry and turn OFF the power supply to the Servopack STOP START 24 V 024V Yaskawa JAMSC B2833 Servomotor Servopack SERVO NORMAL DECEL LS PULSE PULSE SIGN SIGN 12 V CLR 0 V PA PB PC 0 V 0 V 0 V FG CN1 CN1 CN2 CN2 CN1 CN2 12 V 12 V 5 V 0V 1Ry 2Ry 36 1kΩ PULSE PULSE SIGN SIGN CLR CLR SG FG 24 VI...

Page 33: ...d ON when proximity is detected 24 V 024V C500 NC222 Made by OMRON Servomotor Servopack CN1 CN2 I O power supply EXT IN X AXIS Y AXIS M D 2 1 The ALM signal is output for approximately two seconds when the power is turned ON Consider this when designing the power ON sequence Use the ALM signal to operate the alarm detection relay Relay 1Ry and turn OFF the power supply to the Servopack 2 Twisted p...

Page 34: ... LIMIT EMERGENCY STOP EXTERNAL INTERRUPT ORIGIN ORIGIN PROXIMITY LOCAL READY 5V 5V PULSE OUTPUT CW CCW DIRECTION OUTPUT CW External power supply 5V 5V 1 The ALM signal is output for approximately two seconds when the power is turned ON Consider this when designing the power ON sequence Use the ALM signal to operate the alarm detection relay Relay 1Ry and turn OFF the power supply to the Servopack ...

Page 35: ...ned ON Consider this when designing the power ON sequence Use the ALM signal to operate the alarm detection relay Relay 1Ry and turn OFF the power supply to the Servopack 2 These pin numbers are the same for both X and Y axes 3 Twisted pair cable Note Only signals for the MITSUBISHI AD72 Positioning Unit and the Yaskawa Servopack are shown here AD72 Made by MITSUBISHI Servomotor Servopack I O powe...

Page 36: ...nds when the power is turned ON Consider this when designing the power ON sequence Use the ALM signal to operate the alarm detection relay Relay 1Ry and turn OFF the power supply to the Servopack Note Only signals for the MITSUBISHI AD75 Positioning Unit and the Yaskawa Servopack are shown here 24V AD75 Made by MITSUBISHI Servomotor Servopack I O power supply 2 ON when positioning is stopped ON wh...

Page 37: ...otor shaft disconnected from the machine Purpose To check power supply circuit wiring To check motor wiring To check I O signal CN1 wiring Outline Turn the power ON Operate the motor with a digital op erator Check I O signals CN1 Conduct a test run using I O signals Step 2 Conducting a test run with the Servomotor and machine connected Adjust the Servopack according to machine characteristics Spee...

Page 38: ...gment displayon theDig ital Operator will change as shown in the diagram Power will not be supplied to the Servomotor because the servo is OFF If an alarm display appears on the 7 segment display as shown in the diagram above the power supply cir cuit Servomotor wiring or encoder wiring is incorrect Turn OFF the power and correct the problem Refer to Appendix D List of Alarm Displays for details O...

Page 39: ...n No Description S ON CN1 1 Servo is turned ON when this input signal is at 0 V However leave the servo in OFF status Turn ON servo motor Turn ON the servo as follows Check that no reference has been input Speed torque control V REF and T REF are at 0 V Position control PULS and SIGN are fixed Set S ON to 0 V If normal the motor is turned ON and the Digital Operator displays the data as shown in t...

Page 40: ... Reference speed Has a reference speed been input Is the motor speed as set Does the reference speed match the actual Servomotor speed Does the Servomotor stop when no reference is input 3 If the motor rotates at an extremely slow speed when 0 V is specified as the reference voltage correct the reference offset value as described in 3 2 4 Reference Offset Au tomatic Adjustment 4 To change the Serv...

Page 41: ...rence speed match the actual Servomotor speed Does the Servomotor stop when no reference is input 4 To change motor speed or the direction of rotation reset the parameters shown be low Cn 24 Cn 25 Electronic gear ratio Refer to 2 2 5 Electronic Gear Cn 02 bit 0 Reverse rotation mode Refer to 2 1 1 Switching Motor Rotation Direction If an alarm occurs or the Servomotor fails to rotate during the ab...

Page 42: ...djust the Servopack according to the machine characteristics Conduct a test run according to the procedure described below 1 Check that power is OFF Turn OFF the Servopack power 2 Connect the Servomotor to the machine Refer to 1 2 2 Installing the Servomotor 3 Perform autotuning Tune the Servopack according to the machine characteristics Refer to 3 2 3 Autotuning 4 Operate by reference input As in...

Page 43: ...vents the motor from rotating due to gravity External force Servomotor Note To prevent faulty operation caused by gravity or external force first check that theServomo tor and holding brake operate normally with the Servomotor disconnected from the machine If all operations are normal connect the Servomotor to the machine and conduct a test run For wiring of a Servomotor with a brake refer to 2 4 ...

Page 44: ...imum Parameters Required for Test Run For details on how toset each parameter refer to 3 1 5Operation inParameter SettingMode Servopack for Speed Torque Control Cn 03 Speed reference adjustment gain Refer to 2 2 1 Speed References Cn 0A Encoder pulse dividing ratio Refer to 2 2 3 Encoder Output Servopack for Position Control Cn 02 bits 3 4 5 Reference pulse form selection Refer to 2 2 2 Position R...

Page 45: ...set the following param eter Cn 02 bit 0 Reverse rotation mode Refer to 2 1 1 Switching Motor Rotation Direction Minimum Input Signals Required for Test Run The following table lists the minimum input signals required to conduct a test run Signal Name Pin Number Function S ON servo ON CN1 1 Switching between motor ON and OFF status The memory switch can be used to eliminate the need for external s...

Page 46: ...Parameters According to Host Controller 2 9 2 2 1 Speed References 2 9 2 2 2 Position References 2 13 2 2 3 Encoder Output 2 17 2 2 4 Contact I O 2 21 2 2 5 Electronic Gear 2 24 2 2 6 Contact Input Speed Control 2 28 2 2 7 Torque Control 2 32 2 2 8 Reference Pulse Inhibit Function INHIBIT 2 36 2 2 9 Reference Pulse Input Filter Selection Function 2 37 2 3 Setting Up the Σ Series Servopack 2 38 2 3...

Page 47: ...ing Speed Bias 2 52 2 6 6 Mode Switch 2 53 2 6 7 Speed Loop Compensation 2 58 2 7 Designing a Protective Sequence 2 60 2 7 1 Servo Alarm Output 2 60 2 7 2 Servo ON Input Signal 2 62 2 7 3 Positioning Complete Output 2 63 2 7 4 Speed Coincidence Output 2 64 2 7 5 Running Output Signal 2 65 2 8 Special Wiring 2 67 2 8 1 Wiring Precautions 2 67 2 8 2 Wiring for Noise Control 2 69 2 8 3 Using More Tha...

Page 48: ... signals refer to 2 8 4 Connector Terminal Layout For a list of parameters refer to Appendix C List of Parameters For information on setting parameters refer to 3 1 5 Operation in Parameter Setting Mode Parameters are divided into the following two types Constants Usage Memory switches Cn 01 and Cn 02 Set each bit to ON or OFF to select a function Constant settings Cn 03 and later Set a numerical ...

Page 49: ... remain unchanged Reference Standard Setting Reverse Rotation Mode Forward Run Reference Encoder output from Servopack Phase A Phase B PAO PBO Encoder output from Servopack Phase A Phase B PAO PBO Reverse Run Reference Encoder output from Servopack Phase A Phase B PAO PBO Encoder output from Servopack Phase A Phase B PAO PBO Setting Reverse Rotation Mode Set bit 0 of memory switch Cn 02 to select ...

Page 50: ...osition Control Cn 09 TLMTR Reverse Rotation Torque Limit Unit Setting Range 0 to Maximum Torque Factory Setting Maximum Torque For Speed Torque Control and Position Control Sets the maximum torque values for forward rotation and reverse rotation respectively Sets these parameters when torque must be restricted according to ma chine conditions This torque restriction function always monitors torqu...

Page 51: ...1 8 is at high level Motor output torque is not being restricted Internal torque reference is equal to or below the preset value Preset Value Cn 08 TLMTF Cn 09 TLMTR Cn 18 CLMI At CL input Note This function is changed to another function depending on the setting of the pa rameter Cn 2C How to Set Level 2 External Torque Limit First use a contact input signal to make the torque current limit value...

Page 52: ...nction is valid when bit 2 of memory switch Cn 02 is set to 0 Using CL Signal This section describes how to use input signal CL as torque limit input signals I O power supply Servopack 24VIN CL CN1 9 CN1 1 Host controller 5mA 24 V Photocoupler 4 7kΩ Input CL CN1 1 Forward reverse External Torque Limit Input For Speed Torque Control and Position Control These signals are for forward and reverse ext...

Page 53: ...signal selection 1 IN1 CN1 1 input signal Factory Setting 0 For Speed Torque Control and Position Control Cn 2B Input signal selection 2 IN2 CN1 2 input signal Factory Setting 2 For Speed Torque Control and Position Control The function of the input signal changes according to the setting as shown in the follow ing diagram P CON Servopack P CON S ON ALMRST CL CL IN1 IN2 Setting Meaning 0 S ON Serv...

Page 54: ...V REF CN1 12 Speed Reference Input For Speed Torque Control Input SG CN1 13 Signal Ground for Speed Reference Input For Speed Torque Control Use these signals when speed control is selected bits A and B of memory switch Cn 01 For ordinary speed control always wire the V REF and SG terminals Motor speed is controlled in proportion to the input voltage between V REF and SG Setting Example Cn 03 500 ...

Page 55: ... 03 accord ing to output voltage specifications Use the memory switch and input signal P CON to specify one of the four modes shown be low Cn 01 Bit A Control Mode Selection Factory Setting 0 For Speed Torque Control Cn 01 Bit B Control Mode Selection Factory Setting 0 For Speed Torque Control The Servopack for speed torque control provides three different control modes 2 Servopack CN1 12 CN1 13 S...

Page 56: ...amp function to be set when the motor stops D Speed reference is input from V REF D P CON signal is used to turn the zero clamp function ON or OFF Zero clamp Zero clamp is performed when the following two conditions are met Condition 1 P CON is turned ON Condition 2 Motor speed drops below the preset value Preset value Cn 0F ZCLVL Servopack Speed reference CN1 12 CN1 1 P CON 0 1 CN1 1 is open Turn...

Page 57: ...ng contact input speed control Adjust the speed reference gain using the following parameter Cn 03 VREFGN Speed Reference Gain Unit min 1 V Setting Range 0 to 2162 Factory Setting 500 For Speed Torque Control This parameter is for speed torque control only Sets the voltage range for speed reference input V REF Sets this parameter according to the out put form of the host controller or external cir...

Page 58: ...ivalent Connection Example 2 Open Collector Output Sets the value of limiting re sistor R1 so that input cur rent i falls within the follow ing range Input Current i 7 to 15 mA Examples When Vcc is 12 V R1 1 kΩ When Vcc is 5 V R1 180 Ω 2 Positions Reference sign input Error counter clear input Reference pulse input PULS PULS CN1 14 CN1 15 SIGN SIGN CN1 16 CN1 17 CLR CLR CN1 18 CN1 19 Servopack Twi...

Page 59: ...osition Control Cn 02 Bit 4 Reference Pulse Form Selection Factory Setting 0 For Position Control Cn 02 Bit 5 Reference Pulse Form Selection Factory Setting 0 For Position Control Sets the form of a reference pulse that is externally output to the Servopack Sets the pulse form according to the host controller specifications Set also the input pulse logic in bit D of Cn 02 Cn 02 Input Pulse Refer e...

Page 60: ...ference form is two phase pulse train with 90 phase difference the input pulse multiply function can be used The electronic gear function can also be used to convert input pulses Example of I O Signal Generation Timing Servo ON Base block Sign pulse train Release t1 30 ms t2 6 ms When parameter Cn 12 is set to 0 t3 40 ms PG pulse t4 t5 t6 2 ms t7 20 μs SIGN PULS COIN Note 1 The interval from the t...

Page 61: ...e B is 90 behind phase B Phase A Phase B Phase B is 90 forward from phase B Parameter Cn 02 bits 3 4 and 5 is used to switch the input pulse multiplier mode CCW pulse CW pulse Maximum reference frequency 450 kpps CCW pulse CW pulse reference reference SIGN PULS Clearing the Error Counter Use the following procedure to clear the contents of the error counter Input CLR CN1 18 Error Counter Clear Inp...

Page 62: ...evel Cleared state 1 Clears the error counter only once when the rising edge of the CLR signal rises Cleared only once at this point 2 2 3 Encoder Output Encoder outputsignals dividedinside theServopack can be outputexternally These signals can be used to form a position control loop in the host controller Servomotor encoder Servopack Frequency dividing circuit Host controller This output is expla...

Page 63: ...ed SN75175 manufactured by Texas Instruments Inc or MC3486 or equivalent R termination resistor 220 to 470 Ω C decoupling capacitor 0 1 µF I O signals are described below Output PAO CN1 14 Encoder Output Phase A For Speed Torque Control Output PAO CN1 15 Encoder Output Phase A For Speed Torque Control Output PBO CN1 16 Encoder Output Phase B For Speed Torque Control Output PBO CN1 17 Encoder Outpu...

Page 64: ...ut PBO CN1 12 Encoder Output Phase B For Position Control Output PCO CN1 10 Encoder Output Phase C For Position Control Divided encoder signals are output Always connect these signal terminals when a position loop is formed in the host controller to perform position control Set a dividing ratio in the following parameter Dividing ratio setting Cn 0A PGRAT The dividing ratio setting is not relevant...

Page 65: ...ntrol 1024 for SGDF BjCj Sets the number of output pulses for PG output sig nals PAO PAO PBO and PBO Pulses from motor encoder PG are divided by the preset number of pulses before being output The number ofoutputpulses per revolution is set in this parameter Setthisvalue accordingto the reference unit of the machine or controller to be used The setting range varies according to the encoder used Se...

Page 66: ...rvopack outputs signals externally External Power Supply 24 1 VDC 50 mA or more Yaskawa recommends that this external power supply be the same type as for the output cir cuit Input IN1 CN1 1 Input Signal Selection 1 Factory Setting 0 For Speed Torque Control and Position Control Input IN2 CN1 2 Input Signal Selection 2 Factory Setting 2 For Speed Torque Control and Position Control The function of...

Page 67: ...te Servopack operation status Servopack Photocoupler output Per output Maximum operational voltage 30 VDC Maximum output current 50 mA DC Photocoupler CN1 7 CN1 3 CN1 8 SG COM OUT2 ALM MAX 50mA MAX 50mA 24V I O power supply Note Provide an external I O power supply separately There are no power terminals to which the Servopack outputs signals externally Yaskawa recommends that this external power ...

Page 68: ...trol COIN positioning completed signal for positioning control 4 CLT torque limit detection output Output SG COM CN1 3 Output Signal Ground Common For Speed Torque Control and Position Control This signal ground is used for the following output signals Connect to 0 V on the external power supply Contact Output Signals ALM TGON BK V CMP for speed torque control only COIN for position control only C...

Page 69: ...reference the host controller needs to make this calculation Machine conditions and reference unit must be defined for the electronic gear function beforehand To move a workpiece 10 mm Reference unit is 1 μm so 10 mm 1 μm 10 000 pulses Number of encoder pulses 2048 Ball screw pitch 6 mm Workpiece Setting the Electronic Gear Calculate theelectronic gear ratio B A according totheprocedure below and ...

Page 70: ...all Screw Disc Table Belt Pulley Load shaft 1 revolution P Pitch Reference unit P 1 revolution Reference unit 360 Load shaft D Pulley diameter Load shaft 1 revolution Reference unit π D 5 Determine the electronic gear ratio B A If the load shaft makes n revolutions when the motor shaft makes m revolutions the gear ratio of motor shaft and load shaft is n m Electronic gear ratio B A Number of encod...

Page 71: ...lectronic Gear Ratio Denominator Unit None Setting Range 1 to 65535 Factory Setting 1 For Position Control These parameters are for position control only Set the electronic gear ratio according to machine specifications Electronic gear ratio B A Cn 24 Cn 25 B Number of encoder pulses x 4 x Motor shaft rotating speed A Reference unit load travel distance per revolution of load shaft x Load shaft ro...

Page 72: ...ble Reference unit 0 1 Gear ratio 3 1 Load shaft Incremental encoder 2048 pulses per revolution Travel distance per revolution of load shaft Preset values 24576 3600 Cn 24 Cn 25 0 1 360 3600 Electronic gear ratio B A 2048 4 3 3600 1 Cn 24 Cn 25 Belt Pulley Pulley diameter 100 mm Encoder 1024 pulses per revolution Cn 24 Cn 25 Load shaft Reference unit 0 0254 mm Gear ratio 2 4 1 Travel distance per ...

Page 73: ...Cn 0A X4 2 2 6 Contact Input Speed Control The contact input speed control function provides easy to use speed control It allows the user to initially set three different motor speeds in parameters select one of the speeds exter nally by contact input and run the motor This function can be used for speed torque control only Servopack CN1 1 CN1 2 Cn 1F SPEED 1 Cn 20 SPEED 2 Cn 21 SPEED 3 Speed sele...

Page 74: ...trol signals automatically 1 1 Cn 20 SPEED2 g y regardless of CN 2B and C 2C tti 1 0 Cn 21 SPEED3 g Cn 2C settings 2 Set three motor speeds in the following parameters Cn 1F SPEED1 1st Speed Contact Input Speed Control Unit min 1 Setting Range 0 to Maximum Speed Factory Setting 100 For Speed Torque Control Cn 20 SPEED2 2nd Speed Contact Input Speed Control Unit min 1 Setting Range 0 to Maximum Spe...

Page 75: ...e 0 to 10000 Factory Setting 0 For Speed Torque Control In the Servopack a speed reference is multiplied by the preset acceleration or deceleration value to provide speed control When a progressive speed reference is input or contact input speed control is used smooth speed control can be performed For normal speed control set 0 in each parameter Set the following value in each parameter Cn 07 Tim...

Page 76: ...d reference 0 1 0 Stop Stopped by zero clamp 0 0 1 0 1 Analog speed reference V REF input 1 1 1 With zero clamp func tion 0 1 SPEED1 Cn 1F 1 1 SPEED2 Cn 20 1 0 SPEED3 Cn 21 Preset values 0 or 1 and input signal status in the portions indicated by horizontal bars are optional Set the rotation directions for Cn 1F Cn 20 and Cn 21 in bits 3 4 and 5 of Cn 02 respectively Note For the speed torque cont...

Page 77: ...Stopped Stopped 1st speed 2nd speed 3rd speed SPEED3 SPEED2 SPEED1 SPEED1 SPEED2 SPEED3 2 2 7 Torque Control The Servopack can provide the following torque control Level 1 To restrict the maximum output torque to protect the machine or workpiece internal torque limit Level 2 To restrict torque after the motor moves the machine to a specified position exter nal torque limit Level 3 To always contro...

Page 78: ...This is a dedicated torque control mode D A torque reference is input from T REF D P CON is not used Torque reference Servopack 1 0 D Speed reference input V REF cannot be used D Parameter Cn 14 can be used for maximum speed control Example of Use Tension control Tension Servo pack Servomotor 1 1 Not used do not set 0 0 Speed control standard setting 0 1 Zero clamp speed control Input Signals The ...

Page 79: ...Speed Setting Type 25HP 10B manufactured by Sakae Tsushin Kogyo Co Ltd Input V REF CN1 12 Speed Reference Input For Speed Torque Control Input SG CN1 13 Signal Ground for Speed Reference Input For Speed Torque Control These signals are used when speed control is se lected bits A and B of memory switch Cn 01 For normal speed control always connect these signal terminals Motor speed is controlled so...

Page 80: ...or Torque Control Unit min 1 Setting Range 0 to Maximum Speed Factory Setting Maximum Speed For Speed Torque Control Only Sets a motor speed limit value in this constant when torque control is selected This parameter is used to prevent machine over speed during torque control For torque control set bits A and B of memory switch Cn 01 Cn 03 VREFGN Speed Reference Gain Unit min 1 V Setting Range 0 t...

Page 81: ...vopack P CON P CON Schematic Block Diagram for INHIBIT Function Note Use Cn 01 bit F to enable disable the INHIBIT function Using Reference Pulse Inhibit Function INHIBIT To use the INHIBIT function set the memory switch Cn 01 bit F to 1 Cn 01 Bit F Reference Pulse Inhibit Function INHIBIT 1 Enable 0 Disable Factory Setting 0 For Position Control The INHIBIT function will be enabled Setting Meanin...

Page 82: ...or Position Control Sets the memory switch according to the output form line driver or open collector of refer ence pulses from the host controller Setting Meaning 0 Output form of reference pulses from host controller Line driver output maximum frequency of reference pulse 450 kpps 1 Output form of reference pulses from host controller Open collector output maximum frequency of reference pulse 20...

Page 83: ...uch as a torque limit value or speed loop gain is set in this constant For Speed Torque Control Parameter Name and Code Remarks Cn 01 Memory switch Each bit number has a Cn 02 Memory switch Each bit number has a switch ON OFF Cn 03 VREFGN Speed reference gain Cn Parameter setting Cn Parameter setting Cn 2C OUTS2 Output signal selection 2 For Position Control Parameter Name and Code Remarks Cn 01 M...

Page 84: ...Mode 2 3 2 Jog Speed Use the following parameter to set or modify a motor speed when operating the Σ Series Ser vo from a Digital Operator Cn 10 JOGSPD Jog Speed Unit min 1 Setting Range 0 to Maximum Speed Factory Setting 500 For Speed Torque Control and Position Control This constant is used to set a motor speed when the motor is operated using a Digital Operator 2 Artisan Technology Group Qualit...

Page 85: ...rque Reference voltage Reference speed or reference torque Reference Offset Adjustment The following two methods can be used to adjust the reference offset to 0 V Automatic adjustment of reference offset Reference offset is automatically adjusted to 0 V Manual adjustment of reference offset Reference offset can be intentionally set to a specified value Note If a position control loop is formed in ...

Page 86: ...en if the motor is forcibly rotated by external force it returns to the zero clamp position Host controller Speed reference Speed reference less than Cn 0A setting is ignored Stops instantaneously P CON C N 5 CN3 CN4 CN2 CN1 Set the following memory switch so that input signal P CON can be used to enable or disable the zero clamp function Cn 01Bit A Control Mode Selection Factory Setting 0 For Spe...

Page 87: ...ence input T REF cannot be used Settings Set the motor speed level at which zero clamp is to be performed in the following parameter Cn 0F ZCLVL Zero clamp Level Unit min 1 Setting Range 0 to Maximum Speed Factory Setting 10 For Speed Torque Control If zero clamp speed control is selected set the motor speed level at which zero clamp is to be performed Conditions for Zero clamp Zero clamp is perfo...

Page 88: ...ples Use Servopack contact output signal BK and brake power supply to form a brake ON OFF circuit The following diagram shows a standard connection example 24VDC 0V 24V CN1 8 CN1 3 BK SG COM MAX 50mA BK RY BK RY 24V Power supply Servopack Servomotor with brake BK RY Brake control relay BK M U V W PG CN2 Output BK CN1 8 Brake Interlock Output For Speed Torque Control and Position Control This outpu...

Page 89: ...set the following pa rameter to adjust brake ON timing Cn 12 BRKTIM Time delay from the time a brake signal is output until servo OFF status occurs Unit 10 ms Setting Range 0 to 50 Factory Setting 0 For Speed Torque Control and Position Control This parameter is used to set output timing of brake control signal BKand servo OFFopera tion motor output stop when a Servomotor with brake is used With t...

Page 90: ...m occurrence during motor rotation Brakes for Servomotors are designed as holding brakes Therefore brake ON timing when the motor stops must be appropriate Adjust the parameter set tings while observing machine operation Conditions for BK Signal Output During Motor Operation The circuit between CN1 8 and CN1 3 is opened in either of the following situations 1 Motor speed drops below the value set ...

Page 91: ...In the Servopack a speed reference is multiplied by the acceleration or deceleration value set in Cn 07 or Cn 23 to provide speed control Smoothspeed controlcan beachieved whenprogres sive speed references are input or when contact input speed control is used Set these parameters as follows Cn 07 Time interval from the time the motor starts until the maximum speed 5000 min 1 is reached Cn 23 Time ...

Page 92: ...ot perform acceleration deceleration proces sing When reference pulse frequency is too low When reference electronic gear ratio is too high more than 10 times This function does not change the travel distance number of pulses 2 5 3 Gain Adjustment If speed loop gain or position loop gain exceeds the allowable limit for the servo system in cluding the machine to be controlled the system will vibrat...

Page 93: ...ed adjustment procedures refer to the following sections Adjustment Method Section Automatic adjustment of reference offset 3 2 4 Reference Offset Automatic Adjustment Mode Manual adjustment of reference offset 3 2 5 Speed Reference Offset Manual Adjustment Mode 2 5 5 Torque Reference Filter Time Constant If the machine causes vibration possibly resulting from the Servo Drive adjust the following ...

Page 94: ...in Cn 05 Speed loop integration time constant Cn 1A Position loop gain For details of how to perform autotuning refer to 3 2 3 Autotuning 2 6 2 Servo Gain Check and reset the servo gain when Automatically set servo gain values need to be checked after autotuning Each servo gain value checked after autotuning is to be directly set for another Servopack Response performance needs to be further enhan...

Page 95: ... the Servo pack Increasing the position loop gain value provides posi tion control with higher response and less error How ever there is a certain limit depending on machine characteristics This parameter is automatically set by the autotuning function Cn 1E OVERLV Overflow Unit 256 References Setting Range 1 to 65536 Factory Setting 1024 For Position Control Set in this parameter the error pulse ...

Page 96: ...bits A and B of memory switch Cn 01 are set to 0 as shown below input signal P CON serves as a PI P control changeover switch PI Control Proportional Integral control P Control Proportional control Cn 01 Bit A Control Mode Selection Factory Setting 0 For Speed Torque Control Cn 01 Bit B Control Mode Selection Factory Setting 0 For Speed Torque Control TERMS Feed forward control Control for making ...

Page 97: ... occurrence of overshoot and also shorten settling time For particular conditions refer to 2 6 6 Mode Switch If PI control mode is used when the speed reference has a reference offset the motor may rotate at a very slow speed and fail to stop even if 0 is specified as a speed reference In this case use P control mode to stop the motor 2 6 5 Setting Speed Bias The settling time for positioning can ...

Page 98: ...e switch 2 For normal use the speed loop gain and position loop gain set by autotuning provide sufficient speed position control Even if overshoot or undershoot occurs they can be suppressed by setting the accel eration deceleration time constant for the host controller the soft start time constants Cn 07 Cn 23 or smoothing time constant Cn 26 for the Servopack Mode Switch Selection Servopacks can...

Page 99: ...Point of Mode Switch Standard Setting If a torque reference exceeds the torque value set in parameter Cn 0C the speed loop switches to P control The Servopack is factory set to this standard mode Cn 0C 200 Example of Use If a mode switch is not used and PI control is always performed torque may enter a saturation state during acceleration or deceleration causing the motor speed to have overshoot o...

Page 100: ...nd undershoot Using Acceleration as a Detection Point of Mode Switch Standard Setting If motor acceleration exceeds the value set in pa rameter Cn 0E the speed loop switches to P con trol Example of Use If a mode switch is not used and PI control is always performed torque may enter a satura tion state during acceleration or deceleration causing the motor speed to have overshoot or undershoot Usin...

Page 101: ...de switch are summarized as follows Cn 01Bit B Mode Switch ON OFF Factory Setting 0 For Position Control This parameter is used to enable or disable the mode switch function Setting Meaning 0 Uses the mode switch function 1 Does not use the mode switch function The Servopack allows use of four different types of mode switch To select a mode switch set bits C and D of memory switch Cn 01 Cn 01 Bit ...

Page 102: ...ry Setting 200 For Speed Torque Control and Position Control Cn 0D REFMSW Mode Switch Speed Reference Unit min 1 Setting Range 0 to Maximum Speed Factory Setting 0 For Speed Torque Control and Position Control Cn 0E ACCMSW Mode Switch Acceleration Reference Unit 10 min 1 s Setting Range 0 to 3000 Factory Setting 0 For Speed Torque Control and Position Control Cn 0F ERPMSW Mode Switch Error Pulse U...

Page 103: ...use the following constant Cn 28 NDBCC Speed Loop Compensation Constant Unit Setting Range 0 to 100 Factory Setting 0 For Speed Torque Control First adjust the servo position speed loop gain speed loop integration time constant torque reference filter appropriately in the Cn 28 0 status Next gradually increase the set value of Cn 28 from 0 find the proper value at which noise and oscillation are m...

Page 104: ...urrent loop gain Cn 04 Speed loop integration time constant Cn 05 Current loop Speed calculation Compensation gain K is in proportion to the compensation constant parameter Cn 28 Cn 28 0 shows no compensation status Motor Compensation gain K 2 Artisan Technology Group Quality Instrumentation Guaranteed 888 88 SOURCE www artisantg com ...

Page 105: ... There are no DC power available from Ser vopack for output signals Contact Output Signal ALM Output ALM CN1 7 Servo Alarm Output For Speed Torque and Position Control Output SG COM CN1 3 Signal Ground for Servo Alarm Output For Speed Torque andPosition Control Signal ALM is output when the Servopack detects an alarm Form an external circuit so that the alarm output ALM turns OFF the Servopack ON ...

Page 106: ...the number of feedback pulses from the Encoder OFF Overrun Disconnec tion of en coder signal line Overrun occurred due to motor or encoder signal wiring faults Encoder signal line is disconnected Unde Digital Operator transmis Communication error occurred between Digital Oper ator and Servopack Unde fined transmis sion error ON No error ON Output transistor is ON OFF Output transistor is OFF Displ...

Page 107: ...rvopack Photo coupler Host controller I O power supply Input S ON CN1 1 Servo ON For Speed Torque Control and Position Control This signal is used to turn the motor ON or OFF ON CN1 1 is at low level Turns ON the motor This is normal operation state called servo ON state OFF CN1 1 is at high level Turns OFF the motor This is inop erable state called servo OFF state If the servo is turned OFF durin...

Page 108: ...ing Complete Output For Position Control This output signal indicates that motor operation is complete during position control The host controller usesthis signalas aninterlock toconfirm thatposition ing is complete ON status Circuit between CN1 8 and CN1 3 is closed CN1 8 is at low level Positioning is complete position error is below the preset value OFF status Circuit between CN1 8 and CN1 3 is...

Page 109: ...is output to indicate that actual motor speed matches a reference speed The host controller uses this signal as an interlock CN1 8 CN1 3 V CMP SG COM 24 V Photocoupler output Maximum operating voltage per output 30 VDC Maximum output current per output 50 mA DC Servopack I O power supply 0 V Output V CMP CN1 8 Speed Coincidence Output For Speed Torque Control This output signal indicates that actu...

Page 110: ...it between CN1 8 and CN1 3 is closed when the speed is between 1900 and 2100 min 1 2 7 5 Running Output Signal This section describes how to wire and use contact output signal TGON as a running output signal This signal indicates that a Servomotor is currently running CN1 8 CN1 3 TGON SG COM 24 V Photocoupler output Maximum operating voltage per output 30 VDC Maximum output current per output 50 m...

Page 111: ...Note Precautions for Setting Clear Servo Alarm To change a parameter that is made valid by turning the Servopack OFF and then ON always wait for at least the power holding time after the Servopack is turned OFF then turn ON the Servopack Follow the procedure below and then turn ON the power again a Make sure that all indicators LEDs on the Digital Operator are not lit b Make sure that the power an...

Page 112: ...ortion of the cable to minimize the cable length 2 For the ground wire use as thick a cable as possible Ground resistance of 100 Ω or less is recom mended Always use one line ground If the motor is insulated from the machine ground the motor directly 3 Do not bend or apply tension to cables Since the conductor of a signal cable is very thin 0 2 to 0 3 mm handle it with ade quate care 4 Use a noise...

Page 113: ...lters refer to 2 8 2 Wiring for Noise Con trol 6 Use a molded case circuit breaker MCCB or fuse to protect the power supply line from high voltage The Servopack is directly connected to com mercial power supply without a transformer Always use an MCCB or fuse to protect the ser vo system from accidental high voltage Select an appropriate MCCB or fuse according to the Servopack capacity and the num...

Page 114: ...ise filter Servomotor Servopack Casing Operation relay sequence Signal generation circuit provided by customer Wire with a thickness of 3 5 mm2 or more Ground plate Ground One line ground ground to 100 Ω or less Casing Casing see note 2 Casing Casing 100 or 200 VAC 3 5 mm2 or more 3 5 mm2 or more CN2 CN1 AC DC power supply 2 mm2 or more 3 5 mm2 or more CN2 U V W PG M When using a noise filter alwa...

Page 115: ...ilter to prevent noise from the power supply line Install a noise filter on the power supply line for peripheral equipment as necessary The following table lists recommended noise filters for each Servopack type Table 2 1 Noise Filters Servopack Type Noise Filter Connection Recommended Noise Filter See Note Co ect o Type Specifications 10 W SGDF A1Cj Correct LF 205A Single phase 200 VAC A 20 W SGD...

Page 116: ... not accommodate the noise filter ground wire output lines and other signal lines in the same duct or bundle them together Noise filter The ground wire can be close to input lines Noise filter Connect the noise filter ground wire directly to the ground plate Do not connect the noise filter ground wire to other ground wires Shielded ground wire Thick and short Noise filter Noise filter 2 Artisan Te...

Page 117: ...a noise filter is located inside a Unit connect the noise filter ground wire and the ground wires from other devices inside the Unit to the ground plate for the Unit first then ground these wires Unit Ground Noise filter 2 Artisan Technology Group Quality Instrumentation Guaranteed 888 88 SOURCE www artisantg com ...

Page 118: ... 0V 24V Servopack 24 VDC 0V 24V Servomotor Servopack 24 VDC 0V 24V Servomotor Noise filter Power OFF Power ON AC DC power supply 24 V Connect the alarm output ALM terminals for the three Servopacks in series to enable alarm detection relay 1RY to operate This is because ALM is a logical complement output signal so the output transistor is turned OFF when the system enters an alarm state 2 Artisan ...

Page 119: ...output 16 PBO PG output phase B 17 PBO PG output 8 OUT2 Output signal 2 7 ALM Alarm output 18 PCO PG output 17 PBO PG output phase B 8 OUT2 Output signal 2 9 24 VIN External input l 18 PCO PG output phase C 19 PCO PG output h C 9 24 VIN External input power supply 19 PCO PG output phase C 10 20 FG Frame ground CN2 Terminal Layout 1 PG0V 11 2 PG0 V PG power sup 1 PG0V PG power sup l 0 V 12 11 2 PG0...

Page 120: ...Clear error counter input 19 CLR Clear error t i t PG output 9 24 VIN External input power supply 19 CLR Clear error counter input 10 PCO PG output phase C 20 FG Frame ground CN2 Terminal Layout 1 PG0V 11 2 PG0 V PG power sup 1 PG0V PG power sup l 0 V 12 11 2 PG0 V PG power sup ply 0 V 3 PG0V PG power sup ply 0 V 12 13 4 PG5 V 3 PG0V 14 PC PG output 13 4 PG5 V PG power sup 5 PG5V PG power sup 14 P...

Page 121: ... Molex Japan CN4 CN3 CN2 CN1 C N 5 1 2 3 4 5 6 8 7 9 16 17 18 19 14 15 4 1 20 5 2 6 3 Connector case Blue Green Yellow Black Red White Green Green White Yellow Yellow White Blue 0 12mm2 P P P 1 Channel A output Blue 2 Channel A output Blue Black 3 Channel B output Yellow 4 Channel B output Yellow Black 5 Channel C output Green 6 Channel C output Green Black 7 0 V power supply Gray 8 5 V power supp...

Page 122: ...Yellow 3 Channel C output Green 4 0 V power supply Gray 5 Frame ground FG Orange 6 Channel A output Blue Black 7 Channel B output Yellow Black 8 Channel C output Green Black 9 5 V power supply Red Items to be Prepared by Customer Case and Connector 54331 0201 Manufactured by Molex Japan Items to be Prepared by Customer Cap 43020 1001 Socket 43031 0004 Manufactured by Molex Japan Blue Gray Red Blac...

Page 123: ... CN3 CN2 CN1 C N 5 1 2 3 4 1 Phase U Red 2 Phase V White 3 Phase W Blue 4 Frame ground FG Green With Brake Items to be Prepared by Customer Receptacle 5557 04R 210 Socket 5556T chain type or 5556TL loose type Manufactured by Molex Japan CN4 CN3 CN2 CN1 4 Cap 5559 06P 210 Socket 5558T chain type or 5558TL loose type Manufactured by Molex Japan 5 6 1 2 3 C N 5 1 Phase U Red 2 Phase V White 3 Phase W...

Page 124: ...L loose type Manufactured by Molex Japan 1 Phase U Red 2 Phase V White 3 Phase W Blue 4 Frame ground FG Green CN4 CN3 CN2 CN1 C N 5 1 2 3 4 Items to be Prepared by Customer Cap 43020 0401 Socket 43031 0004 Manufactured by Molex Japan 2 Artisan Technology Group Quality Instrumentation Guaranteed 888 88 SOURCE www artisantg com ...

Page 125: ...s for Digital Operator Pin No Signal Name Signal Circuit Name Signal Direction 1 TXD Transmit data non inversion side P S 2 TXD Transmit data inversion side P S 3 RXD Receive data non inversion side P S 4 RXD Receive data inversion side P S 5 OPH 6 7 5VPP 8 GND Signal ground 0 V 2 Artisan Technology Group Quality Instrumentation Guaranteed 888 88 SOURCE www artisantg com ...

Page 126: ...Basic Functins and Mode Selection 3 4 3 1 4 Operation in Status Display Mode 3 5 3 1 5 Operation in Parameter Setting Mode 3 7 3 1 6 Operation in Monitor Mode 3 9 3 2 Applications 3 13 3 2 1 Operation in Alarm Traceback Mode 3 13 3 2 2 Operation Using the Digital Operator 3 15 3 2 3 Autotuning 3 16 3 2 4 Reference Offset Automatic Adjustment 3 21 3 2 5 Reference Offset Manual Adjustment 3 22 3 2 6...

Page 127: ...d with the JUSP OP02A 3 Digital Operator Hand held type The Digital Operator is connected to the Servopack as shown below The Digital Operator con nector can be connected or disconnected while the Servopack power is ON JUSP OP02A 3 Hand held Type CN3 DSPL SET DATA ENTER RESET ALARM JOG SVON DIGITAL OPERATOR JUSP OP02A C N 5 3 Artisan Technology Group Quality Instrumentation Guaranteed 888 88 SOURC...

Page 128: ...Servo Alarm Output for details If the power is turned OFF after a servo alarm has occurred there is no need to reset the alarm After an alarm occurs remove the cause of the alarm before resetting it Refer to 5 2 Trouble shooting to determine and remedy the cause of an alarm Press Alarm Reset 3 Artisan Technology Group Quality Instrumentation Guaranteed 888 88 SOURCE www artisantg com ...

Page 129: ...t and set all Servopack functions Monitor Mode Section 3 1 6 Displays the speed references to the Servopack the actual speed and internal status Alarm Traceback Mode Section 3 2 1 Displays a log of previous alarms Special Modes These modes are selected by setting a value for parameter Setting Mode Software version check mode Section 3 2 8 Operation mode from Digital Operator Section 3 2 2 Referenc...

Page 130: ...the power supply is turned ON Press to select the status display mode Meaning of Status Displays Keys to the status display are shown below The display differs between Servomotors for speed torque control and position control Speed Torque Control Bit data Speed Coincidence Base Block Power ON Speed Reference Input Torque Reference Input TGON Code See table See table Code Status Base block Servo OF...

Page 131: ...etting Position Control Bit Data Code Positioning Complete Base Block Power ON Reference Pulse Input TGON or Torque Limit Detected See table See table Code Status Base block Servo OFF Run Servo ON Alarm Status Displays the alarm number See the table of alarms on page 3 14 Bit Data Description Power ON Lit when Servopack power ON Not lit when Servopack power OFF Base Block Lit for base block Not li...

Page 132: ... C List of Parameter Settings before chang ing the data The following example shows how to change user setting Cn 15 from 100 to 85 1 Press DSPL SET to select the parameter set ting mode 2 Select the parameter number to set Press the and keys to select the digit Press the and keys to change the value 3 Press DATA ENTER to display the current data for the parameter selected at step 2 4 Set the requ...

Page 133: ...e bit number to set 5 Press the and keys to set the memory switch data ON or OFF for the bit number 6 Repeat steps 4 and 5 as often as required 7 Press DATA ENTER to store the data 8 Press DATA ENTER once more to display the pa rameter number again TERMS Turning bits ON and OFF Memory switches use bits not numbers to select functions Sixteen bits are available 0 to 9 and A to F Select the required...

Page 134: ...ress DATA ENTER once more to display the moni tor number again Meaning of Monitor Mode Display Keys to Monitor Mode Displays are shown in the following table The display differs between the speed torque control and position control Speed Torque Control Monitor Number Monitor Display Actual motor speed Units min 1 Input speed reference Units min 1 Internal torque reference Units with respect to rat...

Page 135: ...e V CMP status display mode 6 Mode switch ON 7 During forward current limit or contact input speed control CL 8 Not used 9 Motor power ON 10 Phase A PA PA 11 Phase B PB PB 12 Phase C PC PC 13 Phase U 14 Phase V 15 Phase W 16 Servo ON S ON Cn 01 bit 0 17 P operation zero clamp or rotation direction input P CON Cn 01 bit A B Cn 02 bit 2 18 to 20 Not used 3 Artisan Technology Group Quality Instrument...

Page 136: ...pulse count value 0 to 65535 Units reference unit Monitor Bit Description Related I O Signal Parameter Un 05 1 Servo alarm ALM 2 Not used 3 Reverse rotation mode Cn 02 bit 0 4 During motor rotation TGON status display mode 5 Positioning complete COIN status display mode 6 Mode switch ON 7 During forward current limit or contact input speed control CL 8 Not used 9 Motor power ON 10 Phase A PA PA 11...

Page 137: ... Monitor Related I O Signal Parameter Description Bit Un 06 1 Input reference pulse PLUS PULS 2 Input pulse sign SIGN SIGN 3 Error counter clear input CLR CLR 4 to 20 Not used 3 Artisan Technology Group Quality Instrumentation Guaranteed 888 88 SOURCE www artisantg com ...

Page 138: ... does not prevent the Servopack from operating properly Use the special operation to clear alarm traceback data to clear the data Refer to 3 2 6 Clearing Alarm Traceback Data for details Alarm Sequence Number Alarm Code The higher the number the older the alarm data See the table of alarms on page 3 14 Alarm Confirmation Use the following procedure to determine which alarms occurred previously 1 P...

Page 139: ...r position control only Overspeed Overload Encoder error Reference input read error Servo overrun detected This function prevents overruns Encoder output phase error Encoder phase A B disconnection Encoder phase C disconnection Not an alarm Reset by alarm reset or Servopack power ON The following are operator related alarms which are not recorded by alarm traceback Digital Operator transmission er...

Page 140: ...or 1 Press DSPL SET to select the parameter set ting mode 2 Select the parameter number Cn 00 Parameter Cn 00 is selected when the power is turned ON Press the and keys to select the digit Press the and keys to change the value 3 Press DATA ENTER to display the current data for the parameter Cn 00 4 Press the and keys to change the data to 00 This parameter is set to 00 when the pow er is turned O...

Page 141: ...ils about setting the motor speed refer to 3 1 5 Operation in Parameter Setting Mode and Appendix C List of Parameters 3 2 3 Autotuning The Servopack contains a built in autotuning function to automatically measure the machine characteristics machine configuration and rigidity and set the parameters Autotuning allows even totally inexperienced people to easily complete tuning Autotuning Automatica...

Page 142: ...is set to PI control before starting autotuning If the mode switch is used PI control automatically switches to P control above a set operating level PI control to P control switching level even if the P CON signal is OFF Ifthemode switch is used perform oneofthefollowing operationsbefore startingauto tuning Set the parameters to disable the mode switch Speed control Set both Cn 01 bit C and bit D...

Page 143: ...he and keys to select the digit Press the and keys to change the value 3 Press DATA ENTER to display the current data for the parameter Cn 00 4 Press the and keys to change the data to 05 5 Press DSPL SET to display the machine rigid ity 6 Press the and keys to select the machine rigidity If the actual rigidity is un known select medium rigidity 7 Press DSPL SET to select autotuning mode 3 Setting...

Page 144: ...ring Autotuning The motor speed during autotuning is set by parameter Cn 10 Setto 500 min 1 which is the factory setting Autotuning may be unsuccessful if this value is set too low The motor runs intermittently while the or key is held down The motor does not rotate continuously Machine Rigidity Selection Select the machine rigidity as described below If the actual rigidity is unknown select mediu...

Page 145: ... procedure to correct the machine rigidity setting and run autotuning once more 1 Press the DSPL SET key to cancel autotuning 2 Press the DSPL SET key once more to enter the machine rigidity setting mode In crease the setting by one Autotuning may not end for machines with large play or extremely low rigidity In these cases use conventional manual adjustment Input Signals Set the P CON signal to O...

Page 146: ...k The amount of offset can be checked in the speed reference offset manual adjustment mode Refer to 3 2 5 Reference Offset Manual Adjustment for details The reference offset automatic adjustment mode cannot be used if the error pulses are set to zero when the servo lock is stopped and a positioning loop is formed with the host controller Under these conditions use the reference offset manual adjus...

Page 147: ... This ends reference offset auto matic adjustment 3 2 5 Reference Offset Manual Adjustment Speed reference offset manual adjustment is available for speed torque control It is very convenient in the following situations If a position loop is formed with the host controller and the error pulses are zeroed when servo lock is stopped To deliberately set the offset to specific value This mode can also...

Page 148: ... to 511 78 mV Offset Units Reference Speed 0 038 min 1 0 076 mV For Cn 03 500 factory setting Follow the procedure below to manually adjust the reference voltage 1 Press DSPL SET to select the parameter set ting mode 2 Select the parameter number Cn 00 Parameter Cn 00 is selected when the power is turned ON Press the and keys to select the digit Press and keys to change the value 3 Press DATA ENTE...

Page 149: ... 6 Press the and keys to adjust the amount of offset Adjust the speed references 7 Press DSPL SET to return to the parameter data display 8 Press DATA ENTER to return to the setting mode display This ends the reference offset manual adjustment 3 Set to 00 03 keys to change the value Press the Speed Reference Offset Manual Adjustment Mode Setting Mode Display Artisan Technology Group Quality Instru...

Page 150: ...er set ting mode 2 Select the parameter number Cn 00 Parameter Cn 00 is selected when the power is turned ON Press the and keys to select the digit Press the and keys to change the value 3 Press DATA ENTER to display the current data for the parameter Cn 00 4 Press the and keys to change the data to 02 5 Press DSPL SET to clear the alarm traceback data 6 Press DATA ENTER to return to the parameter...

Page 151: ...otor Capacity Modification Index Modification No Display Hexadecimal Display Modification index Modification No 6 SGMM 24 V 8A 10 W 9A 20 W 3 2 8 Checking Software Version This mode is used for maintenance Set Cn 00 to 00 06 to select the software version check mode Operation Set Cn 00 to 00 06 Software version displayed Software Version Display Type A Speed torque control d Position control Softw...

Page 152: ...ical Characteristics 4 16 4 3 Servopack Ratings and Characteristics 4 18 4 3 1 Ratings and Specifications 4 18 4 3 2 Overload Characteristics 4 25 4 3 3 Starting Time and Stopping Time 4 26 4 3 4 Overhanging Loads 4 26 4 3 5 In rush Current and Power Loss 4 27 4 4 Servo Drive Dimensional Drawings 4 28 4 4 1 Servomotor Dimensional Drawings 4 28 4 4 2 Servomotor Dimensional Drawings European Safety ...

Page 153: ...t Breaker 4 61 4 6 7 Noise Filter 4 62 4 6 8 Magnetic Contactor 4 62 4 6 9 Surge Suppressor 4 64 4 6 10 Variable Resistor for Speed Setting 4 64 4 6 11 Encoder Signal Converter Unit 4 65 4 6 12 Cables for Connecting PC and Servopack 4 67 4 6 10 Variable Resistor for Speed Setting 4 64 4 6 11 Encoder Signal Converter Unit 4 64 4 6 12 Cables for Connecting PC and Servopack 4 66 4 Artisan Technology ...

Page 154: ... indicate the Servomotor model as described in the following diagram Standard Type SGMM A1 C 3 1 2 j SGMM type 1 Rated output A1 10 W A2 20 W A3 30 W B3 3 W B5 5 W B9 10 W 2 Supply voltage B 100 VAC not drived by SGDF Servopack C 24 VDC S EC safety standards 24 VDC 10W 20W 3 Encoder specifications 3 2048 P R incremental encoder F 1024 P R incremental encoder 4 Design revision order 6 Shaft specifi...

Page 155: ...ack C 24 VDC S EC safety standards 24 VDC 10W 20W 3 Encoder specifications 3 2048 P R incremental encoder F 1024 P R incremental encoder 5 With reduction gears Gear ratio A 1 5 1 1 5 B 1 16 2 1 16 C 1 25 3 1 25 10 W 20 W 30 W 7 Option C With brake 24 VDC D With Reduction Gears 6 Shaft specifications 2 Straight without key 6 Straight with key and tap Σ Series SGMM Servomotor 4 Artisan Technology Gr...

Page 156: ...zing software See note on the next page Determine motor capacity Enter rated output Enter code as characters 1 and 2 10 W A1 20 W A2 30 W A3 3 W B3 5 W B5 10 W B9 SGMM jjjj1 Always enter 1 To next page A 1 Select motor capacity 2 Determine supply voltage 3 Select encoder specification 4 Enter design revision order Enter code as character 3 C 24 VDC S EC safety standards 24 VDC 10 W 20 W 2048 P R i...

Page 157: ... SGMM jjjj1 SGMM jjjjJ 6 Select shaft specification With or without flat seat With flat seat Without flat seat SGMM jjjj12 SGMM jjjj13 With or without key With key Without key SGMM jjjjJj2 SGMM jjjjJj6 With or without brake With brake Without brake SGMM jjjjjj SGMM jjjjjjC Note Consult a Yaskawa sales representative for details of Servomotor sizing software 4 Artisan Technology Group Quality Instr...

Page 158: ... of friction µ Motor Overall efficiency η Gear coupling Gear ratio R Nm Nl Gear coupling Jg Gear coupling Jg kg cm2 lb in2 g Ball screw pitch P mm in Ball screw diameter D mm in Ball screw length L mm in Ball screw Timing Belt Load mass W kg lb Pulley Jd Thrust F N lb Jd Coefficient of friction µ Overall efficiency η Gear coupling Timing belt Gear ratio R Nm Nl Gear coupling Jg Gear coupling Jg kg...

Page 159: ...rall efficiency η Motor T ℓ Gear ratio R Nm Nl Gear coupling Motor Gear coupling Jg kg cm2 lb in2 Gear coupling Jg Jℓ Others Load GD2 Jℓ kg cm2 lb in2 Load torque Tℓ N m lb in Motor speed Nm min 1 DUTY td s Positioning time ts s Accel decel time ta s Duty cycle DUTY td s Positioning distance Ls mm in Moving member speed Vℓ m min Positioning time ts s Accel decel time ta s Enter either Vℓ or ts If ...

Page 160: ...er SGDF indicate the Servopack model as de scribed in the following diagram Σ Series SGDF Servopack Supply voltage C 24 VDC SGDF A1 C S Servopack Selection Flowchart Selected Servopack Example SGDF A1CS 1 Rated output A1 10 W 0 013 HP A2 20 W 0 027 HP A3 30 W 0 040 HP B3 3 W 0 004 HP B5 5 W 0 007 HP B9 10 W 0 013 HP 2 Type S For speed torque control P For position control SGDF A1CS DC24V CN3 C N 5...

Page 161: ... motor capacity Enter rated output Enter code as characters 1 and 2 10 W A1 20 W A2 30 W A3 3 W B3 5 W B5 10 W B9 2 Select model Use speed references Use torque references e Direct position specification required by pulse input Select model for speed torque control Select model for position control c Tension control required d Forced stopping or other torque control required a Variable speed contr...

Page 162: ...rs SGMM Servomotor B3CF1j B5CF1j B9CF1j Rated Output 1 W HP 3 0 004 5 0 007 10 0 013 Rated Torque 1 N m 0 00955 0 0159 0 0318 q oz in 2 1 35 2 25 4 5 Instantaneous Peak Torque 1 N m 0 0239 0 0398 0 0796 q oz in 2 3 39 5 64 11 3 Rated Current 1 A rms 1 3 1 3 1 5 Instantaneous Maximum Current 1 A rms 3 5 3 6 3 9 Rated Speed 1 min 1 3000 Instantaneous Maximum Speed 1 min 1 6000 Applicable Encoder 102...

Page 163: ...55 0 191 0 2887 q oz in 3 13 5 27 0 40 9 Rated Current 1 A rms 2 1 2 0 2 9 Instantaneous Maximum Current 1 A rms 6 0 5 7 8 6 Rated Speed 1 min 1 3000 Instantaneous Maximum Speed 1 min 1 5000 Applicable Encoder 2048 P R incremental encoder Rotor M f Without Brake 10 4 kg m2 0 00354 0 00548 0 00689 Moment of Inertia 10 3 oz in s2 3 0 0501 0 0776 0 0976 Inertia JM With Brake 10 4 kg m2 0 00479 0 0067...

Page 164: ...Without Brake 10 4 kg m2 0 00529 0 00454 0 00418 0 00723 0 00648 0 00612 0 00917 0 00842 0 0806 converted to motor shaft motor 10 3 oz in s2 6 0 0750 0 0643 0 0592 0 1024 0 0918 0 0867 0 1299 0 1193 1 142 motor reduction gear JM GD2 M 4 With Brake 10 4 kg m2 0 00662 0 00587 0 00551 0 00858 0 00783 0 00747 JM GD M 4 10 3 oz in s2 6 0 0938 0 0832 0 0781 0 1216 0 1110 0 1058 Brake optional 4 Rated Vo...

Page 165: ...ns yp Capacity W HP Capacity W Holding Torque N m Coil Resistance Ω at 20 C Rated Current A at 20 C Rated Current A at 20 C SGMM A1jjjj 10 0 013 2 0 0 0319 320 0 08 0 08 SGMM A2jjjj 20 0 027 2 6 0 0637 221 5 0 11 0 11 SGMM A3jjjj 30 0 040 2 6 0 0955 220 0 11 0 11 TERMS Holding Brake The holding brake is automatically applied to the motor shaft to prevent the load falling in vertical axis applicati...

Page 166: ... 1 Motor speed min 1 Motor speed min 1 Motor speed min 1 TORQUE N m TORQUE oz in TORQUE N m TORQUE oz in TORQUE N m TORQUE oz in TORQUE N m TORQUE oz in TORQUE N m TORQUE oz in Motor speed min 1 B A 0 1000 0 04 0 06 0 02 0 0 08 3000 0 10 4000 5000 2000 0 3 6 9 12 0 1000 3000 4000 5000 2000 0 08 0 12 0 04 0 0 16 0 20 B A 0 5 10 15 20 25 A B 0 1000 3000 4000 5000 2000 0 0 06 0 12 0 18 0 24 0 30 0 10...

Page 167: ...3CF1j 8 1 8 4 0 0 9 F B5CF1j Fr B9CF1j 10 2 2 Fs With Gears A1C3JAjj 51 9 11 7 47 0 10 5 Fs A2C3JAjj A1C3JBjj 76 4 17 2 A2C3JBjj A1C3JCjj 89 2 20 1 A2C3JCjj Note a The box j at the end of the model number is for the shaft specifications b The allowable load is applied to the shaft end Mechanical Tolerance The tolerances of the Servomotor output shaft and installation are shown in the following tab...

Page 168: ...he Servomotor with the shaft horizontal The Servomotor must withstand the following vibration accelerations in three directions verti cal transverse and longitudinal Vibration Acceleration 49 m s2 Vibration Class The Servomotor meets the following vibration class at rated speed Vibration Class 15µm or below Enclosure Rating The enclosure rating of the Servomotor conforms to IP55 standards TERMS Vi...

Page 169: ...pecifications Motor Capacity W HP 10 0 013 20 0 027 30 0 040 Rated Max Motor Speed 3000 5000 min 1 Applicable Encoder 2048 P R incremental encoder Allowable Load Moment of Inertia JL 10 4 kg m2 10 3 lb in s2 0 1064 0 0942 0 164 0 1452 0 2067 0 1830 Continuous Output Current A rms 2 1 2 0 2 9 Max Output Current A rms 6 0 5 7 8 6 Basic Specifications Power Supply 24 VDC 10 continuous 1 2A peak 9A 24...

Page 170: ...se A B C line driver g Output Frequency Dividing Ratio 16 to N N N 2048 4 Sequence Input 2 Inputs Servo ON P drive or motor forward reverse by zero clamp drive reference or contact input speed control alarm reset current limit select from parameters Sequence Output 2 Outputs Current limit detection TGON speed coincidence external brake interlock servo alarm servo alarms are fixed other settings ar...

Page 171: ...e Load Moment of Inertia JL 10 4 kg m2 10 3 lb in s2 0 012 0 011 0 024 0 021 0 066 0 058 Continuous Output Current A rms 1 3 1 3 1 5 Max Output Current A rms 3 5 3 6 3 9 Basic Specifications Power Supply 24 VDC 10 continuous 0 9A peak 5 0A 24 VDC 10 continuous 1 0A peak 5 1A 24 VDC 10 continuous 1 2A peak 5 5A Control Method MOSFET PWM Feedback 1024 P R incremental encoder Location Ambient Temp 0 ...

Page 172: ...alarm servo alarms are fixed other settings are selected from parameters Protective Functions Overcurrent overload overspeed reference input read error overrun prevention CPU error encoder error Indicators LED indicators Red Alarm Green Ready Others Torque control zero clamp operation position loop stop soft start stop speed coincidence brake interlock signal output JOG run autotuning 1 Use within...

Page 173: ...od MOSFET PWM Feedback 2048 P R incremental encoder Location Ambient Temp 0 C to 50 C 1 Storage Temp 20 C to 85 C Ambient Storage Humidity 90 or less with no condensation Vibration Shock Resistance Frequency 10 to 55 Hz Amplitude 0 075 mm Acceleration 9 8 m s2 147m s2 Structure Base mounted Approx Mass kg 0 3 Performance Bias Setting 0 to 450 min 1 Setting resolution 1 min 1 Feed Forward Compensat...

Page 174: ... range 2 N is the number of encoder pulses SGDF BjCP SGDF Servopack B3CP B5CP B9CP Max Applicable Motor Capacity W HP 3 0 004 5 0 007 10 0 013 Combined S ifi i Motor Type SGMM B3CF1 B5CF1 B9CF1 Specifications Motor Capacity W HP 3 0 004 5 0 007 10 0 013 Rated Max Motor Speed 3000 6000 min 1 Applicable encoder 1024 P R incremental encoder Allowable Load Moment of Inertia JL 10 4 kg m2 10 3 lb in s2...

Page 175: ...put Form Phase A B C line driver output g Output Frequency Dividing Ratio 16 to N N N 1024 2 Sequence Input 2 Inputs Servo ON P drive alarm reset current control select from parameters Sequence Output 2 Outputs Current limit detection TGON positioning complete brake interlock servo alarm servo alarms are fixed and other settings are selected from parameters Protective Functions Overcurrent overloa...

Page 176: ...he overload protective function as shown in the following graph The overload detection level is quoted under hot start conditions at a motor ambient temper ature of 40 C Operating Time s Motor Rated Current Overload Characteristics TERMS Hot Start Indicates that both Servopack and Servomotor have run long enough at rated load to be thermally saturated 4 Artisan Technology Group Quality Instrumenta...

Page 177: ...r rated current A β IL IR Load current coefficient IL Load torque equivalent current load current is β times the motor rated current A Motor Current Time Motor Speed Motor Current size Motor Speed Timing Chart Time 4 3 4 Overhanging Loads A Servomotor may not be operated under an overhanging load that is a load which tends to continually rotate the motor Under an overhanging load e g when the dire...

Page 178: ...p applied tension Motor 4 3 5 In rush Current and Power Loss The following table shows the inrush current and power loss for each Servopack Servopack Type Capacity W Inrush Current Aop Output Current A rms Power Loss W SGDF A1C 10 3 8 2 1 7 SGDF A2C 20 3 8 2 0 7 SGDF A3C 30 3 8 2 9 7 SGDF B3C 3 3 8 1 3 7 SGDF B5C 5 3 8 1 3 7 SGDF B9C 10 3 8 1 5 7 4 Artisan Technology Group Quality Instrumentation ...

Page 179: ...gs The dimensional drawings of the Servomotors are broadly grouped into the following four categories depending on the type of encoder and whether a brake is used Incremental Encoders without Brakes Incremental Encoders with Brakes Incremental Encoders without Brakes but with Reduction Gears Incremental Encoders with Brakes and Reduction Gears 4 Artisan Technology Group Quality Instrumentation Gua...

Page 180: ... in L1 mm in L2 mm in Output W HP Torque NSm lbSm Time Rating Rated Speed min 1 Allowable Radial Load N lb Allowable Thrust Load N lb A1C312 No flat seat 70 2 6 54 2 13 26 5 1 0 10 0 013 0 032 0 00 Contin 3000 34 3 7 7 14 7 3 3 A1C313 With flat seat 2 76 2 13 1 04 0 013 0 007 uous A2C312 No flat seat 80 3 1 64 2 2 36 5 1 20 0 02 0 064 0 01 44 1 9 9 A2C313 With flat seat 3 15 2 52 1 44 0 027 0 014 ...

Page 181: ... in L1 mm in L2 mm in Out put W HP Torque NSm lbSm Time Rating Rated Speed min 1 Approx Mass g Allowable Radial Load N lb Allowable Thrust Load N lb B3CF12 No flat seat 62 2 52 2 0 24 0 9 3 0 00955 0 002 Contin 3000 55 8 1 8 4 0 9 B3CF13 With flat seat 2 44 2 05 0 94 0 004 0 002 uous B5CF12 No flat seat 68 2 68 58 2 28 30 1 18 5 0 0159 0 00 60 B5CF13 With flat seat 2 68 2 28 1 18 0 007 0 004 B9CF1...

Page 182: ...Type SGMM Shaft End Specifica tions L mm in L1 mm in L2 mm in Output W HP Torque NSm lbSm Time Rating Rated Speed min 1 Allowable Radial Load N lb Allowable Thrust Load N lb A1C312C No flat seat 94 5 3 2 78 5 3 09 26 5 1 0 10 0 013 0 032 0 00 Contin 3000 34 3 7 7 14 7 3 3 A1C313C With flat seat 3 72 3 09 1 04 0 013 0 007 uous A2C312C No flat seat 108 5 2 92 5 3 6 36 5 1 20 0 02 0 064 0 01 44 1 9 9...

Page 183: ...3 48 61 2 4 230 10 0 013 0 032 0 007 Continuous 3000 A1C3JB2 117 4 61 99 3 9 71 5 2 81 225 0 00 A1C3JC2 A2C3JA2 116 5 4 59 98 5 3 88 71 2 8 270 20 0 027 0 064 0 014 A2C3JA2 127 5 109 4 29 81 5 3 21 305 0 0 A2C3JC2 Type SGMM Reduction Gears yp SGMM Gear Ratio Torque NSm lbSm Rated Speed min 1 Allowable Radial Load N lb Allowable Thrust Load N lb Lost Motion A1C3JA2 1 5 0 127 0 029 600 51 9 11 67 47...

Page 184: ...2 81 350 0 00 A1C3JC6 A2C3JA6 116 5 4 59 98 5 3 88 71 2 8 370 20 0 027 0 064 0 014 A2C3JB6 127 5 109 4 29 81 5 3 21 405 0 0 A2C3JC6 Type SGMM Reduction Gears yp SGMM Gear Ratio Torque NSm lbSm Rated Speed min 1 Allowable Radial Load N lb Allowable Thrust Load N lb Lost Motion A1C3JA6 1 5 0 127 0 029 600 51 9 11 67 47 0 10 57 0 5 d A1C3JB6 1 16 0 407 0 092 187 5 76 4 17 19 deg A1C3JC6 1 25 0 636 0 ...

Page 185: ...tor Shaft kg2 m2 GD 4 With Without Tap Output W HP Torque NSm lbSm Time Rating Rated Speed min 1 A3C3J12 10 6 0 917 Without 445 30 0 040 0 096 0 022 Continuous 3000 A3C3J16 With 0 022 A3C3J22 10 6 0 842 Without A3C3J26 With A3C3J32 10 6 0 806 Without A3C3J36 With Type SGMM Reduction Gears yp SGMM Gear Ratio Torque NSm lbSm Rated Speed min 1 Allowable Radial Load N lb Allowable Thrust Load N lb Los...

Page 186: ...φ 0 0020 0 0016 0 0024 7 2 0 28 3 0 12 j 40 1 58 18 0 71 40 8 1 61 3 0 12 B A 4 x φ3 4 0 13 dia A φ 9 0 0 015 φ 0 354 0 0003 0 0005 B φ 28 0 0 021 φ 1 102 0 0003 0 0005 Shaft end with key and tap Type SGMM L1 mm in KB mm in Approx Mass g A1C3JAjC 113 4 45 61 2 4 315 A1C3JBjC 127 5 5 02 71 5 2 81 350 A1C3JCjC A2C3JAjC 123 4 84 71 2 8 370 A2C3JAjC 137 5 5 41 81 5 3 21 405 A2C3JAjC 4 Artisan Technolo...

Page 187: ...n Specifications SGMM AjC 1 A channel output Blue 2 A channel output Blue Black 3 B channel output Yellow 4 B channel output Yellow Black 5 C channel output Green 6 C channel output Green Black 7 0 V power supply Gray 8 5 V power supply Red 9 FG frame ground Orange SGMM BjC 1 A channel output Blue 2 B channel output Yellow 3 C channel output Green 4 0 V power supply Gray 5 FG frame ground Orange 6...

Page 188: ...ors are broadly grouped into the following four categories depending on the type of encoder and whether a brake is used Incremental Encoders without Brakes Incremental Encoders with Brakes Incremental Encoders without Brakes but with Reduction Gears Incremental Encoders with Brakes and Reduction Gears 4 Receptacle 5557 04R Molex Japan Terminal 5556T At other end Plug 5559 04P Terminal 5558T 1 2 3 ...

Page 189: ...5 0 0 008 0 197 0 0001 0 0005 B B φ 20 0 0 013 0 787 0 0004 0 0001 A φ 0 0015 0 16 0 02 0 18 φ 28 φ 1 10 45 Type SGMM Shaft End Specifications L mm in L1 mm in L2 mm in Allowable Radial Load N lb Allow able Thrust Load N lb A1S312 No flat seat 70 2 76 54 2 13 26 5 1 04 34 3 7 7 14 7 3 3 A1S313 With flat seat A2S312 No flat seat 80 3 15 64 2 52 36 5 1 44 44 1 9 9 A2S313 With flat seat A3S312 No fla...

Page 190: ...8 φ 0 0018 A φ 5 0 0 008 0 197 0 0001 0 0005 B φ 20 0 21 φ 0 79 0 0 83 A A B 0 02 0 18 0 16 45 φ 28 φ 1 10 Type SGMM Shaft L mm in L1 mm in L2 mm in Allowable Radial Load N lb Allow able Thrust Load N lb A1S312C No flat seat 94 5 3 72 78 5 3 09 26 5 1 04 34 3 7 7 14 7 3 3 A1S313C With flat seat A2S312C No flat seat 108 5 4 27 92 5 3 64 36 5 1 44 44 1 9 9 A2S313C With flat seat A3S312C No flat seat...

Page 191: ...0 0 83 300 11 81 30 1 18 φ 28 φ 1 10 Model SGMM L mm in L1 mm in L2 mm in Approx Mass g A1S3JAj 106 5 4 19 88 5 3 48 61 2 4 230 A1S3JBj 117 4 61 99 3 9 71 5 2 81 265 A1S3JCj A2S3JAj 116 5 4 59 98 5 3 88 71 2 8 270 A2S3JBj 127 5 109 4 29 81 5 3 21 305 A2S3JCj Model SGMM Reduction Gears Gear Ratio Allow able Radial Load N lb Allow able Thrust Load N lb Lost Motion A1S3JAj 1 5 51 9 11 67 47 0 10 57 0...

Page 192: ...r Motor connector 4 x φ3 4 0 13 dia 0 43 Model SGMM L mm in L1 mm in L2 mm in Approx Mass g A3S3J1j 129 5 08 111 4 37 42 7 1 68 400 A3S3J2j A3S3J3j Model SGMM Reduction Gears Gear Ratio Allow able Radial Load N lb Allow able Thrust Load N lb Lost Motion A3S3J1j 1 5 68 7 15 46 58 8 13 23 0 5 deg A3S3J2j 1 16 147 33 1 g A3S3J3j 1 25 186 41 9 Note 1 The detector uses a 2048 P R incremental encoder 2 ...

Page 193: ... 28 φ 1 10 Model SGMM L mm in L1 mm in L2 mm in Approx Mass g A1S3JAjj 131 5 16 113 4 45 61 2 4 315 A1S3JBjj 145 5 5 73 127 5 5 02 71 5 2 81 350 A1S3JCjj A2S3JAjj 141 5 55 123 4 84 71 2 8 370 A2S3JBjj 155 5 6 12 137 5 5 41 81 5 3 21 405 A2S3JCjj Model SGMM Reduction Gears Gear Ratio Allow able Radial Load N lb Allow able Thrust Load N lb Lost Motion A1S3JAjj 1 5 51 9 11 67 47 0 10 57 0 5 deg A1S3J...

Page 194: ...16 300 11 81 30 1 18 Model SGMM L mm in L1 mm in L2 mm in Approx Mass g A3S3J1jj 167 5 6 59 149 5 5 89 52 7 2 07 545 A3S3J2jj A3S3J3jj Model SGMM Reduction Gears Gear Ratio Allow able Radial Load N lb Allow able Thrust Load N lb Lost Motion A3S3J1jj 1 5 68 7 15 45 58 8 13 23 0 5 deg A3S3J2jj 1 16 147 33 07 g A3S3J3jj 1 25 186 41 85 Note 1 The detector uses a 2048 P R incremental encoder 2 The keyw...

Page 195: ...d Orange Motor Plugs Motor Connection Specifications Without Brake 1 Phase U Red 2 Phase V White 3 Phase W Blue 4 FG Green Motor Connection Specifications With Brake 1 Phase U Red 2 Phase V White 3 Phase W Blue 4 FG Green 5 Brake Black 6 Brake Black 4 Plug 55101 0800 Molex Japan At other end Socket 54280 0800 Receptacle 5557 04R Molex Japan Terminal 5556T At other end Plug 5559 04P Terminal 5558T ...

Page 196: ...s the external dimensions of the Servopack 5 4 5 80 3 15 35 1 38 1 0 039 98 3 86 92 3 62 3 0 12 CN2 PG CN1 IO CN3 CN4 RDY ALM 1 0 039 C N 5 Approx Mass 0 3 kg 0 66 lb 100 3 94 including mounting screws 0 20 0 18 4 Artisan Technology Group Quality Instrumentation Guaranteed 888 88 SOURCE www artisantg com ...

Page 197: ...owing diagram shows the external dimensions of the Digital Operator JUSP OP02A 3 125 4 92 135 5 31 50 1 97 63 2 48 7 18 5 0 73 1000 39 37 DSPL SET DATA ENTER RESET ALARM JOG SVON DIGITAL OPERATOR JUSP OP02A Approx Mass 0 18 kg 0 40 lb 0 28 4 Artisan Technology Group Quality Instrumentation Guaranteed 888 88 SOURCE www artisantg com ...

Page 198: ...pheral devices using the flowcharts on the subsequent pages The following items are not included in the flowcharts Refer to 4 6 Specifications and Dimen sional Drawings of Peripheral Devices Variable resistors for speed setting Encoder signal converter units Cables for connecting PC and Servopack 4 Artisan Technology Group Quality Instrumentation Guaranteed 888 88 SOURCE www artisantg com ...

Page 199: ...ector at both ends Cable only With connector at both ends Cable only Select one of the following according to cable length Select one of the following according to cable length Select one of the following according to cable length Select one of the following according to cable length Select connector kit Servo side JZSP CFM9 1 Motor side JZSP CFM9 3 With connector at both ends Cable only With conn...

Page 200: ... reference input Connector kit One cable end without connector Connector kit JZSP VFP9 1m JZSP VFI01 01 3m JZSP VFI01 03 One cable end without connector Cable with CN1 connector and one end without connector 4 Select connector kit for power supply JZSP CFG9 5 Select Servopack power supply Power supply 220 W min 6 Select power supply circuit breaker QF and noise filter Capacity 3 A 7 Use a magnetic...

Page 201: ... GND Motor Connec tion Terminals U V W Power Supply Capac ity per MCCB or Fuse Capac ity A 3 Recommended Noise Filter 4 Magnetic Contactor Power Supply Capac ity to SGDF Rated Current A rms Cable Spec Rated Current A rms Cable Spec ity per Servo pack W 2 ity A 3 Type Spec ity to Servo pack W 5 A1Cj 1 2 0 5 mm2 i 2 1 1 28 5 LF 205A Single h Yaskawa HI 1 J 220 A2Cj 1 7 min 2 0 42 g phase 200 VAC HI ...

Page 202: ...apidly deteriorate 4 6 2 Motor Cables Thedimensionsandappearanceofthemotorcablesare shownbelow Specifythecabletype when ordering SGMM A With Connector at Both Ends Without Brake Type L mm feet JZSP CFM00 01 1000 100 0 3 3 0 33 0 JZSP CFM00 03 3000 100 0 10 0 33 0 JZSP CFM00 05 5000 100 0 16 7 0 33 0 Shrink Tube L Cable AWG20 x 4 C UL2517 KQVQV DP8409359 Cap 5559 04P 210 Socket 5558T Receptacle 555...

Page 203: ...L Cap 5559 06P 210 Socket 5558T Receptacle 5557 04R 210 Socket 5556T Label 19 7 Cable only Without Brake Type L mm feet JZSP CFM09 01 1000 100 0 3 3 0 33 0 JZSP CFM09 03 3000 100 0 10 0 33 0 JZSP CFM09 05 5000 100 0 16 7 0 33 0 Internal Configuration and Lead Colors White Red Bright Blue Green L Multi core Cable AWG20 x 4 C UL2517 KQVQV DP8409359 6 2 0 24 4 Artisan Technology Group Quality Instrum...

Page 204: ...low L Multi core cable AWG20 x 6 C UL2517 KQVQV DP8409360 6 2 0 24 Ifcable only is ordered purchase theMolex connector separately Refer to 4 6 4Connec tor Kits for details SGMM B With Connector at Both Ends 3 mm pitch micro fit connector made by Molex Japan Plug 43020 0401 Terminal 43031 0001 4 2 mm pitch mini fit connector made by Molex Japan Receptacle 5557 04R 210 Terminal 5556T L 4 Artisan Tec...

Page 205: ... 0 24 4 6 3 Encoder Cables The dimensions and appearance of the encoder cables are shown below Specify the cable type when ordering With Connector at Both Ends SGDF AjCj Type L mm feet JZSP CFP00 01 1000 100 0 3 3 0 33 0 JZSP CFP00 03 3000 100 0 10 0 33 0 JZSP CFP00 05 5000 100 0 16 7 0 33 0 Shrink Tube Connector 54331 0201 Shielded Cable AWG22 x 3 C AWG26 x 4 P KQVV SW B9400064 L Cap 51112 0910 S...

Page 206: ...r 54306 2011 L 3 mm pitch micro fit connector made by Molex Japan Plug 43020 0401 Terminal 43031 0001 43031 0004 No Connector at Motor End Type L mm feet JZSP VFP01 01 1000 100 0 3 3 0 33 0 JZSP VFP01 03 3000 100 0 10 0 33 0 JZSP VFP01 05 5000 100 0 16 7 0 33 0 Label Terminal number labels Cable shielding Connector 54331 0201 Shielded Cable AWG22 x 3 C AWG26 x 4 P KQVV SW B9400064 Shrink Tube 50 1...

Page 207: ...n white green Orange white orange φ 0 3 If cable only is ordered purchase the Molex connectors separately Refer to 4 6 4 Con nector Kits for details Cables prepared by Yaskawa are 1 m 3 m or 5 m in length The maximum allowable length between the Servopack and Servomotor PG is 5 m 4 6 4 Connector Kits Power Supply Connector Kit Type JZSP CFG9 4 2 0 17 5 4 0 21 13 8 0 54 20 6 0 81 7 4 0 29 Receptacl...

Page 208: ...acle 5557 04R 210 made by Molex Japan Socket 5556TL made by Molex Japan Motor End Type JZSP CFM9 2 11 6 0 46 23 9 0 94 9 6 0 38 9 6 0 38 4 2 0 17 Plug 5559 04P 210 made by Molex Japan Socket 5558TL made by Molex Japan With Brake Servo End Type JZSP CFM9 1 4 2 0 17 9 6 0 38 9 6 0 38 19 6 0 77 11 6 0 46 4 Artisan Technology Group Quality Instrumentation Guaranteed 888 88 SOURCE www artisantg com ...

Page 209: ... made by Molex Japan Socket 5558TL made by Molex Japan SGDF BjCj Type JZSP CFM9 4 A B 6 85 0 27 3 00 0 12 3 00 0 12 3 56 0 14 16 90 0 67 4 06 0 16 0 10 0 0039 1 98 0 078 0 20 0 0079 7 11 0 28 0 10 0 0039 8 71 0 34 0 20 0 0079 0 10 0 0039 0 05 0 002 0 10 0 0039 Plug 43020 0401 made by Molex Japan Socket 43031 0001 made by Molex Japan 4 Artisan Technology Group Quality Instrumentation Guaranteed 888...

Page 210: ...1 39 1 54 12 7 1 27 0 05 9 0 35 19 18 0 76 15 7 0 62 0 5 Plug and Shell 54331 0201 made by Molex Japan Motor End Type JZSP CFP9 1 8 25 0 32 20 35 0 80 27 1 06 2 5 0 098 Plug 51112 0910 made by Molex Japan Socket 50398 8100 made by Molex Japan 4 Artisan Technology Group Quality Instrumentation Guaranteed 888 88 SOURCE www artisantg com ...

Page 211: ...an Motor End Type JZSP VFP9 2 Plug 43020 10001 made by Molex Japan Socket 43031 0001 made by Molex Japan Input Reference Connector Kit Servo End Type JZSP VFP9 33 3 1 31 39 1 54 12 7 1 27 0 05 9 0 35 19 18 0 76 15 7 0 62 0 5 Plug and Shell 54331 0201 made by Molex Japan 4 Artisan Technology Group Quality Instrumentation Guaranteed 888 88 SOURCE www artisantg com ...

Page 212: ... 0 JZSP VFI01 03 3000 100 0 10 0 33 0 Shielded cable Connector 54331 0201 Terminal number labels Label Shielded Cable AWG28 x 10 P UL20276 Shrink tube 40 1 57 L 4 6 6 Circuit Breaker The customer should purchase a circuit breaker MCCB of appropriate capacity to protect the power lines Recommended Product Ground fault detector for motor protection manufactured by Mitsubishi Electric Co Ltd Type MN5...

Page 213: ...9 0 53 0 53 6 φ0 14 0 59 1 30 4 6 8 Magnetic Contactor The magnetic contactor is used to turn the servo power supply ON and OFF Always attach a surge suppressor to the magnetic contactor before using Use one 20 A magnetic contactor of the type shown below for a single Σ Series regardless of capacity For multiple servo systems select the magnetic contactor according to the total ca pacity Type HI 1...

Page 214: ...inal M3 5 Main contact terminal M4 45 5 1 79 15 3 0 60 8 2 0 32 9 6 0 38 51 2 01 9 6 0 38 11 3 0 44 11 3 0 44 10 8 0 43 8 2 0 32 29 1 14 50 1 97 85 3 35 91 3 58 65 2 56 39 1 54 4 5 0 18 35 1 38 9 0 35 54 2 13 76 2 99 Approx mass 0 38 kg 0 838 lb 2 M4 mounting holes 5 2 0 20 35 1 38 5 0 20 70 2 76 75 2 95 A1 a b A2 R 1 S 3 T 5 21 1 13 3 U 2 V 4 W 6 22 2 Auxiliary NO contact Auxiliary NC contact 14 ...

Page 215: ...This variable resistor is used to give speed references by applying the speed reference volt age from the external power supply across CN1 12 and CN1 13 25 HP Helicolumn Panel MD Multidial Panel Drilling Diagram Type 25HP 10B Multi wrap variable resistor with MD10 30B4 dial manufactured by Sakae Tsushin Kogyo K K φ 25 1 φ 0 98 0 04 0 83 1 48 0 04 0 94 0 04 0 18 0 57 0 04 0 45 0 04 φ 2 5 φ 0 10 HOL...

Page 216: ...pulse output Terminal Numbers Input Phase A Input Phase B Input Phase B Input Phase Z Input Phase Z Output Phase A Output Phase B Output Phase Z Input Phase A Dimensional Drawings 11 M3 5 x 7 Seams screws 51 max Holes 2 x 4 5 mm dia φ 0 18 33 5 max 1 32 118 max 1 97 5 08 3 94 0 75 3 15 1 39 0 16 81max 3 19 0 31 0 20 0 16 1 39 1 57 0 0079 4 65 2 01 0 16 4 Artisan Technology Group Quality Instrument...

Page 217: ... collector output Voltage pulse output Open collector output Input Signal Level Voltage differential 0 3 V internal termination resistance 100 Ω Output Signal Level H 10 V min 1 mA L 0 5 V max 30 mA L 0 5 V max 30 mA Withstand voltage 50 V H 3 V min 1 mA L 0 5 V max 30 mA L 0 5 V max 30 mA Withstand voltage 50 V Operating Ambient Temperature Range 0 to 60 C IC Used AM26LS32C Receiver IC or equival...

Page 218: ...r Yaskawa representative for more details and operate the software as de scribed in the manual supplied J D sub 25 pin Connector Cable Connecting a Personal Computer to a Servopack Rear of the personal computer Cable model JZSP CFS01 Cable Servopack Cable Configuration D Sub Connector 17JE 23250 02 D8A Daiichi Denshi Kogyo Co Ltd 2 M2 6 screws 2000 78 74 50 1 97 Modular Connector 5 569552 3 Made b...

Page 219: ...y 1 bit even Synchronization Method Start Stop XON XOFF Control None Shift Control None Communications Method Semi duplex Connection Circuits With an RS 232C Port Maximum cable length is 2 m 6 56 ft In this case the connection circuit is as follows RS 232C port personal computer end Servopack end CN5 Shield Case 8 3 1 5 4 7 2 TXD RXD RXD TXD 4 Artisan Technology Group Quality Instrumentation Guara...

Page 220: ... and IBM PC compatible to a Servopack D sub 9 pin Connector Cable for IBM PC Compatible The JZSP CFS02 cable must be purchased at customer side Cable Configuration Connecting Circuit Servopack end Modular connector Clamp with hood Personal computer end D sub 9 pin 8 Clamp with hood 4 2 4 Artisan Technology Group Quality Instrumentation Guaranteed 888 88 SOURCE www artisantg com ...

Page 221: ...pitch connector Plug 10114 3000VE Shell 10314 52A0 008 Sumitomo 3M Co Ltd Label 2000 78 74 50 1 97 Modular Connector 5 569552 3 Made by AMP Japan Shielded cable AWG24 3P UL2835 Connecting Circuit Servopack end Modular connector Personal computer end 14 pin half pitch FG 12 8 4 2 S GND 14 4 10 9 1 CTS RTS TXD RXD RXD TXD S GND Clamp with hood Clamp with hood 4 Artisan Technology Group Quality Instr...

Page 222: ... for problems which result in no alarm display 5 1 Servo Drive Inspection and Maintenance 5 2 5 1 1 Servomotors 5 2 5 1 2 Servopack 5 3 5 2 Error Diagnosis and Troubleshooting 5 4 5 2 1 Troubleshooting Problems with Alarm Display 5 4 5 2 2 Troubleshooting Problems With No Alarm Display 5 13 5 2 3 Servopack Connection Diagrams 5 15 5 Artisan Technology Group Quality Instrumentation Guaranteed 888 8...

Page 223: ...n with cloth or compressed air Insulation resistance measurement At least once a year Disconnect Servopack and test insulation resistance at 500 V Resistance is normal if it exceeds 10 MΩ See note below Contact your Yaskawa representative if the insulation resistance is below 10 MΩ Replace oil seal At least once every 5 000 hours Remove Servomotor from machine and replace oil seal Applies only to ...

Page 224: ...e parts in unit or on circuit boards At least once a year Check for discoloration damage or discontinuities due to heating Contact your Yaskawa representative Part Replacement Schedule Thefollowingparts aresubject tomechanical wearor deteriorationover time To avoidfailure replace these parts at the frequency indicated Part Standard Replacement Period Replacement Method Smoothing Capacitor 7 to 8 y...

Page 225: ...lem cannot be solved by the described pro cedures 1 A 02 Display and Outputs Digital Operator Display Alarm Name Alarm Output A 02 Parameters breakdown Output transistor is OFF alarm state Status when Alarm Occurred The letters A and B in the following diagram correspond to the letters in the table The letters in bold type indicate the main causes of the display At power ON A B Cause Remedy A Powe...

Page 226: ...r operation When servo ON S ON signal turned ON A B C D C D At power ON C Cause Remedy A Wiring grounded between Servopack and Servomotor Check and correct wiring B Servomotor phase U V or W grounded Replace Servomotor C Circuit board 1PWB defective Power transistor defective Replace Servopack D Current feedback circuit power transistor or circuit board defective Replace Servopack 4 A 31 Display a...

Page 227: ...oop gain Cn 04 and or position loop gain Cn 1A D Servomotor overloaded Reduce load torque and load moment of inertia Otherwise replace with larger capacity Servomotor E Position reference pulse frequency too high Decrease reference pulse frequency Use smoothing function Change electronic gear ratio F Circuit board 1PWB defective Replace Servopack 5 A 51 Display and Outputs Digital Operator Display...

Page 228: ...d reference is input No Servomotor rotation During normal operation At power ON D E E When servo ON S ON signal turned ON A B D Cause Remedy A Servomotor wiring incorrect or disconnected Check wiring and connectors at Servomotor B Encoder wiring incorrect or disconnected Check wiring and connectors at encoder C Load greatly exceeds rated torque Reduce load torque and load moment of inertia Otherwi...

Page 229: ...Display and Outputs Digital Operator Display Alarm Name Alarm Output A b1 Reference input read error for speed torque control only Output transistor is OFF alarm state Status when Alarm Occurred A B During Servomotor operation At power ON C Cause Remedy A Part malfunctioned in reference read in unit A D converter etc Reset alarm and restart operation B Part defective in reference read in unit A D ...

Page 230: ... for the encoder D Encoder defective Replace Servomotor E Circuit board 1PWB defective Replace Servopack 10 A C2 Display and Outputs Digital Operator Display Alarm Name Alarm Output A C2 Encoder phase detection error Output transistor is OFF alarm state Status when Alarm Occurred D At power ON During Servomotor operation A B C D 1 to 3 seconds after power ON A B C D Cause Remedy A Noise in encoder...

Page 231: ...ct or poor connection Check wiring and connectors at encoder B Noise in encoder wiring Separate encoder wiring from main wiring circuits C Encoder defective Replace Servomotor D Circuit board 1PWB defective Replace Servopack 12 A C4 Display and Outputs Digital Operator Display Alarm Name Alarm Output A C4 Encoder phase C discontinuity Output transistor is OFF alarm state Status when Alarm Occurred...

Page 232: ...connected be fore Servopack power turned ON Digital Operator con nected to Servopack after power turned ON A B C D Cause Remedy A Cable defective or poor contact between Digital Operator and Servopack Check connector connections Replace cable B Malfunction due to external noise Separate Digital Operator and cable from noise source C Digital Operator defective Replace Digital Operator D Servopack d...

Page 233: ...ise Separate Digital Operator and cable from noise source C Digital Operator defective Replace Digital Operator D Servopack defective Replace Servopack 15 A 99 Display and Outputs Digital Operator Display Alarm Name Alarm Output A 99 Output transistor is ON Status when Alarm Occurred A 99 is not an alarm The display A 99 indicates normal operation 5 Artisan Technology Group Quality Instrumentation...

Page 234: ... to match application Reference pulse mode selection incorrect Refer to 2 2 2 Position References Select correct parameters Cn 02 bits 3 4 5 CLR input is turned ON Check status of error counter clear input Turn CLR input OFF Servomotor moves instantaneously then stops Servomotor or encoder wiring incorrect Refer to 2 8 Special Wiring and correct wiring Suddenly stops during operation and will not ...

Page 235: ...screws loose Tighten mounting screws co ect Coupling not centered Center coupling Coupling unbalanced Balance coupling Bearing defective Check noise and vibration near bearing Consult your Yaskawa representative if defective Machine causing vibrations Foreign object intrusion damage or deformation of sliding parts of machine Consult with machine manufacturer Speed reference 0 V but Servomotor rota...

Page 236: ...Diagram for Speed Torque Control 5V 5V PG5V CN2 CN5 CN4 A D CPU CN1 FG U W V MOSFET FG GND CN3 I O PWM 24 VDC 10 Gate Drive Circuit Current Detection PG Signal Processing Digital Current Amplifier PG Signal Divider EEPROM Control Power Supply Servomotor Encoder For I O Signals For Digital Operator For PG Signals For References Current Detector M PG 5 Speed Torque Artisan Technology Group Quality I...

Page 237: ...Drive Circuit Current Detection Control Power Supply PG Signal Processing Reference Counter Digital Current Amplifier PG Signal Divider For I O Signals For Digital Operator For PG Pulses For References Pulses Photocoupler EEPROM Current Detector CN2 FG U W V Servomotor Encoder M PG 5 Positions Artisan Technology Group Quality Instrumentation Guaranteed 888 88 SOURCE www artisantg com ...

Page 238: ...OM ALMRST CL set in parameters 5Ry OFF for Servo Alarm ALM TGON BK V CMP CLT set in parameters PG Output Line Driver Phase A Phase B Phase C Line Driver ALM TGON BK V CMP CLT S ON P COM ALMRST CL Correctly terminate end of shield cable Servo Alarm Note 1 The capacity of each output circuit is below 30 VDC and 50 mA 2 Signal input line P represents twisted pair cable 3 I O power supply 24 V must be...

Page 239: ... ALMRST CL set in parameters 5Ry OFF for Servo Alarm Servopack SGDF jjCP PG Output Open Collector Note 1 The capacity of each output circuit is below 30 VDC and 50 mA 2 Signal input line P represents twisted pair cable 3 I O power supply 24 V must be prepared by customers Correctly terminate end of shielded cable Servo Alarm Open Collector S ON P COM ALMRST CL ALM TGON BK COIN CLT set in parameter...

Page 240: ...ds 6 2 6 1 2 What is the CE Marking 6 2 6 1 3 EMC Directive 6 2 6 1 4 TÜV Certification Body Authorized by EU 6 3 6 2 Measures to Satisfy the EMC Directive 6 4 6 2 1 Applicable Servomotors 6 4 6 2 2 Applicable Noise Filter 6 4 6 2 3 Applicable Power Supply 6 4 6 2 4 Motor Cables 6 4 6 2 5 Encoder Cables 6 5 6 2 6 Control I O 6 7 6 2 7 Digital Operator and Monitoring by Personal Computer 6 7 6 2 8 ...

Page 241: ...irective since Janu ary 1 1995 2 CE is an abbreviation of Communauté Européenne in French which means European Communities EC Due to the increase of member countries the name has been changed to EU European Union but EC is still used for the name of the directives 6 1 3 EMC Directive 1 The EMC Directive is one of the EC Directives relating to safety requirements for industri alproducts The EMCDire...

Page 242: ... for EMC conformance according to their operating status 6 1 4 TÜV Certification Body Authorized by EU 1 TÜV is one of the certification bodies authorized by the European Union EU specifying organization which is the abbreviation of the Technical Inspection Association in Ger man TÜV has offices TÜV Product Services etc in Japan through which Yaskawa obtains approvals The Servopack has been approv...

Page 243: ... de tails on the above Servomotors The difference with standard Servomotors is in the encoder connector only 6 2 2 Applicable Noise Filter Model MYB 1206 33 Manufacturer NEMIC LAMBDA K K Make sure to ground the noise filter properly 6 2 3 Applicable Power Supply Use a power supply conforming to EN standards Make sure to ground the power supply properly Recommended power supply is as follows Model ...

Page 244: ...ength JZSP VFP00 01 5 m 1 m JZSP VFP00 03 JZSP VFP00 05 Select one of the following according to cable length JZSP VFP01 01 5 m 1 m JZSP VFP01 03 JZSP VFP01 05 3 m Select one of the following according to cable length JZSP CFP09 01 5 m 1 m JZSP CFP09 03 JZSP CFP09 05 3 m 3 m Select connector kit JZSP VFP9 2 Motor connector Select connector kit JZSP VFP9 2 Servopack connector Motor connector JZSP V...

Page 245: ...ZSP VFP00 05 5000 100 0 16 7 0 33 0 Connector Kit 54280 0800 Connector Kit 54331 0201 Label Shielded cable KQVV SW B9400064 AWG 22 3C AWG26 4P L Encoder Connector Kit Motor Connector JZSP VFP9 2 Socket Connector Kit 54280 0800 Product of Molex Japan 21 5 0 84 12 0 47 2 0 07 43 7 1 72 6 Artisan Technology Group Quality Instrumentation Guaranteed 888 88 SOURCE www artisantg com ...

Page 246: ...onnector kits use shielded cable for the CN1 cable and make sure to ground between the cable shield and connector case Connect the shield at the host controller properly 6 2 7 Digital Operator and Monitoring by Personal Computer UsetheDigitalOperatororpersonalcomputer for monitoring for trialoperation only Discon nect them during normal operation 6 2 8 Cable Core Model ESD SR 25 Manufacturer Tokin...

Page 247: ...Core 2 m 78 7 in 5 m 196 8 in Servomotor Motor Encoder FG Clamps Fix and ground the cable shield using a piece of conductive metal Clamp Controller Power Supply AC DC Output 24 VDC Noise Filter CN1 CN2 FG U V W GND 24 VDC SGDF SERVOPACK Earth Plate Shield Box SGMM Symbol Name Specification 1 Controller cable Shield cable 0 5 m 2 Motor cable Shield cable 5 m 3 Encoder cable Shield cable 5 m 4 AC Li...

Page 248: ...tment Methods A 2 A 1 2 Basic Rules for Gain Adjustment A 3 A 2 Adjusting a Speed control Servopack A 4 A 2 1 Adjusting Using Autotuning A 4 A 2 2 Manual Adjustment A 5 A 3 Adjusting a Position control Servopack A 8 A 3 1 Adjusting Using Autotuning A 8 A 3 2 Manual Adjustment A 9 A 4 Gain Setting References A 13 A 4 1 Guidelines for Gain Settings According to Load Inertia Ratio A 13 A Artisan Tech...

Page 249: ...t controller the same adjustment can be achieved using Cn 03 Speed Reference Gain but the Servomotor may not reach maximum speed for some preset values of this parameter A simple block diagram of the servo system is shown below Speed Speed Pattern Time Pulse Train Position control Servopack Speed control Servopack Error Count er Position Control Loop D A Convert er Analog Voltage Speed Control Loo...

Page 250: ...ely poor rigidity and a characteristic frequency of approximately 10 to 20 Hz This type of machine allows a position loop gain of only 10 to 20 1 s Conversely the characteristic frequency of a precision machine tool such as a chip mounter or IC bonder exceeds 70 Hz allowing a position loop gain exceeding 70 1 s for some machines Therefore although the response of the servo system controller Servo ...

Page 251: ... rigidity according to the following standards Drive Method Machine Rigidity Ball screw direct 3 C 003 to 7 C 007 Ball screw with reduction gears 2 C 002 to 3 C 003 Timing belt 1 C 001 to 3 C 003 Chain 1 C 001 to 2 C 002 Wave decelerator Harmonic Driver 1 C 001 to 2 C 002 Select the machine rigidity level according to the table Level Rigidity 7 C 007 High 6 C 006 5 C 005 4 C 004 3 C 003 Medium 2 C...

Page 252: ...final minute references An excessively high settingoftheintegration timeconstant Cn 05 during autotuningis one cause ofthis problem If response is slow after autotuning the speed loop gain cannot be manually increased very much before oscillation starts In this case manually reduce the integration time constant while observing the machine behavior to ensure oscillation does not occur Autotuning do...

Page 253: ... will however produce a delay in the servo system just like the integration time constant Cn 05 and its value should not be increased more than necessary Speed Reference Gain Cn 03 Changing thespeed reference gain Cn 03 changes theposition loopgain anequivalent amount That is reducing the speed reference gain is equivalent to reducing the position loop gain and increasing it is equivalent to incre...

Page 254: ...ease the speed reference gain Cn 03 3 Determinethespeedloopintegrationtimeconstant Cn 05 byobservingthepositioning setting time and vibrations in the mechanical system The positioning setting time may become excessive if the speed loop integration time constant Cn 05 is too large 4 It is not necessary to change the torque reference filter time constant Cn 17 unless tor sional resonance occurs in t...

Page 255: ...cording to the following standards Drive Method Machine Rigidity Ball screw direct 3 C 003 to 7 C 007 Ball screw with reduction gears 2 C 002 to 3 C 003 Timing belt 1 C 001 to 3 C 003 Chain 1 C 001 to 2 C 002 Wave decelerator Harmonic Driver 1 C 001 to 2 C 002 Select the machine rigidity level according to the following table Level Rigidity 7 C 007 High 6 C 006 5 C 005 4 C 004 3 C 003 Medium 2 C 0...

Page 256: ...sponse to the final minute references An excessively high settingoftheintegration timeconstant Cn 05 during autotuningis one cause ofthis problem If response is slow after autotuning the speed loop gain cannot be manually increased very much before vibration starts In this case manually reduce the integration time constant while observing the machine behavior to ensure oscillation does not occur A...

Page 257: ...cessary Position Loop Gain The position loop gain parameter sets the servo system response The higher the position loop gain is set the better the response and shorter the position ing times To enable a high setting of the position loop gain increase the machine rigidity and raise the machine characteristic frequency Increasing the position loop gain only to improve the response can result in osci...

Page 258: ...e saturated during acceleration or deceleration Above the set level the speed loop control switches from PI proportional integral con trol to P proportional control Feed forward Function Use feed forward to improve the response speed However feed forward may be inef fective in systems where a sufficiently high value of position loop gain is not possible Follow the procedure below to adjust the fee...

Page 259: ...g adjustment as the optimum value depends on the load gain and positioning complete width Set Cn 0C to zero 0 when the bias is not used Speed Speed Reference Positioning Complete COIN Signal Motor Speed with No Bias Motor Speed with Bias Time The adjustment procedures described above are common for all Yaskawa digital AC Servo packs However not all functions are available on each Servopack Consult...

Page 260: ...rect Drive Machines Example Chip mounter IC bonder precision machine tools Load Inertia Ratio GDL 2 GDM 2 Position Loop Gain Cn 1A 1 s Speed Loop Gain Cn 04 Hz Speed Loop Integration Time Constant Cn 05 ms 1 x 50 to 70 50 to 70 5 to 20 3 x 100 to 140 Slightly increase for 5 x 150 to 200 Slightly increase for inertia ratio of 20 x or greater 10 x 270 to 380 greater 15 x 400 to 560 20 x 500 to 730 3...

Page 261: ...gain to the lower limit of the range of values specified Conversely increase the speed loop integration time constant Machines with Low Rigidity Machines driven by timing belts chains or wave reduction gears product name Harmonic Drive Example Conveyors articulated robots Load Inertia Ratio GDL 2 GDM 2 Position Loop Gain Cn 1A 1 s Speed Loop Gain Cn 04 Hz Speed Loop Integration Time Constant Cn 05...

Page 262: ...fer ence gain Cn 03 The position loop gain Cn 1A of a speed control Servopack is valid in zero clamp mode only The position loop gain is determined from the following relationship KP 1 s Position loop gain VS PPS Steady speed reference ε pulse Steady error The number of pulses in the error counter at steady speed Kp VS Á A Artisan Technology Group Quality Instrumentation Guaranteed 888 88 SOURCE w...

Page 263: ...rcuit Note 1 The meanings of some signals for speed torque control and position control are differ ent Always refer to the correct list for the Servopack type 2 Refer to Chapter 2 for details of how to use I O signals 3 The functions of I O signal terminals differ according to the memory switch Cn 01 Cn 02 settings B Artisan Technology Group Quality Instrumentation Guaranteed 888 88 SOURCE www art...

Page 264: ...nal selec tion P CON tion refer ence IN2 3 SG COM Signal ground common 4 Unused 5 Unused 6 Unused 7 ALM Alarm output 8 OUT 2 Output signal 2 Output signal selec tion 9 24V IN 24 V external power input 10 Unused 11 Unused 12 V REF T REF Speed torque reference in put V REF Speed refer ence input T REF Torque refer ence input Un used V REF Speed refer ence 13 SG Signal ground SG Signal ground SG Sign...

Page 265: ...s column is also applicable to blank columns 2 Number x x x in box represents a section number corresponding to each signal name For example 2 2 1 represents section 2 2 1 B Artisan Technology Group Quality Instrumentation Guaranteed 888 88 SOURCE www artisantg com ...

Page 266: ...ignal 11 PAO Phase A g output 12 PBO Phase B 13 SG Signal ground 14 PULS Reference pulse input PULS Forward run refer ence pulse PULS Phase A reference pulse input 15 PULS PULS ence pulse input CCW PULS pulse input 16 SIGN Reference sign input SIGN Reverse run refer SIGN Phase B reference 17 SIGN SIGN run refer ence pulse input CW SIGN reference pulse input 18 CLR Clear signal input 19 CLR g p 20 ...

Page 267: ...lect a function Parameter setting Cn 03 and later A numerical value such as a torque limit value or speed loop gain is set in this constant Note Some parameters for speed torque control and position control are different Always refer to the correct list of parameters for the Servopack type Refer to 2 3 1 Setting Parameters for details of how to use parameters For details of how to set parameters r...

Page 268: ...se rotation torque limit 0 Maximum torque Maximum torque Cn 14 TCRLMT Speed limit for torque control min 1 0 Maximum speed Maximum speed Cn 17 TRQFIL Torque reference filter time constant 0 1 ms 0 250 4 Cn 18 CLMI Forward reverse external torque limit 0 Maximum torque 100 Sequence Related C Cn 07 SFSACC Soft start time acceleration ms 0 10000 0 See note 4 e ated Constants Cn 23 SFSDEC Soft start t...

Page 269: ...ximum speed 200 Cn 21 SPEED3 3rd speed contact input speed control min 1 0 Maximum speed 300 Cn 28 NFBCC Speed loop compensation constant 0 100 0 Cn 29 AXISNO Axis address 0 14 0 Cn 2A INS1 Input signal selection 1 0 3 0 See note 1 Cn 2B INS2 Input signal selection 2 0 3 2 See note 1 Cn 2C OUTS2 Output signal selection 2 0 4 3 See note 1 Note 1 After changing the setting always turn OFF the power ...

Page 270: ...me position error processing selection 1 Detects home position error Does not detect home position error 0 Contact input speed control 2 Does not use contact input speed control Uses contact input speed control 0 Contact input speed control 3 Contact input speed control Speed 1 Forward Contact input speed control Speed 1 Reverse 0 speed co t o rotation direction selection 4 Contact input speed con...

Page 271: ...E Position refer ence accelera tion deceleration time constant 100 µs 0 640 0 Cn 27 FFFILT Feed forward reference filter 100 µs 0 640 0 Cn 08 TLMTF Forward rotation torque limit 0 Maximum torque Maximum torque Cn 09 TLMTR Reverse rotation torque limit 0 Maximum torque Maximum torque Cn 17 TRQFIL Torque reference filter time constant 0 1 ms 0 250 4 Cn 28 CLMI Forward reverse external torque limit 0...

Page 272: ...n 1E OVRLV Overflow 256 reference unit 1 32767 1024 Cn 28 NFBCC Speed loop compensation constant 0 100 0 Cn 29 AXISNO Axis address 0 14 0 Cn 2A INS1 Input signal selection 1 0 3 0 See note 1 Cn 2B INS2 Input signal selection 2 0 3 2 See note 1 Cn 2C OUTS2 Output signal selection 2 0 4 3 See note 1 Parameters that must always be set before turning ON power to the Servomotor Note 1 After changing th...

Page 273: ...ion error processing selection 1 Detects home position error Does not detect home position error 0 Not used 2 Not used Do not set 0 Reference pulse form selection 5 4 3 0 0 0 Sign Pulse 0 0 1 CW CCW 0 1 0 Phase A Phase B x 1 multiplication 0 1 1 Phase A Phase B x 2 multiplication 1 0 0 Phase A Phase B x 4 multiplication 0 0 0 Not used 6 7 8 Not used Do not set 0 Error counter clear signal A Clears...

Page 274: ...als CN1 1 and CN1 2 Setting Value Function 0 S ON 1 P CON 2 ALMRST 3 CL Output Signal Selection Cn 2C Setting Values Select the functions of output signal CN1 8 Setting Value Function 0 ALM 1 TGON 2 BK 3 COIN 4 CLT C Artisan Technology Group Quality Instrumentation Guaranteed 888 88 SOURCE www artisantg com ...

Page 275: ...ndix provides the name and meaning of each alarm display For details of how to display an alarm refer to the following section 3 2 1 Operation in Alarm Traceback Mode For details on causes of each alarm and the actions to be taken refer to the following section 5 2 1 Troubleshooting Problems with Alarm Display D Artisan Technology Group Quality Instrumentation Guaranteed 888 88 SOURCE www artisant...

Page 276: ...r encoder ran out of control A C2 OFF Encoder output phase error Phase A B and C output by the encoder are abnormal A C3 OFF Encoder phase A B disconnection Wiring in encoder phase A or B is disconnected A C4 OFF Encoder phase C disconnection Wiring in encoder phase C is disconnected CPF00 Unde fined Digital Operator transmission error 1 Digital Operator fails to communicate with Servopack even fi...

Page 277: ...coder 2 76 standard type motor 2 78 terminal layouts 2 74 Servopack position control 2 75 Servopack speed torque control 2 74 contact input signal terminals connections 2 21 contact input speed control function 2 28 motor speeds 2 29 soft start time 2 30 contact output signal terminals connections 2 22 D Digital Operators alarm traceback mode 3 13 connection 3 2 dimensional drawings 4 46 mode sele...

Page 278: ... 2 21 proportional integral control 2 12 reference pulse input 2 14 reference sign input 2 14 reverse external torque limit input 2 7 servo ON 2 62 signal ground for speed reference input 2 9 2 34 signal ground for torque reference input 2 34 speed reference input 2 9 2 34 speed selection 2 31 torque reference input 2 34 zero clamp speed control 2 41 inspection 5 2 5 3 Servomotors 5 2 Servopacks 5...

Page 279: ...lection 4 47 flowchart 4 48 specifications 4 50 wiring 1 12 position references inputs 2 13 line driver output 2 13 open collector output 2 13 positioning complete signal 2 63 positioning time minimizing 2 49 precautions 1 2 pressure control 2 33 proportional control 2 51 proportional integral control 2 51 signal 2 12 protective sequence 2 60 pulse dividing ratio 2 20 R radial load 1 8 reference o...

Page 280: ... 5 stop mode setting 2 40 stopping time 4 26 surge suppressor 4 64 T tension control 2 33 terminals standard type motor without brake 2 78 test run 1 23 minimum user constants 1 30 motor alone 1 24 position control from the host controller 1 29 servomotor with brake 1 29 thrust load 1 8 torque control 2 5 2 32 torque limit input signals 2 8 output signal 2 6 torque reference filter time constant 2...

Page 281: ...nstant 2 49 speed reference gain 2 12 time delay from brake signal output to servo OFF 2 44 torque control 2 33 torque reference filter time constant 2 48 torque reference gain 2 35 zero clamp speed control 2 41 zero speed level 2 66 V variable resistor dimensional drawings 4 64 vibration class 4 17 vibration resistance 4 17 W wiring 1 12 2 67 grounding 2 70 more than one servo drive 2 73 noise co...

Page 282: ... Wu Kong 6 Rd Wu Ku Industrial Park Taipei Taiwan Phone 886 2 2298 3676 Fax 886 2 2298 3677 YASKAWA ELECTRIC HK COMPANY LIMITED Rm 2909 10 Hong Kong Plaza 186 191 Connaught Road West Hong Kong Phone 852 2803 2385 Fax 852 2547 5773 BEIJING OFFICE Room No 301 Office Building of Beijing International Club 21 Jianguomenwai Avenue Beijing 100020 China Phone 86 10 6532 1850 Fax 86 10 6532 1851 TAIPEI OF...

Page 283: ...quipment Have surplus equipment taking up shelf space We ll give it a new home Learn more Visit us at artisantg com for more info on price quotes drivers technical specifications manuals and documentation Artisan Scientific Corporation dba Artisan Technology Group is not an affiliate representative or authorized distributor for any manufacturer listed herein We re here to make your life easier How...

Reviews: