background image

The System SLIO safety DI module can be used with cable length up to 330m (capacity

up to 100nF, ohmic resistance up to 22.4Ω). General rule: A single-channel sensor is suf-

ficient to achieve SIL2/Cat. 3/PLd; to achieve SIL3/Cat.4/PLe, sensors must be con-

nected via two channels.

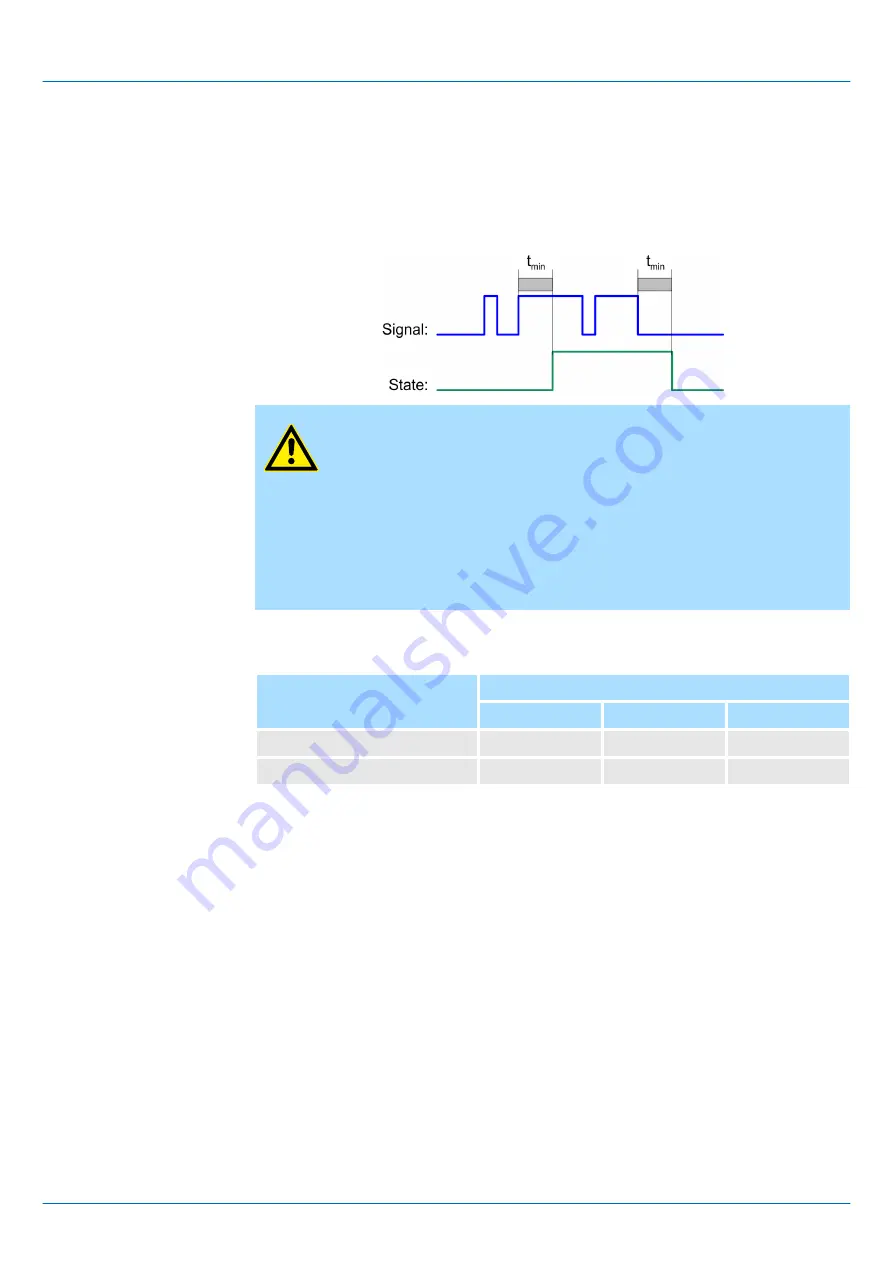
Note the following requirements on the sensor signals:

CAUTION!

In order to guarantee accurate detection of sensor signals by the safety

DI module, you must ensure that the sensor signals have a defined 

min-

imum duration

.

The 

minimum duration

 is a minimum switch-on and switch-off duration,

which is necessary to detect a signal in the worst case. The time interval

between two signal transitions must be greater than the Sync Manager

monitoring time (SM Watchdog) for EtherCAT communication to allow

reliable detection of the pulses. This must be specified in the 

SPEED7

EtherCAT Manager

 within the parameters for the slave station.

Reliable detection by the safety DI module

Parameter short-circuit test

Parametrized input delay

1ms

3ms

15ms

de-activated

7ms

9ms

23ms

activated

8ms

12ms

37ms

In the table exemplary the minimum duration of the sensor signals of the safety DI

module is shown. It depends on the configuration of the short-circuit test and the input

delay in the Configuration tool of the FSoE master.

Requirements to the sen-

sors

Duration of the sensor sig-

nals

VIPA System SLIO

Deployment

Wiring > Requirements to the sensor and actuators

HB300 | SM-S | 02x-1SD10 | en | 20-02


89

Summary of Contents for VIPA SLIO SDI

Page 1: ...SM S 02x 1SD10 Operating manual HB300 SM S 02x 1SD10 en 20 02 VIPA System SLIO Safety Digital I O SM S 02x FSoE ...

Page 2: ...02x 1SD10_000_SM S 1 EN 2020 YASKAWA Europe GmbH Ohmstraße 4 91074 Herzogenaurach Tel 49 9132 744 0 Fax 49 9132 744 186 Email info yaskawa eu com Internet www yaskawa eu com ...

Page 3: ...on 25 2 2 Dimensions 26 2 3 SDI 4xDC 24V Operating and display elements 27 2 4 SDI 4xDC 24V IO structure 33 2 5 SDI 4xDC 24V FSoE Parameter record set 34 2 5 1 FSoE application parameters 34 2 5 2 FSoE communication parameters 39 2 6 SDI 4xDC 24V Technical data 40 2 7 SDO 4xDC 24V 0 5A Operating and display elements 43 2 8 SDO 4xDC 24V 0 5A IO structure 49 2 9 SDO 4xDC 24V 0 5A FSoE Parameter reco...

Page 4: ...Generate safety program 105 3 9 5 Diagnostic messages EtherCAT 105 3 10 Validation of the system 107 3 11 Operation 108 3 12 Maintenance 108 3 13 Repair 108 3 14 Diagnostics 108 3 14 1 Error response 109 3 14 2 Fault diagnostics 110 3 15 Packing and transport 115 3 16 Storage and disposal 116 3 17 Sample application 117 3 17 1 Precondition 117 3 17 2 Configuration in YASKAWA SAFE CPU 118 3 17 3 Co...

Page 5: ...are units and functions known at the present time Descriptions may be included for units which are not present at the customer site The exact scope of delivery is described in the respective purchase contract Hereby YASKAWA Europe GmbH declares that the products and systems are in compli ance with the essential requirements and other relevant provisions Conformity is indi cated by the CE marking a...

Page 6: ...Germany Fax 49 9132 744 29 1204 Email Documentation HER yaskawa eu com Contact your local representative of YASKAWA Europe GmbH if you encounter problems or have questions regarding the product If such a location is not available you can reach the YASKAWA customer service via the following contact YASKAWA Europe GmbH European Headquarters Hauptstraße 185 65760 Eschborn Germany Tel 49 6196 569 500 ...

Page 7: ... will cause death or serious injury WARNING Hazardous situation to life and limb of personnel and others Non compliance may cause death or serious injury CAUTION Hazardous situation to life and limb of personnel and others Non compli ance may cause slight injuries This symbol is also used as warning of damages to property NOTICE Designates a possibly harmful situation Non compliance can damage the...

Page 8: ...ed Since deviations cannot be precluded entirely we cannot guarantee full agreement However the data in this manual are reviewed regularly Necessary correc tions are included in subsequent editions Suggestions for improvement are welcomed For damage which results from missing or insufficient knowledge of the manual any lia bility of the manufacturer is impossible Therefore the operator is recommen...

Page 9: ...IPA safety components and systems have been developed manufactured and tested in compliance with the pertinent safety standards and regulations They may only be used for the intended applications under the specified environmental conditions They must be used only as specified in environmental descriptions and be connected only to approved external devices The manual contains safety instructions de...

Page 10: ... to the product that have not been expressly approved by the man ufacturer Every person working with the product must have read and understood the operating instructions before carrying out any work The manual must be available to all personnel in the n project design department n installation department n commissioning n operation CAUTION The following conditions must be met before using or commi...

Page 11: ...s than the human threshold of perception These voltages can occur where persons do not dis charge themselves before handling electrostatic sensitive modules and they can damage components thereby causing the module to become inoperable or unusable Modules that have been damaged by electrostatic discharges can fail after a temperature change mechanical shock or changes in the electrical load Only t...

Page 12: ...ich are to be demonstrated since it can come without any additional measures to EMC disturbances Whether a products described here reaches category C2 C1 with additional measures cannot be ensured To avoid endangerments and to ensure the optimal power neither changes nor modifica tions may be made at the product which are not specially approved by the manufacturer 1 6 Responsibility of the user Th...

Page 13: ...sioning by the manufacturer and are allowed to ground mark and install electrical circuits and devices in accordance to the standard safety technology Qualified personnel is trained and instructed according to the corresponding valid standards in safety technology in the care and use of appropriate safety equipment 1 9 Personal protective equipment During work the wearing of personal protective eq...

Page 14: ...electrical system only by qualified personnel Always power off and secure the electrical system during the work on it DANGER Risk of death by electric current After disconnecting the device from main voltage parts such as power connections should only be touched when the capacitors are discharged in the device Therefore Regard discharge time of the capacitors do not touch live parts before Regard ...

Page 15: ... degree of pollution 2 This means only non conductive pollution may occur during operation Temporary con ductivity by condensation is only allowed when the module is out of operation WARNING Risk of injury from conductive pollution During the operation there is no conductive pollution allowed Therefore Before the system is installed check and guarantee if necessary by additional measures that the ...

Page 16: ...and rescue mechanisms familiar n Set immediately the device with emergency stop out of operation n Initiate first aid measures n Rescue persons from the danger zone n Inform responsible on site n Alarm medical and or fire department n Make free the access routes for emergency vehicles 1 15 Sign posting WARNING Danger of injury by illegible symbols In course of time stickers and symbols on the equi...

Page 17: ...ty rules n general ESD regulations Disturbances of any kind or other damage must be reported to a responsible person Pro tective and safety equipment must not be circumvented or bypassed Dismounted protec tive equipment must be mounted and functionally tested before a restart The modules are to be secured against misuse or accidental use Original mounted signs labels stickers are to be always cons...

Page 18: ...lity of danger failure per hour PFDavg 1 85 10 5 Probability of Failure on Demand average Average of probability of failure on demand SFF according SIL 3 Safe Failure Fraction Fraction of failure which lead to a safe state Characteristics according to DIN EN ISO 13849 1 Meaning MTTFD high 192 years Mean Time To dangerous Failure DCavg high Diagnostic Coverage average Device life 20 years During th...

Page 19: ...asures against short circuit Environmental conditions to EN 61131 2 Climatic Storage transport EN 60068 2 14 25 70 C Operation Horizontal installation hanging EN 61131 2 0 60 C Horizontal installation lying EN 61131 2 0 55 C Vertical installation EN 61131 2 0 50 C Air humidity EN 60068 2 30 RH1 without condensation rel humidity 10 95 Pollution EN 61131 2 Degree of pollution 2 Installation altitude...

Page 20: ...r Article Description Feed Dehn BLITZDUCTOR VT BVT AVD 24 External Lightning protection DC24V 10A Digital inputs test pulse outputs Dehn DEHNconnect RK DCO RK ME 24 External Lightning protection DC24V 0 5A Digital outputs Dehn DEHNconnect RK DCO RK D 5 24 External Lightning protection DC24V 10A EtherCAT interface Dehn DEHNpatch DPA M CLE RJ45B 48 External Lightning protection RJ45 48V Norms and st...

Page 21: ...LV regulations in accordance to EN 50178 DIN EN 61508 The normative requirements of the 61508 increased EMC requirements and requirements concerning isolation are to be fulfilled also for the common voltage circuit of the SLIO system DIN EN 50178 So that the electrical values for extra low voltage with safe separation cannot be exceeded on the safe field bus coupler for the system 24V power suppli...

Page 22: ...ists of the following components n CPU head module n Bus coupler head module n Periphery modules n Power modules n Accessories With this CPU 01x CPU electronic and power supply are integrated to one casing As head module via the integrated power module for power supply CPU electronic and the electronic of the connected periphery modules are supplied The DC 24 power section supply for the linked pe...

Page 23: ...s are carried out in the configuration tool of the FSoE master n The configuration of the EtherCAT system with the System SLIO I O modules takes place in the SPEED7 EtherCAT Manager n The safety configuration is transferred to the SPEED7 EtherCAT Manager via an ESI file which must be generated in the configuration tool of the FSoE master Each periphery module consists of a terminal and an electron...

Page 24: ...hanical compatible terminal modules is not allowed In the System SLIO the power supply is established by power modules These are either integrated to the bus coupler or may be installed between the periphery modules Depending on the power module isolated areas of the DC 24V power section supply may be defined respectively the electronic power supply may be extended with 2A For better recognition t...

Page 25: ...ain If this is a clamp module for adaptation the upper part of the bus cover can be cut off 2 1 1 Hardware revision n The hardware revision version is printed on every System SLIO module n Since a System SLIO module consists of a terminal and electronics module you will find a hardware revision on each of them n Authoritative for the hardware revision of a System SLIO module is the hardware revi s...

Page 26: ...SLIO safety modules are identical to those of the System SLIO standard modules Dimensions bus coupler Dimensions periphery module here Safety Dimensions electronic module here Safety VIPA System SLIO Product description Dimensions HB300 SM S 02x 1SD10 en 20 02 26 ...

Page 27: ... channels via LEDs n Safety module with automatic disconnection in case of error according to IEC 61508 SIL3 and EN ISO 13849 1 Cat 4 PL e 1 Locking lever terminal module 2 Labeling strip 3 Address switch for F address 4 Backplane bus 5 LED status indication 6 DC 24V power section supply 7 Electronic module 8 Terminal module 9 Locking lever electronic module 10 Terminal Description Properties Stru...

Page 28: ... on off blinking with 0 5Hz B blinking with 2Hz BB Blink code C Each module has the LEDs RUN and MF on its front side Errors or incorrect modules may be located by means of these LEDs In the following illustrations flashing LEDs are marked by Behaviour After PowerON the RUN LED of each module is off and the MF LED of each module is sporadically on Cause The maximum current for the electronic power...

Page 29: ...t correspond to the configured module Remedy Match configuration and hardware structure Behaviour After PowerON all of the RUN LEDs up to the defective module are flashing With all following modules the MF LED is on and the RUN LED is off Cause The module on the right of the flashing modules is defective Remedy Replace the defective module RUN and MF LED Error in configuration RUN and MF LED Modul...

Page 30: ...in with the code output Normally an external error is caused by wiring respectively by a connected sensor Please check also your parameters for the sensor If an external error was reported by the ERR LED the LED ER2 indicates the faulty channel by the following blink code n The ER2 LED gets off for 2s n Then it indicates the number of the faulty channel by blinking with 1Hz Here it is valid blinki...

Page 31: ...0 2 DI 2 I Digital input DI 2 3 T0 O Clock output T0 4 T2 O Clock output T2 5 DI 1 I Digital input DI 1 6 DI 3 I Digital input DI 3 7 T1 O Clock output T1 8 T3 O Clock output T3 I Input O Output Terminal VIPA System SLIO Product description SDI 4xDC 24V Operating and display elements HB300 SM S 02x 1SD10 en 20 02 31 ...

Page 32: ...ate Pos Value Example State Address 0 1 1 1 2 32 512 547 Address 547 1 2 1 2 4 0 3 8 0 4 16 0 5 32 1 6 64 0 7 128 0 8 256 0 9 512 1 10 1024 0 11 2048 0 When the module is installed the F address switch may not be accessed To set the F address on the safety module the electronic module is to be demounted before as described at Demounting and module exchange Ä Chap 3 5 Demounting and module exchange...

Page 33: ...UINT 16 FSoE Master CRC 0 0x7000 3 UINT 16 FSoE Master Connection ID Tx direction 0x6000 1 USINT 8 FSoE Slave Command 0x6001 1 BOOL 1 DI0 0x6001 2 BOOL 1 DI1 0x6001 3 BOOL 1 DI2 0x6001 4 BOOL 1 DI3 0x0 4 0x6000 2 UINT 16 FSoE Slave CRC 0 0x6000 3 UINT 16 FSoE Slave Connection ID VIPA System SLIO Product description SDI 4xDC 24V IO structure HB300 SM S 02x 1SD10 en 20 02 33 ...

Page 34: ... Condition channel 0 1 acti vation on activated Condition channel 0 1 evalu ation of the inputs to 2 channel 0 equivalent 1 antivalent BOOL 1 65 rw 0 5 Channel 0 1 Evaluation of the inputs Condition channel 0 1 acti vation on activated 0 1 channel 1 2 channel BOOL 1 66 rw 1 6 Channel 0 1 Test pulse acti vation Condition Channel 0 1 acti vation on activated 0 activated 1 deactivated Test pulse acti...

Page 35: ...nel 2 3 Activation 0 deactivated 1 activated BOOL 1 76 rw 1 16 Parameter change mode 0 Normal parameter record set 1 Parameter change F address BOOL 1 77 rw 0 17 Activation diagnostic inter rupt 0 deactivated 1 activated Bit is not security relevant BOOL 1 78 rw 1 18 Behavior after channel errors 0 Passivate the entire module 1 Passivate the affected channel BOOL 1 79 rw 0 19 Channel 0 1 Input smo...

Page 36: ...o be changed for a System SLIO safety module you can delete the F address in the memory of the System SLIOsafety module by setting this parameter Ä Chap 3 3 Setting the F address page 71 If the SDI module detects an error on one of the input channels e g short circuit the entire System SLIO safety module is passivated Here the module provides the safety PLC as long with the fail safe value 0 for t...

Page 37: ...activated test pulse activation 0 the DC 24V power supply output is shortly set to 0V at defined intervals Here the return of the test pulse is observed by each input channel provided the sensor is currently closed Here wiring errors or short and cross circuits can be detected n This function is to be deactivated test pulse activation 1 if there is an active sensor e g light array connected to the...

Page 38: ...electromechanical sensors Discrepancy to be set real signal discrepancy switch and bounce time of the sensor set Input smoothing time 7 ms n It is valid for active sensors with semiconductor output and own test pulse genera tion Discrepancy to be set real signal discrepancy set Input smoothing time 3 4 ms Please consider with mechanical sensors and increasing abrasion by e g contact bounce the dis...

Page 39: ...d n The watchdog time parameter determines the monitoring time for the communication between the safety PLC and the System SLIO safety module n Within the monitoring time at least one valid telegram must be exchanged between the safety PLC and the System SLIO safety module In this case the I O data of the EtherCAT telegrams are correspondingly copied into the I O areas of the safety PLC n In the s...

Page 40: ...me of the safety PLC TECM Max Response time of the EtherCAT slave 2 6 SDI 4xDC 24V Technical data Order no 021 1SD10 Type SM 021 Module ID 0C42 9E00 Current consumption power loss Current consumption from backplane bus 95 mA Power loss 0 8 W Technical data digital inputs Number of inputs 4 Cable length shielded 330 m Cable length unshielded 330 m Rated load voltage Current consumption from load vo...

Page 41: ...arameterizable Process alarm no Diagnostic interrupt yes parameterizable Diagnostic functions yes parameterizable Diagnostics information read out possible Module state green LED Module error display red LED Channel error display red ERR LED and yellow ER2 LED Isolation Between channels Between channels of groups to Between channels and backplane bus ü Insulation tested with DC 500 V Safety Safety...

Page 42: ...e of safe digital inputs of a System SLIO safety module may affect the test pulses of connected devices sensors with OSSD outputs If the OSSD outputs are of the type open collector the input capacitance which is specified in the technical data here must be considered as a load capacitance in addition to the cable capacitance You can find the maximum permissible load capacitance of the sensor in it...

Page 43: ...channels via LEDs n Safety module with automatic disconnection in case of error according to IEC 61508 SIL3 and EN ISO 13849 1 Cat 4 PL e 1 Locking lever terminal module 2 Labeling strip 3 Address switch for F address 4 Backplane bus 5 LED status indication 6 DC 24V power section supply 7 Electronic module 8 Terminal module 9 Locking lever electronic module 10 Terminal Description Properties Struc...

Page 44: ...input is triggered on off blinking with 0 5Hz B blinking with 2Hz BB Blink code C Each module has the LEDs RUN and MF on its front side Errors or incorrect modules may be located by means of these LEDs In the following illustrations flashing LEDs are marked by Behaviour After PowerON the RUN LED of each module is off and the MF LED of each module is sporadically on Cause The maximum current for th...

Page 45: ...correspond to the configured module Remedy Match configuration and hardware structure Behaviour After PowerON all of the RUN LEDs up to the defective module are flashing With all following modules the MF LED is on and the RUN LED is off Cause The module on the right of the flashing modules is defective Remedy Replace the defective module RUN and MF LED Error in configuration RUN and MF LED Module ...

Page 46: ...the setpoint state control n If there is a difference between the setpoint state and the actual state detected a read back error is reported This can either mean that the output is 1 state although it should have 0 state points to a separate power supply or the output has 0 state although it should have 1 state points to an external short circuit or an internal hardware malfunction In this case of...

Page 47: ...V O GND for actuator 3 DO 2 O Digital output DO 2 4 0V O GND for actuator 5 DO 1 O Digital output DO 1 6 0V O GND for actuator 7 DO 3 O Digital output DO 3 8 0V O GND for actuator I Input O Output Terminal VIPA System SLIO Product description SDO 4xDC 24V 0 5A Operating and display elements HB300 SM S 02x 1SD10 en 20 02 47 ...

Page 48: ... Pos Value Example State Address 0 1 1 1 2 32 512 547 Address 547 1 2 1 2 4 0 3 8 0 4 16 0 5 32 1 6 64 0 7 128 0 8 256 0 9 512 1 10 1024 0 11 2048 0 When the module is installed the F address switch may not be accessed To set the F address on the safety module the electronic module is to be demounted before as described at Demounting and module exchange Ä Chap 3 5 Demounting and module exchange pa...

Page 49: ...OOL 1 DO1 0x7001 3 BOOL 1 DO2 0x7001 4 BOOL 1 DO3 0x0 4 0x7000 2 UINT 16 FSoE Master CRC 0 0x7000 3 UINT 16 FSoE Master Connection ID Tx direction 0x6000 1 USINT 8 FSoE Slave Command 0x6001 1 USINT 8 Data 0x6000 2 UINT 16 FSoE Slave CRC 0 0x6000 3 UINT 16 FSoE Slave Connection ID VIPA System SLIO Product description SDO 4xDC 24V 0 5A IO structure HB300 SM S 02x 1SD10 en 20 02 49 ...

Page 50: ...ated 0 deactivated 1 activated Bit is not security relevant BOOL 1 65 rw 0 5 Channel 0 1 Activation mode Condition Channel 0 1 acti vation on activated 0 1 channel 1 2 channel BOOL 1 66 rw 1 6 Channel 0 1 Activation1 0 deactivated 1 activated BOOL 1 67 rw 1 7 Channel 2 Wire break detection Condition Channel 2 3 acti vation on activated 0 deactivated 1 activated Bit is not security relevant BOOL 1 ...

Page 51: ...1000 1 Deactivation of channel groups deviates from normal operation and represents a potentially dangerous condition The version identifier is specific to a module type i e for the input module and the output module Since these have different parameter data in each case with version 0x0001 is started In the MX file the identifier 0x0000 is entered so that the firmware can recognize that this is a...

Page 52: ...her safety level like SIL3 or PLe can be achieved if you can exclude the errors cross circuit or external power supply or there is a superior shut down on error n With 2 channel a 2 channel actuator with 2 inputs or 2 actuators with respectively 1 input are connected to a channel group Here bit 0 switches the outputs DO 0 and DO 1 respectively bit 2 switches the outputs DO 2 and DO 3 Here the actu...

Page 53: ...or because here it is not possible for the module to test the switch off ability of an output Then the module reports short circuit Orientation values for the test pulse length Load current Cable length capacity resistor Test pulse length to be configured 2 mA 100 m 30 nF up to 6 7 Ohm 3000 µs 2 mA 333 m 100 nF up to 22 4 Ohm 4500 µs 2 mA 1000 m 300 nF up to 67 Ohm 8000 µs 5 mA 100 m 30 nF up to 6...

Page 54: ... The watchdog time parameter determines the monitoring time for the communication between the safety PLC and the System SLIO safety module n Within the monitoring time at least one valid telegram must be exchanged between the safety PLC and the System SLIO safety module In this case the I O data of the EtherCAT telegrams are correspondingly copied into the I O areas of the safety PLC n In the safe...

Page 55: ... 2 10 SDO 4xDC 24V 0 5A Technical data Order no 022 1SD10 Type SM 022 Module ID 0C82 AE00 Current consumption power loss Current consumption from backplane bus 75 mA Power loss 1 W Technical data digital outputs Number of outputs 4 Cable length shielded 1000 m Cable length unshielded 600 m Rated load voltage DC 20 4 28 8 V Current consumption from load voltage L without load 15 mA Total current pe...

Page 56: ...f contacts Output data size 4 Bit Status information alarms diagnostics Status display green LED per channel Interrupts yes parameterizable Process alarm no Diagnostic interrupt yes parameterizable Diagnostic functions yes parameterizable Diagnostics information read out possible Supply voltage display green LED Group error display red SF LED Channel error display red ERR LED and yellow ER2 LED Is...

Page 57: ...s 16 Diagnostic bytes 20 Housing Material PC PPE GF10 Mounting Profile rail 35 mm Mechanical data Dimensions WxHxD 12 9 mm x 109 mm x 76 5 mm Net weight 64 g Weight including accessories 69 g Gross weight 85 g Environmental conditions Operating temperature 0 C to 60 C Storage temperature 25 C to 70 C Certifications UL certification in preparation KC certification in preparation VIPA System SLIO Pr...

Page 58: ...e required for plant design Hereby you can determine whether the maximum error tolerance time of a process is not exceeded Here the following cases are to e distinguished which are described below n Error free case n Existing error n Arbitrary run times at single errors 2 11 1 Error free case In the error free case it is assumed that none of the time monitors are responding and the passage of a si...

Page 59: ... EtherCAT input output data from Safety SDI to the FSoE master and back respectively between Safety SDO and FSoE master TI TOECS Max response time of the EtherCAT slave i e max delay due to the EtherCAT coupler and the backplane bus EtherCAT Slave TI TOBUS Time for EtherCAT bus transfer TECM_ECAT Max delay due to the EtherCAT master stack TCL Configured cycle time of the safety PLC This also corre...

Page 60: ...considered TOPSTO TODAT n A single error occurs in the System SLIO safety SDO Here the possibly larger max response time during an error TOOFDT is to be considered with the max response time in error free case TOWCDT TOOFDT TOWCDT TmaxOF TmaxNF MAX TIDIS TIOFDT TIWCDT TIECSMWD TCL TOECSMWD TODAT TOOFDT TOWCDT Ä Chap 2 11 4 Designations page 62 TmaxOF Max response time in the presence of an error m...

Page 61: ... TOECSMWD n The max processing time to and in the System SLIO safety SDO TOWCDT TOECSMWD n The possibly increased processing times in case of an error within the System SLIO safety modules here but only the larger of them because it is assumed that there is a single error MAX TIOFDT TIWCDT TOOFDT TOWCDT n For the entire process chain a good EtherCAT telegram could be sent before to the System SLIO...

Page 62: ...ctuatorDLY Ä Chap 2 11 4 Designations page 62 TmaxRTSA Max response time in the presence of an error with max runtime with sensor and actuator max RunTime Sensor Actuator TSensorDLY Delay time of the sensor Sensor DeLaY TmaxRT Max response time in the presence of an error with max runtime max RunTime TActuatorDLY Delay time of the actuator Actuator DeLaY 2 11 4 Designations Abbreviations sorted by...

Page 63: ...of the EtherCAT bus coupler EtherCAT master TIECM_ECAT TOECM_ECAT Max delay due to the EtherCAT Master stack Documentation of the EtherCAT master If exists otherwise you can preset the EtherCAT cycle time as max imum value EtherCAT field bus TIBus TOBus Time for EtherCAT bus transfer SPEED7 EtherCAT Manager If exists otherwise you can preset the EtherCAT cycle time as max imum value Safety PLC TCL...

Page 64: ...tal Sensor to actuator TmaxOFSA Max response time in the pres ence of an error with sensor and actuator max One Fault SensorActuator See formula Ä Chap 2 11 2 Existing error page 60 Total Input to output TmaxRT Max response time in the pres ence of an error with max runtime max RunTime See formula Ä Chap 2 11 3 Arbi trary run times at single errors page 61 Total Sensor to actuator TmaxRTSA Max res...

Page 65: ...which have the properties suitable for the application and the corresponding type examination The System SLIO safety input and output modules were successfully tested with the fol lowing controllers n VIPA System SLIO CPU 015N n SIS 800 FSoE Master from ISH Ingenieursozietät GmbH Actuators Controllers VIPA System SLIO Product description Compatibility list HB300 SM S 02x 1SD10 en 20 02 65 ...

Page 66: ...ing is to be used Ä Appendix A Checklist planning page 130 The risk evaluation shows the risk which can come from a machine and which plant com ponents must be equipped with safety equipment Due to the safety measures the residual risk is reduced to an acceptable level CAUTION As a manufacturer of machine you are obliged under the machinery directive to execute a risk evaluation to identify all ha...

Page 67: ...Sequence of a risk evalua tion in accordance to DIN EN ISO 12100 1 and EN ISO 14121 VIPA System SLIO Deployment Planning of a safety related control system HB300 SM S 02x 1SD10 en 20 02 67 ...

Page 68: ...sured n Compatibility of the modules Ä Chap 2 12 Compatibility list page 64 and technical data n Sufficient supply of the control system by attached power supplies respectively attached safety components 3 2 Installation guidelines The installation guidelines contain information about the interference free deployment of the System SLIO There is the description of the ways interference may occur in...

Page 69: ...isolation may be favourable Lay the line isolation extensively on an isolation protected earth conductor rail directly after the cabinet entry and fix the isolation with cable clamps Make sure that the isolation protected earth conductor rail is connected impe dance low with the cabinet Use metallic or metallised plug cases for isolated data lines n In special use cases you should appoint special ...

Page 70: ...ta lines always use metallic or metallised plugs for serial couplings Fix the isolation of the data line at the plug rack Do not lay the isolation on the PIN 1 of the plug bar n At stationary operation it is convenient to strip the insulated cable interruption free and lay it on the isolation protected earth conductor line n To fix the isolation tangles use cable clamps out of metal The clamps mus...

Page 71: ...ty module the electronic module is to be demounted before as described at Demounting and module exchange Ä Chap 3 5 Demounting and module exchange page 80 n Before setting take the field bus coupler of circuit n F address must be unique F addresses from 1 to 4095 may be set Each F address must be unique in the communication network of the safety PLC n Only use suitable tools for the setting The sw...

Page 72: ...O safety module is to be powered off and to demounted 1 Switch off the DC 24V power supply of your System SLIO safety module 2 Demount the System SLIO safety module 3 Switch all the switches of the F address switch to 0 position 4 Mount the System SLIO safety module 5 Switch on the DC 24V power supply for the System SLIO safety module 6 Please wait for about 5s and switch the DC 24V power supply f...

Page 73: ...master open the properties dialog of the safety module and reset the reparametrization mode again For details refer to the manual for your FSoE master 9 Transfer the safety configuration to the FSoE master and restart the system 3 3 1 2 Changing the F address in the configuration For details refer to the manual for your FSoE master CAUTION Once the F address has been changed a complete functional ...

Page 74: ...in the environment of the installed safety compo nents Make sure that the system components do not get in contact to aggressive media e g acid leaches gear oil 3 4 1 Requirements to the operating personnel Qualified personnel are persons who based on their education experiences instructions about valid standards and regulations accident prevention regulations and operation con ditions are authoriz...

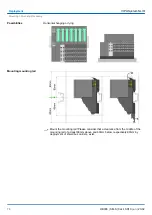
Page 75: ...ronic module may be pulled forward after pressing the unlocking lever at the lower side of the module For installation plug the electronic module guided by the strips at the lower side until this engages audible to the terminal module 3 4 3 Mounting Proceeding The modules were directly be mounted to the mounting rail and so connected to the backplane bus and the power supply for the electronic and...

Page 76: ...a clearance from the middle of the mounting rail of at least 80mm above and 60mm below respectively 80mm by deployment of shield bus carriers exist Possibilities Mounting mounting rail VIPA System SLIO Deployment Mounting Mounting Proceeding HB300 SM S 02x 1SD10 en 20 02 76 ...

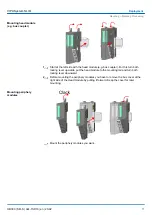
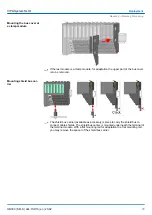
Page 77: ...ver downward 2 Before mounting the periphery modules you have to remove the bus cover at the right side of the Head module by pulling it forward Keep the cover for later mounting Mount the periphery modules you want Mounting head module e g bus coupler Mounting periphery modules VIPA System SLIO Deployment Mounting Mounting Proceeding HB300 SM S 02x 1SD10 en 20 02 77 ...

Page 78: ...you may not install a System SLIO safety module behind a slave extension module of the System SLIO line extension After mounting the whole system to protect the backplane bus connectors at the last module you have to mount the bus cover now Characteristics when installing System SLIO safety modules Mounting the bus cover at a peripheral module VIPA System SLIO Deployment Mounting Mounting Proceedi...

Page 79: ...o connect cable shields The shield bus carrier is mounted underneath the terminal of the terminal module With a flat mounting rail for adaptation to a flat mounting rail you may remove the spacer of the shield bus carrier Mounting the bus cover at a clamp module Mounting shield bus car rier VIPA System SLIO Deployment Mounting Mounting Proceeding HB300 SM S 02x 1SD10 en 20 02 79 ...

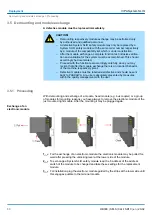
Page 80: ...ve and should be sent back to YASKAWA A re use is absolutely prevented by measures within the quality management with the user 3 5 1 Proceeding With demounting and exchange of a module head module e g bus coupler or a group of modules for mounting reasons you have always to remove the electronic module of the just mounted right module After the mounting it may be plugged again 1 For the exchange o...

Page 81: ...ule forward 5 For mounting turn the locking lever of the module to be mounted upwards 6 To mount the module put it to the gap between the both modules and push it guided by the stripes at both sides to the mounting rail 7 Turn the locking lever downward again 8 Plug again the electronic module which you have removed before Exchange of a module VIPA System SLIO Deployment Demounting and module exch...

Page 82: ...lever of the head module to be exchanged upwards 4 Pull the head module forward 5 For mounting turn all the locking lever of the head module to be mounted upwards 6 To mount the head module put it to the left module and push it guided by the stripes to the mounting rail 7 Turn all the locking lever downward again 8 Plug again the electronic module which you have removed before Exchange of a head m...

Page 83: ... the module group to be exchanged upwards 4 Pull the module group forward 5 For mounting turn all the locking lever of the module group to be mounted upwards 6 To mount the module group put it to the gap between the both modules and push it guided by the stripes at both sides to the mounting rail Exchange of a module group VIPA System SLIO Deployment Demounting and module exchange Proceeding HB300...

Page 84: ...t between inputs and outputs In the case of a short circuit between inputs and outputs the electronic module can be destroyed CAUTION Please regard in particular that electromechanical sensors safety switch gears are supplied with suitable clock pulses for short circuit detection Electromechanical switches must correspond to the requirements in accordance with IEC 60947 5 1 For the adherence to th...

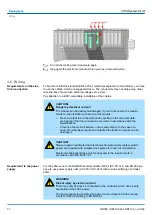
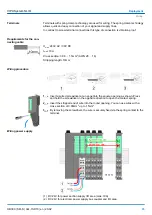
Page 85: ...opening as shown Press and hold the screwdriver in the opposite direction to open the contact spring 2 Insert the stripped end of wire into the round opening You can use wires with a cross section of 0 08mm2 up to 1 5mm2 3 By removing the screwdriver the wire is securely fixed via the spring contact to the terminal 1 DC 24V for power section supply I O area max 10A 2 DC 24V for electronic power su...

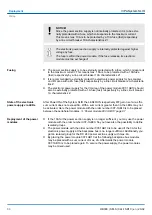
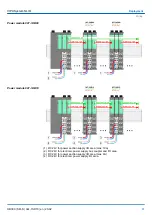
Page 86: ...ast respectively by a line circuit breaker 1A characteristics Z After PowerON of the System SLIO the LEDs RUN respectively MF get on so far as the sum current does not exceed 3A With a sum current greater than 3A the LEDs may not be activated Here the power module with the order number 007 1AB10 is to be placed between the peripheral modules Ä Power module 007 1AB10 page 87 n If the 10A for the po...

Page 87: ...for electronic power supply bus coupler and I O area 3 DC 24V for power section supply I O area max 4A 4 DC 24V for electronic power supply I O area Power module 007 1AB00 Power module 007 1AB10 VIPA System SLIO Deployment Wiring HB300 SM S 02x 1SD10 en 20 02 87 ...

Page 88: ...e equipped our electronics safety relevant in such a way that we can offer you for the sensors and actuators 85 of the maximally permis sible probability of dangerous errors corresponds to the recommended dispatch between sensors actuators and the electronic circuits for input processing and output in expenditure in safety technology Instrumentation using sensors and actuators poses considerable s...

Page 89: ...interval between two signal transitions must be greater than the Sync Manager monitoring time SM Watchdog for EtherCAT communication to allow reliable detection of the pulses This must be specified in the SPEED7 EtherCAT Manager within the parameters for the slave station Reliable detection by the safety DI module Parameter short circuit test Parametrized input delay 1ms 3ms 15ms de activated 7ms ...

Page 90: ...m 300 nF up to 67 Ohm 1500 µs High speed actuators may briefly drop out or be activated during this test If your process does not tolerate this action you must use actuators with a sufficient lag 1 ms CAUTION The outputs of a fail safe output module must be electrically isolated to EN 50178 from components which carry higher voltages if the actuators are operated at voltages higher than 24 V DC fo...

Page 91: ... the safety functions is max 1 100 of the test rate n System SLIO safety input The test rate for the System SLIO safety input module at single channel operation is 1x per 150ms This means the max demand rate is 1x per 15s You have to evaluate the external components which are used in single channel operation regarding the demand rate e g manual check of a single channel pro tection door switch n S...

Page 92: ...mode outputs the outputs must be compatible to IEC 61131 2 WARNING Achievable SIL Cat PL for single channel use of the digital inputs The achievable SIL Cat PL depends on the quality of the safe sensors This must be certified according to EN 60947 5 1 5 3 7 1 1 Emergency Off connection single channel Connection 4 x emergency off single channel Test pulse activation active VIPA System SLIO Deployme...

Page 93: ...Test pulse activation to deactivated Otherwise the safety module detects a short circuit on the input and reports the Short circuit diagnostic message n If you connect the digital input via the switching element to the associated clock output and the safety module should monitor the signal line for short circuits you have to set the parameter Test pulse activation to activated Please consider the ...

Page 94: ...out parameter to the discrepancy time required for the two switching elements In addition set the Discrepancy timeout parameter to the discrepancy time required for the two switching elements n You can set the Test pulse activation of both inputs used to activated or not active Please note that the Test pulse activation parameter must be set the same for both digital inputs If you connect the digi...

Page 95: ...the protective door switch n You can achieve SIL3 Cat 4 PLe with this circuit 3 7 1 3 Connection light array n For light array applications which require single fault security you can connect two digital safety inputs to the according light array outputs n Here set the parameter Evaluation of the inputs of the digital safety inputs to 2 channel n For this the Input smoothing time of the according ...

Page 96: ...ecovery circuit Consider the maximum switching frequency of 0 1Hz WARNING Defect by thermal overheating if the switching frequency is too high If the inductivity and load current you have selected is too high for the selected switching frequency it can lead to thermal destruction of the dig ital safety output Destruction of the digital safety output can cause the safety function to fail If you use...

Page 97: ...tronically controlled door locking device using the System SLIO safety module Switching electronic loads When switching electronic loads increased inrush currents that signifi cantly exceed the rated current can be caused by internal capacities in the electronic loads This can lead to passivation of the System SLIO safety module with the Overload diagnostic message You can remedy this by limiting ...

Page 98: ...cted installation of signal lines To prevent a short circuit between the connecting cables of the safe sen sors and the safety module the signal lines must be installed protected between the safe sensor and the safety module according to EN 60204 1 or EN ISO 13849 2 e g as separated sheathed lines or in sep cable ducts Set the parameter Activation mode of the according safety output to 1 channel C...

Page 99: ...ormally open contacts K0 and K1 of 2 relays in series to the load to be switched In the following it is shown how to connect the safety outputs DO 0 3 to the safety inputs of a System SLIO safety input module n For the according safety input you have to set the parameter Test pulse activation to deactivated Otherwise the safety module detects a short circuit on the input and reports the Short circ...

Page 100: ...portant note to single fault security Never use a single digital safety output alone for the safety function if single fault security is required If single fault security is required you have to integrate a second discon nection facility e g a line contactor K4 in the safety application by e g analysing the relay states read back With this connection you can achieve SIL3 Cat 4 PLe by re reading th...

Page 101: ...acts of a contactor in series to the motor to be connected These can originate from one contactor or from two different contactors n Connect the contactors between the digital safety outputs Connection 2 motors 2 channel with feedback 2 contactor per motor VIPA System SLIO Deployment Connection examples Connection examples for digital safety outputs HB300 SM S 02x 1SD10 en 20 02 101 ...

Page 102: ...he machine plant or safety device do not behave in such a way as it is intended If there are changes or extensions on the system during commis sioning influences to the system behaviour must be checked Here the check lists for planning and installation must be handled again DANGER Risk of injury from moving parts During the commissioning machine parts components or the entire machine plant can mov...

Page 103: ...eckhoff Automation GmbH Germany n EtherCAT uses Ethernet as transfer medium n Standard CAT5 cables are used Here distances of about 100m between 2 stations are possible n Only EtherCAT components may be used in an EtherCAT network n For topologies which depart from the line structure the corresponding EtherCAT components are necessary n Hubs may not be used n At EtherCAT the master sends a telegra...

Page 104: ...e ESI files as XML data 3 9 2 General information on deployment n The programming of the safety program and the parametrization of the safety modules are carried out in the configuration tool of the FSoE master Here an ESIFSoE master is to be exported n In the SPEED7 EtherCAT Manager the EtherCAT master is to be integrated as slave system by means of the ESIFSoE master n The configuration of the E...

Page 105: ...E master By importing the ESIFSoE master into the SPEED7 EtherCAT Manager the FSoE master can be integrated into EtherCAT as a slave system 3 9 4 Generate safety program As soon as you change a parameter of a System SLIO safety module in the hardware configuration you must validate it with the configuration tool of the FSoE master transfer the new configuration and import the new ESIFSoE master in...

Page 106: ...cuit to ground n ERR LED 4x blinking n Diagnostic data CHxERR Bit 1 is set 0x9B Only SDI 4xDC 24V Channel discrepancy detected Discrepancy error between 2 channels n ERR LED 3x blinking n Diagnostic data CHxERR Bit 4 is set 0x9C 0xA8 Internal error n ERR LED 5x blinking 0xA9 Safety Module F Address EEPROM unequal DIP switch F address was changed The F address set with the DIP switches does not mat...

Page 107: ...ts is recommended n Connect the actuators and drives with the safe output terminals only if while checking the wiring no errors were found n Examine a fully IO test This means in order to bring all the sensors in each switch positions each normally on off respectively actuated not actuated Please check whether the specified and expected signal state is also the real state Please also check whether...

Page 108: ...safety safety relevant parameters page 17 n With the System SLIO safety module there is no repeat test possible for the user n If you keep the prescribed environmental conditions see technical data the corre sponding safety module is maintenance free n If you determine or assume a defect on a safety module please contact YASKAWA 3 13 Repair CAUTION Defective safety modules may only be repaired by ...

Page 109: ...ion between the F CPU and safety module are detected by means of the PROFIsafe safety protocol communication error n when peripheral or channel errors are detected e g wire break discrepancy error If possible errors are logged to the diagnostic buffer of the safety related CPU and reported to the safety program of the safety related CPU Safety modules cannot store errors non volatile After PowerOF...

Page 110: ...U and are passivated in the safety related CPU On a serious internal error in the safety module which leads to a fault of the safety module n the connection to the backplane bus is interrupted and the safety related I Os are passivated n Diagnostics are not transmitted from the safety module and the default diagnostic message Module Fault is reported n the SF LED of the corresponding safety module...

Page 111: ...rror and perform a power cycle Discrepancy error n The signal state of the dual channel input does not match The error is only a short time reported Correct the wiring sensor or configu ration error Acknowledge the error and perform a power cycle The address switch for F address was changed n The address switch and the con figuration was changed n e g module replacement Error is permanently report...

Page 112: ...e output part n The target state does not match its current state n Either external power supply DC 24V and output should be 0 or external short circuit to ground and output should be 1 Error at external power supply is per manently reported A short circuit or defect of the module is only a short time reported Correct the wiring error Acknowledge the error and perform a power cycle The address swi...

Page 113: ...4V FSoE Parameter record set page 34 Ä Chap 2 9 SDO 4xDC 24V 0 5A FSoE Parameter record set page 50 3 14 2 1 Diagnostic data With EtherCAT the access happens via the CoE objects n 0x5002 Access to the first 4byte of diagnostic data n 0x5005 Access to all diagnostic data 20byte Name Bytes Function Default ERR_A 1 Diagnostic 00h MODTYP 1 Module information 18h ERR_B 1 reserved 00h ERR_C 1 Module int...

Page 114: ...per channel here 08h Byte Bit 7 0 0 Number of channels of a module here 04h Byte Bit 7 0 0 n Bit 0 set at error in channel 0 n Bit 1 set at error in channel 1 n Bit 2 set at error in channel 2 n Bit 3 set at error in channel 3 n Bit 7 4 reserved Byte Bit 7 0 0 Channel specific error Channel x n Bit 0 set at short circuit to DC 24V n Bit 1 set at short circuit to ground n Bit 2 set at wire break n ...

Page 115: ... µs ticker With PowerON the timer starts counting with 0 After 232 1µs the timer starts with 0 again Byte Bit 7 0 0 reserved 3 15 Packing and transport Each device was packaged before in a way that makes becoming damaged while on transport very unlikely The units are packed at the factory in accordance with the order n Avoid heavy shaking while on transport and severe bumping n Avoid electrostatic...

Page 116: ...delivery note n System SLIO signal module n Manual incl conformity manufacturer declaration The packaging consists of cardboard and or plastic Please observe the local disposal regulations if you discard the packaging 3 16 Storage and disposal Store the safety module in an appropriate packaging and to the storage conditions men tioned in Approvals directives standards Ä Chap 1 18 Approvals directi...

Page 117: ...40 VIPA System SLIO Safety DI VIPA SM 021 021 1SD10 VIPA System SLIO Safety DO VIPA SM 022 022 1SD10 VIPA System SLIO DI VIPA SM 021 021 1BD10 VIPA System SLIO DO VIPA SM 022 022 1BD00 Switch Relay DC 24V relay with two changeover contacts e g Finder type 40 52 with base 95 95 3 Switch Switch as closer Software Tool Programming software Siemens SIMATIC Manager Configuration tool EtherCAT VIPA SPEE...

Page 118: ... illustration 3 17 2 Configuration in YASKAWA SAFE CPU 1 Open the configuration tool YASKAWA SAFE CPU for the FSoE master 2 Use the corresponding button to create a new project Hardware structure Wiring Proceeding VIPA System SLIO Deployment Sample application Configuration in YASKAWA SAFE CPU HB300 SM S 02x 1SD10 en 20 02 118 ...

Page 119: ...r assigning the password opens 5 Assign passwords for Development and Commissioning here 6 Open the FSoE Bus Configurator via Project è FSoE Bus Configurator First install the corresponding ESIFSoE Slave here via Device è Import Slave ESI file VIPA System SLIO Deployment Sample application Configuration in YASKAWA SAFE CPU HB300 SM S 02x 1SD10 en 20 02 119 ...

Page 120: ...7 Create the configuration of the System SLIO safety modules via drag drop VIPA System SLIO Deployment Sample application Configuration in YASKAWA SAFE CPU HB300 SM S 02x 1SD10 en 20 02 120 ...

Page 121: ...e module parameters are then set in the FsoE Master Parameter tab and veri fied with Accept VIPA System SLIO Deployment Sample application Configuration in YASKAWA SAFE CPU HB300 SM S 02x 1SD10 en 20 02 121 ...

Page 122: ...rt FsoE Master ESI File ð The configuration of the safety program is created and exported as an ESIFSoE master which is required for configuration in the SPEED7 EtherCAT Man ager 10 Close the FSoE Bus Configurator VIPA System SLIO Deployment Sample application Configuration in YASKAWA SAFE CPU HB300 SM S 02x 1SD10 en 20 02 122 ...

Page 123: ... YASKAWA SAFE CPU at SafePLC ð After entering the password and asking for time synchronization between the PC and the FSoE master the following window opens 15 Click at Debug ð The FSoE master switches to Debug mode 16 Click at Stop ð The FSoE master switches to Stop mode and is ready to receive data VIPA System SLIO Deployment Sample application Configuration in YASKAWA SAFE CPU HB300 SM S 02x 1S...

Page 124: ...the corresponding manual for your CPU 4 Configure the EtherCAT network for the VIPA CPU 015 CEFNR00 More details can be found in the corresponding manual for your CPU PROFINET IO System Module CPU PN IO Slot 1 2 X 3 SLIO CPU 5 Click at the EtherCAT Network and select Context menu è Start Device Tool è SPEED7 EtherCAT Manager ð The SPEED7 EtherCAT Manager opens 6 Install the ESI files ESIFSoE maste...

Page 125: ...nd confirm the save project dialog box with Yes ð The SPEED7 EtherCAT Manager is closed and the configuration is applied to the project 9 Select Station è Save and compile 10 Now you can close the hardware configurator VIPA System SLIO Deployment Sample application Configuration in the Siemens SIMATIC Manager and VIPA SPEED7 EtherCAT Manager HB300 SM S 02x 1SD10 en 20 02 125 ...

Page 126: ...EMaster CRC 0 T AW 278 L EW 260 FSoEMaster ConnectionID T AW 280 Network 4 FSoE Master SDO L EB 262 FSoEMaster Command T AB 282 L EB 263 Data T AB 283 L EW 264 FSoEMaster CRC 0 T AW 284 L EW 266 FSoEMaster ConnectionID T AW 286 12 Include FC 1 in OB 1 for the cyclic call 13 Create the operation blocks OB 57 and OB 82 for error handling These do not have to be programmed 14 Select Station è Save an...

Page 127: ...roceed as follows by clicking on the corresponding buttons Validate Param eter Safe Project and Export Safe Container 10 Close the FSoE Bus Configurator 11 Compile and save the project using the corresponding buttons and transfer it to the safety controller of the FSoE master ð You now have an executable security program with a changed F address 1 Open YASKAWA SAFE CPU with the project for the app...

Page 128: ...Appendix VIPA System SLIO Appendix HB300 SM S 02x 1SD10 en 20 02 128 ...

Page 129: ...st installation 131 C Checklist commissioning parameterization and validation 132 D Checklist operation 133 E Checklist modification and retrofitting 134 F Checklist decommissioning 135 VIPA System SLIO Appendix HB300 SM S 02x 1SD10 en 20 02 129 ...

Page 130: ...ements of the safety classification specified before 1 7 Do the components fulfill the environmental conditions of the application 1 8 Does the system fulfill the necessary degree of protec tion 1 9 Is degree of pollution 2 kept 1 10 Was the maximally permissible response time of the safety functions determined by a hazard analysis 1 11 Is the maximally permissible response time reached Was the pr...

Page 131: ...h the specified breakaway torque 2 6 Is guaranteed that the isolation of the lines does not lead to a faulty contact 2 7 Was the reliability of all the clamp connections con trolled by a mechanical tensile load 2 8 Was a visual inspection of the installed components accomplished 2 9 Were necessary installation distances kept to other components 2 10 Do the components fulfill the environmental cond...

Page 132: ...ion number of the safety PLC correctly adjusted 3 3 Were the device parameters of the System SLIO safety modules validated 3 4 Was the safety cycle time determined and adjusted in the safety PLC 3 5 Was the maximum response time with the adjusted cycle time proofed by calculation 3 6 Were the project data copied on a memory card 3 7 Was a complete functional test accomplished and docu mented 3 8 W...

Page 133: ...ing changes to the wiring the control system is set to a safe state dependent on the application by competent per sonnel 4 3 Are the ambient conditions specified in the technical data observed Ä Chap 2 6 SDI 4xDC 24V Technical data page 40 Ä Chap 2 10 SDO 4xDC 24V 0 5A Technical data page 55 4 4 Is it guaranteed that commissioning only takes place after acclimatisation of the System SLIO safety mo...

Page 134: ... checklists of planning installation commissioning and validation further fulfilled 5 2 Are the calculated reaction times further kept after mod ification retrofitting Proof necessary 5 3 Were the project data copied on a memory card 5 4 Was a complete functional test accomplished and docu mented Date Name Sign VIPA System SLIO Checklist modification and retrofitting HB300 SM S 02x 1SD10 en 20 02 ...

Page 135: ...be decommissioned 6 3 Has the wiring been removed from the device to be decommissioned Has the disassembly been carried out according to the disassembly description Ä Chap 3 5 Demounting and module exchange page 80 6 4 Is it guaranteed that the defective System SLIO safety module decommissioned is sent to YASKAWA for dis posal in its original packaging Date Name Signature VIPA System SLIO Checklis...

Reviews: