7
O R I G I N A L I N S T R U C T I O N S
GB
Charging the battery
Open the charging socket cap. Connect the Micro USB plug of
the cable supplied with the screwdriver to the battery charging
socket. Put the USB plug into a USB socket on your computer
or in a charger equipped with such a socket with an output cur-
rent of not less than 0.3 A. The LED near the charging socket
will start
fl
ashing, which means the beginning of the charging
process. When the battery is fully charged, the LED will be lit
continuously. When the battery is fully charged, disconnect the
screwdriver from the charger and cover the charging socket with
the cap. Leaving the screwdriver connected to the charger will
cause premature wear of the battery. If, when connected to the
charger, the LED near the charging socket is lit continuously, it
means that the battery is fully charged. In this case, disconnect
the screwdriver from the charger immediately.
Placing screwdriver bits in the holder
Place the selected screwdriver bit in the screwdriver socket.
The bits should be selected so that they
fi
t into the socket of
the screw as good as possible. This will prevent damage to the
screw head, which may make it impossible for the screw to be
screwed in or unscrewed.
Setting the rotation direction
The rotation direction switch is also the ON/OFF switch. Press
and hold the switch to start the screwdriver rotation. Pressing
the switch on the front of the button will screw in the screws with
right-hand thread, and pressing the switch on the back of the
button will unscrew the screws with right-hand thread. Releas-
ing the pressure on the switch stops the screwdriver rotation.
The screwdriver can also be used as an ordinary screwdriver.
The switch does not need to be pressed in this case. A higher
torque is generated then, compared to the electric drive. Do not
overload the screwdriver in manual mode to avoid damaging it.
PRODUCT USE
Before starting work, check that the tool is starting and running
evenly at idling speed. Any irregularities observed are a signal for
inspection or repair at an authorised service centre.
Screwing - unscrewing
Insert the appropriate bit into the bit holder. Select the direction
of rotation with the switch. Then place the bit in the screw socket
and press the switch. The tool will continue to work as long as
the switch is pressed.
Drilling
Due to too low a torque, the product is not suitable for drilling.
Additional notes
When working, do not exert too much pressure on the workpiece
and do not make sudden movements in order not to damage the
bit and the screwdriver. Take regular breaks during work. Do not
overload the tool, the temperature of the external surface must
never exceed 60
O
C. After
fi
nishing work, switch o
ff
the screwdriv-
er and perform activities related to maintenance and inspection.
The declared total vibration value has been measured using the
standard test method and can be used to compare one tool to
another. The declared total vibration value can be used in the
initial exposure assessment. Caution! The vibration emission
during tool operation may di
ff
er from the declared value, depend-
ing on the manner the tool is used. Caution! Safety measures
to protect the operator, which are based on an assessment of
exposure under actual conditions of use (including all parts of the
work cycle, such as the time when the tool is switched o
ff
or idle
and the activation time), must be speci
fi
ed.
MAINTENANCE AND OVERHAUL
Clean the tool casing with a soft, slightly damp cloth and then dry
with a soft cloth. After the work is
fi
nished, the technical condition
of the tool should be checked by external visual inspection. Any
abnormality found during this inspection or the operation require
servicing at an authorized service agent’s.
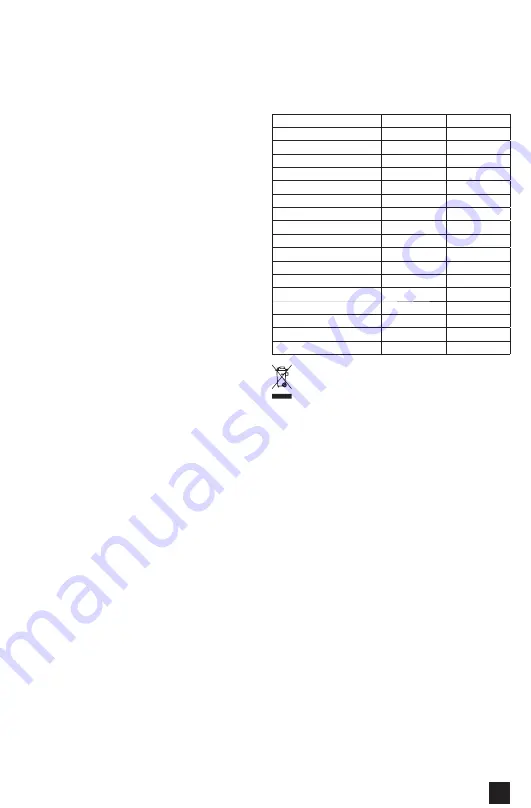
TECHNICAL PARAMETERS
Parameter
Unit
Value
Catalogue No.
YT-27930
Operating voltage
[V]
5 DC
Revolutions (idle speed)
[min
-1
]
100
Torque (electric drive)
[Nm]
0.35
Torque (manual drive)
[Nm]
2
Noise level
- sound pressure
[dB]
45.6 ± 3.0
- power L
WA
[dB]
56.6 ± 3.0
Protection rating
IPX0
Vibration level
[m/s
2
]
0.21 ± 1.5
Insulation class
III
Weight
[kg]
0.6
Tool holder
[mm]
4
Rechargeable battery type
Li-ION
Rechargeable battery capacity
[mAh]
450
Charging time
[h]
approx. 1.5
Operation time
[h]
approx. 3.5
This symbol indicates that waste electrical and electronic equipment
(including batteries and storage cells) cannot be disposed of with
other types of waste. Waste equipment should be collected and
handed over separately to a collection point for recycling and
recovery, in order to reduce the amount of waste and the use of natural
resources. Uncontrolled release of hazardous components contained
in electrical and electronic equipment may pose a risk to human health
and have adverse e
ff
ects for the environment. The household plays an
important role in contributing to reuse and recovery, including recycling
of waste equipment. For more information about the appropriate recycling
methods, contact your local authority or retailer.
D
PRODUKTBESCHREIBUNG
Der Präzisions-Akkuschrauber ist ein Werkzeug zum Schrau-
ben und Lösen einer Vielzahl von Schaftschrauben, Schrauben,
Muttern usw. mit austauschbaren Akkuschrauber-Bits. Der Präzi-
sions-Akkuschrauber ist aufgrund des geringen Drehmomentes
und der geringen Drehzahl für Präzisionsarbeiten ausgelegt.
Der störungsfreie, zuverlässige und sichere Betrieb des Gerätes
hängt von der ordnungsgemäßen Verwendung ab, deshalb:
Lesen Sie vor Beginn der Arbeiten mit dem Werkzeug die
gesamte Bedienungsanleitung durch und bewahren Sie sie
für die weitere Nutzung auf.
Der Lieferant haftet nicht für Schäden, die sich aus der Nicht-
beachtung der Sicherheitsvorschriften und der Bestimmungen
dieser Bedienungsanleitung ergeben.
ZUBEHÖR
Der Präzisions-Akkuschrauber wird mit Bits und einem USB-La-
dekabel geliefert. Das Ladegerät ist nicht im Lieferumfang ent-
halten.
Summary of Contents for YT-27930
Page 11: ...11 RUS residual current device RCD Li Ion 10 20...
Page 12: ...12 RUS 500 0 30 50 70 Micro USB USB USB 0 3 60O C YT 27930 5 DC...
Page 14: ...14 UA Li Ion 10 20 500 0 30 50 70...
Page 40: ...40 GR USB RCD RCD...
Page 41: ...41 GR Li ion 500 0 30 50 70 Micro USB USB 0 3 A...
Page 44: ...44...

