9
O R I G I N A L I N S T R U C T I O N S
EN
PRODUCT OVERVIEW
The radio receiver is used to receive signals transmitted by radio stations. With the battery power, the radio can also be used in
places where there is no access to the regular power supply. Proper, reliable, and safe operation of the product depends on its
appropriate use; that is why you should:
Read this entire instructions manual before the
fi
rst use of the tool and keep it for future reference.
The supplier shall not be liable for any damage resulting from failure to comply with the safety instructions and recommendations
speci
fi
ed in this instructions manual.
EQUIPMENT
The product is supplied complete and does not require assembly. The radio is supplied with the power adapter. The battery is not
supplied with the equipment.
SAFETY INSTRUCTIONS
WARNING!
Read all the following instructions. Failure to do so may result in electric shock,
fi
re, or personal injury. Keep this
manual for future reference. If the device is handed over, the manual should be handed over together with it.
Do not use the device in a potentially explosive atmospheres with
fl
ammable liquids, gases, or vapours.
Do not place the device near any heat or
fi
re sources.
Protect the device from moisture. Do not expose the machine to rain or other precipitation. Never immerse any part in water or
other liquids. Do not use in an environment with relative humidity above 80%.
Avoid using the device in bad weather, especially when there is a risk of lightning.
In the event of a storm, disconnect the device from the power supply and fully retract the antenna.
Only use the power adapter supplied or the batteries described in the manual to power the device.
Use only accessories indicated by the manufacturer.
The power cord must not be exposed to sharp edges and hot objects. Do not bend the cord, expose it to stepping or contact with
water and/or oils. If the power cord is damaged it must be replaced with the power adapter. The power cord cannot be repaired.
PRODUCT OPERATION
Preparing for operation
Unpack the product by removing all packaging components. It is recommended not to dispose of the packaging as it may be useful
for later storage of the product.
Check all parts of the product for damage.
Clock power supply
The radio has a clock powered by separate batteries. Once set, the clock works independently of the main supply of the receiver
until the batteries are replaced. The clock is independent of the operation of the radio. The clock supply is not required to power
the radio.
The batteries powering the clock do not supply power to the receiver. After starting the receiver with only the clock batteries in-
stalled, only the watch will be visible on the display.
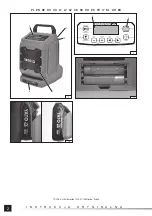
To power the clock open the compartment at the back of the housing and insert two AAA (II) batteries in it. When installing pay
attention to the correct polarity of the batteries. After installing the batteries, close the compartment with the cover.
Battery power supply
Only one of the following YATO Li-Ion 18 V batteries can be used to power the device: YT-82842, YT-82843, YT-82844 and YT-
82845, which can only be charged with YATO YT-82848 or YT-82849 chargers. It is forbidden to use other batteries with a di
ff
erent
rated voltage and not matching the device battery socket. It is forbidden to modify the socket or battery to make them match.
On the back of the housing, there is a battery socket. Slide the battery into the socket with the contacts facing inside the device
and downwards until the battery latch (III) engages. Make sure that the battery will not slide out on its own during operation.
Disconnect the battery by pressing and holding the latch and then pulling the battery out of the device socket.
Power adapter supply
If there is no battery, the included power adapter can be used to power the device. It is forbidden to use another power adapter
even if its plug
fi
ts into the socket in the device’s housing. It is forbidden to modify the plug or socket to make them
fi
t.
Slide the power supply plug as far as it will go into the DC socket on the front of the device housing. Then plug the power plug into
Summary of Contents for YT-82940
Page 16: ...16 RU 80 AAA II Li Ion YATO 18 V YT 82842 YT 82843 YT 82844 YT 82845 YATO YT 82848 YT 82849...
Page 19: ...19 UA 80 AAA II Li Ion YATO 18 YT 82842 YT 82843 YT 82844 YT 82845 YATO YT 82848 YT 82849...
Page 52: ...52 GR 80 II Li Ion YATO 18 V YT 82842 YT 82843 YT 82844 YT 82845 YATO YT 82848 YT 82849...
Page 55: ...55 GR V 100 240 Hz 50 60 A 0 4 W 12 V d c 12 A 1 II...


