background image

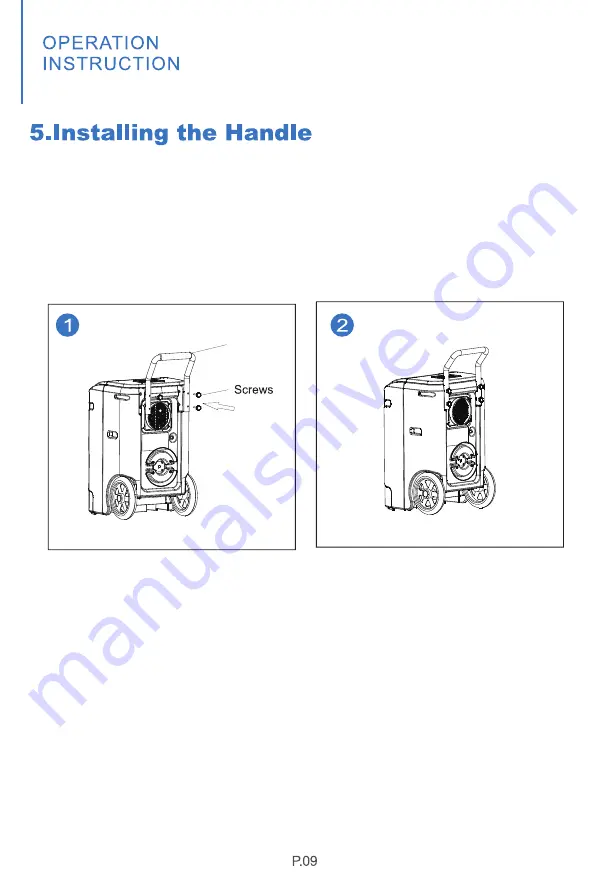
1. Take out 4 screws and a handle from the accessories, and put the 
handle into the groove at the back of the humidifier, making the screws 
correspond to the screw holes. 

2.Tighten all the four screws on the hands respectively, the installation 

is finished. 

Handle 

Put the handle into the groove at 
the back of the dehumidifier, 
making the 4 screws correspond to 
the screw hole. 

Tighten all the four screws,
complete the installation. 

Summary of Contents for PDGT701BD

Page 1: ...www yaufey com PDGT701BD...

Page 2: ......

Page 3: ...support yaufey com...

Page 4: ...d functions provided in this manual may not be the same as the actual product Please always refer to the actual product The model of the machine on the manual is for reference only Please operate the...

Page 5: ...otes For your safety please read the manual carefully and keep the manual before you use the product for reference Please use this product according the installation and operation instructions of this...

Page 6: ...1 2 3 4 5 6 4 1 5 2 3 6...

Page 7: ...1 Understand the Control panel...

Page 8: ...the humidity setting state In the power on or standby state press the Timer button once to enter the timer setting state Timing indicator light up and the digital number ashes to show the time In the...

Page 9: ......

Page 10: ...ll light up when the fan is running Digital number will be ashing when the target humidity is setting or the room humidity is lower than the set humidity When the setting value is read out to be highe...

Page 11: ...2 Find the gravity drain outlet at the bottom of the dehumidi er and connect the emergency hose to drain The dehumidi er will not be ready for operation Pump Failure...

Page 12: ...display the alarm in case there will be multiple errors on the unit it will display the errors in turn When one of above malfunctions occurs the buzzer will alarm for a few seconds press any key durin...

Page 13: ...midi er making the screws correspond to the screw holes 2 Tighten all the four screws on the hands respectively the installation is nished Handle Put the handle into the groove at the back of the dehu...

Page 14: ...tach the hose to the drain outlet 3 Place the unattached end of the hose in a sink drain bucket or outdoors Anywhere that the water can drain out safely Please ensure that no kinks or other obstructio...

Page 15: ...In power disconnected status tilt the dehumidi er as the gure shown pull out the rubber plug and put the dehumi er straight to drain the sewage in the water tank Plug...

Page 16: ......

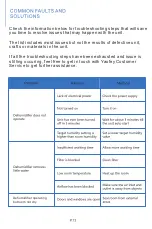
Page 17: ...h the unit The list includes most issues but not the results of defective unit crafts or materials in the unit If all the troubleshooting steps have been exhausted and issue is stilling occuring feel...

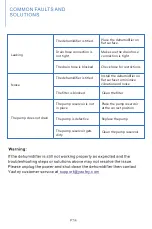
Page 18: ...tight Check hose for restrictions Install the dehumidifier on flat surface to minimize vibration and noise Leaking The filter is blocked The pump reservoir is not in place The pump is defective The p...

Page 19: ...Please clean the lter every two weeks do not use hot water above 104 gasoline or toluene...

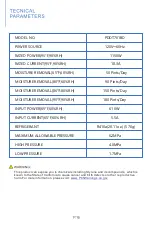
Page 20: ...20 11oz 570g 6 2MPa 4 0MPa 1 7MPa MOISTURE REMOVAL 65 F 60 RH 50 Pints Day MOISTURE REMOVAL 80 60 RH MOISTURE REMOVAL 86 80 RH MOISTURE REMOVAL 95 90 RH 90 Pints Day 150 Pints Day 180 Pints Day This...

Page 21: ...Yaufey Yaufey support yaufey com www yaufey com Yaufey www yaufey com yaufey com Yaufey O ce we will dedicate suggest...

Page 22: ...We are expecting to see our products ful ll your life and hear your voice Your satisfaction means a lot to us Please tag us if you share a snap on your social media...

Reviews: