background image

Genesis CD4 CD Player

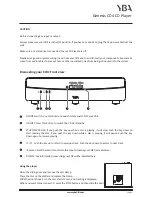
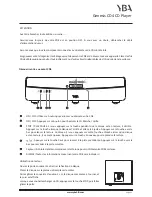
Discovering your CD4: Front view 

ON/OFF switch: Use this button to switch ON or switch OFF your CD4.

2

1

Page 5

www.ybahifi.com

ON/OFF: Press this button to switch the CD On/Standby

STOP/PLAY PAUSE: If you push the key up while a disc is playing, it will stop. Push the key down to 
start  reading  the  disc.  If  you  push  the  key  down  while  a  disc  is  playing,  it  will  pause.  Push  the  key 
down again to resume playing. 

    /     : Push the key up to return to previous track. Push the key down to access to next track.

3

5

6

DISPLAY: Any information concerning your CD4 will be indicated here.

7

4

CAUTION

Before connecting any input or output..... 

Always make sure your CD4 is in the OFF position. If you have any doubt, unplug the AC power cable from the 
wall.

Make sure any components connected to your CD Player are off.

Neatly arrange and organize wiring to and from your CD4 and to and from all your components. Separate AC 
wires from audio cables to prevent hum or other unwanted noise from being introduced into the system.

Open the sliding door and remove the disc clamp


Using the player

Place the disc on the platter and replace the clamp
Slide the door about 2 cm; the disc starts to spin, and tracking is displayed

When you want to load a new CD, press the STOP button and then slide the door

2

3 4

5

6

1

2

IR sensor: Point the remote control to this zone to control your CD4 from a distance. 

Summary of Contents for Genesis CD4

Page 1: ...Owner s Manual Genesis CD4 CD Player Livret d utilisation...

Page 2: ...the top cover of your product are neither covered nor obscured by any object or dust Locate the product away from naked flames or heat producing equipment such as radiators stoves or other appliances...

Page 3: ...the product to a power supply of the type described in the operating instructions or as marked on the rear panel Be sure to check the noted voltage Power supply cords should be routed so that they ar...

Page 4: ...n Proof of purchase in the form of a bill of sale or receipted invoice which is evidence that this product is within the warranty period must be presented to obtain warranty service This warranty is i...

Page 5: ...4 CAUTION Before connecting any input or output Always make sure your CD4 is in the OFF position If you have any doubt unplug the AC power cable from the wall Make sure any components connected to you...

Page 6: ...connectors should be wired as follows Pin 1 Ground Pin 2 Hot in phase Pin 3 Cold phase inverted RCA AUDIO OUTPUT Connect your amplifier or any other suitable device such as powered speakers receiver e...

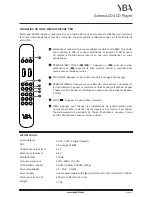
Page 7: ...that the CD will remain the active function until you select another device PREVIOUS NEXT TRACK Press to play previous track or to play next track Hold 3 seconds for fast forward or fast back PLAY PAU...

Page 8: ...ci dessous et sur le couvercle sup rieur de votre produit ne sont ni couverts ni masqu par un objet ou de la poussi re Localisez le produit l cart des flammes nues ou de l quipement produisant de la...

Page 9: ...anches ind l biles Ne branchez le produit une alimentation du type d crit dans les instructions de fonctionnement ou indiqu sur le panneau arri re Soyez s r de v rifier la tension not Les cordons lect...

Page 10: ...me d un acte de vente ou de la facture acquitt e qui est la preuve que ce produit est dans la p riode de garantie doit tre pr sent e pour obtenir le service de garantie Cette garantie n est pas valabl...

Page 11: ...D4 sera indiqu ici ATTENTION Avant de brancher toute entr e ou sortie Assurez vous toujours de votre CD4 est en position OFF Si vous avez un doute d branchez le c ble d alimentationdumur Assurez vous...

Page 12: ...avec des quipements avec des entr es sym triques Connecteurs XLR doivent tre c bl s comme suit Broche 1 Masse Broche 2 Hot en phase Broche 3 Cold phase invers e Coaxial digital output La sortie num r...

Page 13: ...nouveau l cran s allume STOP Appuyez sur pour arr ter la lecture Remarque PRESSE signifie un appui bref sur une touche alors que des moyens de maintien pour maintenir la touche enfonc e pendant plus d...

Page 14: ...www ybahifi com info ybahifi com...

Reviews: