background image

11

DRIVE CONTROL

The drive system consists of a two speed transmission and an 
adjustable belt drive from the engine to the transmission.

The transmission speed can be set to 

LO - N - HI

HI speed is approximately  4mph - a fast walking speed.
LO speed is approximately 3mph - an average walking speed.

The shifter arm is intentionally made 

fl

 exible.  When the arm is 

locked in the 

LO

 or the 

HI

 position the transmission will 

automatically mesh into the gears as soon as the drive is 
engaged by operating the lower control bar. 

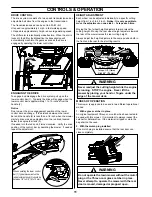
ENGAGING THE DRIVE

To engage and disengage the drive system pull up on the 
lower control bar (1).  Typically the drive will engage when the 
lower control bar is approximately 1 to 1.5 inches from the 
handle (2). 

Notice

Due to wear, the drive engagement position of the lower 
control bar can change.  If the distance between the lower 
bar and the handle (2) is less than a 1/4 inch when the mower 
starts to drive make an adjustment on the red knob located 
below the engine fuel tank (3).  
If needed turn the red knob 2 turns clockwise.  Verify the drive 
position of the control  bar by operating the mower.  If needed 
repeat the adjustment.

HEIGHT ADJUSTMENT

Each wheel can be adjusted individually to a speci

fi

 c cutting 

height from 1 inch to 4.5 inch.  

Notice: It is only possible to 

move the adjustment on one side 2 - 3 steps each time.


Moving the front wheel height adjusters forward raises the 
cutting height.  Moving the rear wheel height adjusters towards 
the rear of the mower raises the rear cutting height.  

Always adjust the height adjusters to the same position both in 
the front and the rear for best cutting results.

WARNING

Never readjust the cutting height while the engine 
is running.  STOP the engine.  Never lift the 
mower by placing your hand or 

fi

 ngers under the 

edge of the mower deck.  

CONTROLS & OPERATION

MODES OF OPERATION

This mower is approved to be used in two different operational 
modes:

1.  With a grass catcher in place

An original equipment Ybravo.com catcher has been tested to 
be used with this mower.  It is important to always inspect the 
catcher for deterioration.  If the material is ripped or worn the 
bag shall not be used.   

2.  With the mulch plug installed

If the mulch plug is installed ensure that the rear door can 
close completely. 

WARNING

Do not operate the lawn mower without the mulch 
plug or the Ybravo.com grass catcher in place.  
Never attempt to operate the mower with the rear 
door removed, damaged or propped open. 

3

1

Low 1”  (25mm)

High 4.5” (114mm)

7 steps - 1/2”  (13mm)


 the engine before 

making any height adjustment

2

Drive Adjustment

When operating the lower control 
bar (1) typical movement on the 
red adjustment knob (3) should be 
between 1/4” to 3/8” (6 to 10 mm)

Summary of Contents for Bravo 21

Page 1: ...21 Mower Model 21 110 BBC Honda 21 210 BBC Kawasaki P N 990012 1 Rev 02 2016 Operator s Manual Read these instructions carefully and make sure you understand them before using the BRAVO 21 OPERATOR S...

Page 2: ...efficiently and safely Additional manuals are available at NO CHARGE and can also be obtained on the internet site Ybravo Texas LLC P O Box 40490 Houston TX 77240 0490 USA Toll Free no 888 ybravo1 888...

Page 3: ...tes a hazard which if not avoided might result in minor or moderate injury NOTICE indicates a message not related to personal injury REGISTER THE PRODUCT Please register your new lawn mower with Ybrav...

Page 4: ...arefooted or while wearing sandals Always wear substantial footwear protective shoes 7 Do not pull machine backward unless absolutely necessary Always look down and behind before and while moving back...

Page 5: ...s on a water heater or on other appliances 6 Never fill containers inside a vehicle or on a truck or trailer bed with a plastic liner Always place containers on the ground away from your vehicle befor...

Page 6: ...trol bar drive control page 11 Throttle cable adjustment at the engine page 8 9 Drive cable adjustment page 11 Oil filler cap and dipstick page 8 9 13 Gasoline page 9 Throttle control page 8 9 Gear sh...

Page 7: ...ten the nuts Please note that there are three holes for the upper clamp We suggest to install the bolt in the center hole as a start STEP 3 To simplify the alignment of the handle install the grass ca...

Page 8: ...new engine with an SAE 10W 30 engine oil Fill 22 Fl Oz 0 7 Qt 0 65 Liters If the oil filter is changed the fill volume is 29 Fl Oz 0 9 Qt 0 85 Liters Please read the Kawasaki engine Owner s Manual for...

Page 9: ...ttes cigars pipes and other sources of ignition Use only approved gasoline containers Never remove gas cap or add fuel with the engine running Allow engine to cool a minimum of 3 minutes before refuel...

Page 10: ...uncut lawn If the blade is blocked by tall grass or debris it can damage the clutch during the start up of the blade 1 Start the engine and let it warm up for 10 to 30 seconds 2 Set the throttle contr...

Page 11: ...4 5 inch Notice It is only possible to move the adjustment on one side 2 3 steps each time Moving the front wheel height adjusters forward raises the cutting height Moving the rear wheel height adjust...

Page 12: ...e mower The buildup of moist grass fertilizer and water can cause extreme corrosion damage to many parts of the mower and the engine Never use a Pressure Washer The use of a pressure washer can force...

Page 13: ...aintain the radius where the cut ting edge ends Always remove the same amount of material from both ends of the blade This ensures that the blade stays balanced If sharpening is done with a grinding s...

Page 14: ...14...

Page 15: ...ect storage or use habits 2 Failure to operate or maintain the unit in accordance with the Owner s Operator s manual or instruction sheet furnished by Ybravo 3 Alterations or modifications that change...

Page 16: ......

Reviews: