Link CX-24 User’s Manual
Version 1.0
Page 24
February 2004
2.10.2 Logging In to the Link CX-24 Built-In Web Server
After you have connected and powered up the Link CX-24 and the Craft PC as described in Section
2.10.1, use the web browser on the Craft PC to log into the Link CX-24 built-in web server as follows:
7 Launch the web browser per the manufacturer’s instructions.
8 Open the web page at Ethernet address http://10.0.0.2/ (transmit low models) or http://10.0.0.3/
(transmit high models) in the web browser. If the web browser Ethernet address has been changed,
use the replacement Ethernet address instead of
http://10.0.0.x/
.
9 If the Link CX-24 has not been configured for a login and password, continue with Step 11. If the Link
CX-24 has already been configured for a login and password, enter both and continue with Step 11.
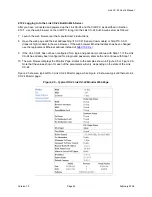
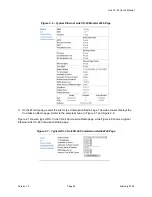
10 The web browser displays the Monitor Page, similar to the samples shown in Figure 2.5 or Figure 2.6.
Note that the values shown for each of the parameters will vary, depending on the state of the Link
CX-24.
Figure 2.5 shows a typical DS-3 Link CX-24 Monitor page, while Figure 2.6 shows a typical Ethernet Link
CX-24 Monitor page.
Figure 2.5 – Typical DS-3 Link CX-24 Monitor Web Page

