background image

System  Applications 

201 

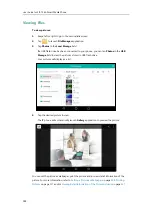
Viewing Pictures/Videos 

To view pictures/videos: 

1.


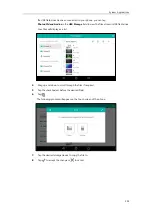
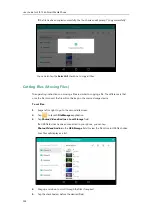
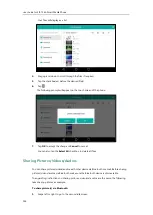
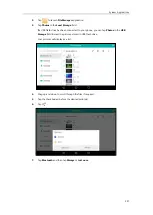
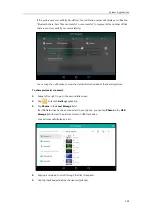
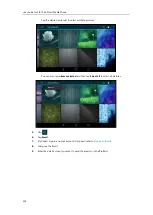
Swipe left or right to go to the second idle screen.


2.


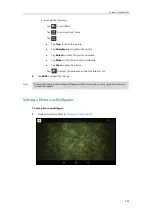
Tap            to launch 

Gallery

 application.


By default, the pictures/videos are displayed as thumbnails in an albums arrangement 
mode. 


3.


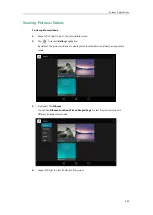
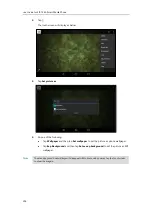
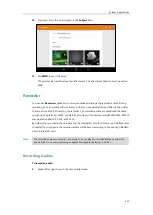
(Optional.) Tap

 Albums

You can tap 

Albums

/

Locations

/

Times

/

People

/

Tags

 to view the pictures/videos in 

different arrangement modes. 


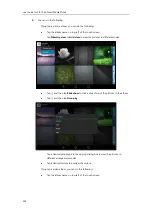
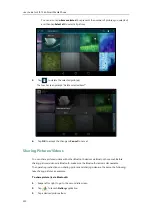
4.


Swipe left/right to view all albums if required.


Summary of Contents for SIP-T56A

Page 1: ......

Page 2: ...XPRESS OR IMPLIED USERS MUST TAKE FULL RESPONSIBILITY FOR THEIR APPLICATION OF PRODUCTS YEALINK XIAMEN NETWORK TECHNOLOGY CO LTD MAKES NO WARRANTY OF ANY KIND WITH REGARD TO THIS GUIDE INCLUDING BUT N...

Page 3: ...erence will not occur in a particular installation If this equipment does cause harmful interference to radio or television reception which can be determined by turning the equipment off and on the us...

Page 4: ...link uses software under the specific terms of the GPL Please refer to the GPL for the exact terms and conditions of the license The original GPL license source code of components licensed under GPL a...

Page 5: ...runs on Android OS version 5 1 1 This guide provides everything you need to quickly use your new phone First verify with your system administrator that the IP network is ready for phone configuration...

Page 6: ...User Guide for SIP T56A Smart Media Phone vi...

Page 7: ...ing Started 27 Packaging Contents 27 Optional Accessories 28 Phone Installation 29 Network Connection 33 Connecting to the Wired Network 33 Connecting to the Wireless Network 33 Phone Initialization 3...

Page 8: ...79 Time Date 81 Administrator Password 84 Key as Send 84 Phone Lock 85 Audio Settings 88 Volume 88 Ring Tones 91 Key Tone 93 Touch Sounds 94 Notification Sound 95 Silent Mode 95 Contact Management 96...

Page 9: ...ion 184 Removing APP Accounts 186 FileManager 187 Viewing Files 188 Searching Files 191 Copying Files 192 Cutting Files Moving Files 194 Deleting Files 195 Sharing Pictures Videos Audios 196 Gallery 2...

Page 10: ...248 Basic Phone Features 251 Placing Calls 252 Answering Calls 254 Answering When Not in Another Call 255 Answering When in Another Call 256 Ending Calls 256 Performing Operations during a Call 256 Go...

Page 11: ...Conference Recording Using a Softkey 312 Call Recording Using a Record Key 316 Hot Desking 318 Intercom 320 Configuring the Intercom Feature on the Phone 320 Using Intercom Feature on the Phone 323 Mu...

Page 12: ...User Guide for SIP T56A Smart Media Phone xii Index 359...

Page 13: ...ent Instructions Icon Instructions LED Instructions User Interfaces Documentations If you require additional information or assistance with your new phone contact your system administrator Hardware Co...

Page 14: ...e idle screens by default Shows information about calls messages time date and other relevant data Default account Call information caller ID call duration Icons for example Missed call list or second...

Page 15: ...dset cradle when the IP phone is mounted vertically For more information on how to adjust the hookswitch tab refer to Yealink Wall Mount Quick Installation Guide for Yealink IP Phones Hookswitch Picki...

Page 16: ...luetooth mode is on Bluetooth headset is both paired and connected Bluetooth Enabled mobile phone is both paired and connected Wi Fi mode is on Wi Fi is connected successfully and the signal strength...

Page 17: ...Hold Public Hold Private Hold DND Voice Mail Direct Pickup Group Pickup DTMF Prefix LDAP Local Group XML Group Conference Forward Transfer ReCall Record URL Record Recording starts successfully Record...

Page 18: ...is line Call forward is enabled on this line Icon indicator associated with mobile account Icons Description Mobile Account Bluetooth Enabled mobile phone is both paired and connected Mobile Account B...

Page 19: ...king Intercom talking state Intercom failed state Icon indicator associated with a shared line The local SCA phone indicates the phone is involved in an SCA call while the monitoring SCA phone indicat...

Page 20: ...all all the shared line parties participating in this call place the shared line conversation on hold Other Icons Icon indicator associated with an active call Icon Description Call Hold Call Mute Cal...

Page 21: ...s initializing Fast flashing red The phone is ringing Slow flashing red The phone receives a voice mail Off The phone is powered off The phone is idle The phone is busy The call is placed on hold or i...

Page 22: ...ons via phone user interface refer to Customizing Your Phone on page 65 Web User Interface In addition to the phone user interface you can also customize your phone via web user interface In order to...

Page 23: ...es Key Tone Touch Sounds Notification Sound Silent Mode Contact Management Local Directory Blacklist Remote Phone Book Mobile Contacts Call History Management Search Source List in Dialing Headset Use...

Page 24: ...onymous Call Rejection Advanced Phone Features Busy Lamp Field BLF BLF List Call Recording Hot Desking Intercom Multicast Paging Music on Hold Shared Call Appearance SCA Message SIP Account User Optio...

Page 25: ...ick Start Guide Basic call features and phone customizations In the package On the website English Chinese User Guide Phone Web user interface settings Basic call features and advanced phone features...

Page 26: ...User Guide for SIP T56A Smart Media Phone 26...

Page 27: ...Phone Installation Network Connection Phone Initialization Registration Using the Touch Screen Entering Data and Editing Fields Phone Status Basic Network Settings Wireless Network Settings If you re...

Page 28: ...ble 2m CAT5E FTP cable Quick Start Guide Check the list before installation If you find anything missing contact your system administrator Optional Accessories The following items are optional accesso...

Page 29: ...on page 33 This section introduces how to install the phone 1 Attach the stand 2 Attach the optional wall mount bracket 3 Connect the handset and optional headset 4 Connect the power 5 Connect the op...

Page 30: ...stand 2 Attach the optional wall mount bracket Note The hookswitch tab has a lip which allows the handset to stay on hook when the IP phone is mounted vertically For more information refer to Yealink...

Page 31: ...power 1 Connect the DC plug on the power adapter to the DC5V port on the phone and connect the other end of the power adapter into an electrical power outlet Note Power over Ethernet With the include...

Page 32: ...r to FileManager on page 187 Note The USB port on the rear of the phone can also be used to connect color screen expansion module EXP50 or USB headset The SIP T56A smart media phone officially support...

Page 33: ...etwork Yealink SIP T56A smart media phone supports Wi Fi feature You can connect your phone to a wireless network The wireless network is more convenient and cost effective than wired network The PC p...

Page 34: ...p your phone the phone will be registered and ready for use The SIP T56A smart media phone supports up to 16 accounts If your phone is not registered you may have to register it For more information o...

Page 35: ...displayed on the left of the status bar For more information refer to Default Account on page 163 If there is no account registered on the IP phone this field will display No Service 5 Phone Dialer T...

Page 36: ...ck on page 240 The Second Idle Screen The second idle screen displays phone s system applications by default No Application Description 1 Settings You can use this application to access phone settings...

Page 37: ...formation refer to Calculator on page 239 9 Browser You can use this application to present and explore content on the World Wide Web For more information refer to Browser on page 227 The Third Idle S...

Page 38: ...and move When you want to scroll quickly swipe your finger across the screen either up down left or right Drag Touch and hold then move To stop scrolling stop the dragging motion Pinch Open Touch the...

Page 39: ...re information refer to Call Forward on page 272 Auto Answer Tap to enter Auto Answer setting screen For more information refer to Auto Answer on page 260 Silent Tap to turn on off silent feature quic...

Page 40: ...screen to adjust the screen brightness For more information refer to Backlight on page 76 3 Notification Center Tap Notification Missed Calls Voice Mail Forwarded to view the corresponding notificatio...

Page 41: ...Displays configuration items of the highlighted menu item in the menu tree area 4 Android Keys tap to go back to the previous screen tap to return to the idle screen tap to view and manage the list o...

Page 42: ...the assigned feature Note The line key list appears only if you have added at least one line key 3 Tap to unfold line key list and display all line keys For more information refer to DSS Keys on page...

Page 43: ...ctory Tap to enter the Directory screen and view contacts 11 History Tap to enter the History screen and view call history 12 Tap to delete the entered characters one by one Long tap to delete two or...

Page 44: ...ideo and far site are shown 6 Soft Keys Label automatically to identify their context sensitive features Swipe left to see other soft keys 7 Far Site Information Shows the information name or number o...

Page 45: ...You can enter data and edit fields using the onscreen keyboard phone keypad or onscreen dial pad Using the Onscreen Keyboard Before using the onscreen keyboard to enter data you need to know the funct...

Page 46: ...aracters Tap to enter the corresponding character 7 Space Key Tap to enter spaces Long tap to change input method 8 Tap to access input options to configure Input languages or Android Keyboard Setting...

Page 47: ...ial characters Tap and hold a key then slide to choose one of the options to enter an alternate character Tap to switch to the symbolic input mode as shown below No Item Description 1 Special Characte...

Page 48: ...in Input Method You can use Google Pinyin input method to enter Chinese For operating instructions on how to use the Google Pinyin input method refer to the operating instructions above When you chang...

Page 49: ...4 Long tap the desired field 5 Tap PASTE Delete more characters at a time Long tap the entered character s Drag to select the characters you want to delete Tap Long tap Replace characters 1 Drag your...

Page 50: ...with different categories The following table lists usage of each category Category Usage Apps Display the memory cost of the application data and media content Cached data Tap to clear cached data fo...

Page 51: ...ser on your computer 2 Enter the IP address in the browser s address bar and then press the Enter key e g http 192 168 0 10 for IPv4 or http 2005 1 1 1 215 65ff fe64 6e0a for IPv6 3 Enter the user nam...

Page 52: ...r both IPv4 and IPv6 addresses To configure the IP mode via phone user interface 1 Swipe down from the top of the screen or swipe left right to go to the second idle screen 2 Tap Settings Advanced def...

Page 53: ...terface 1 Swipe down from the top of the screen or swipe left right to go to the second idle screen 2 Tap Settings Advanced default password admin Network WAN Port IPv4 3 Tap the Type field 4 Tap Stat...

Page 54: ...y DNS field respectively 6 Tap to accept the change or to cancel If you are using an xDSL modem for IPv4 network connection you can connect your phone to the Internet via PPPoE mode Set the WAN port a...

Page 55: ...o connect SIP T56A smart media phone to the wireless network Manually connect to an available wireless network Wi Fi Protected Setup WPS Manually add a wireless network The wrong network settings may...

Page 56: ...reless Network You can manually connect your phone to a wireless network To manually connect to an available wireless network via phone user interface 1 Swipe down from the top of the screen or swipe...

Page 57: ...screen to enter the control center and toggle Wi Fi on The phone will automatically search for wireless network in your area and try to connect the wireless network that you have connected last time I...

Page 58: ...ct Personal Identification Number PIN The user has to enter a WPS PIN generated randomly by the IP phone on the gateway router to connect Push Button Configuration PBC To connect to the wireless netwo...

Page 59: ...e top of the screen or swipe left right to go to the second idle screen 2 Tap Settings Basic Wi Fi 3 Tap the On radio box in the Wi Fi field The phone will automatically search for available wireless...

Page 60: ...uccessfully the touch screen will prompt Connected Note Manually Add a Wireless Network If your gateway router has SSID broadcast disabled it might not appear in the scanning results In that case you...

Page 61: ...ername in the Identity field d Enter the anonymous identity username in the Anonymous identity field to be used as the unencrypted identity e Enter the password in the Password field If you select TLS...

Page 62: ...us to view the detailed wireless network information e g Profile Name SSID or Signal Strength 4 Optional Drag up and down to scroll through the list of wireless network information Disconnecting the W...

Page 63: ...pe down from the top of the screen or swipe left right to go to the second idle screen Tap Settings Basic Wi Fi Tap the Off radio box in the Wi Fi field Swipe down from the top of the screen to enter...

Page 64: ...User Guide for SIP T56A Smart Media Phone 64...

Page 65: ...ze the wallpaper of the SIP T56A smart media phone and color screen expansion module EXP50 if connected You can also change the wallpaper image via phone user interface or web user interface The custo...

Page 66: ...ear in the pull down lists of Wallpaper and Wallpaper for Expansion Modules synchronously You can delete the custom wallpaper by clicking Del when selecting the desired custom wallpaper in the Wallpap...

Page 67: ...Your Phone 67 4 Do one of the following Tap Gallery The touch screen displays all Gallery albums Select a desired Gallery album Tap a desired picture to preview and then tap Set wallpaper or Set as ex...

Page 68: ...d built in wallpapers and the recently used wallpapers list on the bottom of the touch screen Do one of the following Select a desired wallpaper from the build in wallpapers and recently used wallpape...

Page 69: ...y used wallpapers list Tap Set wallpaper or Set as exp background You can long tap the empty spot on the idle screen and then tap WALLPAPERS the effect is equal to tapping Settings Basic Display Wallp...

Page 70: ...ere is an incoming call A new prompt e g missed call new voice mail or forwarded call The status of BLF key changes If your phone is idle again for a specified period of time the screen saver will sta...

Page 71: ...below when screen saver starts If you set the screen saver type to Photo Frame the touch screen will display the selected pictures one by one when screen saver starts If you set the screen saver type...

Page 72: ...in the pop up dialog box 5 Do one of the following Tap the Clock radio box Optional Tap next to the radio box Tap the Style field to set the clock type to Analog or Digital Tap the Night mode radio b...

Page 73: ...sed to turn off the backlight and screen to conserve energy The IP phone enters power saving mode after it has been idle for a certain period of time If you connect a color screen expansion module EXP...

Page 74: ...enable the power saving feature via web user interface 1 Click on Settings Power Saving 2 Select Enabled from the pull down list of Power Saving 3 Click Confirm to accept the change Configuring the Of...

Page 75: ...y on the phone pick up hang up the handset or tap the touch screen By default the Office Hour Idle TimeOut is much longer than the Off Hour Idle TimeOut If you use the IP phone the idle timeout that a...

Page 76: ...me to change the intensity or turn on the backlight permanently Always On Backlight is on permanently 15s 30s 60s 120s 300s 600s or 1800s Backlight is changed when the phone is inactive after the desi...

Page 77: ...to cancel You can also drag the backlight slider on the control center to change the intensity of the touch screen To configure the backlight active level on the control center 1 Swipe down from the t...

Page 78: ...lowest Backlight is configurable via web user interface at the path Settings Preference Language The default language of the phone user interface is English If the language of your web browser is not...

Page 79: ...1 Click on Settings Preference 2 Select the desired language from the pull down list of Language 3 Click Confirm to accept the change Text displayed on the web user interface will change to the select...

Page 80: ...screen or swipe left right to go to the second idle screen 2 Tap Settings Basic Language Input Current Input 3 Tap the desired input method in the pop up dialog You can also long tap the following ke...

Page 81: ...Time Protocol SNTP server contact your system administrator for more information To configure the SNTP setting via phone user interface 1 Swipe down from the top of the screen or swipe left right to g...

Page 82: ...ime and date manually via phone user interface 1 Swipe down from the top of the screen or swipe left right to go to the second idle screen 2 Tap Settings Basic Time Date General 3 Tap the Type field 4...

Page 83: ...otes the first three letters of the month The date formats available Date Format Example 2017 02 9 WWW MMM DD Thu Feb 09 DD MMM YY 09 Feb 17 YYYY MM DD 2017 02 09 DD MM YYYY 09 02 2017 MM DD YY 02 09...

Page 84: ...right to go to the second idle screen 2 Tap Settings Advanced default password admin Set Password 3 Enter the current password in the Current PWD field 4 Enter the new password in the New PWD field 5...

Page 85: ...ting the handset pressing the Speakerphone key the HEADSET key or tapping the Answer soft key and end the call by hanging up the handset pressing the Speakerphone key or tapping the EndCall soft key N...

Page 86: ...nated time in seconds 6 Tap to accept the change When the phone is locked the touch screen prompts Phone locked and displays the icon on the status bar To unlock the phone you must know the phone unlo...

Page 87: ...nterface 1 Swipe down from the top of the screen or swipe left right to go to the second idle screen 2 Tap Settings Basic Change PIN 3 Enter the desired value in the Current PIN New PIN and Confirm PI...

Page 88: ...Press the Volume key to adjust the ringer volume when the phone is idle or ringing When adjusting ringer volume the touch sound and notification sound volume will change as well For more information o...

Page 89: ...when the phone is ringing 1 Press to adjust the ringer volume You can also press to adjust the ringer volume when selecting a ring tone For more information refer to Ring Tones on page 91 Note You ca...

Page 90: ...ust the volume of currently engaged audio device handset speakerphone or headset You can also drag the volume slider to adjust the talking volume To adjust the key tone volume When the phone is on the...

Page 91: ...to indicate incoming calls You can select different ring tones to distinguish different accounts registered on your phone or to distinguish your phone from your neighbor s To select a ring tone for th...

Page 92: ...e screen 2 Tap Settings Basic Sound Ring Tones 3 Tap the desired account 4 Drag up and down to scroll through the list of available ring tones 5 Tap the desired ring tone If Common is selected this ac...

Page 93: ...one the phone will produce a sound when you press the keypad To enable key tone via phone user interface 1 Swipe down from the top of the screen or swipe left right to go to the second idle screen 2 T...

Page 94: ...enable touch sounds the phone will produce a sound when you tap an option on the touch screen To enable touch sounds via phone user interface 1 Swipe down from the top of the screen or swipe left righ...

Page 95: ...field 4 Tap the desired notification sound in the pop up dialog box 5 Optional Press to adjust the notification sound 6 Tap OK to accept the change or Cancel to cancel Note Silent Mode If you turn on...

Page 96: ...f the screen to enter the control center and toggle Silent on Note Contact Management This section provides the operating instructions for managing contacts Topics include Local Directory Blacklist Re...

Page 97: ...ne s local directory You can add new groups and contacts edit delete or search for a contact or simply dial a contact number from the local directory Adding Groups To add a group to the local director...

Page 98: ...g tone refer to Adding Contacts Account ring tone refer to Ring Tones Phone ring tone refer to Ring Tones If a specific ring tone is selected this group will use the ring tone according to the priorit...

Page 99: ...tomizing Your Phone 99 4 Tap after the group name 5 Edit the group name in the highlighted field 6 Tap to accept the change Deleting Groups To delete a group from the local directory 1 Tap 2 Tap Setti...

Page 100: ...the change or Cancel to cancel Adding Contacts You can add contacts to the local directory in one of the following ways Manually From call history From a remote phone book Adding Contacts Manually To...

Page 101: ...ox If Auto is selected this contact will use the ring tone according to the priority Group ring tone refer to Adding Groups Account ring tone refer to Ring Tones Phone ring tone refer to Ring Tones 8...

Page 102: ...User Guide for SIP T56A Smart Media Phone 102 3 Tap after the desired entry 4 Tap Add 5 Edit the corresponding fields 6 Tap to accept the change The entry is successfully saved to the local directory...

Page 103: ...ctory from a remote phone book 1 Tap Remote Phone Book 2 Tap the desired remote phone book The phone then connects to the remote phone book and proceeds to load it The contacts in the remote phone boo...

Page 104: ...rwrite the original contact Tap OK to overwrite the original contact in the local directory or Cancel to cancel For more information on remote phone book operation refer to Remote Phone Book on page 1...

Page 105: ...u want to edit 4 Tap to accept the change or tap and then tap Discard to cancel Deleting Contacts To delete a contact from the local directory 1 Tap 2 Tap after the desired contact If the contact was...

Page 106: ...or SIP T56A Smart Media Phone 106 The touch screen prompts the following warning 4 Tap OK to accept the change or Cancel to cancel To delete all contacts 1 Tap 2 Tap Settings 3 Tap the Select All radi...

Page 107: ...the change or Cancel to cancel Uploading Contact Photos To upload a new custom photo for the contact via web user interface 1 Click on Directory Local Directory 2 Click Upload Photo and then locate an...

Page 108: ...he contact via web user interface 1 Click on Directory Local Directory 2 Click the desired contact you want to edit 3 Select the desired photo from the pull down list of Photo 4 Click Edit to accept t...

Page 109: ...o a specified contact group you can tap the contact group first and then do one of the following Tap the desired contact If only one number for the contact is stored in the local directory the IP phon...

Page 110: ...multiple numbers for the contact are stored in the local directory tap Send to display all numbers Tap the desired number to dial out Searching for Contacts To search for a contact in the local direc...

Page 111: ...can dial from the result list Tap the desired letter e g T along the right side to jump to contacts whose names start with T or t Drag up and down to select the desired contact to view or dial out Imp...

Page 112: ...local system The web user interface prompts The original contact will be covered continue 3 Click OK to complete importing the contact list To import a CSV contact list file via web user interface 1 C...

Page 113: ...ete Old Contacts checkbox It will delete all existing contacts while importing the contact list 5 Click Import to complete importing the contact list To export a contact list via web user interface 1...

Page 114: ...from the blacklist directory contacts will be rejected automatically To add a contact to the blacklist directory manually 1 Tap Blacklist 2 Tap 3 Enter the contact s name and the office mobile or oth...

Page 115: ...page 109 and or Searching for Contacts on page 110 Remote Phone Book You can add contacts to the local directory search for a contact or simply dial a contact number from the remote phone book You can...

Page 116: ...he desired remote phone book The phone then connects to the remote phone book and proceeds to load it The contacts in the remote phone book are displayed on the touch screen You can tap to go back to...

Page 117: ...tacts directory of your IP phone For more information refer to Bluetooth Enabled Mobile Phone on page 137 You can add a contact to the local directory or blacklist directory from mobile contacts You c...

Page 118: ...the corresponding fields 6 Tap to accept the change or tap and then tap Discard to cancel The entry is successfully saved to the local directory To add a contact to the blacklist directory from the mo...

Page 119: ...e contacts temporarily on the mobile phone After updating the contacts you add edit delete on the mobile phone will sync to the mobile contacts directory Note The contact that be added to the local di...

Page 120: ...can view call history place a call add a contact or delete an entry from the call history list History record feature is enabled by default if you don t want to save the call history you can disable t...

Page 121: ...touch screen Placing a Call from History Records To place a call from the call history list 1 Tap The touch screen displays all call records 2 Drag up and down to scroll You can tap Missed Calls Plac...

Page 122: ...s all call records 2 Drag up and down to scroll You can tap Missed Calls Placed Calls Received Calls or Forwarded Calls to view entries in each call list directly 3 Tap after the desired entry 4 Tap B...

Page 123: ...ds 2 Drag up and down to scroll You can tap Missed Calls Placed Calls Received Calls or Forwarded Calls to view entries in each call list directly 3 Tap after the desired entry 4 Tap Delete The touch...

Page 124: ...ne 124 The touch screen displays all call records 2 Drag up and down to scroll You can tap Missed Calls Placed Calls Received Calls or Forwarded Calls to view entries in each call list directly 3 Tap...

Page 125: ...Swipe down from the top of the screen or swipe left right to go to the second idle screen 2 Tap Settings Features History Record 3 Tap the Off radio box in the History Record field 4 Tap to accept th...

Page 126: ...he display order of the enabled list select the desired list and click or 6 Click Confirm to accept the change The touch screen will display search results in the adjusted order Note To search for an...

Page 127: ...rovides an introduction to wired headset use Note The SIP T56A smart media phone supports three types of headsets YHS32 YHS33 headset USB headset and Bluetooth headset You can connect up to three type...

Page 128: ...nter the desired number and tap Send the phone will then place a call using the headset automatically For more information on using the headset to place a call refer to Placing Calls on page 252 To de...

Page 129: ...ies while the one connected to the handset jack will only be able to listen Note To enable dual headset via web user interface 1 Click on Features General Information 2 Select Enabled from the pull do...

Page 130: ...t a time You can also share files with friends via Bluetooth You can pair and connect a Bluetooth headset speakerphone microphone or a Bluetooth enabled mobile phone to your IP phone And the Bluetooth...

Page 131: ...r interface 1 Swipe down from the top of the screen or swipe left right to go to the second idle screen 2 Tap Settings Basic Bluetooth 3 Tap the Off radio box in the Bluetooth field The Bluetooth icon...

Page 132: ...to the second idle screen 2 Tap Settings Basic Bluetooth 3 Tap the On radio box in the Bluetooth field If there is no Bluetooth device found on the touch screen tap to search for the Bluetooth device...

Page 133: ...devices the other Bluetooth devices can scan and find your IP phone But if your IP phone is not visible to other Bluetooth devices your IP phone device name will not display in scanning list of other...

Page 134: ...Device Name field The default device name is Yealink T56A 4 Tap to accept the change or to cancel You should make your phone discoverable first and then the pre configured Bluetooth device name will d...

Page 135: ...ame displayed in scanning list of other devices will not be changed Note Disconnecting the Bluetooth Headset To disconnect your Bluetooth headset from your phone 1 Swipe down from the top of the scree...

Page 136: ...th headset it disappears from the PAIRED DEVICES list To connect it to your phone again you just need to tap the desired Bluetooth headset in the AVAILABLE DEVICES list To unpair Bluetooth headset via...

Page 137: ...ooth mode making the phone discoverable editing device information renaming the paired Bluetooth device and disconnecting unpairing the paired Bluetooth enabled mobile phone refer to the operating ins...

Page 138: ...le phone is discoverable To pair and connect the Bluetooth Enabled Mobile Phone with your phone 1 Swipe down from the top of the screen or swipe left right to go to the second idle screen 2 Tap Settin...

Page 139: ...he IP phone will not sync the mobile contacts If you tap Cancel you can also manually enable the mobile contacts sync feature on the IP phone For more information refer to Syncing the Mobile Contacts...

Page 140: ...nt key to reconnect the last paired Bluetooth Enabled mobile phone Syncing the Mobile Contacts to the IP Phone If you disable the mobile contacts sync feature when you pair and connect the Bluetooth E...

Page 141: ...ntacts in the mobile phone will display in the Mobile Contacts list For operating instructions on adding contact to local blacklist directory from mobile contacts directory update the mobile contacts...

Page 142: ...from Mobile The outgoing call information will appear on both your IP phone and mobile phone screen After the call is picked up the audio goes through the IP phone although the mobile phone screen als...

Page 143: ...pport sending files via Bluetooth You can send pictures videos or audios to a Bluetooth enabled mobile phone or other Bluetooth devices displayed in the AVAILABLE DEVICES list For more information ref...

Page 144: ...nformation refer to the documentation from the Bluetooth device manufacturer The IP phone will play a notification sound and the touch screen prompts Accept incoming file 2 Tap Accept to start receivi...

Page 145: ...hone supports 27 line keys and 3 programable keys Line Keys You can assign predefined functionalities to line keys You can also define a label for a line key feature which will appear on the touch scr...

Page 146: ...nctionality to a line key via phone user interface 1 Do one of the following Tap on the home screen when there is no line key configured on your phone Drag up and down to scroll through the line key l...

Page 147: ...he string that will appear on the touch screen in the Label field 6 Optional Enter the corresponding value in the Value field 7 Optional Enter the corresponding value in the Extension field 8 Tap to a...

Page 148: ...art Media Phone 148 2 Drag a line key to the desired location at which another line key locates For example exchange the locations of line key 1 and line key 2 The following shows the locations of two...

Page 149: ...149 Deleting a Line Key To delete a line key 1 Do one of the following Drag up and down to scroll through the line keys if required Tap on the bottom left of the line key list The touch screen will di...

Page 150: ...non current page you may miss the call because there is no notification on the current page If page tips feature is enabled the breathing light will appear at the top bottom of the line key list when...

Page 151: ...xample of the breathing light appears at the top of the line key list The following figure shows an example of the breathing light appears at the bottom of the line key list To configure the page tips...

Page 152: ...cept the change Note Line Key Features Line key features are explained in the following subchapters in detail Line Speed Dial Voice Mail Direct Pickup Group Pickup DTMF Prefix Local Group XML Group LD...

Page 153: ...o speed up dialing the numbers frequently used hard to remember or perform blind transfer conveniently during the call Dependencies Type Speed Dial Account ID the account this feature will be applied...

Page 154: ...kup You can use this key feature to answer incoming calls in a group that is associated with their own group Dependencies Type Key Event Key Type GPickup Account ID the account this feature will be ap...

Page 155: ...the Local Group field XML Group You can use this key feature to quickly access a remote group in your remote phone book You should configure a remote phone book in advance For more information refer t...

Page 156: ...an incoming call to the number specified in the Value field Note Transfer When there is an active call on the phone you can use this key feature to handle the call differently depending on the transfe...

Page 157: ...touch screen Usage When DND is in phone mode 1 Tap the DND key to enable DND 2 Tap the DND key again to disable DND When DND is in custom mode 1 Tap the DND key to access the custom DND screen You ca...

Page 158: ...network parameters in the corresponding fields 4 Tap the Next soft key 5 Configure the auto provision parameters in the corresponding fields 6 Tap the Next soft key The phone will reboot to update con...

Page 159: ...ne on page 137 Dependencies Type Mobile Account Label key label displayed on the touch screen Usage When the IP phone receives an incoming mobile call 1 Tap the mobile account key to accept the incomi...

Page 160: ...t to select the desired default account Note Ext Keys If EXP50 is connected to the phone you can customize features for ext keys To customize ext keys via phone user interface 1 Long press the desired...

Page 161: ...terface 1 Swipe down from the top of the screen or swipe left right to go to the second idle screen 2 Tap Settings Advanced default password admin Accounts 3 Tap the desired account 4 Tap the Activati...

Page 162: ...s To disable an account via phone user interface 1 Swipe down from the top of the screen or swipe left right to go to the second idle screen 2 Tap Settings Advanced default password admin Account 3 Ta...

Page 163: ...p the Default Account field 4 Tap the desired account in the pop up dialog box 5 Tap to accept the change or to cancel The label of the default account is displayed on the left of the status bar The I...

Page 164: ...calls to this account will be distributed evenly among the available line keys Outgoing calls will be distributed similarly Your phone can be configured to have a combination of accounts with a singl...

Page 165: ...one Example A replace rule configuration Prefix 001 xxx 45 xx Replace 9001 145 2 When you dial out 0012354599 on your phone the IP phone will replace the number with 90012354599 1 means 3 digits in t...

Page 166: ...d replace rule by checking the checkbox 3 Edit the values in the Prefix and Replace fields 4 Enter the desired line ID in the Account field or leave it blank 5 Click Edit to accept the change To delet...

Page 167: ...more information on the valid values for the Account field refer to Replace Rule on page 165 4 Click Add to add the dial now rule When you enter the number 234 the phone will dial out 234 automatical...

Page 168: ...2 Min Length 1 Max Length 15 When you dial out the number 56789 the length of the number is between 1 and 15 the phone will add the area code and dial out the number 059256789 You can only configure o...

Page 169: ...e the dialing will fail and the touch screen will prompt Forbidden Number To add a block out number via web user interface 1 Click on Settings Dial Plan Block Out 2 Enter the desired value in the Bloc...

Page 170: ...to Phone Lock on page 85 Note To specify emergency numbers via web user interface 1 Click on Features Phone Lock 2 Enter the emergency number in the Emergency field For multiple emergency numbers ent...

Page 171: ...r immediately upon lifting the handset pressing the Speakerphone key or tapping the line key You can also configure a delay where the phone will dial out the hotline number automatically after a desig...

Page 172: ...User Guide for SIP T56A Smart Media Phone 172 The default value is 4 5 Tap to accept the change or to cancel Hotline is configurable via web user interface at the path Features General Information...

Page 173: ...Topics include Managing Applications and Widgets Managing Running Applications APP Accounts FileManager Gallery Recorder Email Browser Calendar Calculator Clock Managing Applications and Widgets Addi...

Page 174: ...or SIP T56A Smart Media Phone 174 To add a widget to idle screen 1 Long tap the empty spot on the idle screen 2 Tap WIDGETS 3 Drag the desired widget up down left right to the destination spot on the...

Page 175: ...gallery widget you will be required to choose the desired images to display Before adding a widget to the idle screen make sure the idle screen have enough space for the widget Otherwise the widget ca...

Page 176: ...cation or widget you should know the following You can drag an application or widget to the rightmost of three idle screens to add an idle screen If there is only one application or widget on the scre...

Page 177: ...on the screen The application itself will not be uninstalled To remove a widget from the idle screen 1 Long tap the desired item for about 2 seconds The Remove field will appear on the top of the touc...

Page 178: ...a Phone 178 To create a folder 1 Drag an application icon over another application icon 2 Lift your finger when a folder frame appears around the applications A new folder containing the selected appl...

Page 179: ...nation spot on the idle screen to move the application from the folder to the idle screen The folder will be deleted automatically if there is only one application in the folder To rename a folder 1 T...

Page 180: ...ons Tap the desired application to access the application If there are no running applications the touch screen will prompt Your recent screens appear here APP Accounts Email and Calendar applications...

Page 181: ...System Applications 181 2 Tap Settings Basic APP accounts 3 Tap Add account 4 Tap a desired account type 5 Enter the email address 6 Tap Next or Manual setup...

Page 182: ...stored on the server side and users can see them from the IP phone or other mail clients as well Please check with your network administrators for the correct email account settings for IMAP Exchange...

Page 183: ...System Applications 183 9 Configure the incoming server settings 10 Tap Next 11 Configure the outgoing server settings 12 Tap Next 13 Configure the account options...

Page 184: ...ield as the sender name 16 Tap Next You are able to start using the email account now Syncing APP Account Information To sync account information via phone user interface 1 Swipe down from the top of...

Page 185: ...3 Tap the desired account type 4 Do one of the following Tap and then tap Sync now In this example it will sync both ll50466499 sina com and ll506466400 sina com information Tap a desired account Tap...

Page 186: ...xample it will only sync ll50466499 sina com information Removing APP Accounts To remove an app account via phone user interface 1 Swipe down from the top of the screen or swipe left right to go to th...

Page 187: ...to accept the change or Cancel to cancel FileManager FileManager is a tool that allows you to view search delete copy or move photo video audio files You can also share files via Bluetooth or email I...

Page 188: ...USB Storage field to view the pictures stored in USB flash drive Your pictures will display as a list 4 Tap the desired picture to view The IP phone will automatically launch Gallery application to pr...

Page 189: ...B Storage field to view the videos stored in USB flash drive Your videos will display as a list 4 Tap the desired video to play The IP phone will automatically launch Gallery application to view the v...

Page 190: ...launch FileManager application 3 Tap Audios in the Local Storage field If a USB flash drive has been connected to your phone you can tap Audios in the USB Storage field to view the audios stored in U...

Page 191: ...ying or rewind the playing Press to adjust the volume of the speakerphone Tap to stop the playing You can also swipe down from the top of the screen to enter the control center and then tap USB to lau...

Page 192: ...n drag up and down to scroll through the searching results and then tap the desired result to view the file Copying Files You can copy the files that stored in the USB flash drive to internal SD card...

Page 193: ...the files stored in USB flash drive Your files will display as a list 4 Drag up and down to scroll through the files if required 5 Tap the checkbox es before the desired file s 6 Tap The following pr...

Page 194: ...e file is moved the file will not be kept in the source storage device To cut files 1 Swipe left or right to go to the second idle screen 2 Tap to launch FileManager application 3 Tap Photos Videos Au...

Page 195: ...en will prompt Cut successfully You can also tap the Select All checkbox to cut all files Deleting Files To delete files 1 Swipe left or right to go to the second idle screen 2 Tap to launch FileManag...

Page 196: ...ncel to cancel You can also tap the Select All checkbox to delete all files Sharing Pictures Videos Audios You can share pictures videos audios with other device via Bluetooth or email Before sharing...

Page 197: ...has been connected to your phone you can tap Photos in the USB Storage field to view the pictures stored in USB flash drive Your pictures will display as a list 4 Drag up and down to scroll through th...

Page 198: ...te 8 Tap the desired Bluetooth device to share the pictures The touch screen will prompt Sending n file to XXX n represents the number of pictures that is being send 9 Accept the Bluetooth file transf...

Page 199: ...detail information about the shared pictures To share picture s via email 1 Swipe left or right to go to the second idle screen 2 Tap to launch Gallery application 3 Tap Photos in the Local Storage fi...

Page 200: ...attachment The attachment files size must be within 5MB You can also share pictures with other devices via Bluetooth or email when previewing the pictures And the operating instructions are the same...

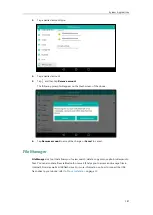
Page 201: ...idle screen 2 Tap to launch Gallery application By default the pictures videos are displayed as thumbnails in an albums arrangement mode 3 Optional Tap Albums You can tap Albums Locations Times People...

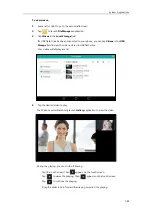
Page 202: ...id view to view the pictures in different modes Tap and then tap Slideshow to start a slide show of the pictures in the album Tap and then tap Group by Tap a desired group type in the pop up dialog bo...

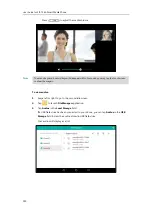
Page 203: ...plications 203 Tap Filmstrip view or Grid view to view the videos in different mode Tap and then tap Group by Tap a desired group type in the pop up dialog box to view the videos in different arrangem...

Page 204: ...picture 1 Swipe left or right to go to the second idle screen 2 Tap to launch Gallery application 3 Tap a desired picture album 4 Tap the desired pictures 5 You can do the following Tap and then tap R...

Page 205: ...re clockwise Tap Mirror to flip the picture symmetrically Tap Draw to draw the picture Tap to adjust the exposure contrast saturation etc 6 Tap SAVE to accept the change Note Setting a Picture as Wall...

Page 206: ...4 Do one of the following Tap Wallpaper and then tap Set wallpaper to set the picture as phone wallpaper Tap Exp Background and then tap Set as exp background to set the picture as EXP wallpaper Note...

Page 207: ...picture Before printing the picture make sure your phone has connected to the network printer For more information refer to the documentation from the printer manufacturer Viewing Detail Information...

Page 208: ...Smart Media Phone 208 To view detail information of the picture 1 Preview the picture refer to Viewing Pictures Videos 2 Tap The touch screen will display as below 3 Tap Details to view the detail inf...

Page 209: ...wing take deleting pictures as example To delete picture s 1 Swipe left or right to go to the second idle screen 2 Tap to launch Gallery application 3 Tap a desired picture album 4 Do one of the follo...

Page 210: ...Cancel to cancel Sharing Pictures Videos You can share pictures videos with other Bluetooth devices via Bluetooth or email Before sharing pictures videos via Bluetooth make sure the Bluetooth device i...

Page 211: ...ictures Tap on other pictures to select multiple pictures Tap and then tap Select item Tap the desired picture s to select multiple pictures You can also tap n items selected n represents the number o...

Page 212: ...tooth device found on the touch screen tap and then Refresh to search for the Bluetooth devices Note 7 Tap the desired Bluetooth device to share the pictures If the Bluetooth mode of the IP phone is d...

Page 213: ...etooth share Sent files n successful n unsuccessful n represents the number of files that are sent successfully or unsuccessfully You can tap the notification to view the detail information about the...

Page 214: ...multiple pictures You can also tap n items selected and then tap Select all to select all pictures 5 Tap 6 Tap Email 7 Optional Sign in an email account if required refer to Signing In Email 8 Compose...

Page 215: ...recorded audios are saved with the name consisting of a prefix record and date time stamp for example record 20160303 092310 was created on March 3 2016 at 09 23 10 By default the recorded audios are...

Page 216: ...or SIP T56A Smart Media Phone 216 2 Tap to launch Recorder application 3 Tap to start recording 4 You can do one of the following Tap to pause the recording and then tap to resume the recording Tap to...

Page 217: ...application to play delete rename the recorded audios To play the recorded audio 1 Swipe left or right to go to the second idle screen 2 Tap to launch Recorder application The recorded audios will di...

Page 218: ...IP T56A Smart Media Phone 218 Tap to stop the playing To delete the recorded audio 1 Swipe left or right to go to the second idle screen 2 Tap to launch Recorder application The recorded audios will d...

Page 219: ...dio The touch screen prompt Are you sure to delete 5 Tap OK to accept the change or Cancel to cancel If you want to delete all recorded audios tap on the top right of the touch screen To rename a reco...

Page 220: ...ap OK to accept the change or Cancel to cancel Email You can use Email application to access personal or business email account and send receive emails Before signing in email you should configure the...

Page 221: ...o the second idle screen Tap to launch Email application Swipe left or right to go to the third idle screen Tap the email widget 2 Sign in email refer to Adding APP Accounts Sending Emails To send an...

Page 222: ...p Attach file to add a file as mail attachment The attachment file size must be within 5MB 8 Tap to send the email Reading Emails If there is an incoming email the IP phone will play a notification so...

Page 223: ...tains the email you want to read 3 Tap the desired email to read Deleting Emails To delete an email 1 Swipe left or right to go to the second idle screen 2 Tap to launch Email application If the email...

Page 224: ...a Phone 224 3 Long tap the desired email 4 Tap to delete the email You can tap UNDO to cancel the deletion Email Options To use the email options 1 Swipe left or right to go to the second idle screen...

Page 225: ...o mark the email as unread read Tap and then tap Print to print the email Long tap the desired email Tap and then tap Add star to star the email Multiple Email Accounts You can add more than one email...

Page 226: ...between the email accounts Email Widget You should sign in the email if you have not registered an email account For more information refer to Adding APP Accounts on page 180 After you sign in the em...

Page 227: ...op right of the widget to compose and send an email Sending Files via Email The Gallery and FileManager applications support data transfer via Email You can send pictures audios or videos as mail atta...

Page 228: ...ch Browser application 3 Enter a part of URL in the address input field of the browser The phone will automatically retrieve and list similar websites 4 Tap the website you want to visit or enter the...

Page 229: ...r right to go to the second idle screen 2 Tap to launch Browser application 3 Open the web page you want to bookmark 4 Tap 5 Edit the bookmark information in corresponding fields 6 Tap OK to accept th...

Page 230: ...ne 230 2 Tap to launch Browser application 3 Tap to access the BOOKMARKS list There are some pre configured bookmarks by default 4 Tap the web page you want to visit To edit a bookmark 1 Swipe left or...

Page 231: ...ons 231 2 Tap to launch Browser application 3 Tap to access the BOOKMARKS list There are some pre configured bookmarks by default 4 Long tap the bookmark you want to edit 5 Tap Edit bookmark in the po...

Page 232: ...Browser application 3 Tap to access the BOOKMARKS list There are some pre configured bookmarks by default 4 Long tap the bookmark you want to delete 5 Tap Delete bookmark in the pop up dialog box 6 Ta...

Page 233: ...System Applications 233 To set a home page 1 Swipe left or right to go to the second idle screen 2 Tap to launch Browser application 3 Tap 4 Tap Settings General Set homepage...

Page 234: ...BOOKMARKS list and then tap Set as homepage Clearing the Navigation History You can periodically clear your navigation history to protect your privacy and prevent information disclosure To clear the n...

Page 235: ...modify browser settings 1 Swipe left or right to go to the second idle screen 2 Tap to launch Browser application 3 Tap 4 Tap Settings 5 Customize the browser style you prefer Calendar You can use th...

Page 236: ...you should sign in an email account first If you have registered an account on the Email application already you can skip this operation To sign in calendar 1 Swipe left or right to go to the second...

Page 237: ...creen 2 Tap to launch Calendar application 3 Tap a desired date 4 Tap 5 Edit the event 6 Tap DONE to accept the change or CANCEL to cancel Checking Events On the calendar screen you can check the info...

Page 238: ...ional Tap on the top left of the touch screen Tap Day Week Month Agenda to select different time format to view the calendar In the agenda view the events you have added are displayed as a list You ca...

Page 239: ...the second idle screen 2 Tap to launch Calendar application 3 Tap 4 Tap Settings 5 Customize the general settings and account settings Calculator You can use the Calculator application to perform sim...

Page 240: ...ch Calculator application Clock You can use the Clock application to set an alarm check the time of other cities in the world calculate the lasting time of an event and set a timer Alarm To set an ala...

Page 241: ...System Applications 241 2 Tap on the top left of the touch screen 3 Tap 4 Tap the desired number to enter the alarm time 5 Tap OK The alarm clock you have set is displayed on the touch screen...

Page 242: ...desired ringtone for alarm Note To edit an alarm clock 1 Tap the digital clock widget on the home screen 2 Tap on the top left of the touch screen 3 Drag up and down to scroll through alarms 4 Select...

Page 243: ...alarm clock 1 Tap the digital clock widget on the home screen 2 Tap on the top left of the touch screen 3 Select a desired alarm 4 Tap on the bottom left of the alarm to delete the desired alarm You...

Page 244: ...ze length field and then tap the desired snooze time after the alarm clock rings in the pop up dialog box Tap the Alarm volume field and then drag the slider to adjust the alarm volume Tap the Volume...

Page 245: ...em Applications 245 The touch screen displays the current date and time 2 Tap 3 Drag up and down to scroll through the cities 4 Tap the checkbox before the desired city 5 Tap to return to the clock sc...

Page 246: ...clock display mode 1 Tap the digital clock widget on the home screen 2 Tap and then tap Settings 3 You can do the following Tap the Style field Tap Analog or Digital in the pop up dialog box Mark the...

Page 247: ...em Applications 247 Timer To set a timer 1 Tap the digital clock widget on the home screen 2 Tap 3 Enter the time by tapping the digits on the right of the screen You can tap to delete the entered num...

Page 248: ...dd an additional minute Tap to pause the timer then you can do the following Tap to resume the timer Tap to restart the timer Tap to delete the current timer The timer beeps when the time is up It kee...

Page 249: ...p to pause the stopwatch Tap to reset the stopwatch Tap and then tap Bluetooth or Email to share the record via Bluetooth or email For more information refer to Sending Files via Bluetooth on page 143...

Page 250: ...User Guide for SIP T56A Smart Media Phone 250...

Page 251: ...conference call This chapter provides basic operating instructions for the SIP T56A smart media phone Topics include Placing Calls Answering Calls Ending Calls Performing Operations during a Call Redi...

Page 252: ...For more information refer to Contact Management on page 96 and Call History Management on page 120 During a call you can alternate between Speakerphone Headset and Handset modes by pressing the Spea...

Page 253: ...Enter the desired number using the keypad or the dial pad on the touch screen Press or tap Send With the handset on hook enter the desired number using the keypad or the dial pad on the touch screen P...

Page 254: ...ctive call do one of the following Tap the line key The active call is placed on hold Enter the desired number using the keypad or the dial pad on the touch screen Press or tap Send Press or tap the H...

Page 255: ...k and the headset mode deactivated tap the line key To answer a call using the headset Do one of the following Press With the headset mode activated tap the Answer soft key With the headset mode activ...

Page 256: ...et tap the EndCall soft key If you are using the speakerphone press or tap the EndCall soft key Note Performing Operations during a Call During the call you may want to see if there is an event on sch...

Page 257: ...one Features 257 Going to the Idle Screen during a Call To go to the idle screen during a call 1 Tap or to go to the idle screen When the phone exits the talking screen the touch screen will display a...

Page 258: ...e 1 Press twice A call to your last dialed number is attempted To redial a previously dialed number from your phone 1 Press when the phone is idle 2 Tap the desired entry from the placed calls list Re...

Page 259: ...the change Note To view placed calls list when the phone is on the dialing interface 1 Pick up the handset press the Speakerphone key or tap the line key The touch screen displays the placed calls lis...

Page 260: ...calls list Auto Answer You can use auto answer to automatically answer an incoming call on a line Auto answer is configurable on a per line basis To configure auto answer via phone user interface 1 S...

Page 261: ...mber when the called party is busy You can also configure the number of auto redial attempts and the time to wait between redial attempts To configure auto redial via phone user interface 1 Swipe down...

Page 262: ...ue is 10 6 Tap to accept the change or to cancel Auto redial is configurable via web user interface at the path Features General Information To use auto redial When the called party is busy the touch...

Page 263: ...ify the caller who failed to reach a desired party when the party becomes available to receive a call To enable call completion via phone user interface 1 Swipe down from the top of the screen or swip...

Page 264: ...e activated When the called party becomes idle the touch screen prompts the following 1 Tap OK to redial the number Note Recall You can tap a recall key to place a call back to the last incoming call...

Page 265: ...touch screen in the Label field 9 Tap to accept the change or to cancel You can also tap on the idle screen to configure a recall key For more information refer to DSS Keys on page 145 Recall key is c...

Page 266: ...press the MUTE key the phone stays in the mute state until you un mute the microphone or until the phone restarts It helps prevent the other party from hearing the noise coming from your room when au...

Page 267: ...the call is on hold The phone will beep softly every 30 seconds to remind you that you still have a call on hold To resume a held call 1 Press or tap the Resume soft key Multiple Calls on Hold If mult...

Page 268: ...D 2 In the DND block mark the desired radio box in the Mode field 3 Click Confirm to accept the change Note To enable DND in phone mode 1 Swipe down from the top of the screen to enter the control cen...

Page 269: ...cific account 1 Swipe down from the top of the screen to enter the control center and then tap DND The touch screen displays a list of accounts registered on the phone 2 Tap the desired account 3 Tap...

Page 270: ...0 4 Optional Enter the DND on code or off code respectively in the On Code or Off Code field 5 Tap to accept the change If you enable DND for the default account the associated line icon will change t...

Page 271: ...he status bar Note To configure the DND authorized numbers via web user interface 1 Click on Features Forward DND 2 Select Enabled from the pull down list of DND Emergency 3 Enter the numbers in the D...

Page 272: ...the Off radio box of the DND Enable field 4 Tap to accept the change Call Forward You can configure your phone to forward incoming calls to another party static forwarding You can also forward calls w...

Page 273: ...tom Call forward can be configured for each or all accounts To configure the call forward mode via web user interface 1 Click on Features Forward DND 2 In the Forward block mark the desired radio box...

Page 274: ...ion a If you tap Always Forward 1 Tap the On radio box in the Always Forward field 2 Enter the destination number you want to forward all incoming calls to in the Forward To field 3 Optional Enter the...

Page 275: ...before forwarding from the pull down list The default ring time is 12 seconds 5 Optional Enter the no answer forward on code or off code respectively in the On Code or Off Code field 5 Tap to accept t...

Page 276: ...ings Features Call Forward Press when the phone is idle Swipe down from the top of the screen to enter the control center and then tap Forward 2 Tap the desired account 3 Tap the desired forwarding ty...

Page 277: ...l Enter the always forward on code or off code respectively in the On Code or Off Code field You can also enable always forward for all accounts Do the following 1 Tap and then tap All Lines The touch...

Page 278: ...box in the Busy Forward field 2 Enter the destination number you want to forward incoming calls to when the phone is busy in the Forward To field 3 Optional Enter the busy forward on code or off code...

Page 279: ...e No Answer Forward field 2 Enter the destination number you want to forward unanswered incoming calls to in the Forward To field 3 Tap the After Ring Time field 4 Tap the desired ring time to wait be...

Page 280: ...280 You can also enable no answer forward for all accounts Do the following 1 Tap and then tap All Lines The touch screen prompts Copy to all lines 2 Tap OK to accept the change or Cancel to cancel 5...

Page 281: ...nge to and the icon will appear on the status bar If you enable call forward for the non default account only the associated line icon will change to the icon will not appear on the status bar If you...

Page 282: ...mergency 3 Enter the numbers in the Forward Authorized Numbers field For multiple numbers enter a comma between every two numbers 4 Click Confirm to accept the change When call forward is enabled on t...

Page 283: ...s Features Call Forward Press when the phone is idle Swipe down from the top of the screen to enter the control center and then tap Forward The touch screen displays a list of accounts registered on t...

Page 284: ...sulting Blind Transfer Before performing a blind transfer except you use dial number method make sure that the transfer mode via Dsskey is configured as Blind Transfer For more information on how to c...

Page 285: ...e configured in advance refer to Remote Phone Book on page 115 for more information Tap and then tap the desired list Tap the desired entry to complete the transfer The call is then connected to the n...

Page 286: ...ty Semi Attended Transfer Before performing a semi attended transfer except you use dial number method make sure that the transfer mode via Dsskey is configured as New Call or Attended Transfer For mo...

Page 287: ...ransfer when receiving ringback If you are using a handset the transfer can be completed by hanging up the handset Attended Transfer Before performing an attended transfer except you use dial number m...

Page 288: ...s already an active call on the phone Otherwise another incoming call is automatically rejected by the phone with a busy message when there is an active call on the phone You can also enable or disabl...

Page 289: ...ll on hold at any time by tapping the Conference soft key To set up a local conference call 1 Place a call to the first party 2 When the first party answers the call tap the Conference soft key to pla...

Page 290: ...conference 1 Make sure you have an active call and one or more calls are on hold either on the same line key or a different line key 2 Do one of the following Drag one far site window to another far s...

Page 291: ...the conference During the conference call you can do the following Press or tap the Hold soft key to place the conference call on hold Tap the Conference soft key to place a new call Tap the Split sof...

Page 292: ...hone to conduct an conference with multiple participants This feature allows you to perform the following Join calls together in a conference call Invite other party into an active conference call To...

Page 293: ...conference 5 Tap the Conference soft key to place a new call The conference call is placed on hold 6 Enter the number of the new party and then press or tap Conference 7 When the new party answers the...

Page 294: ...in the pop up dialog box 6 Tap the Key Type field 7 Tap Call Park in the pop up dialog box 8 Tap the Account ID field 9 Tap the desired line in the pop up dialog box 10 Optional Enter the string that...

Page 295: ...re the call pickup code beforehand on a global or per line basis via web user interface The call pickup code configured on a per line basis takes precedence over that configured on a global basis Note...

Page 296: ...the directed call pickup code in the Directed Call Pickup Code field 4 Click Confirm to accept the change To pick up a call directly 1 Pick up the handset press the Speakerphone key or tap the line k...

Page 297: ...enable group call pickup and configure the group call pickup code on a global basis via web user interface 1 Click on Features Call Pickup 2 Select Enabled from the pull down list of Group Call Pickup...

Page 298: ...on the touch screen 2 Tap GPickup on your phone when a phone in the group receives an incoming call The call is answered on your phone You can also configure a line key as a group pickup key via phone...

Page 299: ...t right to go to the second idle screen 2 Tap Settings Features Anonymous 3 Tap the desired line 4 Tap the On radio box in the Local Anonymous field 5 Optional Tap the On Code or Off Code radio box in...

Page 300: ...eir identities and numbers from being displayed Anonymous call rejection is configurable on a per line basis You can also configure the phone to send anonymous call rejection on off code to the server...

Page 301: ...code or off code depending on your selection when you enable or disable anonymous call rejection feature on the phone 7 Tap to accept the change or to cancel Anonymous call rejection is configurable v...

Page 302: ...User Guide for SIP T56A Smart Media Phone 302...

Page 303: ...c line for status changes on the phone For example you can configure a BLF key on the phone to monitor the status of a friend s line busy or idle The BLF key icon illuminates solid red when the friend...

Page 304: ...l directly 11 Tap to accept the change or to cancel BLF key is configurable via web user interface at the path DSSKey Line key Configuring Visual and Audio Alert for BLF pickup You can enable audio al...

Page 305: ...key icon flashes red The caller ID appears on the touch screen if enabled In the following figure the touch screen shows an incoming call from 1024 on the monitored line You can do the following acti...

Page 306: ...ll Pickup Code If you configure the directed call pickup code in advance you can pick up the monitored user s incoming call by tapping the BLF key You can configure the directed call pickup code when...

Page 307: ...nfirm to accept the change To configure the directed call pickup code on a per line basis via web user interface 1 Click on Account Advanced 2 Select the desired account from the pull down list of Acc...

Page 308: ...o Blind Transfer and there is already an active call on the IP phone you can do the following 1 Tap the BLF key of the monitored user which you want to transfer this call to Then the active call is co...

Page 309: ...om including a list of user1 user2 on the server The BLF List keys on the IP phone can present the status of user1 and user2 The key icons illuminate flashing or solid depending on the status of those...

Page 310: ...st Retrieve Call Parked Code has been configured in advance If the code is not configured the phone will place a call to the monitored user instead of retrieving the parked call when you tap the BLF L...

Page 311: ...prefix Screenshot and date time stamp for example Screenshot_2016 03 02 14 00 26 was created on March 2 2016 at 14 00 26 You can view the screenshots by FileManager or Gallery application For more in...

Page 312: ...ddress name or the first person s number IP address name you called for example 20160302 1452 Tom was created on March 2 2016 at 14 52 and you have a call with Tom You can view the recorded files by F...

Page 313: ...not available When there are no connected calls on your phone When you place a new call to transfer or to conference When the phone prompts you to answer an incoming call The recording is not be pause...

Page 314: ...d there is a red flag on this moment when playing the recorded file If you tap the Hold soft key or press the key while recording only you are recorded If you press while recording only the callee is...

Page 315: ...Recording You can record conference calls in the same way as other calls with the following exceptions All conference participants are recorded while recording If one of the participants taps the Hol...

Page 316: ...es DSS Keys 3 Tap the desired line key 4 Tap the Type field 5 Tap Key Event in the pop up dialog box 6 Tap the Key Type field 7 Tap Record in the pop up dialog box 8 Optional Enter the string that wil...

Page 317: ...Record field 8 Tap to accept the change or to cancel Record and URL record keys are configurable via web user interface at the path DSSKey Line Key The Record and URL Record keys control the recordin...

Page 318: ...rimary motivation for hot desking is cost reduction This feature is regularly used in places where not all the employees are in the office at the same time or not in the office for very long which mea...

Page 319: ...Label field 9 Tap to accept the change or to cancel Hot desking key is configurable via web user interface at the path DSSKey Line Key To use hot desking 1 Tap the hot desking key when the phone is id...

Page 320: ...key to monitor the target extension for status changes on the phone Note Configuring the Intercom Feature on the Phone Configuring an Intercom Key To configure an intercom key via phone user interface...

Page 321: ...y answers an incoming intercom call You can also enable the phone to automatically answer an incoming intercom call while there is already an active call on the phone The active call is then placed on...

Page 322: ...ercom Tone is enabled by default Intercom Barge You can enable or disable the phone to automatically answer an incoming intercom call while there is already an active call on the phone If Intercom Bar...

Page 323: ...when the target phone is idle 1 Tap the intercom key The target extension plays a warning tone and automatically answers the call in the hands free speakerphone mode by default Picking up an Incoming...

Page 324: ...hat the Yealink IP phones running old firmware version old paging mechanism can be regarded as listening to channel 0 It is the default channel 1 to 25 You can broadcast audio to a specific channel We...

Page 325: ...ired channel in the Channel field The valid channel ranges from 0 to 30 11 Tap to accept the change or to cancel Multicast paging key is configurable via web user interface at the path DSSKey Line Key...

Page 326: ...en the phone is idle If the paging list key is not configured you can also swipe down from the top of the screen or swipe left right to go to the second idle screen Then tap Settings Features Paging L...

Page 327: ...to accept the change or to cancel 7 Repeat steps 2 to 6 you can add more paging groups Paging list is configurable via web user interface at the path Directory Multicast IP To delete paging group via...

Page 328: ...can tap on the top right of the touch screen You can also configure the phone to use a default codec for sending multicast RTP stream via web user interface To configure a default codec for multicast...

Page 329: ...nored automatically If Disabled is selected from the pull down list of Paging Barge the voice call in progress will take precedence over all incoming multicast paging calls Valid values in the Paging...

Page 330: ...3 Select the desired value from the pull down list of Paging Priority Active 4 Enter the multicast IP address es and port number e g 224 5 6 20 10008 which the phone listens to for incoming RTP multic...

Page 331: ...n is established again Tap the EndCall soft key to cancel the multicast RTP session Tap the Record soft key to record a call To stop recording tap the Stop soft key Note To send RTP stream via a pagin...

Page 332: ...the phone will send a SIP INVITE message to the Music on Hold Server account The Music on Hold Server account automatically answers the SIP INVITE messages and immediately plays audio from some source...

Page 333: ...ll to this extension will cause both phones to ring simultaneously The incoming call can be answered on either phone but not both This feature is very useful in the boss and secretary scenario For exa...

Page 334: ...line on the phone If auto linekeys feature is enabled For example party A party B share the account 4603 phone A registers the primary account 4603 and assigns line key 1 and line key 2 for the accou...

Page 335: ...Advanced Phone Features 335 If Auto LineKeys is enabled you can automatically assign multiple DSS keys with Line type for a registered shared line on the phone 3 Click Confirm to accept the change...

Page 336: ...of line key on phone A via web user interface 1 Register the primary account 4603 2 Click on Advanced and then select Share Call Appearance from the pull down list of Shared Line 3 Enter the desired...

Page 337: ...value is 1 In this example the value is set to 2 4 Click Confirm to accept the change The phone A will automatically configure the line keys from the first unused DSS key according to the configured...

Page 338: ...user interface 1 Register the alternate account 4603_1 Enter the primary account 4603 in the Register Name field 2 Click on Advanced and then select Share Call Appearance from the pull down list of S...

Page 339: ...you can retrieve the held call on either phone A or phone B when you place a call on public hold you can retrieve the held call only on phone A when you place a call on private hold on phone A By def...

Page 340: ...ft right to go to the second idle screen 2 Tap Settings Features DSS Keys 3 Tap the desired line key 4 Tap the Type field 5 Tap Key Event in the pop up dialog box 6 Tap the Key Type field 7 Tap Privat...

Page 341: ...Pull Feature Access Code field 4 Click Confirm to accept the change The phone will dial out 11 automatically when you tap the CallPull soft key Using SCA Feature on the IP Phone This section provides...

Page 342: ...phone A do one of the following on phone A Press or tap the Hold soft key The original call is placed on hold Tap the NewCall soft key to enter the dialing screen Enter the desired number using the ke...

Page 343: ...phone A displays the information of the incoming call e g Incoming call pbx yealink com Note Do one of the following on phone A Tap the line key 2 Phone B stops ringing Tap the Answer soft key Phone B...

Page 344: ...n the line key 1 Note Placing a Call on Hold To place a call on public hold 1 Press or tap the Hold soft key on phone A when party A and party C are talking The icon indicators of line key 1 on phone...

Page 345: ...conversation between phone A and phone C is retrieved To retrieve the call on phone B Do one of the following Tap Long tap the desired line key The Cancel CallPull NewCall and Retrieve soft keys appea...

Page 346: ...l set up a conference call with the other parties in the active call 3 Press tap the Hold soft key or the EndCall soft key If any party in the conference call presses or taps the Hold soft key two way...

Page 347: ...In soft key to interrupt the active call of phone A Party B may hear a warning tone and then set up a conference call with the other parties of the active call 4 Press tap the Hold soft key or the En...

Page 348: ...and phone C To retrieve a call from another shared phone If there is an active call between phone A and phone C do the following 1 Long tap the desired line key on phone B The Cancel CallPull NewCall...

Page 349: ...t n New Voice Mail s n indicates the number of unread voice mails e g 176 New Voice Mail s and display an icon If the voice mail pop up message box disappears it won t pop up again unless the user rec...

Page 350: ...Set Voice Mail 4 Enter the voice mail access code e g 88 in the desired account field 5 Tap to accept the change or to cancel Note Listening to Voice Mails To listen to voice mails 1 When the touch sc...

Page 351: ...power indicator LED slowly flashes red This will be cleared when you retrieve all voice mails or delete them The MWI service is unsolicited for some servers so the SIP T56A smart media phone only hand...

Page 352: ...iption Period Seconds field 5 Click Confirm to accept the change The IP phone will subscribe to the account number for MWI service by default To enable subscribe MWI to voice mail via web user interfa...

Page 353: ...voice mail number in the Voice Mail field 6 Click Confirm to accept the change The IP phone will subscribe to the voice mail number for MWI service using Subscribe MWI To Voice Mail Note MWI subscript...

Page 354: ...User Guide for SIP T56A Smart Media Phone 354...

Page 355: ...safety instructions before use The following basic safety precautions should always be followed to reduce the risk of fire electrical shock and other personal injury General Requirements Before you i...

Page 356: ...d on the product or use the equipment near water for example near a bathtub washbowl kitchen sink wet basement or near a swimming pool Do not tread on pull or over bend any cable in case of malfunctio...

Page 357: ...tugal Lisboa Porto Funchal Spain Canary Islands Las Palmas United Kingdom London 1 Albania Tirane Austria Vienna Belgium Brussels Caicos Chad Croatia Zagreb Czech Republic Prague Denmark Kopenhagen Fr...

Page 358: ...Melboume Canberra Russia Vladivostok 10 30 Australia Lord Howe Islands 11 New Caledonia Noumea Russia Srednekolymsk Time 11 30 Norfolk Island 12 New Zealand Wellington Auckland Russia Kamchatka Time...

Page 359: ...Hold Resume 267 Call Park 293 Call Pickup 295 Call Recording 312 Call Recording Using a Record Key 316 Call Transfer 284 Call Waiting 288 Checking Events 237 Clearing the Navigation History 234 Clock...

Page 360: ...Listening to Voice Mails 350 Local Conference 289 Local Directory 97 M Making the Phone Discoverable 133 Managing Applications and Widgets 173 Managing Bookmarks 229 Managing Running Applications 180...

Page 361: ...Signing In Calendar 235 Signing In Email 220 Silent Mode 95 Static Forwarding 273 Stopwatch 248 System Applications 173 System Customizations 127 T Table of Contents vii The Home Screen 35 The Second...

Reviews: