background image

User Guide for the VC120 Video Conferencing 

System


142 

3.


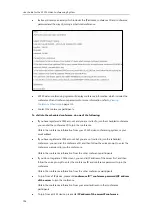
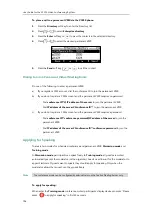
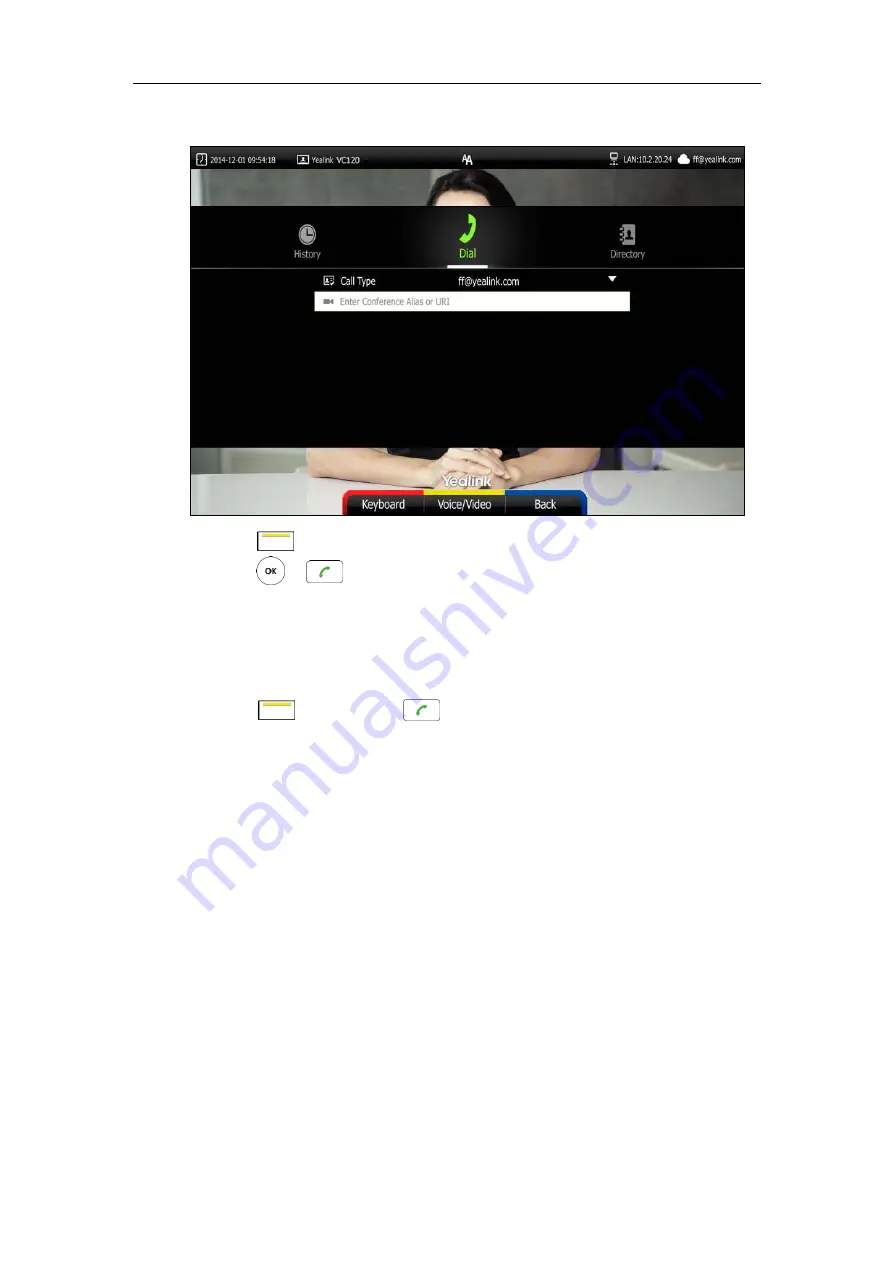
Enter the device alias or URI using the keypad or the on-screen keyboard. 


4.


Press              (

Voice/Video

 soft key) to change call mode. 

5.


Press          or              . 

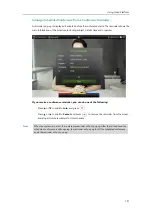
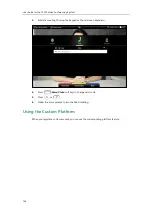
Joining the Pexip Meeting 

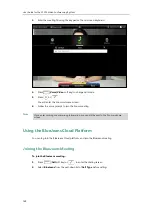
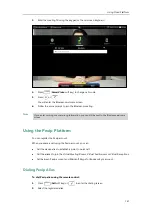
To join the Pexip meeting: 

1.


Press              (

Call

 soft key) or              to enter the dialing screen. 

2.


Select the registered alias. 


Summary of Contents for VC120

Page 1: ......

Page 2: ...BE ACCURATE AND PRESENTED WITHOUT WARRANTY OF ANY KIND EXPRESS OR IMPLIED USERS MUST TAKE FULL RESPONSIBILITY FOR THEIR APPLICATION OF PRODUCTS 2 Disclaimer YEALINK XIAMEN NETWORK TECHNOLOGY CO LTD M...

Page 3: ...e striving to improve our documentation quality and we appreciate your feedback Email your opinions and comments to DocsFeedback yealink com Technical Support Visit Yealink WIKI http support yealink c...

Page 4: ...Yealink uses software under the specific terms of the GPL Please refer to the GPL for the exact terms and conditions of the license The original GPL license source code of components licensed under GP...

Page 5: ...eed to start using your new video conferencing system quickly First verify with your system administrator that the IP network is ready for system configuration Also be sure to read the Overview and Ge...

Page 6: ...m On the website English Chinese Yealink VC400 VC120 Video Conference Room Deployment Solution Conference room layout environmental requirements and installation recommendations for the system On the...

Page 7: ...ormation refer to Yealink VC400 VC120 Video Conferencing System Administrator Guide You also need to know the following writing conventions to distinguish conditional information Convention Descriptio...

Page 8: ...22 Guide Version 22 15 The following section is new for this version Account Polling on page 83 Using the StarLeaf Cloud Platform on page 137 Major update has occurred to the following section Changin...

Page 9: ...sing the Remote Control on page 89 Changes for Release 21 Guide Version 21 15 The following sections are new for this version VCP41 Video Conferencing Phone on page 12 Website Snapshot on page 50 Hidi...

Page 10: ...on page 53 Meeting Whitelist on page 55 Using the VCM30 Video Conferencing Microphone Array on page 147 Major updates have occurred to the following sections VCC18 VCC20 HD Camera on page 7 VCR10 Remo...

Page 11: ...1 VC120 Package 1 VCP40 Package 3 VCP41 Package 4 VCM30 Package 5 System Component Instructions 5 VC120 Codec 5 VCC18 VCC20 HD Camera 7 Video Conferencing Phone 10 CPE80 Expansion Microphone 12 VCM30...

Page 12: ...ontacts 61 Deleting Local Contacts 62 Searching for Contacts 63 Search Source List in Dialing 64 Importing Exporting Local Contact Lists 66 Call History Management 68 Viewing Call History 69 Placing a...

Page 13: ...Zoom Cloud Platform 139 Joining the Zoom Meeting 139 Using the BlueJeans Cloud Platform 140 Joining the BlueJeans Meeting 140 Using the Pexip Platform 141 Dialing Pexip Alias 141 Joining the Pexip Mee...

Page 14: ...r Guide for the VC120 Video Conferencing System xiv Service Agreements 165 Limitations of Liability 165 Safety Instructions 165 Restriction of Hazardous Substances 167 Appendix A Time Zones 169 Index...

Page 15: ...our new system contact your system administrator Packaging Contents The VC120 video conferencing system can work with the VCP40 video conferencing phone VCP41 video conferencing phone or VCM30 video c...

Page 16: ...r Guide for the VC120 Video Conferencing System 2 L Bracket for installing the camera Velcro 2 one Velcro is on the bracket Camera Mounting Accessories VCR10 Remote Control AAA Batteries 2 Power Adapt...

Page 17: ...port on the VC120 Codec and connect it to the Audio Out port of the VCP40 video conferencing phone with the 7 5m Ethernet cable VCP40 video conferencing phone can work as an audio device for the VC12...

Page 18: ...PC Mobile device to the VCP41 Locate the Audio In port on the VC120 Codec and connect it to the Audio Out port of the VCP41 video conferencing phone with the 7 5m Ethernet cable VCP41 Video conferenci...

Page 19: ...talling and using the VC120 video conferencing system you need to be familiar with the following system components VC120 Codec VCC18 VCC20 HD Camera Video Conferencing Phone CPE80 Expansion Microphone...

Page 20: ...e the VC120 Codec once it has been installed properly in your environment VC120 Codec front panel VC120 Codec back panel Port Name Description Power Button Powers the system on or off LED Indicator In...

Page 21: ...images Line In Connects to an audio input device using an audio cable 3 5mm Line Out Connects to an audio output device using an audio cable 3 5mm Audio In Connects to the video conferencing phone or...

Page 22: ...the HD camera Port Name Description LED Indicator Indicates different system statuses For more information refer to LED Instructions on page 20 The back of the HD camera Port Name Description Camera...

Page 23: ...ge tilted 30 degrees range Infrared Sensor The infrared sensor is located within the Yealink logo Aim the remote control at the camera IR sensor to operate the unit Note Avoid physically turn camera w...

Page 24: ...Conferencing Phone The VCP40 video conferencing phone supports 360 degree audio pickup to achieve ultra HD voice Connect the VCP40 phone to the VC120 Codec It can work as an audio device for the syst...

Page 25: ...Keypad Generates the digits and special characters Off hook Key Initiates a call or answers a call Presentation Key Enables or disables presentation Mute Key Toggles the mute feature Volume Key Adjust...

Page 26: ...the PC or mobile audio using your VCP41 video conferencing phone Item Description PC Mobile Port Allows you to connect an optional PC or Mobile Device to your phone so that you can listen to the PC o...

Page 27: ...ne CPE80 is a directional microphone Its coverage range is a 120 degree Always ensure that the speaker faces the expansion microphone Item Description Mute Indicator LED Toggles and indicates mute fea...

Page 28: ...ute the VCM30 by tapping the mute button during a call Name Description Built in Microphones Support 360 degree audio pickup at a radius of up to 3 meters Mute Button Mutes or unmutes the VCM30 For mo...

Page 29: ...stem to sleep or wakes the system up Red Shortcut Key Located at the bottom left of the screen Label automatically identifies context sensitive features In the idle screen this is used to enter main m...

Page 30: ...nfirms actions or answers incoming calls Navigation Key In the menu screen press or to switch menus press or to select items In the idle screen pan and tilt the camera to adjust the viewing angle Mute...

Page 31: ...the image from the camera Icon Instructions Icons on Display Device Icons appearing on the display device are described in the following table Icon Description flashing Network is disconnected Networ...

Page 32: ...drive is inserted to the USB port on the VC120 Codec VPN is enabled PC Mobile mode when a PC or mobile device is connected to the VCP41 Call mute Call encryption Call Hold Output volume is 0 during a...

Page 33: ...he following table Icon Description Flashing Network is unavailable SIP account is registered the icon flashes when it is not registered successfully H 323 account is registered the icon flashes when...

Page 34: ...tions Indicator LED on the VC120 Codec LED Status Description Solid green The VC120 Codec is powered on The VC120 Codec is upgrading firmware Solid red The VC120 Codec is in sleep mode Solid orange Sy...

Page 35: ...d to the VC120 Codec The VCM30 is idle User Interfaces There are two ways to customize the configurations of your VC120 video conferencing system Web User Interface Remote Control Note Web User Interf...

Page 36: ...of the web interface to log out Remote Control You can use the remote control and display device to configure and use the VC120 video conferencing system The Advanced option is only accessible to the...

Page 37: ...section introduces the following Installing the VC120 video conferencing system Installing the camera Installing batteries for the remote control Note Up to two display devices can be connected to the...

Page 38: ...connect it to the Camera port on a camera with the supplied DVI cable Optional If you purchase VC Dual camera Box VCB20 separately you can connect two VCC20 cameras to the VC120 Codec 3 Optional Locat...

Page 39: ...connect it to the HDMI port on the PC with the supplied HDMI VGA direct cable for sharing content 6 Connect the DC19V port on the VC120 Codec to an AC power outlet with the supplied power adapter and...

Page 40: ...positioned against each other b Mounting the camera on a wall You can also decide to mount the camera on a wall The recommended height for camera positioning is 1 5m 1 8m above the ground Do the foll...

Page 41: ...acket and then connect the other end of the DVI cable to the VC120 Codec Installing Batteries for the Remote Control Do the following 1 Open the battery cover on the back of the remote control 2 Inser...

Page 42: ...nts are connected press on the VC120 Codec The indicator LED on the VC120 Codec then illuminates solid green To power off the system Do one of the following Long press on the VC120 Codec Short press t...

Page 43: ...ted 29 The default language is English 2 Press Next soft key to continue 3 Set the date and time 4 Press Next soft key to continue or press Previous soft key to return to the previous screen 5 Edit th...

Page 44: ...to return to the previous screen 7 Change the administrator password The default administrator password is 0000 Note Do remember the new administrator password or keep a copy of the password in a saf...

Page 45: ...xt soft key to continue or press Previous soft key to return to the previous screen 10 Configure network settings The phone will try to contact a DHCP server in your network to obtain network paramete...

Page 46: ...trol refer to Navigating Menus on the Display Device on page 36 and Entering Data and Editing Fields on page 37 For more information on how to configure language time and date refer to Customizing the...

Page 47: ...captured from the camera 1 by default The display device will display the image captured from the camera 2 once you unplug the camera 1 When you are using camera 1 unplug the camera 2 will not affect...

Page 48: ...the left of the status bar Site name The site name of the system For more information on how to change the site name refer to Site Name on page 44 Status icon Status icons are displayed in the center...

Page 49: ...23 gatekeeper the account icon is For more information refer to Yealink VC400 VC120 Video Conferencing System Administrator Guide When the VC120 system logs into Yealink VC Cloud Management Service Ye...

Page 50: ...screen Press Go back to the previous menu Press Back soft key or Navigate through menus Press or to select a menu Press or to select an item Expand pull down list Press or to expand a pull down list...

Page 51: ...ick 5 To adjust the display order of the enabled input methods select the desired list and click or 6 Click Confirm to accept the change To change keyboard input method via the remote control 1 In the...

Page 52: ...exit from the on screen keyboard Entering special characters 1 Press Keyboard soft key to open the on screen keyboard If the system is in the dialing screen press Keyboard soft key to open the on scre...

Page 53: ...mera status device model SPEC and hardware version Audio the active audio input and output devices VCS Phone status device model hardware version and serial number Wired Micpod status model hardware s...

Page 54: ...erencing System 40 The system status is displayed on the web user interface To view the system status via phone user interface 1 Press 2 Press or to select the desired list 3 Press or the Enter soft k...

Page 55: ...the call history This chapter provides basic operating instructions for customizing your system Topics include General Settings Directory Call History Management Call Protocol Bandwidth Settings Audio...

Page 56: ...ccept incoming calls The display device will prompt No Signal and the video conferencing phone LCD screen prompts Sleeping Press any key to resume You can press any key on the remote control or video...

Page 57: ...Backlight The backlight of the video conferencing phone is always on by default You can configure backlight time for the video conferencing phone s LCD screen via web user interface You can configure...

Page 58: ...ideo conferencing phone You can make an IP address call to the other party the system site name will be displayed on the remote display device Site names can consist of letters numbers or special char...

Page 59: ...ect and use the same language as which of the display device The default language of the web user interface is English You can change the web user interface language for web user interface The availab...

Page 60: ...ideo conferencing phone will change to the selected language To change the language for the web user interface 1 Click on Language at the top right corner of the web page 2 Select the desired language...

Page 61: ...nth The available date formats you need to know are Date Format Example 2017 5 23 WWW MMM DD Tue May 23 DD MMM YY 23 May 17 YYYY MM DD 2017 05 23 DD MM YYYY 23 05 2017 MM DD YY 05 23 17 DD MM YYYY 23...

Page 62: ...r to select the Basic menu 3 Press or to scroll to Date Time and then press 4 Select the Manual Settings from the pull down list of Time Type 5 Select the desired year from the pull down list of Year...

Page 63: ...tone feature to play a key tone when you press any key on the remote control Key tone is configurable via the remote control or web user interface Key tone feature is enabled by default Note To confi...

Page 64: ...erface at the path Setting General Key Tone Website Snapshot You can enable the website snapshot feature to allow the user to watch video images captured by local camera on the web user interface Webs...

Page 65: ...ser interface at the path Home Volume Settings You can use the remote control or video conferencing phone to adjust the ringer volume of the system when it is idle or ringing You can also adjust the r...

Page 66: ...creen of the video conferencing phone displays the current ringer volume The display device will display the ringer volume simultaneously Note To adjust the volume when the system during a call Press...

Page 67: ...lume The display device will display the receiver volume simultaneously Note Meeting Password If an 8 way conference license is imported to your VC120 video conference system you can use meeting passw...

Page 68: ...ter the meeting password in the Password field 6 Press Save soft key to accept the change Meeting password is configurable via web user interface at the path Settings General Meeting Password People c...

Page 69: ...ds Meeting whitelist is configurable via web user interface only For more information on how to import an 8 way conference license refer to 8 way MCU on page 85 To add the meeting whitelist numbers vi...

Page 70: ...l history from blacklist VC120 supports up to 100 blacklist records Blacklist is configurable via web user interface only To add the blacklist numbers via web user interface 1 Click on Directory Meeti...

Page 71: ...SecondScreen Icon If you select Disabled the system displays corresponding icons during a call If you select Hide with UI the system displays corresponding icons during a call but the icons will disap...

Page 72: ...rol Yealink Cloud contacts If you log into the Yealink VC Cloud Management Service platform Yealink Cloud contacts which are created by your administrator appear in your directory Note that only the a...

Page 73: ...o the system via the remote control or web user interface To add a local contact via the remote control 1 Press Call soft key 2 Press or to select the Directory menu 3 Press New Contact soft key 4 Ent...

Page 74: ...ealink VC Cloud Management Service Platform you can also place calls to Cloud contacts To place a call to a contact via the remote control 1 Press Call soft key 2 Press or to select the Directory menu...

Page 75: ...ontact press the Send soft key or to call the contact If multiple numbers are stored for the contact press the Enter soft key or to view the contact numbers Press or to highlight the desired number Pr...

Page 76: ...ser interface at the path Directory Local Directory Deleting Local Contacts You can only delete local contacts via the remote control or web user interface To delete a local contact via the remote con...

Page 77: ...eb user interface If you log into the Yealink VC Cloud Management Service Platform or Yealink Meeting Server you can also search for Yealink Cloud contacts or YMS contacts via the remote control or vi...

Page 78: ...een when you enter a few characters the system will search for the matched contacts from the enabled search source lists and display the result in the dialing screen If you want to match the LADP list...

Page 79: ...place a call via search source lists 1 Press Call soft key 2 Enter a few or all characters of the contact name or numbers The contacts whose names or phone numbers matches the characters entered will...

Page 80: ...rface 1 Click on Directory Local Directory 2 Select Import from the pull down list of Import Export 3 Click Browse to locate a local contact list file file format must be xml from your local system 4...

Page 81: ...t line of the CSV file 6 Optional Check the Delete Old Contacts checkbox It will delete all existing local contacts while importing the local contact list 7 Select the desired value from the pull down...

Page 82: ...act list is saved to your local system Call History Management The VC120 video conferencing system maintains call history lists of All Calls Missed Calls Placed Calls and Received Calls The system sup...

Page 83: ...tory record feature is configurable via web user interface at the path Setting Call Features History Record Viewing Call History You can view call history via the remote control video conferencing pho...

Page 84: ...ed Calls list 3 Press or to view the desired call history Call history can be viewed via the web user interface at the path Directory History Placing a Call from the Call History List You can place a...

Page 85: ...l records 2 Press or soft key to switch between All Calls Missed Calls Placed Calls and Received Calls list 3 Press or to select the desired call history 4 Press the Send soft key or Deleting an Entry...

Page 86: ...entry To clear call history via the remote control 1 Press Call soft key 2 Press or to select the History menu The display device shows recent history records 3 Press Clear soft key to clear all histo...

Page 87: ...t OK 6 Press to clear the history records Adding a Local Contact from the Call History List To add a local contact from the call history list via the remote control 1 Press Call soft key 2 Press or to...

Page 88: ...ate to other video conferencing systems SIP is commonly used to communicate with other VoIP devices You can configure which protocol is to be used when the system is making calls When the Auto call pr...

Page 89: ...reduce a lot You can specify the uplink and downlink bandwidths for the system to achieve the best result The uplink bandwidth refers to the max bandwidth of outgoing calls The downlink bandwidth ref...

Page 90: ...he appropriate bandwidth automatically 6 Press Save soft key to accept the change Note Bandwidth is configurable via web user interface at the path Setting Call Features Uplink Bandwidth Downlink Band...

Page 91: ...ec By default the system automatically selects the audio output devices with the highest priority The priority is VCS Phone HDMI Line Output If the audio output device with the highest priority is rem...

Page 92: ...Audio Audio Output Audio Input Device The system supports the following audio input devices Auto select the audio input device with the highest priority VCS Phone video conferencing phone Wired Micpo...

Page 93: ...Setting and then press 4 Select desired audio input device from the pull down list of Audio Input If VCS Phone is selected as the audio output device manually or automatically the audio input device m...

Page 94: ...control features you need to know Parameters Description Far Control of Camera Allows the far end to control the local camera Far Set of Camera Presets Allows the far end to create presets for the lo...

Page 95: ...Camera Far Set of Camera Presets Far Move to Camera Presets Controlling Far end Camera To control far end camera via the remote control during a video call 1 Press More soft key during an active call...

Page 96: ...User Guide for the VC120 Video Conferencing System 82...

Page 97: ...ator Account Polling When you dial account numbers of other system account polling feature enables your system to use different call types according to this priority Cloud platform H 323 account SIP a...

Page 98: ...ttempt to call other system using different call types according the priority 3 Click Confirm to accept the change The following example shows the way calls are placed when account polling is enabled...

Page 99: ...stem supports one video calls and an additional voice call an original caller and two other sites You can import an 8 way MCU to extend the VC120 to support 8 way video calls and an additional voice c...

Page 100: ...dat from your local system 3 Click Upload to complete importing the MCU license To view 8 way MCU status via the remote control 1 Press Menu soft key to enter main menu 2 Press or to select the Statu...

Page 101: ...an additional voice call an original caller and eight other sites in X Y period When the trial license expires your system supports one video call and one voice call If the 8 way MCU displays Eternal...

Page 102: ...call Remote system has reached maximum sessions when you place a SIP call Call Failed Remote endpoint refused call Remote system rejects your H 323 call Remote system does not answer your H 323 call...

Page 103: ...trol To place a call using the remote control 1 Press Call soft key or any numeric key to enter the dialing screen 2 Select the desired account type from the pull down list of Call Type before calling...

Page 104: ...r interface 1 Click Home 2 Enter the desired number in the Enter Number field 3 Optional Select the desired account type If you select Auto the system will select the desired account type according to...

Page 105: ...press Dial soft key to place a new call 3 Enter the number of the secondary party and then press or the Send soft key When the secondary party answers the call you have created a three way conference...

Page 106: ...erence Chairman Mode Conference When the number of participants is greater than or equal to 5 in a multi point video conference the conference will be a chairman mode conference The conference organiz...

Page 107: ...3 The conference organizer authorizes a single member to speak via the remote control 1 Press Preside soft key during a chairman mode conference 2 Press or to select Single Speaker and then press The...

Page 108: ...ct the desired member 4 Do one of the following Press Select soft key to authorize the member to speak All the other members are muted and the mute icon appears on their video images The authorized vi...

Page 109: ...d The authorized video image is shown in full size Press Cancel soft key to cancel Multi Speaker Conference organizer authorizes multiple members to speak and all the other members are muted The confe...

Page 110: ...rs 3 Press the navigation key to select the desired member and then press 4 Repeat step 3 to select more members The icon appears on the selected video images 5 Do one of the following Press or to scr...

Page 111: ...e authorized the authorized video images are shown in same sizes All the other members are muted and the mute icon appears on their video images Press Speaker Only soft key to authorize the selected m...

Page 112: ...video images are shown in the same size Requesting to speak Only authorized conference members can speak and other conference members are muted Muted member can request to speak The muted members req...

Page 113: ...the icon will not disappear Do nothing to ignore the request the applicant will stay muted and the icon will not disappear Subsequently the conference organizer can authorize this conference member t...

Page 114: ...nferencing System 100 To display presentation in full creen via the remote control 1 Press Preside soft key during a chairman mode conference 2 Press or to select Share FullScreen and then press The p...

Page 115: ...r or reject the call in the following ways Using the remote control Using the video conferencing phone If the system accepts multiple calls a conference call will be established To answer a call Do on...

Page 116: ...feature is enabled Auto Answer Multiway Enables or disables the system to answer a new incoming call automatically during an active call The auto answer multiway feature is available only when the au...

Page 117: ...ble via web user interface at the path Setting Call Features Auto Answer Auto Answer Mute Auto Answer Multiway Do Not Disturb DND You can use DND to reject incoming calls automatically on the system C...

Page 118: ...ically When video conferencing phone is idle you can also press the DND soft key to enable or disable this feature DND is configurable via web user interface at the path Setting Call Features DND DND...

Page 119: ...emote control Press or the End Call soft key on the video conferencing phone Click Hang Up All button on the web user interface The interface prompts Hang up Click Confirm to end the call During a mul...

Page 120: ...remove and then press 4 Press Remove soft key To remove any party from a multi way call via web user interface go to the path Home Hover your cursor over of the number of remote system and then click...

Page 121: ...video conferencing phone is shown as below Log into the web user interface check the Mute checkbox If video conferencing system is muted the icon will appear on the local video Call Statistics If voi...

Page 122: ...presentation on the connected PC If two VCC20 cameras are connected to the VC120 Codec you can switch the images between these two cameras freely If two display devices are connected to the VC120 Code...

Page 123: ...source Video input is configurable via web user interface at the path Home Input Presentation The system supports sharing video and documents on a PC while simultaneously displaying the main video We...

Page 124: ...u can store up to 10 preset camera positions using the remote control If you want to store more than 10 preset camera positions you can enable the multiple preset feature For more information refer to...

Page 125: ...ss More soft key during an active call 2 Press or to scroll to Camera Preset and then press 3 Press the numeric key that is already associated with a preset The local camera will adjust to the preset...

Page 126: ...oll to Camera Preset and then press 6 Press the numeric key that is already associated with a preset The far end camera will adjust to the preset 7 Press Exit soft key Clearing the Local Camera Preset...

Page 127: ...n receiving or making a call it is not allowed to record When there is an incoming call during recording the system will quit recording When recording during a video call the record will be finished a...

Page 128: ...n Press or to scroll to USB Recording and then press to start recording Open the More screen scroll to USB Recording again and then press to stop recording To record video during a call via the video...

Page 129: ...appears on the LCD TV screen Press Play soft key to continue playing video To skip forward the video press Press once to skip forward 8 seconds To rewind the video press Press once to rewind 8 seconds...

Page 130: ...y when the recording feature is enabled If it is enabled the system will start recording automatically once a call is established Make sure a USB flash drive has been inserted to the USB port on the V...

Page 131: ...ots via the remote control When you capture a screenshot via web user interface you can save the screenshots to the computer The stored screenshot will be saved in jpg format and named as the captured...

Page 132: ...oll to Screenshot and then press to capture screenshots The icon at the status bar of the display device shows 1 animated effects To view screenshots via the remote control 1 Press Menu soft key to en...

Page 133: ...whether a presentation is being viewed Screen layouts appear as one of the following types One big other small The selected video image is shown in a big size the other video images along the right s...

Page 134: ...n Layouts Two way Video Calls The far end video image is shown in full size by default Two way Video Call with Presentation Presentation is shown in a big size The other video images along the right s...

Page 135: ...0 Codec Display1 port is the only available port To make it easier for users to view video images users can connect two display devices to Display1 and Display2 ports respectively When two display dev...

Page 136: ...ay Video Calls In the primary display device all video images are shown in the same size In the secondary display device the local video image is shown in full size Primary display device Secondary di...

Page 137: ...ress 3 Press or to select the desired content and then press The secondary display device displays the selected content The icon is displayed on the focus content After reassigning the display content...

Page 138: ...User Guide for the VC120 Video Conferencing System 124...

Page 139: ...log into the third party platform you can also select the desired third party platform to call corresponding VMRs quickly For more information refer to Yealink VC400 VC120 Video Conferencing System A...

Page 140: ...ant to place a call to a Yealink Cloud contact who is in the same Yealink Cloud directory as you you can enter the 9 digit Cloud number or the extension the last four Cloud number to place a call If y...

Page 141: ...account you can use YMS video conference feature There are two types of YMS video conference Scheduled conference You should schedule the conference using the Yealink Meeting Server or Microsoft Outlo...

Page 142: ...wing Conference Schedules When you schedule a conference or receive an invitation to a conference the conference details will appear on the idle screen and the menu If the conference organizer edits t...

Page 143: ...it will appear every 10 minutes until the conference starts The conference schedule shows the conference details as below Note To view conference schedules in the menu 1 Press Menu soft key to enter m...

Page 144: ...led conference in following ways Joining a scheduled conference from a conference reminder Joining a scheduled from a conference invitation Joining a scheduled conference from the conference schedule...

Page 145: ...receive a conference reminder you can do one of the following Press or to scroll to Join and press Press or to scroll to Cancel and press to remove the reminder from the screen and stop all future re...

Page 146: ...erence invitation you can do one of the following Press or to scroll to Answer and press to join the scheduled conference Press or to scroll to Reject and press to remove the invitation Note Joining a...

Page 147: ...default 4 Do one of the following to join the conference Press Join soft key Press Detail soft key to view the detail and then press Join soft key Dialing into a Scheduled Conference If you schedule a...

Page 148: ...0 video conferencing system or your email address If you have registered a YMS account but you are not invited to join the scheduled conference you can dial the conference ID and then follow the voice...

Page 149: ...ways Dialing from the Yealink Enterprise Directory Dialing to enter a permanent VMR Join a Permanent VMR from the Yealink Enterprise Directory The administrator can determine whether synchronize the p...

Page 150: ...he permanent VMR c If you do not register a YMS account and the permanent VMR requires a password Dial conference ID conference password IP address of the server to join the permanent VMR Dial IP addr...

Page 151: ...l 1 Press Other participants remain connected Using the StarLeaf Cloud Platform You can log into the StarLeaf Cloud platform When you place a call using the StarLeaf Cloud account you can Call the oth...

Page 152: ...or the on screen keyboard 4 Press Voice Video soft key to change call mode 5 Press or Joining the StarLeaf Meeting To join the StarLeaf meeting via the remote control 1 Press Call soft key or to ente...

Page 153: ...change call mode 5 Press or to join the StarLeaf meeting Using the Zoom Cloud Platform You can log into the Zoom Cloud platform and join the Zoom meeting Joining the Zoom Meeting To join the Zoom meet...

Page 154: ...oice prompt to join the Zoom meeting Note Using the BlueJeans Cloud Platform You can log into the BlueJeans Cloud platform and join the BlueJeans meeting Joining the BlueJeans Meeting To join the Blue...

Page 155: ...you place a call using the Pexip account you can Call the device alias to establish a point to point call Call the aliases to join the Virtual Meeting Rooms Virtual Auditoriums or Virtual Receptions C...

Page 156: ...the device alias or URI using the keypad or the on screen keyboard 4 Press Voice Video soft key to change call mode 5 Press or Joining the Pexip Meeting To join the Pexip meeting 1 Press Call soft ke...

Page 157: ...change call mode 5 Press or 6 Follow the voice prompt to join the Pexip meeting Using the Mind Platform You can log into the Mind platform and join the Mind meeting Joining the Mind Meeting To join t...

Page 158: ...ting ID using the keypad or the on screen keyboard 4 Press Voice Video soft key to change call mode 5 Press or 6 Follow the voice prompt to join the Mind meeting Using the Custom Platform When you reg...

Page 159: ...call To connect a PC or mobile device to your VCP41 1 Connect one end of the 3 5mm audio cable to the PC mobile port on the VCP41 phone and connect the other end to the headset jack on the mobile devi...

Page 160: ...uring a call you can adjust the output volume of the PC mobile device via your VCP41 To adjust the volume of the PC or mobile device 1 When your PC or mobile device is during a call press on the VCP41...

Page 161: ...hone contact your system administrator Placing the VCM30 The VCM30 has a rubber pads on its base to prevent it from sliding You can place the VCM30 on a stable surface and keep it away from obstacles...

Page 162: ...tes solid green And the mute icon disappears from the local video image Viewing VCM30 Information When the VCM30 is connected to the Audio In port of VC120 Codec you can view VCM30 status via the remo...

Page 163: ...Using the VCM30 Video Conferencing Microphone Array 149 VCM30 information can be viewed via web user interface at the path Status Wired Micpod...

Page 164: ...User Guide for the VC120 Video Conferencing System 150...

Page 165: ...r the network between the local and the remote system is connected Trace Route Display the route path and measure transit delays of packets across an Internet Protocol IP network Audio Diagnose 1 Pres...

Page 166: ...te and then press 4 Press or to select Start and then press 5 You can also enter any IP address for example the IP address of the remote system in the Trace Route field If the test is successful the V...

Page 167: ...o obtain the IP address of the system Three are three ways to obtain the IP address of the system The IP address of the system is shown on the top right corner of the display device Press Menu soft ke...

Page 168: ...ts Colored lighting Why can t I adjust the camera angle and focus You can adjust the camera when the system is idle or during a call The camera cannot be adjusted when the system is in the menu screen...

Page 169: ...phone is connected to the VC120 Codec and LED indicators on the phone illuminate solid green Ensure the proper volume level on the system Ensure that the microphone on the remote system is not muted W...

Page 170: ...phone if necessary Why is the voice quality poor Users may receive poor voice quality during a call such as intermittent voice low volume echo or other noise It is difficulty to diagnosis the root ca...

Page 171: ...7 Select OK and then press You can reboot the system via web user interface at the path Setting Upgrade Reboot How to export PCAP trace We may need you to provide a PCAP trace to help analyze your pro...

Page 172: ...the USB port on the VC120 Codec to store packets Make sure the USB feature is enabled 1 Long press when the system is idle or during a call The display device prompts Onekey capture is running press...

Page 173: ...he trace 6 Click Export to save the file to your local system How to export import the system configurations We may need you to provide your system configurations to help analyze problems In some inst...

Page 174: ...shown as below 4 Click Confirm to export the configurations To import the system configurations via web user interface 1 Click on Setting Configuration 2 Click Browse to locate a configuration file fr...

Page 175: ...irm to confirm upgrading How to upgrade VCC20 Camera firmware Camera firmware is included in the system firmware The VCC20 camera will upgrade automatically in one the following situations The VCC20 c...

Page 176: ...the remote control or web user interface To reset the system via the remote control 1 Press Menu soft key to enter main menu 2 Press or to scroll to the Advanced menu 3 Enter admin password default p...

Page 177: ...een of the video conferencing phone prompts Rebooting Please wait The phone will be reset to factory sucessfully after startup Note Resetting the system is configurable via web user interface at the p...

Page 178: ...User Guide for the VC120 Video Conferencing System 164...

Page 179: ...R OF LIABILITY FOR DAMAGES WILL NOT BE AFFECTED IF ANY REMEDY PROVIDED HEREIN SHALL FAIL OF ITS ESSENTIAL PURPOSE Safety Instructions Save these instructions Read these safety instructions before use...

Page 180: ...ories provided or authorized by the manufacturer The power supply of the device shall meet the requirements of the input voltage of the device Please only use the surge protection power socket provide...

Page 181: ...um Cd Hexavalent Chromium Cr 6 Polybrominated Biphenyls PBB Polybrominated Diphenyl Ethers PDBE Plastic and Polymeric Parts O O O O O O Metal Parts X O O O O O PCBA X O O O O O Cables and Cable Assemb...

Page 182: ...User Guide for the VC120 Video Conferencing System 168...

Page 183: ...ada Manitoba Winnipeg 06 00 Chile Easter Islands 06 00 Mexico Mexico City Acapulco 06 00 United States Central Time 05 00 Bahamas Nassau 05 00 Canada Montreal Ottawa Quebec 05 00 Cuba Havana 05 00 Uni...

Page 184: ...Kopenhagen 01 00 France Paris 01 00 Germany Berlin 01 00 Hungary Budapest 01 00 Italy Rome 01 00 Luxembourg Luxembourg 01 00 Macedonia Skopje 01 00 Netherlands Amsterdam 01 00 Namibia Windhoek 01 00...

Page 185: ...k 07 00 Thailand Bangkok 08 00 China Beijing 08 00 Singapore Singapore 08 00 Australia Perth 08 00 Russia Irkutsk Ulan Ude 08 45 Eucla 09 00 Korea Seoul 09 00 Japan Tokyo 09 00 Russia Yakutsk Chita 09...

Page 186: ...User Guide for the VC120 Video Conferencing System 172...

Page 187: ...s Guide v Configuring Camera Presets 110 Controlling Far end Camera 81 Controlling the Camera 32 Customizing VC120 Video conferencing system 41 D Deleting an Entry from the Call History List 71 Deleti...

Page 188: ...Call Using the Remote Control 89 Placing a Call Using the Video Conferencing Phone 90 Placing a Call via Web User Interface 90 Placing Calls 88 Placing Multiple Calls 91 Placing the VCM30 147 Powerin...

Page 189: ...rver 126 Using the Zoom Cloud Platform 139 V VC120 Codec 5 VCC18 VCC20 HD Camera 7 VCM30 Video Conferencing Microphone Array 147 VCR10 Remote Control 15 Video Conferencing Phone 10 Video Audio Issues...

Reviews: