Session Timer
Selected
Refrigerant
Selected
Units
tŚŝůĞŽŶĂŶLJŵŽĚĞƐƐĐƌĞĞŶ͕ƚĂƉŽŶĂŶLJŽĨƚŚĞĨŽƵƌďƵƩŽŶƐŶĞdžƚƚŽƚŚĞ
screen oncĞƚŽďƌŝŶŐƵƉƚŚĞďƵƩŽŶǁĞďďŝŶŐ͖ƚŚĞďƵƩŽŶǁĞďďŝŶŐǁŝůů
ĚŝƐĂƉƉĞĂƌĂŌĞƌĨŽƵƌƐĞĐŽŶĚƐǁŝƚŚŶŽďƵƩŽŶƉƌĞƐƐ͘tŚŝůĞŝŶƚŚĞƉƌĞƐƐƵƌĞͬ
ƚĞŵƉĞƌĂƚƵƌĞŵŽĚĞ͕ƵƐĞƚŚĞďŽƩŽŵƚǁŽďƵƩŽŶƐƚŽĂůƚĞƌŶĂƚĞďĞƚǁĞĞŶ
ƐLJƐƚĞŵƚĞŵƉĞƌĂƚƵƌĞ͕ƐĂƚƵƌĂƟŽŶƚĞŵƉĞƌĂƚƵƌĞ͕ƐLJƐƚĞŵƐƵƉĞƌŚĞĂƚĂŶĚ
ƐƵďĐŽŽůŝŶŐ͘YƵŝĐŬůLJƉƌĞƐƐƚŚĞƉŽǁĞƌďƵƩŽŶƚŽƚŽŐŐůĞƚŚĞďĂĐŬůŝŐŚƚŽŶĂŶĚŽī͘
WŽǁĞƌƚŚĞƵŶŝƚŽŶďLJƉƌĞƐƐŝŶŐƚŚĞƉŽǁĞƌďƵƩŽŶŽŶĐĞ͘dŚĞƵŶŝƚĂƵƚŽŵĂƟĐĂůůLJ
ĚĞĨĂƵůƚƐƚŽWƌĞƐƐƵƌĞͬdĞŵƉĞƌĂƚƵƌĞŵŽĚĞ͘dŚŝƐŵŽĚĞĚŝƐƉůĂLJƐƐLJƐƚĞŵƉƌĞƐƐƵƌĞ
ĂŶĚƚĞŵƉĞƌĂƚƵƌĞĂƐŵĞĂƐƵƌĞĚďLJƚǁŽĂƵdžŝůŝĂƌLJz:ƚĞŵƉƉƌŽďĞƐ͘
ŽŶŶĞĐƚƚŚĞůŽǁƐŝĚĞƚĞŵƉĞƌĂƚƵƌĞƉƌŽďĞƚŽdϭŽŶƚŚĞďĂĐŬŽĨƚŚĞĚĞǀŝĐĞ͘
ŽŶŶĞĐƚƚŚĞŚŝŐŚƐŝĚĞƚĞŵƉĞƌĂƚƵƌĞƉƌŽďĞƚŽdϮŽŶƚŚĞďĂĐŬŽĨƚŚĞĚĞǀŝĐĞ͘
tŚŝůĞŝŶWƌĞƐƐƵƌĞͬdĞŵƉĞƌĂƚƵƌĞŵŽĚĞ͕ƉƌĞƐƐŝŶŐƚŚĞďŽƩŽŵƚǁŽ
ďƵƩŽŶƐǁŝůůĂůƚĞƌŶĂƚĞďĞƚǁĞĞŶǀĂƌŝŽƵƐƚĞŵƉĞƌĂƚƵƌĞƐ͘^LJƐƚĞŵ
ƐƵƉĞƌŚĞĂƚĂŶĚƐƵďĐŽŽůŝŶŐƐŚŽǁŶ͘
KŶĐĞƚŚĞǀĂĐƵƵŵŚŽůĚƟŵĞƌŚĂƐ
ĚĞƉůĞƚĞĚ͕ƚŚĞƵƐĞƌŝƐƉƌŽŵƉƚĞĚƚŽ
ďĞŐŝŶĂƉƌĞƐƐƵƌĞŚŽůĚƚĞƐƚ͘LJƐĞůĞĐƟŶŐ
LJĞƐ͕ƚŚĞƵƐĞƌĂĚǀĂŶĐĞƐƚŽƚŚĞƉƌĞƐƐƵƌĞ
ŚŽůĚƐĞƚƵƉŵĞŶƵ͘hƐĞƚŚĞďƵƩŽŶ
ǁĞďďŝŶŐƚŽŶĂǀŝŐĂƚĞƚŚĞƉƌĞƐƐƵƌĞŚŽůĚ
ƐĞƚƵƉŵĞŶƵĂŶĚĐŽŶĮƌŵƐĞƐƐŝŽŶ
ƐĞƫŶŐƐ͘dŽŵŽŶŝƚŽƌĂƌŝƐĞŝŶǀĂĐƵƵŵ
ƉƌĞƐƐƵƌĞ͕ĞŶƐƵƌĞƐĞƐƐŝŽŶƚLJƉĞŝƐƐĞƚƚŽ
ZŝƐĞ͘,ŽůĚ>ŝŵŝƚƐĞƚƐƚŚĞŵĂdžŝŵƵŵ
ǀĂĐƵƵŵƉƌĞƐƐƵƌĞƚŚĞƐLJƐƚĞŵǁŝůůďĞ
ĂůůŽǁĞĚƚŽƌĞĂĐŚďĞĨŽƌĞĨĂŝůƵƌĞ͘,ŽůĚ
ƟŵĞƐĞƚƐƚŚĞĚƵƌĂƟŽŶŽĨƚŚĞƉƌĞƐƐƵƌĞ
ŚŽůĚƚĞƐƚ͘KŶĐĞĂůůƐĞƫŶŐƐŚĂǀĞďĞĞŶ
ĐŽŶĮƌŵĞĚ͕ƐĞůĞĐƚŽŶƟŶƵĞƚŽďĞŐŝŶƚŚĞ
ƉƌĞƐƐƵƌĞŚŽůĚƚĞƐƚ͘
ǀĂĐƵĂƟŽŶŵŽĚĞĚŝƐƉůĂLJƐƚŚĞƐLJƐƚĞŵǀĂĐƵƵŵƉƌĞƐƐƵƌĞĂƐŵĞĂƐƵƌĞĚďLJ
ĂŶĂdžŝůŝĂƌLJz:ǀĂĐƵƵŵƉƌŽďĞ;WͬEϲϳϬϯϬͿ͘WůƵŐƚŚĞz:ǀĂĐƵƵŵƉƌŽďĞŝŶƚŽ
ĞŝƚŚĞƌĂdϭŽƌdϮŽŶƚŚĞďĂĐŬƐŝĚĞŽĨƚŚĞĚĞǀŝĐĞ͘dĂƉĂŶLJďƵƩŽŶƚŽďƌŝŶŐ
ƵƉƚŚĞďƵƩŽŶǁĞďďŝŶŐ͘WƌĞƐƐdĂƌŐĞƚƚŽƐĞƚƚŚĞdĂƌŐĞƚǀĂĐƵĂƟŽŶƉƌĞƐƐƵƌĞ͘
WƌĞƐƐ,ŽůĚƚŽƐĞƚƚŚĞĚƵƌĂƟŽŶŽĨƚŚĞsĂĐƵƵŵ,ŽůĚdŝŵĞƌ͘KŶĐĞdĂƌŐĞƚ
ǀĂĐƵĂƟŽŶƉƌĞƐƐƵƌĞĂŶĚ,ŽůĚdŝŵĞƌŚĂǀĞďĞĞŶƐĞƚ͕ďĞŐŝŶƚŚĞĞǀĂĐƵĂƟŽŶ͘
KŶĐĞLJŽƵĂƌĞƌĞĂĚLJƚŽďĞŐŝŶƚŚĞƉƌĞƐƐƵƌĞŚŽůĚƚĞƐƚ͕ďƌŝŶŐƵƉ
ƚŚĞďƵƩŽŶǁĞďďŝŶŐƚŚĞŶƉƌĞƐƐ͞^ĞƚWŝ͘͟dŚŝƐǁŝůůƐĞƚƚŚĞĐƵƌƌĞŶƚ
ǀĂĐƵƵŵƉƌĞƐƐƵƌĞĂƐƚŚĞŝŶŝƟĂůƐLJƐƚĞŵƉƌĞƐƐƵƌĞĂŶĚďĞŐŝŶ
ŵŽŶŝƚŽƌŝŶŐĨŽƌĂƌŝƐĞŝŶǀĂĐƵƵŵƉƌĞƐƐƵƌĞ͘
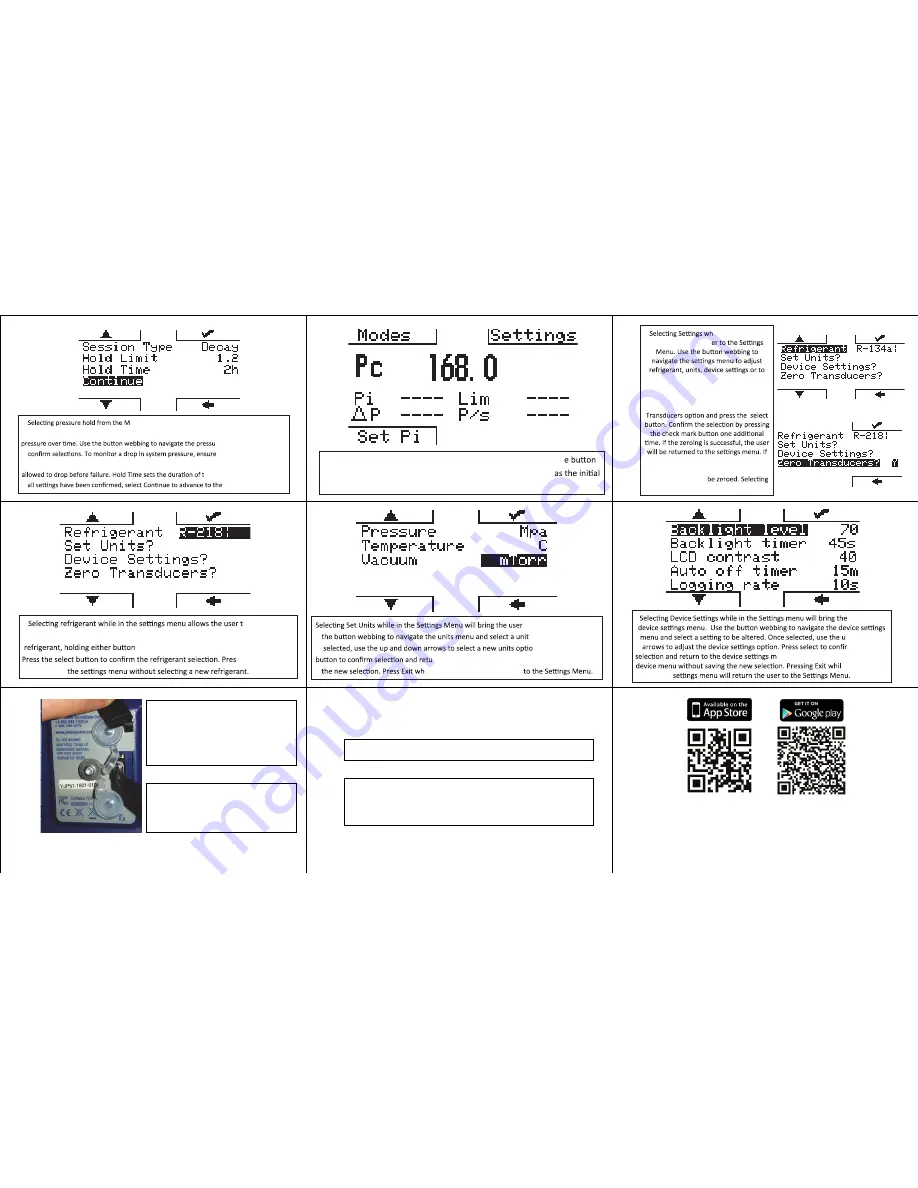
odes menu will advance to the pressure hold setup
screen. Pressure Hold mode allows the user to monitor either a rise or drop in system
re hold setup menu and
session type is set to
Decay. Hold Limit sets the percentage of the current system pressure the system will be
he pressure hold test. Once
pressure hold test.
ile on any modes
screen brings the us
zero manifold transducers. To Zero the
manifold transducers, ensure all valves
are open and the manifold is vented to
atmosphere. Navigate to the Zero
the manifold is under pressure, an error
message will be returned and the
transducers will not
Exit will return to previous Modes screen.
o quick select
the system refrigerant. Use the up and down arrows to navigate to the desired
allows the user to fast pass through the menu.
s Exit to return to
Once you are ready to begin the pressure hold test, bring up th
webbing and press “Set Pi”. This will set the current pressure
system pressure and begin monitoring for a decay in pressure.
to the Units menu. Use
to be altered. Once
n. Press the select
rn to the units menu. Exit will return without saving
ile in the units menu to return
user to the
p and down
m the new
enu. Pressing Exit will return to the
e in the device
red LE
ƚƵƌŶƐŽī
.
To charge the unit, connect the micro usb cable to the micro usb port on the back
of the device. Connect the opposite end of the cable to the usb port on a charging
brick or computer. The LED will turn a solid green while the unit is charging.
10
17
16
15
14
13
12
11
9
POWER DOWN- Hold the power bu�on for three seconds or un�l the red LED
turns off.
CHARGING- Connect the micro-USB cable to the micro-USB port on the back of
the device. Connect the opposite end of the cable to the USB port on a charging
brick or computer. The LED will turn solid green when the unit is charging and will
turn off when the unit is fully charged.
***For iOS Users-This device does not require the tradi�onal
Bluetooth connec�on process through the Bluetooth se�ngs u�lity
on your device. Instead, navigate directly to the ManTooth 3.0 app
to establish the Bluetooth connec�on with your P51 manifold.
ACCESSING DATA LOG FILES- Connect the unit
to a PC via the provided USB to micro-USB
cable and power the unit on. The P51-860 will
open as a removable drive. Data logs can be
copied to the PC for edi�ng and storage. To
disconnect the device, eject it as you would a
removable flash drive.
ERASING DATA LOG FILES- As the device
onboard memory nears maximum capacity, the
user will be prompted to clear memory on first
power up. Selec�ng yes will remove all data log
files from the device.


