Page 10 of 47
25.12.2018
DIS-14-ek
Rev Nr: 2
2.2 Dispenser island construction, dispenser anchoring and piping
Take necessary safety actions at the work site. Consider the safety precautions
stated in the article 1.3 and DO
s and DON’Ts in Appendix D.
Disconnect and anchor.
More than one switch may be utilized to disconnect power supply. Use a multimeter
to make sure that all the circuits in the dispenser are closed. Failure to take these
precautions may result in personal injury.
Be sure that all valves are closed.
More than one switch may be required to be closed to shut the system down. Refer
to station piping drawings to make sure that all valves are closed. Failure to take
these precautions may result in personal injury.
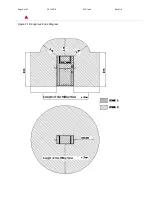
A chassis is required for the dispenser.
Do not pour concrete around the liquid inlet and steam return lines or electrical conduits.
Instead, it is recommended to use sand or sandbags to prevent steam build-up under the
dispenser.
Unlatch and remove cap locks to reach the bottom section of the dispenser. Place the caps in a place
where they would not be damaged.
There are bolt holes on the bottom of the dispenser fro anchoring it to the chassis. Tightly mount the
dispenser to the island.
.
Remove the plastic caps located on the liquid inlet and steam return line. There may be some test
liquid left in the dispenser and may pour out from one of the pipes.
Connect the liquid and steam return lines. Use flexible pipes in the connection of dispenser and
underground pipe tips in order to allow ground movement. Underground piping (steam return and
liquid lines) should be at least 1”.
Make sure that all connections are leak-proof when making pipe connections.
Use a liquid sealant compound, such as Loxeal 58.11 or other similar liquid compounds
(liquid sealant) that is used for LPG applications on male threads only. Be careful not to
let compound to leak into the fittings.


