background image

1-888-962-6554 


www.YERFDOG.Com


8


PRE-RIDE INSPECTION 


WARNING  –

  Perform this pre-ride inspection everyday before riding the 

vehicle.  If not performed, serious damage to vehicle and 
personal injury may result.


1. 

Engine Oil Level

 – Add oil if required.  Check for leaks.  Tighten filler cap securely. 

 
2. 

Fuel Level

 – Add fuel if necessary.  Do not overfill (no fuel in filler neck).  Replace cap tightly.  Check 

for leaks.  Do not mix oil with gas.  Only refuel when engine is off and cool. 

 
3. 

Brakes

 – Perform a Brake Test:  Sit in the vehicle with the brake actuated by pressing on the brake 

pedal.  Start the engine with the ignition switch on.  Increase the engine RPM gradually to ensure that 
the brake is effective.  Do not operate this Fun-Kart unless the brake is working properly. 

 
4. 

Tires

 – Check conditions and pressure. 

 
5. 

Drive Chain

 – Check condition, tension, lubricate as necessary. 

 
6. 

Throttle

 – Check for smooth operation.  Assure throttle “snaps” back to idle.  Also, check for frayed 

cable or damaged able conduit.  If either condition exists replace the cable assembly before riding. 

 
7. 

Stop Switch 

– Perform this stop switch test.  While the engine is running, move the steering column 

remote stop switch to the “OFF” position.  If this does not stop the engine, move the engine remote 
switch to the “OFF” position.  If the engine is not equipped with an engine remote switch, pull the 
spark plug wire.  Check to insure that the stop switch wire is attached to the terminal on the engine.  

Do not operate this vehicle with a stop switch that is not functioning properly.


8. 

All Nuts, Bolts, and Fasteners

 – Check wheels to insure that all axle nuts and lug nuts are tightened 

properly.  Check and tighten all other fasteners as necessary.  Regularly check set screws on 
sprockets and drum. 

 
9. 

Guards

 – Ensure all protective guards are in place.  

Never remove the chain guard, or clutch 

guard.  

Each of these covers have a protective purpose, if removed it could endanger the personal 

safety of the operator or passenger. 

 
10.  

Steering System

 – Ensure that it turns freely. 


STARTING INSTRUCTIONS 


NOTE:

  Do not attempt to start or operate this vehicle without being 

completely familiar with all controls necessary to operate this 
vehicle safely.  Do not start the engine before reading and 
understanding all the rules, warnings, and instructions in this 
manual. 

Summary of Contents for 1204

Page 1: ...Vehicle DANGER YOU MUST ADD OIL TO THE ENGINE PRIOR TO USE 20 oz Or 1 Pints 0 6 Liters OF SAE 30 MOTOR OIL This vehicle is sold for off road use only Before operating this vehicle read all the instru...

Page 2: ...ns carbon monoxide which is a tasteless odorless and poisonous gas 3 This Fun Kart is not intended nor designed for racing 4 The operator of this vehicle should always wear a D O T approved helmet and...

Page 3: ...stopped when the vehicle is not in use 14 Loose clothing long hair or articles worn by any riders must be fully contained or covered to prevent them from possibly being caught in rotating parts of th...

Page 4: ...ar please call 1 888 389 5522 for assistance 24 Never operate this vehicle while under the influence of alcohol drugs or medication of any kind Such operation could be dangerous to you and or others 2...

Page 5: ...o all Caution and Warning labels on the Fun Kart ASSUMPTIONS OF RISK The owner or operator assumes all the risks incident to or arising out of the operation of this vehicle Failure to follow and compl...

Page 6: ...as follows from the date of purchase A Frame for 90 days Void if 1 Frame is broken or bent due to abuse underside scraped abusively 2 Wheels are bent or broken due to impact 3 Spindles are bent due t...

Page 7: ...y Instructions page 16 6 Bolts Check the screws nuts and bolts on your vehicle to see that all are tightened securely For safe operating conditions do periodic checks and tighten securely 7 Engine Fil...

Page 8: ...riding 7 Stop Switch Perform this stop switch test While the engine is running move the steering column remote stop switch to the OFF position If this does not stop the engine move the engine remote...

Page 9: ...mary technique to be mastered in riding this vehicle Practice turning at a slow constant speed Defer increased speeds until you are confident of your proficiency and are intimately familiar with the t...

Page 10: ...INSTRUCTIONS Engine Lubrication You must change the oil in the crankcase after the first two hours of operating your new engine and after each 25 hours of use thereafter That will insure proper lubri...

Page 11: ...1 888 962 6554 www YERFDOG Com 11 STEERING WHEEL ASSEMBLY INSTRUCTIONS...

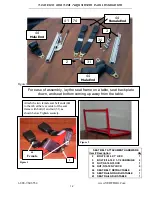
Page 12: ...L NON ADJUSTABLE 1 41 SEAT RAIL ADJUSTABLE 1 41 3 34 44 Female End 44 Male End 2 31 44 Male End Seat Belt and Seat Adjustment Rail Installation For ease of assembly lay the seat frame on a table seat...

Page 13: ...2 Place the seat rails 41 74 on the bolts coming out of the square tube If the bolts are not accessible then slide the rails downward to access the bolts 3 Place 5 16 18 nylock nuts 34 onto bolts but...

Page 14: ...of seat as shown in Figure 8 2 Pull female ends of seat belts 44 through slot in hinge of seat cushion as shown in Figure 9 3 Attach seat cushion 23 to seat frame 45 using 20x1 75 hex bolt 5 lock was...

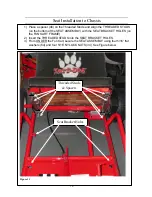
Page 15: ...STUDS on the bottom of the SEAT ASSEMBLY with the SEAT BRACKET HOLES on the FUN KART FRAME 2 Insert the THREADED STUDS into the SEAT BRACKET HOLES 3 From UNDER the Fun Kart secure the SEAT ASSEMBLY us...

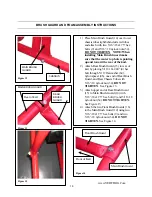
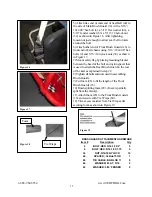
Page 16: ...16 18x2 00 4 hex bolt through 5 16 flat washer 64 nylon spacer 46 one end of Rear Brush Guard and Rear Chassis Tube with 5 16 18 nylock nut 34 DO NOT TIGHTEN See Figure 15 3 Attach upper end of Rear...

Page 17: ...head of the bolt and nylon spacer that is used to attach the Rear Brush Guard to the rear of the kart as explained in step 2 8 Tighten all bolts and nuts used in assembling Brush Guards 9 Cut foam 28...

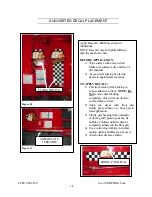
Page 18: ...O APPLY DECALS 1 Peel from center of the backing to expose adhesive surface NOTE Do Not remove decal backing completely This will cause decal to curl and stick to itself 2 Align the decal with floor p...

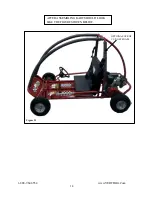
Page 19: ...1 888 962 6554 www YERFDOG Com 19 Figure 23 AFTER ASSEMBLING KART SHOULD LOOK LIKE THE FIGURE SHOWN BELOW OPTIONAL USE OF CUT OFF FOAM...

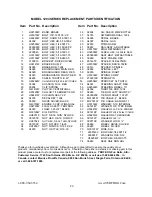
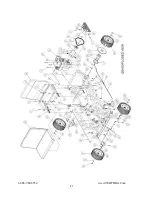
Page 20: ...04392 THROTTLE ROD 1204 22 H91480W COLLAR 7 16 BOREX7 8 OD 57 02063 TIE ROD LEFT SHORT 9 23 H92441W CUSHION SEAT 2P 58 26000209 TIE ROD RIGHT 19 125 24 04005 DECAL SET 1204 59 M01001W TIE CABLE 4 BLA...

Page 21: ...1 888 962 6554 www YERFDOG Com 21...

Page 22: ...1 888 962 6554 www YERFDOG Com 22...

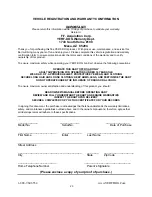
Page 23: ...OSE CLOTHING KEEP ARMS LEGS AND FEET INSIDE THE KART DO NOT OPERATE UNDER THE INFLUENCE OF DRUGS OR ALCOHOL To ensure maximum owner satisfaction and understanding of this product you should READ OWNER...

Reviews: