YETI 160E | OWNER’S MANUAL
9
FRAME ASSEMBLY
TABLE OF CONTENTS |
FRAME ASSEMBLY
YETI TIPS
Make sure your tools are in good condition. A worn
allen key can round the hex on a bolt not allowing
for proper torque. Torque settings are listed
throughout the instructions. It is important to prep
all bolt threads. The instructions denote whether to
use a Loctite compound or grease.
PREP HARDWARE PER THE ASSOCIATED ASSEMBLY DRAWING
• 1x SHCS M5 x 14L (4.3.6): Blue Loctite 243
• 2x 15mm Collet Axle (4.8): Grease shaft and head
• Small (4.45) and Large (4.9) Collet Wedge Bolts: Grease wedge and threads
• 2x Short (4.10) and 2x Long (4.61) Tie Link Pivot Bolts: Blue Loctite 243
• 2x Upper Shock Bolts (4.11): Blue Loctite 243
• 1x Rocker Link Pivot Bolt, Male (4.12): Blue Loctite 243
• 1x Rocker Link Pivot Axle (4.13): Grease shaft
• 4x M12 Clevis Bolts (4.14): Blue Loctite 243
• 4x Main Pivot Race Extenders (4.15): Grease inner surface
• 4x each 12/15mm Race Reducers, Small (4.16) and Large (4.17)
• 2x 12/10mm Race Reducer (4.18): Grease reducer OD
• 6x Motor Mount Bolts (4.21): Blue Loctite 243
• 2x M5 H20 Bolts (4.34): Grease
• 1x Derailleur Hanger Stop Screw (4.36): Blue Loctite 243
• 2x M5 x 12L FHCS (4.39): Blue Loctite 243
• 1x M10 Collet Axle, Long Head (4.43): Grease shaft and head, Blue Loctite 243 on threads
• 1x M8 Lower Shock Bolt (4.46): Blue Loctite 243
• 1x CS Guard Retension Screw (4.64): Blue Loctite 243
WARNING:
Service on Yeti bicycles requires special
knowledge and tools. Yeti Cycles recommends that
all service and repairs be performed by an authorized
Yeti Dealer-
WARNING:
All frame components must be installed
for proper function of this bike. Removal of any frame
component could result in frame damage and injury.
TOOLS NEEDED
• 1.5mm allen key
• 2mm allen key
• 2.5mm allen key
• T10 Torx
• T30 Tamper-Resistant Torx
• 3mm allen key
• 4mm allen key
• 5mm allen key
• 6mm allen key
• 10mm allen key
• Guide pin tool (Or two)
• Torque wrench
• Grease
• Blue (243) Loctite
01
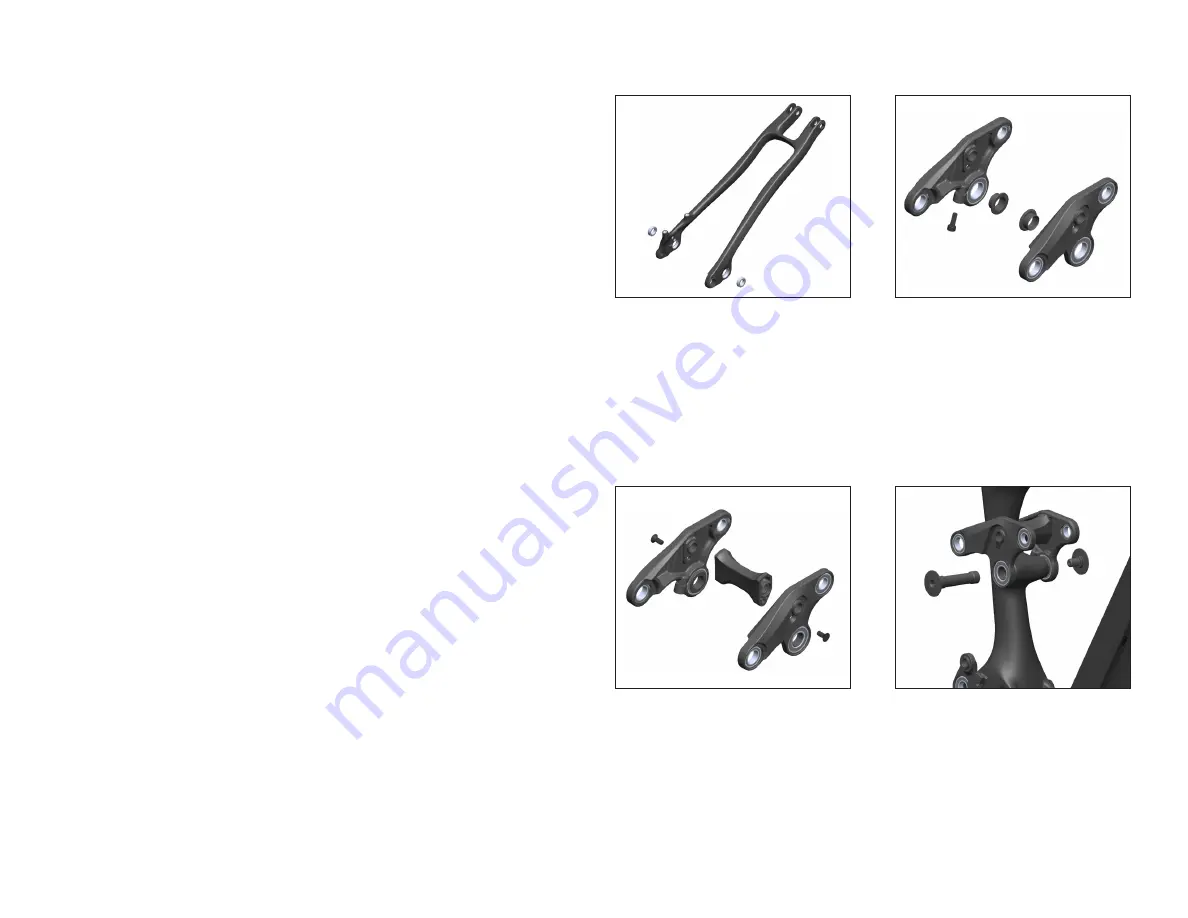
Apply grease to the bearing bores of the rear SS
Pivot. Press 2x 3802 Bearing (4.31) using provided
tools. Make sure bearings are fully pressed into
rear triangle.
03
Assemble the non-drive side Rocker Link (4.3),
Rocker Bridge (4.60), and drive-side Rocker Link
(4.2) together using 2X M5 FHCS (4.39). To help
align the Rocker links and Bridge, you may also
temporarily install the upper Timing Link bolts
(4.61)
02
If not already completed, install non-drive side
Rocker Pinch Bolt (4.3.6) into non-drive side
Rocker Link but leave loose. Press/Slide 1x
15/17mm Bearing Reducer (4.3.5) into the inside
of each lower bearing on drive-side and non-drive
side Rocker Links. Make sure reducer is fully
seated in bearing.
04
Install Rocker Link Assembly to the Front Triangle
and secure with Link Pivot Axle (4.13) and male
Link Pivot Bolt (4.12). Make sure pinch bolt on non-
drive side Rocker Link allows bearing to float and
secure flush onto frame.
Torque Link Pivot hardware to 15 Nm.
Summary of Contents for 160E
Page 1: ...YETI 160E OWNER S MANUAL...


