background image

13 
 

ASSEMBLY INSTRUCTIONS


Step 1

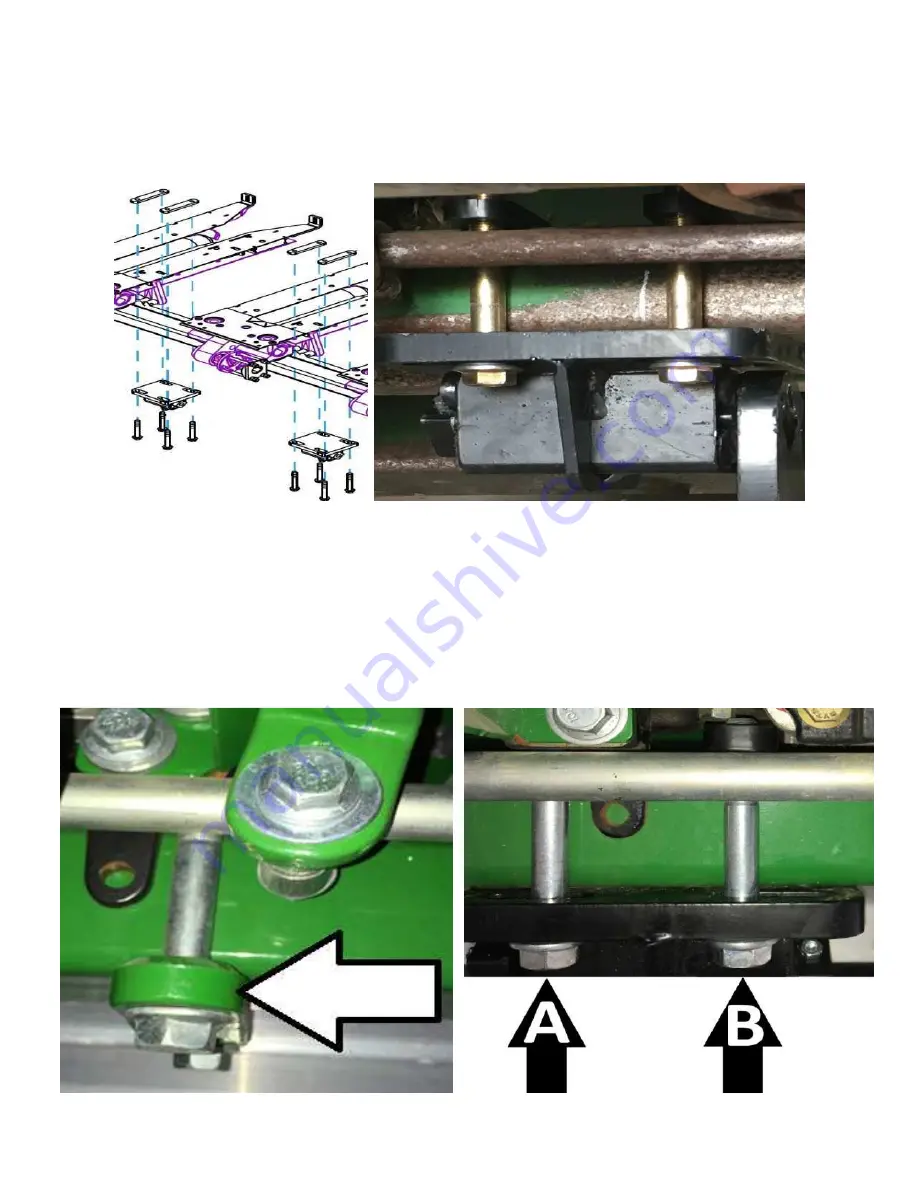
: Attach the 5000-167 torsion mount bracket to the frame using 4) M16 X 110 flange head bolts & 2) 

5000-420 clamp straps. Thread the bolts into the clamp straps by hand & tighten to torque specifications. 

Note: Torque the M16 bolts @ 236 ft. /lbs. 


Alternative Step 1

: (20”-22” row spacing)  Remove (1) toolbar strap from the gear box, then attach the 

5000-158  torsion mount brackets to the frame and gear box using the 2) M16 X 120 flange head bolts and 
(1) 5000-420 clamp & 2) M16 X 110 flange head bolts. Some situations may require 1 side of the gear box to 
install a mounting bracket. Mounting locations may vary. The photo below on the left illustrates the gear box 
bolt & clamp that need removed. The photo below on the right illustrates: 

Arrow A

 – Using 1 side of the gear 

box to mount the 5000-158 torsion mount bracket using 2) M16 X 120 flange head bolts. 

Arrow B

 – Using 1) 

5000-420 clamp & 2) M16X 110 flange head bolts. 

Note: Torque the M16 bolts @ 236 ft./lbs. 


Summary of Contents for STALK DEVASTATOR 5000 Series

Page 1: ...nghoff All Chopping 20 22 30 All Calmer All Lexion Capello Non Chopping OWNER S MANUAL PART IDENTIFICATION 2565 965 8 2019 YETTER MANUFACTURING CO Founded 1930 Colchester IL 62326 Toll free 800 447 57...

Page 2: ...ply with the safe and correct operating procedure and to lubricate and maintain the product according to the maintenance schedule in the operator s manual The user is responsible for inspecting his ma...

Page 3: ...attention to the caution notes in the text Review this manual at least once a year with all operators 1 Read and understand the operator s manual before operating this machine Failure to do so is con...

Page 4: ...ine engine and remove the key Subject to the size and weight of the corn header one or two additional hydraulic cylinders may be required The combine manufacturer generally keeps corresponding kits re...

Page 5: ...o the torque values chart when tightening hardware The chart below is a guide for proper torque Use it unless a specified torque is called out elsewhere in the manual Torque is the force applied to th...

Page 6: ...Torsion Mount Bolt Bag 3 5000 267 4R20 Roller W A 2 5000 273 3R20 Roller W A 2 5000 274 3R20 Roller Mount W A 3 5000 275 4R20 3R30 Roller Mount W A 10 5000 292 Torsion Arm W A 1 5000 171 Manual Bag 5...

Page 7: ...e 2502 397 5 8 11 X 5 bolts with original lock washer into the gear box Slide the holes in the upright tab on the 5000 285 over the threaded rod of the 5000 284 hand tighten new lock washers hex nuts...

Page 8: ...or kit Install the 5000 452 Lexion adaptor bracket on the bottom side of the frame using 4 2502 813 M16 X 2 X 70 8 8 bolts the original flat washers spacer bushing Thread bolts by hand then tighten to...

Page 9: ...the end that the pivot assembly is not attached to Align these 2 bolts with threaded holes on the gear box thread by hand NOTE EACH 5000 167 TORSION PIVOT ASSEMBLY THAT IS RECEIVED IN THE 5000 040A 5...

Page 10: ...PIVOT ASSEMBLY ALTERNATE LOCATIONS MAY BE USED IF INTERFERENCE OCCURS 5000 040 6 ROW 30 Arrows indicate 5000 167 Torsion Pivot locations 5000 041 8 ROW 30 Arrows indicate 5000 167 Torsion Pivot locati...

Page 11: ...AY BE USED IF INTERFERENCE OCCURS 5000 043 1290 12 ROW 20 Arrows indicate 5000 167 Torsion Pivot locations 5000 044 12 ROW 30 Arrows indicate 5000 167 Torsion Pivot locations On Rows 3 and 10 1 set of...

Page 12: ...MMENDED LOCATIONS OF THE TORSION PIVOT ASSEMBLY ALTERNATE LOCATIONS MAY BE USED IF INTERFERENCE OCCURS 5000 046 12 ROW 22 Arrows indicate 5000 167 Torsion Pivot locations 5000 047 18 ROW 22 Arrows ind...

Page 13: ...ount brackets to the frame and gear box using the 2 M16 X 120 flange head bolts and 1 5000 420 clamp 2 M16 X 110 flange head bolts Some situations may require 1 side of the gear box to install a mount...

Page 14: ...ine which side of the Torsion Pivot Assembly to install the 5000 292 Torsion Arm Step 3 Attach the roller mount to the pivot arms using the x 2 1 2 x 3 1 2 U bolts lock nuts See the diagrams on pages...

Page 15: ...s pictured in the diagram below IMPORTANT The spacer must be installed between the roller and the bearing The notches of the bearing housing must face the mounting plate The extended race on the beari...

Page 16: ...s the traction bar may have to be off center of the row some Step 6 If Applicable On chopping corn heads trim 3 inches off the bottom of the back curtain to keep the roller from contacting the curtain...

Page 17: ...tractor on the stripper plate to get the angle Adjust the feeder house as needed fore or aft to achieve 23 25 degrees STORAGE TRANSPORT Head cart may need adjusted to fit the head with devastator corr...

Page 18: ...RAPS 16 3 2505 343 13 X 2 CARRIAGE BOLT GR 5 ZP 12 4 2520 357 1 2 13 LOCK HEX NUT GR A ZP 28 5 2520 604 10 HEX TOP LOCK NUT 4 6 2570 568 X 2 X 3 U BOLT 8 7 5000 167 TORSION PIVOT ASSEMBLY 4 8 5000 272...

Page 19: ...BOLT GR 5 ZP 18 4 2520 357 1 2 13 LOCK HEX NUT GR A ZP 42 5 2520 604 10 HEX TOP LOCK NUT 6 6 2570 568 X 2 X 3 U BOLT 12 7 5000 167 TORSION PIVOT ASSEMBLY 6 8 5000 268 2R30 ROLLER W A 1 9 5000 269 2R3...

Page 20: ...4 CLAMP STRAPS 24 3 2505 343 13 X 2 CARRIAGE BOLT GR 5 ZP 18 4 2520 357 1 2 13 LOCK HEX NUT GR A ZP 42 5 2520 604 10 HEX TOP LOCK NUT 6 6 2570 568 X 2 X 3 U BOLT 8 7 5000 167 TORSION PIVOT ASSEMBLY 6...

Page 21: ...APS 32 3 2505 343 13 X 2 CARRIAGE BOLT GR 5 ZP 24 4 2520 357 1 2 13 LOCK HEX NUT GR A ZP 56 5 2520 604 10 HEX TOP LOCK NUT 8 6 2570 568 X 2 X 3 U BOLT 16 7 5000 167 TORSION PIVOT ASSEMBLY 8 8 5000 272...

Page 22: ...BOLT GR 5 ZP 30 4 2520 357 1 2 13 LOCK HEX NUT GR A ZP 70 5 2520 604 12 HEX TOP LOCK 10 6 2570 568 X 2 X 3 U BOLT 20 7 5000 167 TORSION PIVOT ASSEMBLY 10 8 5000 267 4R20 ROLLER W A 3 9 5000 273 3R20 R...

Page 23: ...STRAPS 24 3 2505 343 13 X 2 CARRIAGE BOLT GR 5 ZP 18 4 2520 357 1 2 13 LOCK HEX NUT GR A ZP 42 5 2520 604 10 HEX TOP LOCK NUT 6 6 2570 568 X 2 X 3 U BOLT 12 7 5000 167 TORSION PIVOT ASSEMBLY 6 8 5000...

Page 24: ...BOLT GR 5 ZP 30 4 2520 357 1 2 13 LOCK HEX NUT GR A ZP 70 5 2520 604 10 HEX TOP LOCK NUT 10 6 2570 568 X 2 X 3 U BOLT 20 7 5000 167 TORSION PIVOT ASSEMBLY 10 8 5000 280 3R22 ROLLER W A 2 9 5000 281 3...

Page 25: ...9 M16 X 2 X 65 HEX FLANGE SCREW THREAD LOCK ZP 2 3 2502 810 M16 X 2 X 30 HEX FLANGE SCREW THREAD LOCK ZP 2 4 2520 452 5 8 11 HEX NUT ZP GR 8 2 5 2525 451 5 8 MEDIUM LOCK WASHER ZP 2 6 2967 302 PLATE S...

Page 26: ...ON ITEM PART DESCRIPTION QUANTITY 1 2502 810 M16 X 2 X 30 HEX FLANGE SCREW THREAD LOCK ZP 4 2 2502 814 M16 X 2 X 160 8 8 HHCS ZP 2 3 2502 815 M16 X 2 X 140 8 8 HHCS ZP 1 4 2502 817 M16 X 2 X 180 8 8 H...

Page 27: ...27...

Page 28: ...28 2565 965 08 2019...

Reviews: