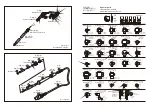
Soldering iron part
1. Connect the soldering iron handle, put the iron on the iron holder.
2. On iron power switch ,the display beside Red LED bright ,the display window
shows iron preset temperature 2 seconds ,iron start from 200
high-speed
°C
heating until the temperature rose to the preset temperature and stable, then
able to work properly.
3. Print front panel “UP”(temperature rise key)”/”DOWN(drop in temperature key)”
adjust what you need temperature.
Dear User! Our air gun and soldering iron handle adopt high strength stainless
steel tube, the machine must be inspected or calibrated four times in normal
working condition during the production process, the copper tube could be slight
yellowing due to high temperature! When use the new machine first time, it is
normal that the steel tube at a slight yellowing , please be assured!
Special Instructions:
VIII. Symbol Show
1. The displays
--- , hot air gun sleep state, it shows air gun handle enter into
show “
”
sleep state.
2. The displays show “S-E”, it means the soldering iron and hot air gun of sensor is
having a problem or other parts have faulty, then the machine stops heating
output signal.
3. LED Digital last place the decimal point: - Always bright is the entire heating;
- goes off to stop heating; - flashing at a constant temperature all the way to the
current state.
4. Shows “---” always flashing, it means that the machine into standby, prompt you
turn off the power switch, more human and saving energy.
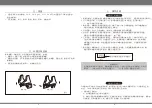
1. Unscrews the nut NO.1, and then removes the steel tube NO.2, followed by rem-
oving the tips which is going to be replaced.
2. For the replacement of heating core’s element can be performed by unscrewing
the plastic cap NO.4, pulls out gently the heating core’s element NO.6 along with
the circuit board NO.7,please carefully remember the connection of spring NO.5.
3. The iron core from the circuit board welding, the replacement of the heating core,
can be fitted well. Note that the order of the iron core wire connection.
IX. Interchangeable Component Description
Attention:
When replacing the heating element, be careful not to damage the ground; do not
damage the cable of fan; while back install handle, the handle is fixed on the column
should be fixed on the pipe in the hole.
15
16
1. Ensure the hot air rework is fully cooled down before replacing the element
2. Figure, loosen the two screws on the handle.
3. Unscrew the handle assembly 1, and then remove the handle shell 2.
4. Gently takes out the fan, loosen the three screws to remove the fixed wiring
board.
5. The wiring board in turn, heating elements connector apart from the wiring board,
pay attention to its connection position.
6. Remove from the heat pipe heat body wrap body with mica paper, careful not
broken ground wire of the steel.
7. Wraps well with the new heater mica, inserted into the tube, the attention heater
to install in place.
8. According to the original location of the connection to connect heater.
9. When the reverse process by open bottles and handle back.
Replacement of Hot Air rework heating element (Figure 3)
2. Air gun manual work state:
A. Open air gun switch, the display shows the air gun preset temperature 2 seco-
nds, air gun start from 100°C high-speed heating until the temperature rose to
the preset temperature and stable, then able to work properly.
B. Print front panel “UP(temperature rise key)”/“DOWN(drop in temperature key)”
adjust what you need temperature.
C. Manual Mode, air gun handle back into the air gun frame,air gun also keep the
currently work temperature. This mode is very suitable for all-too-frequent
soldering ,it can save air gun heating up time, raise soldering efficiency.
Replacement of the soldering iron’s tip and soldering iron heating core’s
element (Figure 4)


