background image

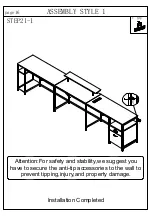
Installation Completed

V

V

V

STEP21-1

page16

Attention:For safety and stability,we suggest you

have to secure the anti-tip accessories to the wall to

prevent tipping,injury,and property damage.

ASSEMBLY STYLE 1

Summary of Contents for FTOFOD-6019

Page 1: ...ASSEMBLY INSTRUCTIONS Notice FTOFOD 6019 OFFICE DESK FTOFOD 6020...

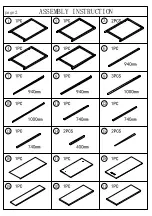
Page 2: ...ASSEMBLY INSTRUCTION page1 2 1 3 7 8 37 37 6 20 21 16 17 18 19 36 36 9 9 9 4 38 38 11 12 13 22 32 29 31 26 30 27 28 32 33 34 24 25 5 23 14 14 15 15 3 10 35...

Page 3: ...ASSEMBLY INSTRUCTION page2 1 2 3 4 5 6 7 8 9 10 11 12 13 14 15 16 17 18 19 20 21...

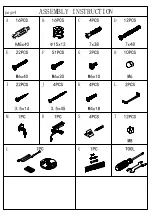
Page 4: ...ASSEMBLY INSTRUCTION page3 22 23 24 25 26 27 28 29 30 31 32 33 34 35 36 37 38 39...

Page 5: ...ASSEMBLY INSTRUCTION page4 A M6 B C D E F G H I J K L M R S T U V...

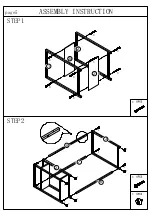
Page 6: ...page5 STEP1 STEP2 ASSEMBLY INSTRUCTION D T E 1 2 2 20 21 8 7 6 3 D D D D D D D D E E E E E E T T T T T T...

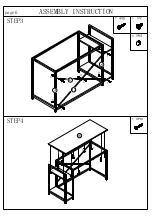
Page 7: ...ASSEMBLY INSTRUCTION page6 STEP3 STEP4 G F H F 37 37 16 3 2 F F F F F F F F F F F F F F F F H H H H G H...

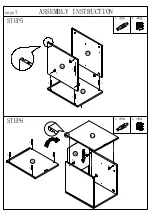
Page 8: ...page7 STEP5 STEP6 ASSEMBLY INSTRUCTION B A B A 23 24 25 22 22 26 A A A A B B B B A A A A B B B B C...

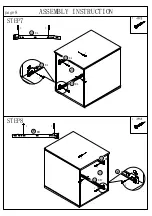
Page 9: ...STEP7 I I ASSEMBLY INSTRUCTION page8 24 25 STEP8 I I I I I I I I I I I I I I 39 CL 39 CR 39 CR 39 CR 39 CL 39 CL 39 CL 39 CR...

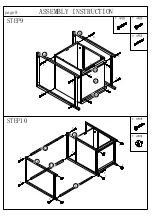
Page 10: ...ASSEMBLY INSTRUCTION STEP9 STEP10 page9 E D F E T 4 5 14 14 23 3 4 11 12 13 E E E E F F F F D D D D E E E E T T T T E E...

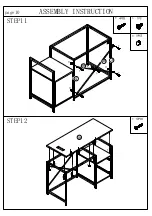
Page 11: ...ASSEMBLY INSTRUCTION STEP11 STEP12 G F H F 3 4 38 38 18 page10 F F F F H H H H H G F F F F F F F F F F...

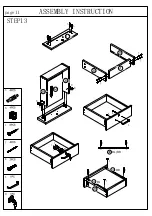
Page 12: ...ASSEMBLY INSTRUCTION STEP13 M L K J B A I 27 29 30 31 29 30 32 page11 A A A A B B B B J J J J K K L M I I I I I I I I 39 DL DR I I 39 DR 39 DL 29...

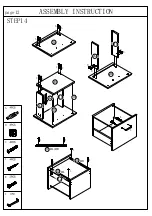
Page 13: ...ASSEMBLY INSTRUCTION L K B A I C 28 33 34 28 33 32 34 35 page12 STEP14 15 15 A A A A B B B B K K L C C C C 39 DL DR I I I I I I 39 DR 39 DL 33...

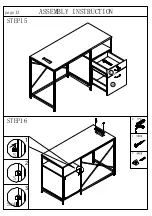
Page 14: ...ASSEMBLY INSTRUCTION STEP15 STEP16 R I S S S Sx4 1 3 2 page13 28 27 R I I...

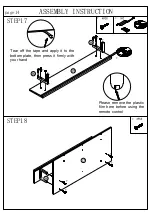
Page 15: ...ON STEP17 STEP18 Tear off the tape and apply it to the bottom plate then press it firmly with your hand Please remove the plastic film here before using the remote control U F 19 36 17 36 page14 36 F...

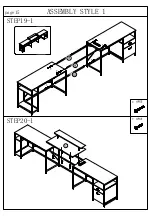
Page 16: ...ASSEMBLY STYLE 1 STEP19 1 STEP20 1 E F 9 9 10 page15 E E E E E E F F F F F F 17...

Page 17: ...llation Completed V V V STEP21 1 page16 Attention For safety and stability we suggest you have to secure the anti tip accessories to the wall to prevent tipping injury and property damage ASSEMBLY STY...

Page 18: ...STEP19 2 STEP20 2 E F 17 9 9 9 10 page17 F F F F F F E E E E E E ASSEMBLY STYLE 2...

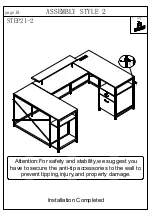
Page 19: ...nstallation Completed V STEP21 2 page18 Attention For safety and stability we suggest you have to secure the anti tip accessories to the wall to prevent tipping injury and property damage ASSEMBLY STY...

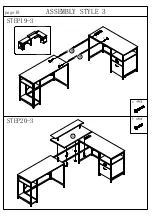
Page 20: ...STEP19 3 page19 STEP20 3 E F 17 9 9 E E E E F F F F F F ASSEMBLY STYLE 3...

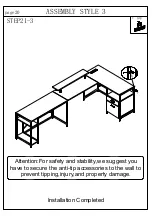
Page 21: ...llation Completed V STEP21 3 page20 Attention For safety and stability we suggest you have to secure the anti tip accessories to the wall to prevent tipping injury and property damage ASSEMBLY STYLE 3...

Page 22: ...page21 STEP19 4 STEP20 4 E F 9 9 E E E E F F F F F F 17 ASSEMBLY STYLE 4...

Page 23: ...llation Completed V STEP21 4 page22 Attention For safety and stability we suggest you have to secure the anti tip accessories to the wall to prevent tipping injury and property damage ASSEMBLY STYLE 4...

Page 24: ...Pure Easy CONTACT US...

Reviews: