background image

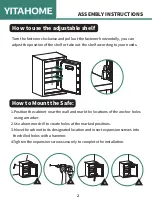
1.Position the cabinet near the wall and mark the locations of the anchor holes 
    using a marker.
2.Use a hammer drill to create holes at the marked positions.
3.Move the cabinet to its designated location and insert expansion screws into 
   the drilled holes with a hammer.
4.Tighten the expansion screws securely to complete the installation.

ASSEMBLY INSTRUCTIONS

Turn the fastener clockwise and pull out the fastener horizontally, you can 
adjust the position of the shelf or take out the shelf according to your needs.

How to use the adjustable shelf

How to Mount the Safe:

1

3

2

4

2

Summary of Contents for HNXD-V1

Page 1: ...ASSEMBLY INSTRUCTIONS SAFE BOX HNXD V1 IMISSB 0001 IMISSB 0002...

Page 2: ...eference Image Emergency key Emergency battery box Expansion screw Fireproof bag Qty X1 X6 X1 1 Con rm all parts are present prior to assembly 2 Do not lock the emergency key or emergency battery box...

Page 3: ...ated location and insert expansion screws into the drilled holes with a hammer 4 Tighten the expansion screws securely to complete the installation ASSEMBLY INSTRUCTIONS Turn the fastener clockwise an...

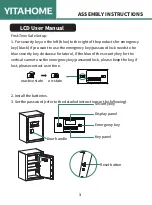
Page 4: ...key password lock needs to be blue security key clockwise for lateral if the blue of the security key for the vertical cannot use the emergency key password lock please keep the key if lost please con...

Page 5: ...roximately 10 seconds of pressing any key the circuit board will automatically enter sleep mode The screen will display the year month day hour minute and day of the week Pressing will wake it up and...

Page 6: ...ered the alarm will stop automatically after one minute but the alert state will remain active 4 Door Opening and Password Change 1 To wake up the system press the key then input the correct 1 8 digit...

Page 7: ...hour will appear as shown in the icon below indicating that the tens digit of the hour is 0 8 Door Access Records Inquiry 1 To inquire about door access records enter the correct password to unlock t...

Page 8: ...r will decrease accordingly reminding you to replace the batteries 2 If the battery voltage is insu cient an external power source can be used Operating voltage 4 6V to 6 0V 3 Before inserting the bat...

Page 9: ...Pure Easy...

Reviews: